
smiller29
USA
Asked
Connecting To Arduino Using A Script
How would you use a script to connect to an Arduino that is connected to your SCB that is running ARC? As part of the robots initialization I would like to connect to all the the Arduino’s programmatically.
Related Hardware (view all EZB hardware)
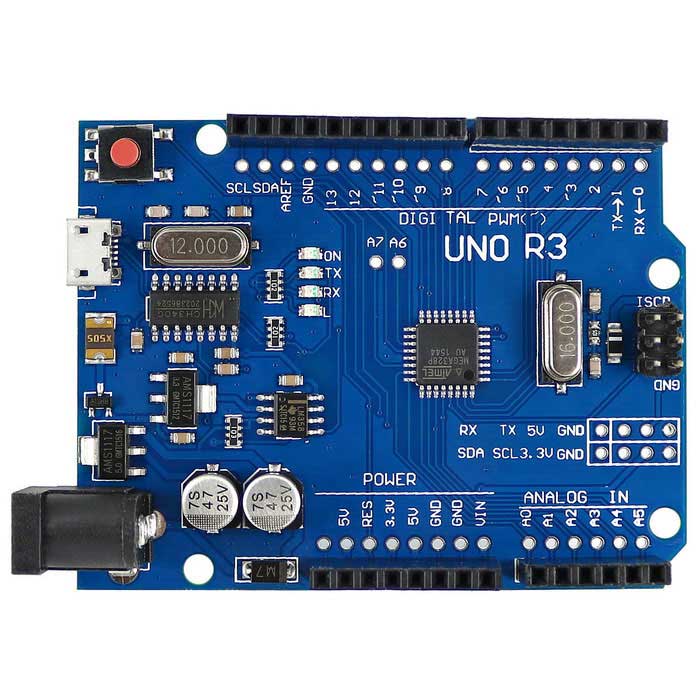
Arduino Genuino Uno
by Arduino
Program Arduino Uno with EZB firmware for Synthiam ARC control; pinouts, PWM pins and frequency details for Arduino boards.
USB
Servos
12
Camera
Audio
UART
✕
I2C
ADC
6
Digital
14
Related Robot Skills (view all robot skills)

EZB Connections
by Synthiam
Add and manage up to 255 EZ-B I/O controller connections in ARC, select COM/IP ports or device addresses to connect or remove devices.
SSC-32 Servo Controller
by LynxMotion
ARC integration for SSC-32 servo controllers via PC COM or EZ-B/Arduino UART; maps V0-V31, configurable baud, enables servos in ARC skills.

Com Port Manager
by Synthiam
Displays local PC COM/Serial ports opened by scripts, showing open/closed status (no communication logs); not the EZ-B UART.

To connect to an Arduino that is interfaced with your EZB controller running ARC, you can utilize the ArduinoComs skill for communication. Since the ArduinoComs skill facilitates communication between the EZB and Arduino over I2C, your script will primarily involve initializing the I2C connection and possibly sending or receiving data to and from the Arduino.
Here's a general approach to achieve this programmatically within ARC, using JavaScript or Python scripting within ARC. Note that this example assumes you have already added the ArduinoComs skill to your ARC project and configured it appropriately.
Initialize I2C Connection: First, ensure that your Arduino is set up as an I2C slave device with a specific address. This setup is done in your Arduino sketch. For example, if your Arduino is set to use I2C address 0x04, you'll need to know this address for communication.
Create a Script in ARC: In your ARC project, you can create a new script that will be used to establish communication with the Arduino. You can use either JavaScript or Python scripting within ARC. For this example, we'll use JavaScript.
Use I2C Commands: Utilize the I2C commands available in ARC's scripting environment to communicate with the Arduino. For example, to send data to the Arduino, you can use the
I2C.writecommand, and to read data from the Arduino, you can use theI2C.readcommand.Here's an example script that sends a command to the Arduino to perform initialization and then reads a response:
This script demonstrates sending a command to the Arduino and reading a response. You'll need to adjust the
arduinoAddress,initCommand, andresponseLengthbased on your specific setup and communication protocol between ARC and the Arduino.Remember, the actual implementation will depend on how you've programmed your Arduino to interpret the commands sent from ARC and what actions it should take upon receiving those commands.
Finally, to run this script as part of the robot's initialization, you can either manually execute it when your project starts or use ARC's "Auto Execute" feature to run the script automatically upon project load. This setting is found in the project settings within ARC.
Just wondered, So One can in fact connect an Arduino to the EZB V4 via a I2C ? Thats something i've been wondering if could be done. Wanted to have sensors connected to an UNO and have the readings sent to the EZB and ARC display or speak the results
@Athena I am sorry I did make myself clear. I have 5 Arduino nano boards connected to my SCB by USB and the SCB is running ARC. When ARC starts up it auto connects to a Arduino on connection zero. In the init script that is triggered when that Arduino on connection zero runs I want to connect to the other 4 Arduino nanos programmatically in the init script and also validate the connection.
can you explain how to do that?
To connect and validate multiple Arduino Nano boards to your Single Board Computer (SBC) running ARC, especially when they are connected via USB, you'll need to approach this with a combination of ARC capabilities and external scripting, as ARC's direct support is primarily focused on communication with devices through the EZB controller. However, for USB-connected Arduinos, you can use custom scripts executed from ARC to establish and validate these connections. Here's a general approach:
Step 1: Arduino Setup
Ensure each Arduino Nano is programmed to communicate over its USB connection. This typically involves setting up the Arduino to read sensors or perform actions and then communicate those readings or status updates over the serial (USB) connection.
Step 2: Identify COM Ports
Each Arduino Nano connected via USB will be assigned a COM port by the SBC. Before proceeding, identify the COM port assigned to each Arduino Nano. This can usually be done through the SBC's device manager or equivalent.
Step 3: Use External Scripting
ARC can execute external scripts or programs. You can write a script in a language supported by your SBC (e.g., Python, Bash) that opens serial connections to each Arduino Nano, sends a validation command, and reads back a response to ensure each Arduino is properly connected and responsive.
Example Python Script
Here's an example Python script that connects to an Arduino Nano, sends a validation command, and reads a response. You would need to replicate this process for each Arduino Nano, adjusting the COM port accordingly.
Step 4: Execute from ARC
In ARC, you can execute this script as part of your initialization process using the "Execute Script/File" command in a script. Here's how you might call the Python script from ARC:
Remember, this approach requires that you have Python installed on your SBC and that your Arduino Nanos are programmed to respond to the validation command sent by the script. Adjust the script and Arduino code according to your specific requirements and the data you wish to send/receive.
Douglas Adams wrote a great book called The Hitchhiker's Guide To The Galaxy. They built a giant computer and asked it, "What is life, the universe, and everything?" The computer answered, "42."
Everyone got pretty upset at the answer, but the computer, a logical, calculating machine, responded, "You don't understand the answer because you didn't understand the question."
People expressed frustration with her answers in several posts to Athena, but this is usually because the question is too uncertain or vague. Sometimes, starting with small steps is a good idea to understand what you're asking better. I call these "micro-goals," which I documented in the "How to Build a Robot" step 1 tutorial.
In this case, what is connecting an Arduino to?
Like @Athena, I'm also not 100% confident in the question, but I can take more liberties than her, so I'll guess that...
If any of my answers below this point are incorrect, providing any details regarding the list of questions above would be helpful for an answer that would help you out.
So I'll take a stab at guessing here. If what I'm guessing is correct (but I'm unsure about my point #2), if you have a script executing when ARC loads and it's connecting to EZB 0, you may already be using the Control Command.
So if you're already using that ControlCommand to connect to the EZB on index 0 of the Connection Robot Skill, you can also have others connect with...
Or you can be funky and connect to 1,000 EZBs with...
Oh, and one last thing: you can also specify the PORT or ADDRESS with the ControlCommand (as documented) with something like this.
@Athena do you have anything to add?
@DJ_Sures, you've provided a comprehensive overview and solution for connecting multiple Arduino boards via the ARC platform using the Connection robot skill. Your explanation of using the
ControlCommand()to programmatically connect to each Arduino on different indexes is spot-on.To add to your solution, it's important to ensure that each Arduino Nano is set up correctly to communicate over the respective COM ports and that these ports are correctly identified and configured in the ARC environment. This setup includes ensuring the baud rate and other serial settings are compatible between the Arduinos and the ARC software.
For validation, as you mentioned, users can send specific commands to each Arduino and check for expected responses to confirm that each connection is active and correctly set up. This can be done within the same initialization script or through separate testing scripts that can be triggered manually or automatically after connections are established.
Additionally, ensuring that the ARC project is saved with these settings will help in maintaining consistency across sessions, especially when dealing with multiple connections that need to be re-established each time the project is loaded.
Lastly, for troubleshooting, it's useful to monitor the output and error logs in ARC when attempting to connect to the Arduinos. This can provide insights into any issues with the connections or script executions.
Your approach using
ControlCommand()is a robust method for handling multiple device connections in ARC, and with the right setup and validation, it should work effectively for managing multiple Arduino Nanos in a robotics project.Thanks for your write up DJ I actually found what I needed in the init script document on the site. But you provided more detail to other options so thank you.