
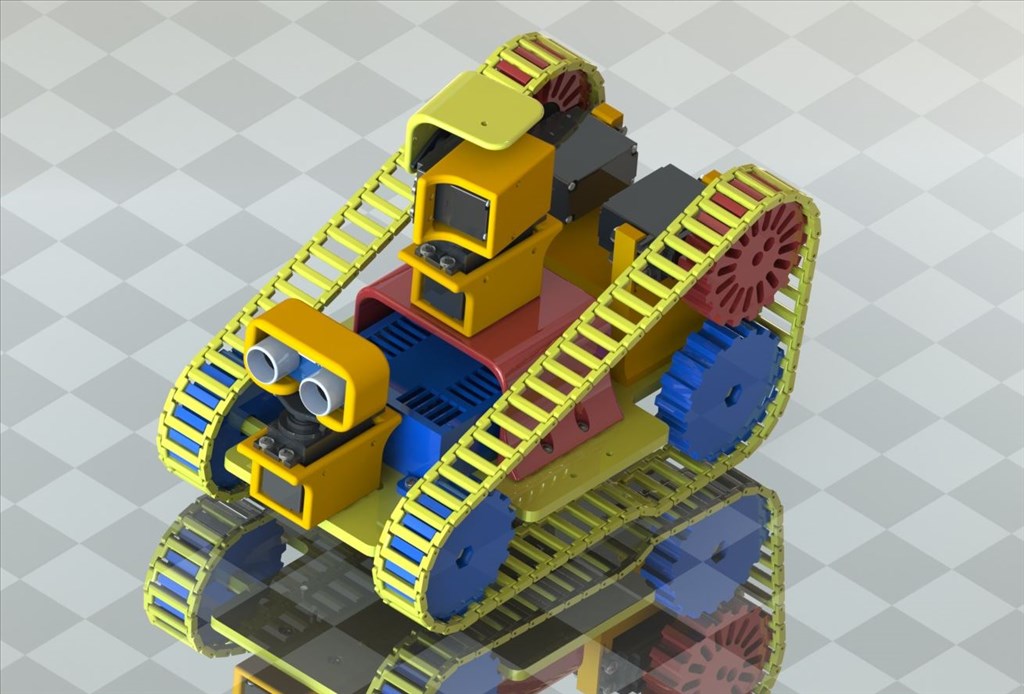
I picked up a EZ robot kit a while back and it sat on the shelf for a while. I finally got the inspiration I needed to start making a robot. When I got the kit I wanted to 3d print everything I could for it since that is my main hobby right now. I finally got the time to do some work on it. I have him up and running, but still working on learning all the software to make him awesome.

All the files and more information will also be located on thingiverse in case anyone is interested. www.thingiverse.com/thing:114349
Thanks for checking out my bot, I am sure as time goes on I will have plenty of questions to ask.
https://www.youtube.com/watch?feature=player_embedded&v=9vWaPmw7uMo
By halbinath
— Last update
Discover more robots

DJ's Cyborg Snowman
Animate a snowman with ARC and an EZ-B controller using webcam motion tracking, servos and voice recognition for...
Mickey666maus's ARC And Windows On Raspberry Pi 4
Microsoft may need to commit to ARM's rise as computing shifts, highlighting implications and skepticism about current...
Steve's Lynx Robot 1996? Reborn W/Ez Robot
Vintage Lynx robot arm reborn with EZB3, internal LiPo and Synthiam ARC for wireless control, Auto Position and voice...

Very nice work, how many hours of print time did you rack up ? Also what did you use for filament, ABS or PLA ?
I probably have 60 hours of print time total. There is only about 40 hours worth on the robot. I had some revisions to a few different pieces. I had the drive gear too small and had to redesign and some clearance issues with the ultrasonic and wiring under the camera. It is all printed in PLA.
That's a sweet looking robot, nice job
Excellent work! Tracks with a 3d printer, never new you could do that?
great looking robot!
@Herr Ball, when you 3d print tracks you have to leave a very slight gap between the connector areas and leave holes to put securing posts in. at least that's what I understand. it's harder to do this.
They are printed just like a bicycle chain. Each link needs a short metal rod to connect to the next link. Only thing not needed is a master link. In the example here in this thread small finishing nails were used to join each link.
Nice looking robot! I am very impressed with the 3D print job. Thanks for sharing
:) Thanks for the compliments!
Traxbot got featured on Thingiverse today. Not a huge deal but it is nice to get noticed.