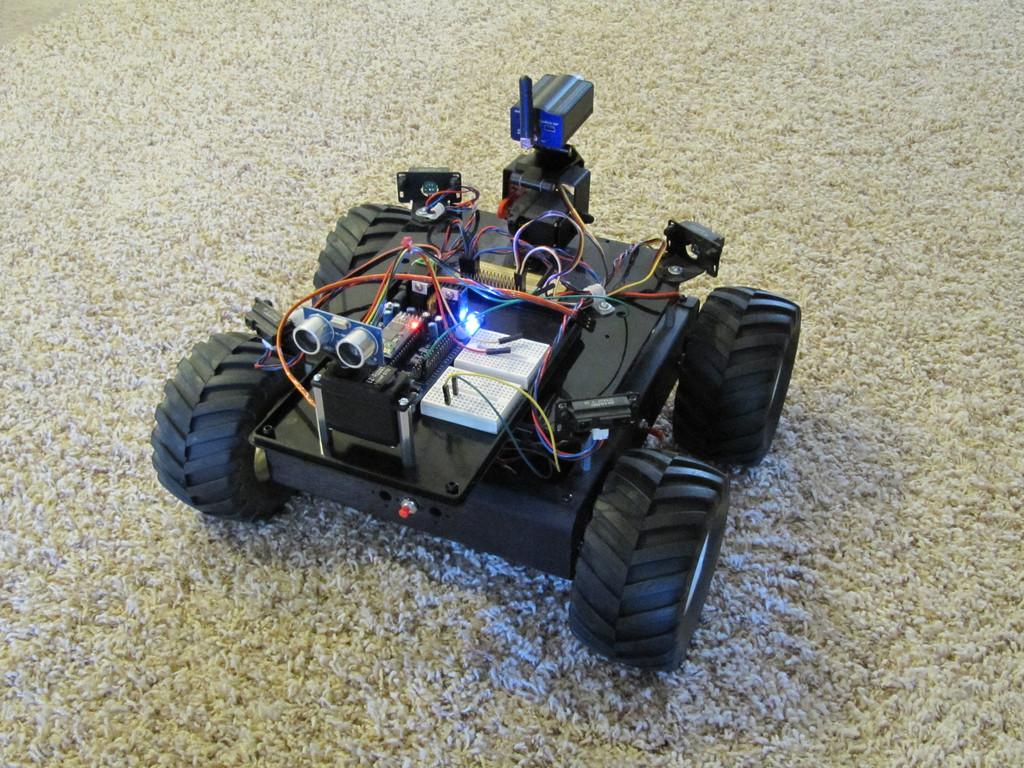
4wd Project

Marv

USA

Thought I would share my progress so far converting my old 4WD project over to using my new EZ-B controller. Over the last year or so, I have had it running on an Arduino Mega using Xbee RF modules for communications.

I had an on-board 2.4ghz camera but always had problems with it knocking out my Xbee communications (also 2.4ghz). Lately I tried Synapse RF modules instead of Xbee but had similar issues. I don't think I'll have any problems using the EZ-B camera and Bluetooth communications. But at some point, I want to change the EZ-B's Bluetooth adapter over to Synapse, as it can work out to several thousand feet line of sight.

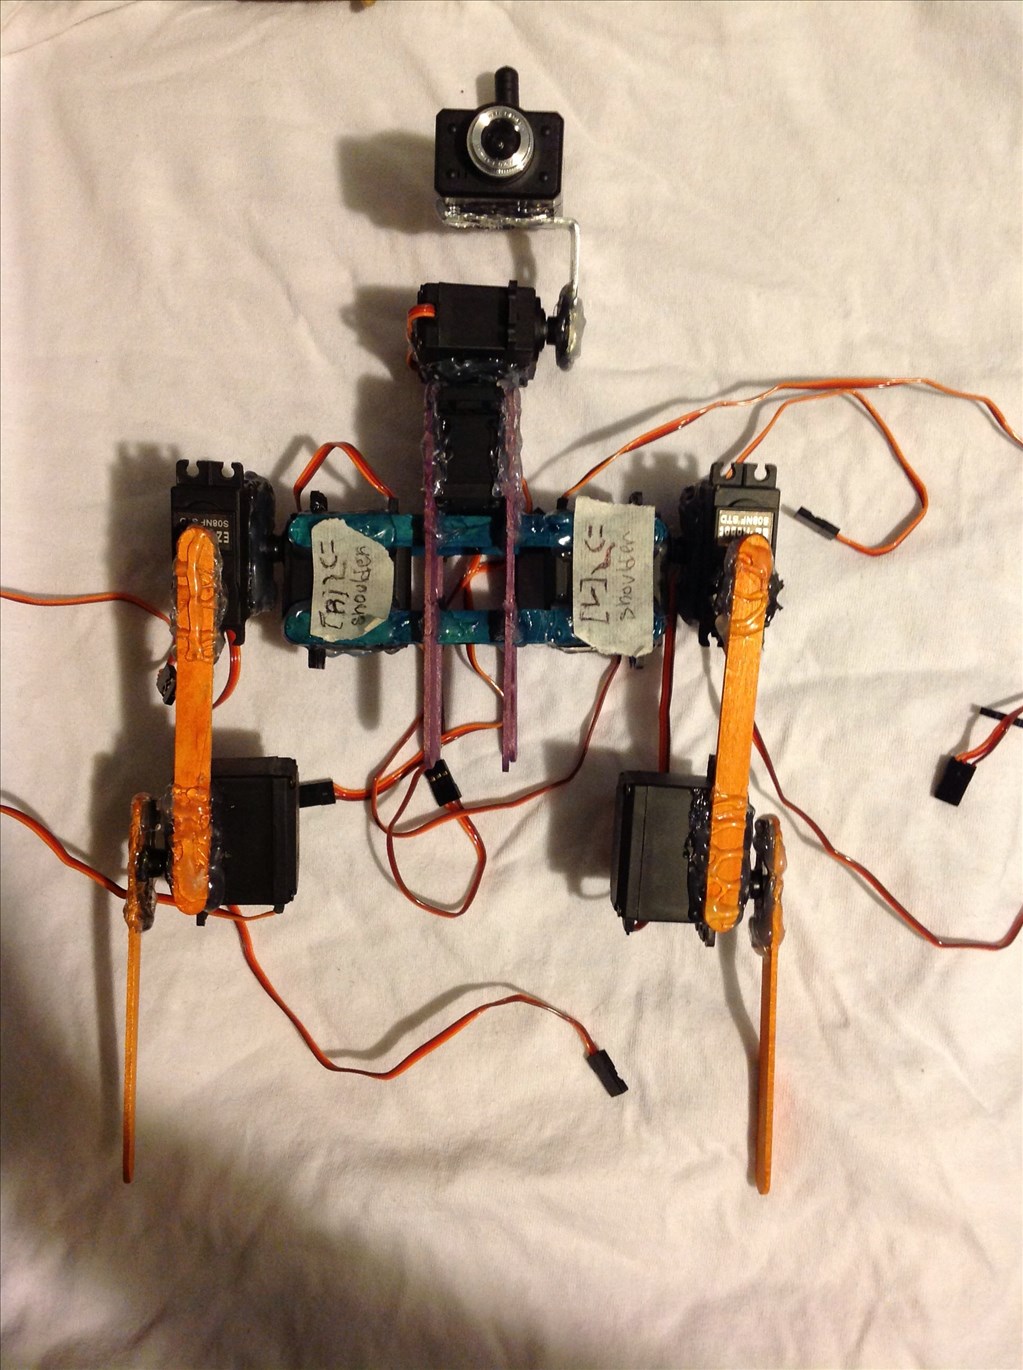
Here's how the 4WD is outfitted: (1) Sabertooth 2x12 motor controller; (4) Gearhead 12V, 30:1, 200rpm motors; (1) 12V 2800mAh battery; (4) Sharp GP2Y0A21YK0F IR Range Sensors; (2) Quadrature Motor Encoders.

The Sabertooth and battery pack are located in the base. The Sharp range sensors, EZ-B ultrasonic sensor and camera are not connected in the photo, so don't give me a hard time about all the loose wires.

I never got around to installing the motor encoders or doing any more with the Sharp range sensors than testing them. The motor encoders will eventually be used to keep track of distance travelled.

Here's where I'm at this point in the new project: I have the Sabertooth motor controller connected and working with the EZ-B much to our dog's frustration. Reminds me, I need to add the ability for the 4WD to bark.

The Sabertooth swiches are set for Mode 3 Simplified Serial at 38,400 baud (1,3, & 6 ON). The EZ-B is getting its 12VDC power from the same battery as the Sabertooth, so their grounds are tied together through the battery connection. The only other connection is one wire from the Sabertooth S1 terminal to the EZ-B's D0 port.

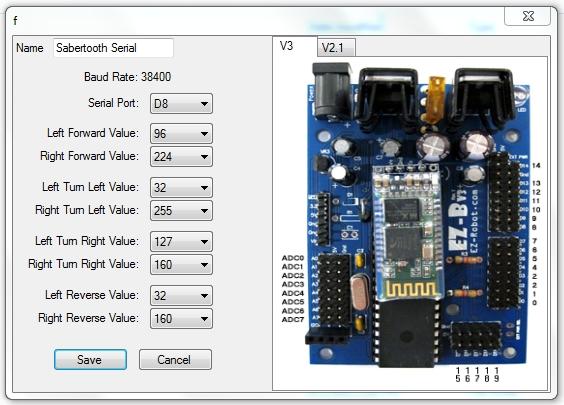
Because I have both of my left motors are connected to the Sabertooth's Motor #1 output and both of my right motors are connected to its Motor #2 output, I had to change the settings in ARC's HBridge Sabertooth Panel as follows:

Full Forward Left 127 Right 255

Turn Left Left 1 Right 255

Turn Right Left 127 Right 128

Full Reverse Left 1 Right 128

It goes forward or reverse about 10 feet per second with these settings. It can rotate or turn on a dime and would no doubt eventually tear a hole in the carpet, which my wife says will cause something even worse to happen, depending on who she catches first. Really, those tires mounted to those motors can do some serious turning when one side goes full forward and the other side goes full reverse.

Next up will be making the EZ-B ultrasonic ranging sensor work with my 4WD. I have tested the ultrasonic sensor by itself, and it works great. It looks like it can sense 3-4 times farther out than the Sharp sensors.

Until next time.

User-inserted image

By — Last update

ARC Pro

Upgrade to ARC Pro

Experience early access to the latest features and updates. You'll have everything that is needed to unleash your robot's potential.

PRO
Synthiam
#1  

Great write-up Marv! That's a heavy duty robot:D

I don't think there has been any interference reported with the ez-robot camera and synapse. You should be good to go! That'll make a fun spy robot... Have you looked at the Vuzix glasses we use for Augmented Reality? I used my brookstone rover, sat in a chair and drove it down the street into someone's back yard one day. It's such an adventure! Totally new experience

#2  

That is amazing! Guess I'll have to work that into next year's budget somehow. Even now, once I get it connected with one of my Synapse RF266 modules, I should be able to run the 4WD around our cul-de-sac while I sit inside at my computer. How far does the video camera you sell reach? Would it work out to maybe 150' with a couple walls in between?

By the way, I sent a problem report to the "Contact Us" link about my new video camera. It looks like I'm having the same problem steve3624 and lordhotwing mention on the forum. For now I'm just using one of my old wired usb cameras for testing.

#3  

A4WD Project Phase 2

Didn't take long to realize it's safer to test my motor configuration setting math with the A4WD sitting on a book. I'm using two EZ-B control panels for this test. One config's the servos, where I can input specific values for my Sabertooth motor controller, as far as speed & direction. The other panel config's the ultrasonic sensor where I can set the detection distance for obstacles, delay for turning and reversing. I have it set for 20" for this test. You'll notice it's scanning 180 degrees of the horizon looking for potential targets, but its head stops scanning or moving if it detects the enemy, in this case a fly swatter.

You can see and hear the left motors react when the ranging sensor sees something to its left. Same thing on the right. An obstacle in the center causes both motors to reverse. The fly swatter confuses it a little, because it can't physically move to avoid the fly swatter. But... I could just as easily charge forward while firing a paint gun instead of retreating:)

allenconnections.com/video/A4WD_Phase2.mp4

#4  

Here's a link to a blog I setup to post my A4WD/EZ-B project's progress.

A4WD RoboBlog

#6  

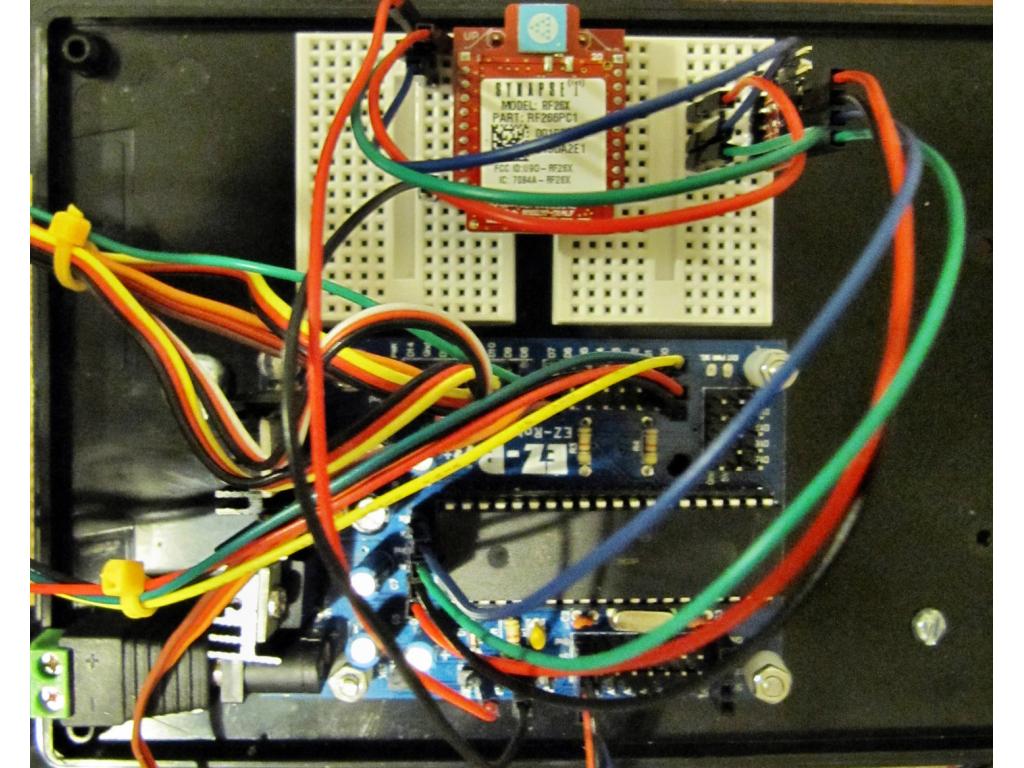
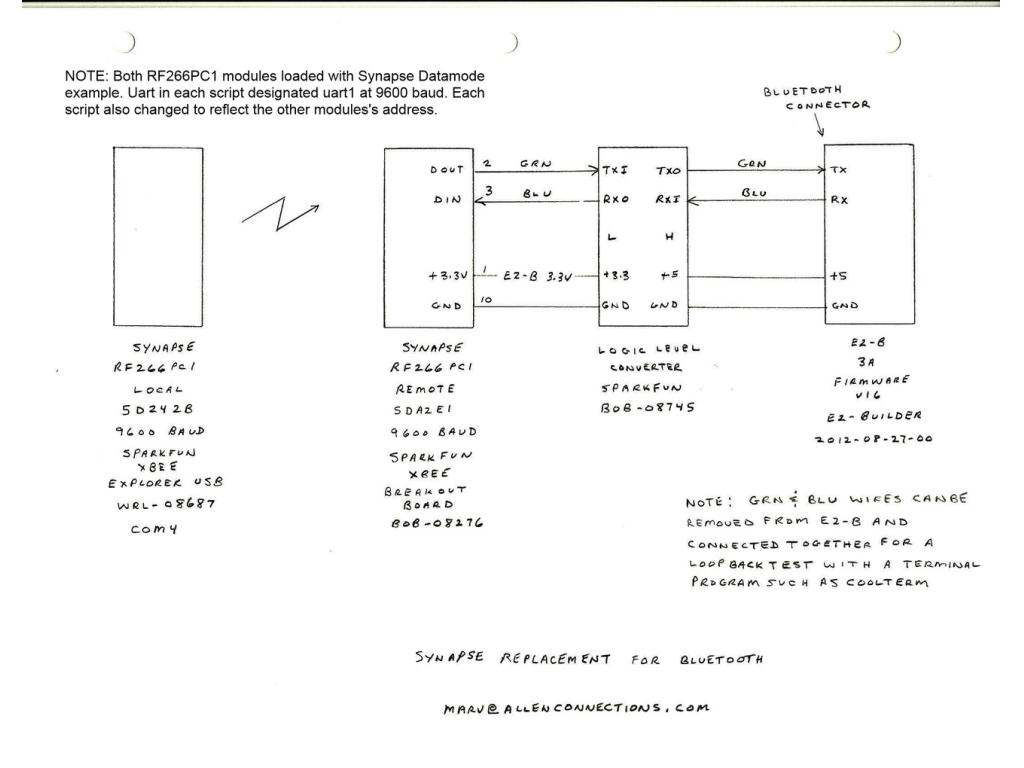
After hitting a few pot holes along the way, I now have the EZ-B in my 4WD comminicating with Synapse RF266PC1 modules instead of Bluetooth. Synapse's datasheet for the RF266PC1 rates them at 4,000 feet line of sight. I'm expecting much less in the real world and plan to do some distance testing this weekend.

I'm sort of a pragmatic person, so I started by setting things up first by replacing the Bluetooth with just a simple FTDI setup. Once I had that going, I set it up with a pair of Xbee's, which are a bit simpler than Synapse modules. They are configurable but don't run a (Python) script like the Synapse modules.

So, then it was on to the Synapse modules. That's where I hit a couple pot holes. The Synapse RF266PC1's are plug compatible with Xbee's (at far as the essential pins for uart communications), and I have a collection of Xbee adapters. Once I had scripts loaded in each Synapse module, it should have been as simple as just plugging them in instead of the Xbee's. But that was not to be.

Some Synapse modules have two uarts designated 0-1. The main issue was I assumed the single uart in the RF266PC1 would be designated uart0. Silly me. The RF266 requires use of uart1 in its Python programming.

Another issue was the script I modified was actually an example provided by Synapse for some of their other modules. The RF266PC1 is a new product, and some of the documentation is a bit behind release of the product.

Many thanks to J.C. Woltz on the Solarbotics forum for showing me the light.

Anyway, all's well that ends well. Now I can run my 4WD Rover around the neighborhood with my laptop. hmm... may have to have some kind of auto kill switch in case I loose sight of it.

User-inserted image

User-inserted image

#7  

With long range communications now established with the Synapse modules, it was time to move on to controlling my 4WD Rover with a joystick connected to my notebook PC. I chose a direct USB cable connected model over a wireless one, since I intended to have the notebook PC within arm's reach anyway.

I found a good buy on a Playstation 3 Afterglow AP1 from Performance Designed Products (PDP) at Wal-Mart.

Then I mapped the buttons using EZ-Robot's Joystick Control Panel. The cross button to the left must be out of range of the Joystick Control Panel's button list, as those particular buttons never show. That's ok. There are more buttons than I have fingers. The numbers match to the button list in the Joystick Control Panel.

I only used two panels for the following tests shown below. The Joystick Control Panel and the Sabertooth Movement Panel. The #1 (left) joystick controls the drive motors, and the #2 (right) joystick controls head movement, up/down, left/right. The gripper jaws and up/down movement are controlled by the 4 buttons on the right side. The 3 buttons in the center control rear IR sensor movement.

It took some trial & error to set the min/max servo positions to keep the servos in a practical range of movement. For example, setting the gripper up/down servo max too high results in lifting the Rover's front wheels off the floor. I have learned to start with min/max settings in a very safe range before increasing them to prevent damage.

Video - Controlling the A4WD Rover with a Joystick

Spain
#8  

Welcome to the forum Marv! Your project is fantastic, spy or surveillance robot! You've just arrived and has already made a good contribution to all that want to install modules synapses. Keep it up.:)

#9  

A4WD / EZ-B Project Phase 5 - Rover Gets Speech & Hearing

This part of my A4WD / EZ-B Project could be used by others for a non-robotic purpose, but my objective was to give my Rover speech and hearing "on the cheap".

The setup for my application is a pair of $20 Motorola FV-300 TalkAbout's; one connected to my computer, the other attached to my 4WD Rover.

There was no need to open the case on the unit connected to my computer. Everything was done using the PTT (Push To Talk) headset jack. The basic concept is that the computer's sound output jack is connected to the microphone input on its Walkie-Talkie. Then that Walkie-Talkie's speaker is connected to the computer's microphone input. Now this is not a perfect impedance match, but it works surprising well. The volume needs to be kept low anyway, so as not to overdrive the circuits and cause distortion. It does take more than just connecting these things but more on that in a moment.

The remote unit mounted on my Rover was disassembled and removed from its case so that connections could be attached directly to its circuit board. Knowing what I know now, disassembly probably wasn't necessary.

OK, let's start with the unit connected to my computer and the drawing linked below.

First, obtain a new 3/32 inch (2.5mm) plug. You should look for one that has a shoulder sufficient enough that 1/32 inch can be removed. That's so the plug will insert a little deeper in the headset jack on the Motorola TalkAbout. Motorola used a special jack to prevent anyone from using non-Motorola headsets. I put my new plug in a drill and used a file to remove 1/32 inch from its shoulder. Now it inserts all the way and stays inserted.

As the drawing for the new modified plug shows, the tip is the mic connection, the ring is the speaker connection and the base is ground. In normal operation, the Walkie-Talkie's speaker is working, and you have to push the talk button to talk. External PTT is accomplished by connecting the plug's ring terminal (ear piece) to ground. As long as those two terminals are connected, the Walkie-Talkie accepts a signal coming in on its mic terminal pin.

Well, up to 60 seconds, anyway. It seems a timer is built into its circuitry to prevent anyone from keeping the talk circuit activated any longer than 60 seconds. If the ground to earpiece connection is dropped sooner than 60 seconds, the unit immediately reverts back to normal operation.

For my application, I'm connecting the ear piece terminal to ground using an USB/Serial microcontrolled relay. There are plenty of such devices available. Depending on your application, the connection could be accomplished with something as simple as a momentary push button switch.

The headphone or speaker output of a computer is typically stereo, with the ring and tip each being a channel. For my purpose, I just connected both channels to the Walkie-Talkie's mono mic pin.

The microphone input to a computer is also mono. Three terminal jacks and three terminal plugs are normally used, which might make you think it is a stereo connection. But the ring terminal is actually a +5V bias for the type of microphones used in headsets and such. In my case, the extra +5V power isn't needed. The Walkie-Talkie's speaker provides plenty of power without any help. So, the ring terminal is left unconnected.

That's about it for the computer end. Now any speech or sound from the computer is fed into the Walkie-Talkie after first pulling the PTT relay. Otherwise, sound from the other remote Walkie-Talkie is feeding the computer's speakers.

I won't be going into so much detail as far as the disassembled Motorola unit mounted to my 4WD Rover, as every model is going to be a bit different on the inside. Depending on application, someone might want to use the remote Walkie-Talkie "as is" and simply speak and listen to it from their remote computer.

The FV-300 takes 3 AA bateries, which provides 4.5V. However, the circuitry also picks off 3V from in between the batteries. That worked out great for me, as I already had 3.3V and 5V available on the Rover.

The push to talk button is just a two wire switch on this particular unit, so I soldered wires to it and ran those to an onboard microcomputer controlled relay. Same concept as the relay at the computer end, as far as PTT. I also had to extend the speaker's wires in order to mount it on the Rover's platform.

Now on to the fun part of integrating speech and hearing into the overall project.

User-inserted image

User-inserted image

allenconnections.com/roboblog/

Spain
#10  

I do not understand the lack of interest from the community to your project, your project still much higher than most. Just by the way you documented here, and their contributions will benefit others silently deserves: congratulations on your robot! By the way, I saw your blog and it's great, very well documented. I'm dying to know what the real extent xbee module, if one day you test, please let me know!

#11  

I'll post more about this in a couple days, but tonight I was using my Acer Iconia A200 (Android Tablet) to connect to ARC's HTTP Server. Works great! I was surprised I was able to control my Rover's movements so smoothly. Of course, I am limited by how far my Wi-Fi signal reaches. I'm still using ARC on my netbook connected to a Synapse RF module for field operations.

Canada
#12  

Hi @Marv thanks for your post. i have a very simular base and motor controller. I am having an issue getting the ez-b to talk correctly to the sabertooth controller. which control in ARC are you using and could you possibly send me a screen shot of the settings?

thanks for your help

#13  

Wow congrats on a really cool robot I can't wait to see some video of it. Do you have plans to dust proof it and take it off road?

#14  

tklass

I'm mostly using the HBridge/Sabertooth Serial Movement Panel. A screen shot of its config should be attached. These values as far as left/right and fwd/rev could be different on your Sabertooth controller depending on how you connected the motor wires.

Left Motor = 1 to 127 (Full Rev = 1, Stop = 64, Full Fwd = 127) Right Motor = 128 to 255 (Full Rev = 128, Stop = 192, Full Fwd = 255)

Sabertooth Dip Switches, 1, 3 & 6 set ON (Mode 3, 38,400 Baud Simple Serial) EZ-B D8 signal wire to Sabertooth S1 input

The baud rate between the EZ-B and the Sabertooth is 38,400, but it is 9,600 between the EZ-B and ARC.

Hope this helps.

User-inserted image

Marv

Canada
#15  

Thanks Marv i'll give that a shot and let you know

Canada
#16  

So weird, same setup same controller and motor. My ez-b flashes away and the status on the sabertooth lights up but nothing moves.

I am beginning to think that there is something wonky with the sabertooth that I have:(

#17  

One simple thing I've forgotten before is making sure there are ground wires between all modules. confused

Canada
#18  

Thanks yeah I could see how that would be easy to miss too. I figured out that it was a defective controller. Swapping it out fixed the issue. Thanks for all your help!

#19  

Hi Marv,

Great robot and nice Blog. I am also using a Sabertooth 2 x 12. Could you explain how you determined the values that you used in the config section? I must be misunderstanding something......not sure I follow how to decide what numbers to use for my Sabertooth. I tried the numbers you used but, it is not going full speed in FWD or REV. When I tried changing some of the numbers it behaves differently than I would expect.

I guess what really throws me is the nomenclature used such as "Left Turn Left Value", "Right Turn Left Value" and some of the others mentioned on the picture below.

User-inserted image

Thanks,

Rex

#20  

Update....

Marv, I reviewed your previous post and discovered my answer. I need to read more carefully :D

Anyway you posted....

"Left Motor = 1 to 127 (Full Rev = 1, Stop = 64, Full Fwd = 127) Right Motor = 128 to 255 (Full Rev = 128, Stop = 192, Full Fwd = 255)"

This was the key!

#22  

I was about to say I've been sidetracked by another project the past couple of months, but I see it has been more like 4 months! Once it gets nicer here in Indiana, I'll get back to my robot. I want to do some camera and wireless testing with it outside.

I've been totally engrossed in a Raspberry Pi this winter and am now in the process of converting my home monitor & control system over to it from a Windows computer.

Here's a blog of some of my tests: http://allenmlab.blogspot.com/

#23  

Yes, I can see that from your blog. I once knew a top tier programmer from indiana named Marv. By chance have you ever worked on state government projects?

#24  

Nope -grew up here and retired here but lived everywhere else in between...

United Arab Emr
#25  

@Marv : I do have problem accessing your blog. I am not sure if it is only me Good work. HH