
rregister
Help To Print A New Jd Head Design (Adding A 'Bell-Bottom') For A Character
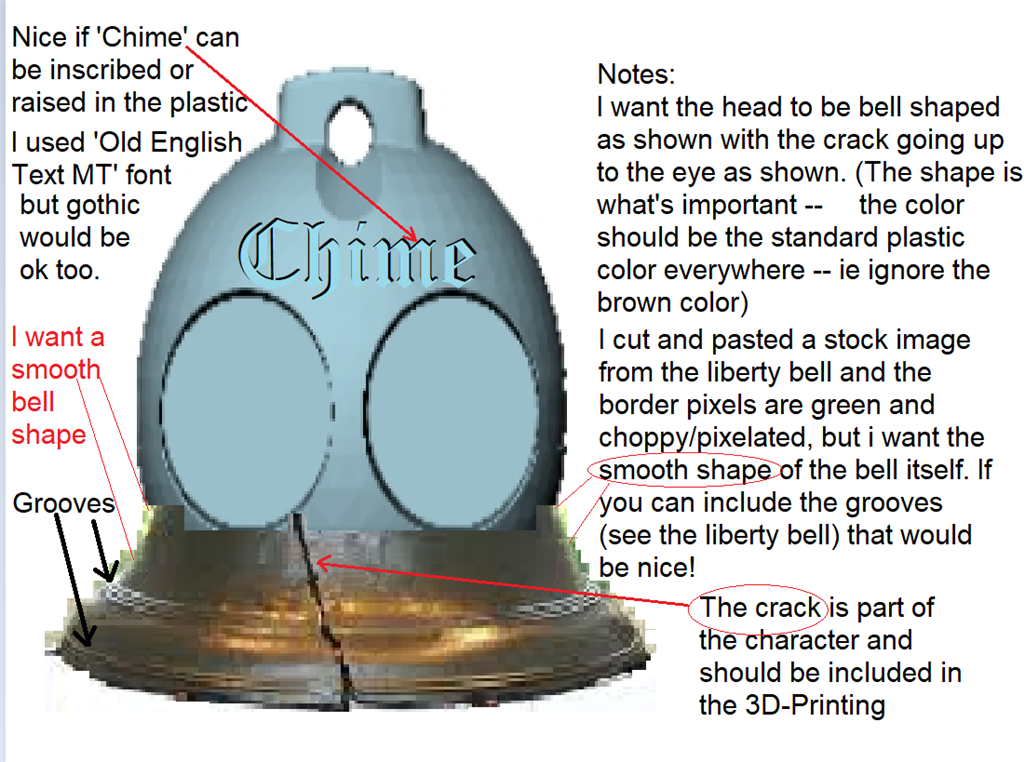
Hi all, this is my first post, and so i apologize in advance for etiquette problems (and i will try to learn and improve rapidly.) I'm starting an ambitious project with mutliple EZ-robots (love this system!) and i would like to modify the standard JD head front-piece by adding a 'bell-bottom' as shown in the photo attached (i did try to follow the instructions posted in this forum for attaching a photo) for this character called 'Chime'.
Notes: This character has a crack in his bell, like the liberty bell (this crack can be molded cosmetically in the bell-bottom and does not have to be an actual crack -- ie think of it as 'a scar'). I lifted/overlaid an image of the liberty bell to try to convey to you what i am hoping for, and the result shown in this photo is pixelated/blocky/blotchy/green-brown at the bell-shape perimeter, but i want a smooth bell-shaped perimeter. It would also be nice to have the beautiful concentric grooves at the bottom, which the liberty bell also has. (Note that i intend to use the standard head back-piece molding, because the front is the most important part (but if somebody felt it was no big deal to also add the bell bottom to the back piece somehow, that would be a nice addition).

I loudly echo everything Jeremie and RichardR said, they are spot on with their advice!
The only part not mentioned is the desire to have "Chime" scrolled on the forehead and rather than 3D print that (like RichardR pointed out, you could do this in TinkerCad and take the JD head .stl and place raised letters on the forehead) I would ink print a sticker on clear sticker paper for a "Chime" forhead tattoo.
For the Bell though, instead of the one Patrick found, I thought this one had the 2 sets of groove rregister wanted: https://www.thingiverse.com/thing:138580
Thank you Jeremie, DJ, Richard R, Nomad 6R, and JustinRatliff I really appreciate your help and advice.
I am printer-less and obviously a complete 3D printer novice and this solution sounds perfectly fine to me (tho I don’t fully understand the tradeoffs involved)
It seems everybody agrees this superglue skirt’ is the best approach, ok great.
But to be honest it’s not clear to me why one needs a lot of support material for a single print of the head+skirt, but don’t need the support material for the superglue-skirt approach? Is this a matter of the superglue being stronger than the printed-plastic? (that was probably a dumb question but thanks for any help on this) (Perhaps the idea is that the superglue-skirt will lack strength, but would be readily replaceable when it breaks, whereas the broken head would be a pain?) (Or maybe this is a time-to-print and cost of material, but if I need the head printed also, it seems the total cost/time-to-print would be similar - or should I try to use my existing headpiece from EZR?) One more question: I kind of imagine that the part of the skirt that attaches to the head via superglue would have to be exactly the right shape and size in order to get a decently-solid connection, does that pose a serious challenge? (I guess it is still easier than getting a single piece to be the right size).
Those 2 bells from thingiverse look great. The thing:138580 has a smoother bell shape and better groove pattern based on the view provided - thank you for finding these!
I’d like to hear what 3dPrinterGuy thinks about all this information, and whether any of it changes your willingness to help with it Tony? (no worries if this is all getting to be above and beyond...)
thanks again everybody! -Richard 'twitch' R.
can you just print the bell complete and then cut in half ?
@rregister. Well, I'm a "maker". I like to do things right and while arts and crafts are fun, @JustinRatliff comments made me shudder. (no offense JustinRatliff) I don't even own a hot glue gun or have any super glue.
I'll probably model up and entire new head (with built in supports).
The amount of work to design a new jd head with the skirt would be crazy - and 3d printed parts don’t look great compared to the real robust injection molded plastic.
But - if you really want a 3d printed head - use the stl file and merge a bell stl into it. You can’t "crop" the bottom of jd’s head anyway because that holds the Servo. All you’re doing is merging a bell stl into the jd head stl
Now is a good time to learn tinkerCad if you’re interested in 3d printing have fun!
@DJ > Now is a good time to learn tinkerCad if you’re interested in 3d printing Grin have fun!
Thanks for the advice, (if that was directed at me), but I am well acquainted with tinkercad and have been 3dprinting for many years.
Thanks Tony
this you can use.
bell sound