rregister
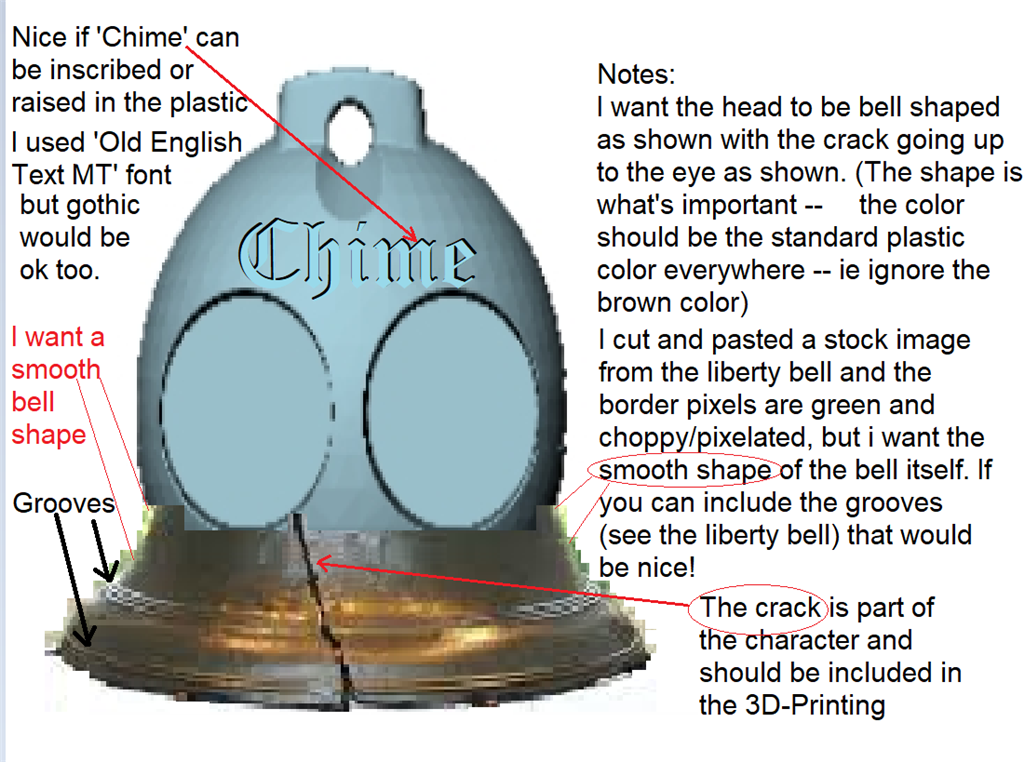
Hi all, this is my first post, and so i apologize in advance for etiquette problems (and i will try to learn and improve rapidly.) I'm starting an ambitious project with mutliple EZ-robots (love this system!) and i would like to modify the standard JD head front-piece by adding a 'bell-bottom' as shown in the photo attached (i did try to follow the instructions posted in this forum for attaching a photo) for this character called 'Chime'.
The idea is to keep everything the same and hopefully have no impact on JD's behaviors (e.g. head stands) but add some superficial plastic as shown to add character (so that his head looks like a bell), and it would be ideal if the 'Chime' name could appear centered on the forehead similar as shown. My problem is i have 1) no 3D printer and 2) no experience in this area (other than those 2 issues, i'm extremely well-positioned for a 3D project like this:). If anyone out there has a moment to point me in the right direction, i would be VERY grateful -- thank you! -Richard 'twitch' R.Notes: This character has a crack in his bell, like the liberty bell (this crack can be molded cosmetically in the bell-bottom and does not have to be an actual crack -- ie think of it as 'a scar'). I lifted/overlaid an image of the liberty bell to try to convey to you what i am hoping for, and the result shown in this photo is pixelated/blocky/blotchy/green-brown at the bell-shape perimeter, but i want a smooth bell-shaped perimeter. It would also be nice to have the beautiful concentric grooves at the bottom, which the liberty bell also has. (Note that i intend to use the standard head back-piece molding, because the front is the most important part (but if somebody felt it was no big deal to also add the bell bottom to the back piece somehow, that would be a nice addition).
Haha - that's a real neat modification.
I'm not the right person to help tooooo much, but i can try! My 3D design skills are quite limited - but i do have a little experience to know that it's very doable with a little effort.
The program that I have experience with is Solid Works, and it's really expensive and unnecessarily confusing because it's designed for serious manufacturing. What you could use is one of the many free and easier applications. Such as TinkerCad or Vectary or Clara
I've played with TinkerCad and there's a TON of great tutorials around it. Here's a few links to free programs for editing...
https://www.tinkercad.com/
https://www.vectary.com/
https://clara.io/
Hi to all again -- and especially to DJ (wow can't believe i got a reply from the robot overlord himself! I think all your videos and tutorials are amazing and great and i have been learning a ton, thank you so much!) Thank you for these tips and links. I visited and checked them out (Vectary seems well-suited to starting with an existing design and customizing it, and Tinkercad looks great and to be a bit easier to understand overall). To be honest tho, it looks very daunting to climb that 3D model learning curve (and especially to get it right without having a 3D-printer and no knowledge thereof). If there is anyone out there who has this understanding and capability and would be willing to work with me, it would help me out tremendously. I know everybody (and especially DJ) are super-busy with their own projects, so no worries if this is 'above and beyond' -- i totally understand. very kind regards, -Richard 'twitch' R.
Hi Richard,
I can probably help out. I have a lot of experience with 3d design and 3d printing.
It would help if DJ can get me a real cad file for the head , Solid Works or .step file ?
Working with a STL file is cumbersome.
Hi there Holy1, that sounds fantastic -- thank you for your generous offer and i really appreciate it (I was just looking at your CD stepper with limit switch example via arduino in thread 11075, wow that is amazing to me -- i keep my junk around too, and my kids make fun too, but i have never put it to such good use, ha)
DJ can you help with making this (Solid Works or .step) file available for the JD head front and back pieces? thank you!
-Richard 'twitch' R.
Hi Richard, Just to correct you the -CD stepper with limit switch example via arduino in thread 1107 was done for me by member PTP. He did the arduino code for me to operate my door. We'll wait a bit for DJ and if he can't provide a cad file I'll get started without.
Regards, Tony
Hey gang - I’m traveling and don’t have access to a solid works pc until late next week
Hi DJ and Tony,
>don’t have access to a solid works pc until late next week
Ok thanks, late next week is fine of course.
>the -CD stepper with limit switch example via arduino in thread 1107 was done for me by member PTP
Oh i see that now Tony, ha, (i somehow got the msg order confused), and so you have the bi-fold door project, got it -- yes kudos to PTP, wow
thank you!
-Richard 'twitch' R.
Hi DJ and Tony,
>don’t have access to a solid works pc until late next week
Just a reminder nudge about these 3d files thank you
-Richard "twitch" R.
Hi DJ @DJ
(know you are super busy, ...) I'm still hoping you can make this solid works file (for JD head front and back pieces) available, in order for Holy1 to help me out -- Thanks!
-Richard "twitch" R.
Hi again Tony @Holy1,
While we are waiting to hear back from DJ, i thought it might be helpful to consider the maximum diameter (at the bottom) of the bell shape. I'm thinking that if it is too large, it will restrict some JD movements, such as push-ups. The standard head is about 8cm in diameter, so i'm thinking the max diameter of the bell should be about 9cm as shown below ('m not good with photo-editing, so this is very blotchy) -- let me know if you (or anybody?) have any thoughts or ideas about this? -Richard "twitch" R.
Patience just got back to home - I’ll need a bit. Thanks!
welcome home and no worries (go ahead and unpack/unwind, ha) -Richard 'twitch' R.
Hi everybody, I'm hoping to paint this JD head piece and the standard chest as well. Are there any tips and ideas anyone can pass along to get good paint adhesion to the plastic? and good durability? Thanks in advance, -Richard 'twitch' R.
Hi DJ @DJ (I apologize in advance if I am being overly impatient I don’t mean to be, ha -- but at the same time I know how sometimes things can easily slip off the radar when someone is as busy running an operation like you are) just checking in again with a very patient and definitely-not-trying-to-be-ornery’ reminder that I am still hoping that you can make the JD head solid works file available so @Holy1 can help me out (if Tony is still willing)? I’ve been working hard on a kinda-neat character-driven multi-robot project that is coming online in its first iteration very soon ARC and JD and your servos and kits are perfect for it -- and I will definitely be sharing information about it soon in case anybody is interested I hope people will like it. Thanks again, -Richard 'twitch' R.
Ha, i meant DJ @DJ (am i the first to ever to switch JD and DJ? there may be some dislexia rattling around in my braincase)
Yes, I'm still willing to do it!
Hi DJ I realize I'm being a pest, but is there any chance of making this solid works file available soon so Tony can help me with it? (or perhaps there are some proprietary issues involved and you simply can't do it? -- which would be totally understandable if that is the case -- if so can you clarify that?) Thanks!
>Yes, I'm still willing to do it! Thanks Tony!
Richard 'twitch' R.
Hi Tony, I guess that DJ @DJ has stopped following this thread, perhaps because i was too pushy about it (i didn’t mean to be -- maybe he will give me another chance at some point i hope so) or because he has some business-reasons for not wanting to make the solid works file available, or perhaps he is simply too busy to help out right now.
Whatever the reason, I wanted to get your opinion on how best to proceed from here? I am reluctant to keep pestering him because perhaps he is already mad at me and if so I don’t want to make it worse. Are you willing to try with the .STL file, or do you have any thoughts or suggestions?
Thanks for any ideas, -Richard 'twitch' R.
Hi Richard, I don't know why DJ has not responded to you, very out of character for him. Anyway, I'll mess around with the STL file and see what I can do. When imported into a CAD program they (STL files) are represented in (tens of)thousands of triangles so don't always play well with new geometry. I am involved with another project at the moment so can't give a definite date for completion.
BTW I changed my username to 3dPrinterGuy.
Hi Tony, (yes it seems unlike DJ based on what i've seen throughout the forum -- he's always so enthusiastic and helpful about people's projects, which is really great -- but I will respect his reasons, whatever they may be, and hope that he will clarify the matter for me eventually when he has time.)
>When imported into a CAD program they (STL files) are represented in (tens of) thousands of triangles so don't always play well with new geometry.
ok -- so that is why the solid works file would be a better starting point -- makes sense.
>I am involved with another project at the moment so can't give a definite date for completion.
ok i will be very patient! (and please let me know if i'm being otherwise). (and I like the new 3dPrinterGuy moniker) best regards and thanks again, -Richard 'twitch' R.
Hi Richard,
While you wait you could always try printing the JD head and the Bell as 2 separate pieces and then combine them with super glue, hot glue, acetone, etc. It might help with the designing process as you can mechanically see what works and what doesn't.
I'm not able to get the origin of the 3d printed STL for you. The origin of the stl's appear to have been misplaced. All we have are the injection mold origin files in solidworks, which are not the same thing.
I'd go with what Jeremie mentioned - for two reasons
i can't get u the original files
printing the head with the bell is gonna be a nitemare of support material anyway
I do agree with Jeremie and design a skirt for the existing head that converts it into a bell. And attach it with super glue
That way you maintain the integrity and strength of the original injection molded plastic
i found this 3d print of a bell.
bell
@rregister You can do what you want to do just in TinkerCad in about 15 minutes or so. Find a STL file of the liberty bell and import it to Tinkercad ...Cut off the part you don't want... Now import JD's head and merge the portion of the liberty bell (skirt) that you do want to JD's head to the position where you want it in... Combine the two parts then download them as one STL file... Done
However, I would do what Jeremie suggested (post #22) to do because of the amount of support material that is going to probably be needed if you print them as one big part...
I loudly echo everything Jeremie and RichardR said, they are spot on with their advice!
The only part not mentioned is the desire to have "Chime" scrolled on the forehead and rather than 3D print that (like RichardR pointed out, you could do this in TinkerCad and take the JD head .stl and place raised letters on the forehead) I would ink print a sticker on clear sticker paper for a "Chime" forhead tattoo.
For the Bell though, instead of the one Patrick found, I thought this one had the 2 sets of groove rregister wanted: https://www.thingiverse.com/thing:138580
Thank you Jeremie, DJ, Richard R, Nomad 6R, and JustinRatliff I really appreciate your help and advice.
>try printing the JD head and the Bell as 2 separate pieces and then combine them with super glue, hot glue, acetone, etc.
I am printer-less and obviously a complete 3D printer novice and this solution sounds perfectly fine to me (tho I don’t fully understand the tradeoffs involved)
> printing the head with the bell is gonna be a nitemare of support material anyway
It seems everybody agrees this superglue skirt’ is the best approach, ok great.
But to be honest it’s not clear to me why one needs a lot of support material for a single print of the head+skirt, but don’t need the support material for the superglue-skirt approach? Is this a matter of the superglue being stronger than the printed-plastic? (that was probably a dumb question but thanks for any help on this) (Perhaps the idea is that the superglue-skirt will lack strength, but would be readily replaceable when it breaks, whereas the broken head would be a pain?) (Or maybe this is a time-to-print and cost of material, but if I need the head printed also, it seems the total cost/time-to-print would be similar or should I try to use my existing headpiece from EZR?) One more question: I kind of imagine that the part of the skirt that attaches to the head via superglue would have to be exactly the right shape and size in order to get a decently-solid connection, does that pose a serious challenge? (I guess it is still easier than getting a single piece to be the right size).
Those 2 bells from thingiverse look great. The thing:138580 has a smoother bell shape and better groove pattern based on the view provided thank you for finding these!
I’d like to hear what 3dPrinterGuy thinks about all this information, and whether any of it changes your willingness to help with it Tony? (no worries if this is all getting to be above and beyond...)
thanks again everybody! -Richard 'twitch' R.
can you just print the bell complete and then cut in half ?
@rregister. Well, I'm a "maker". I like to do things right and while arts and crafts are fun, @JustinRatliff comments made me shudder. (no offense JustinRatliff) I don't even own a hot glue gun or have any super glue.
I'll probably model up and entire new head (with built in supports).
The amount of work to design a new jd head with the skirt would be crazy - and 3d printed parts don’t look great compared to the real robust injection molded plastic.
But - if you really want a 3d printed head - use the stl file and merge a bell stl into it. You can’t crop the bottom of jd’s head anyway because that holds the Servo. All you’re doing is merging a bell stl into the jd head stl
Now is a good time to learn tinkerCad if you’re interested in 3d printing have fun!
@DJ > Now is a good time to learn tinkerCad if you’re interested in 3d printing Grin have fun!
Thanks for the advice, (if that was directed at me), but I am well acquainted with tinkercad and have been 3dprinting for many years.
Thanks Tony
this you can use.
bell sound
Hi Nomad 6R -- i downloaded it and listened, sounds great -- yes i'd like to use it -- thanks for that! I'm not sure how best to use ARC to move this mp3 from your ARC project into mine. I tried to use 'Merge' but this gave me a 2nd sound board called "Soundboard V4" -- i guess i can just rename it to be another name and use use it, but it would be nicer to have this added as a new entry to my existing Soundboard control. (if anybody is willing to spell this out please do, but i'll see if i can figure it out from the help and trial and error. ) -Richard 'twitch' R.
here is the link from bell sound
bell sound
ah thanks looks like a great resource.
yeach lots of bells.are you making a full jd with bell head ? looking forwart to see him.
Hi Tony, I don’t know whether you have had time to explore this head-print yet I’m still excited about it, am making good progress on the overall project and eager to hear any news from you whenever you are ready and in the meantime I had an idea that you probably already considered but I thought I would throw it out as an alternative to see if you prefer the approach: Would it be easier and/or superior to design/3D-print a bell shaped thin helmet’ that fits snugly over JD’s existing head (with same-sized holes for the eyes and camera) and included the cracked-bell bottom? This is just a thinking out loud’ idea and I don’t want to derail the original approach, especially if you prefer it.
(And if your situation has changed and it’s not feasible to work on this in the near future no worries just let me know thanks)
BTW I enjoyed seeing your T-One robot in the intro video, I really like the way T-One’s arms appear from behind your wife, and then his head pops out to the side with a grin incredible work on T-One wow. (also playing the violin jingle bells that is great) The two thumbed hand has an interesting look and seems very practical.
Thanks again and Talk to you soon, -Richard twitch’ R.
Hi Richard, Thanks. T-One was a lot of fun to build, although he has been idle for some time.
I'm sorry to say that I'm just not getting the time to work on your idea. My day job is taking over big time so my hobby time is nonexistent and will be until at least November.
Can't play until I make some dough!
You'll have to come up with another plan. Sorry about that. Best Regards, Tony
Ok Tony, i understand completely and no worries. (I'm not sure whether i can take on an investment in a 3D printer and climb that learning curve for this, but i'll figure something out one way or the other ) kind regards, -Richard 'twitch' R.