
fredebec
France
Asked
— Edited
Easydriver And NEMA17 Stepper Motor
Hi,
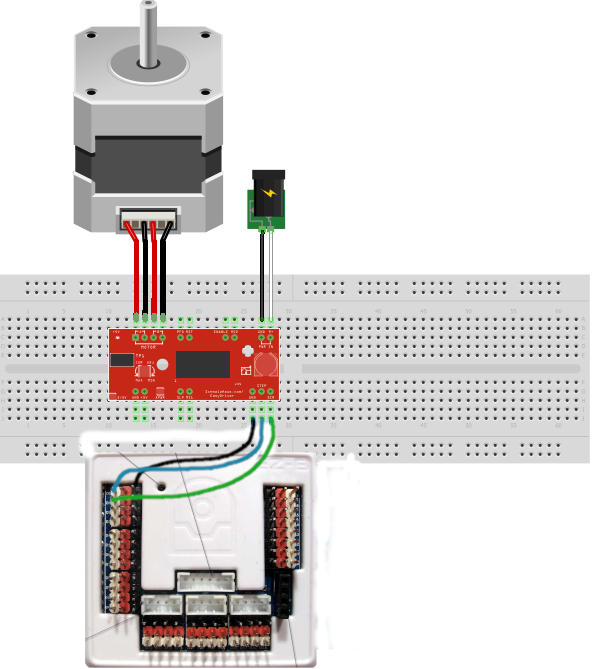
I am trying to use a NEMA17 stepper motor (from an old 3D printer) with the EZB v4, through the EasyDriver - Stepper Motor Driver from Sparkfun. I have connected everything this way:
and use the following code (from this thread: Link):
$x = 0
:loop

  $x = $x + 1
  SET(D1,ON) # dir pin (maintain current direction)
  SET(D0,ON) # step pin
  Sleep(1)
  SET(D0,OFF) # step pin
  Sleep(1)

  print($x) # let me know the loop progress
  if($x = 6400)
  $x = 0 # don't go crazy
  endif

goto (loop)
But the motor barely moves and I cannot change the speed by playing with Sleep().
I use a 24v 15A alim (the same I used before with this stepper motor in my 3D printer) so I should have enough power
Any idea what I do wrong ?
Related Hardware (view all EZB hardware)

EZ-B V4
by EZ-Robot
EZ-B v4/2 robot controller: dual Cortex ARM, Wi-Fi, audio/video, 24 servo/digital ports, I2C/UART, camera and Synthiam ARC control for custom robots
Wi-Fi / USB
Servos
24
Camera
Audio
UART
3
I2C
ADC
8
Digital
24
Related Robot Skill (view all robot skills)

Set Digital
by Synthiam
Toggle a digital I/O port between TTL low (0V) and high (3.3V/5V) in ARC; select board and port, simple on/off control-signal only.

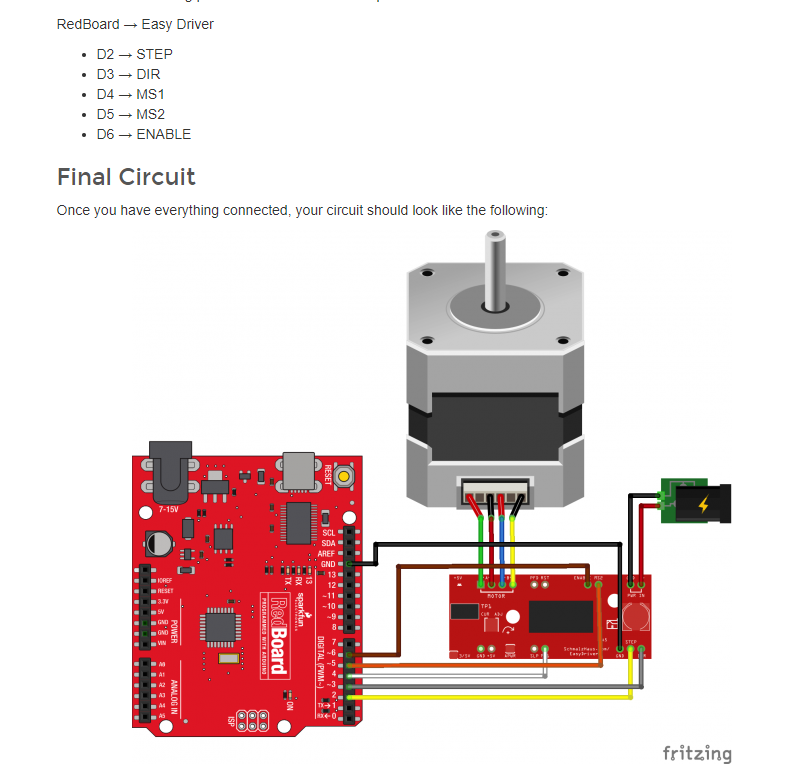
you can't run the stepper from the PC i.e. ARC you need an arduino to run the code.
@ptp,
Looking at this thread : Easydriver-Code-Nema-17-Motor-Driver-With-Io-tiny-4177, it seems that the stepper is indeed controlled by ARC, through the EasyDriver
@Fredebec, Soon or later you will find out that is not efficient to run the stepper through the PC (ARC) versus running on the micro-controller. If you look to your code you are sending ON,OFFs to the controller in a short period, when you do that you are "flooding" the controller. The timing is another issue sleep(1) is not 1 ms, sleep(5) is not 5 ms and so on, sleep only works when you are in the context of Javascript, Python, when you get out that context e.g. sending a command through network, and then to EZB queue there is no guarantee of speed.
nevertheless that does not mean you can't run a slow stepper using all the Elephant power (ARC).
Looking to the documentation: https://learn.sparkfun.com/tutorials/easy-driver-hook-up-guide
Did you match the motor coils wiring, and the motor amps (Potentiometer) ?
Please post a PIC of your setup and motor specs.
you missed a few things: Enable (Low = Activates) / (High= Deactivates). Don't forget to switch off otherwise the coils are active. Don't change the wiring while the coils are active.
Resolution:
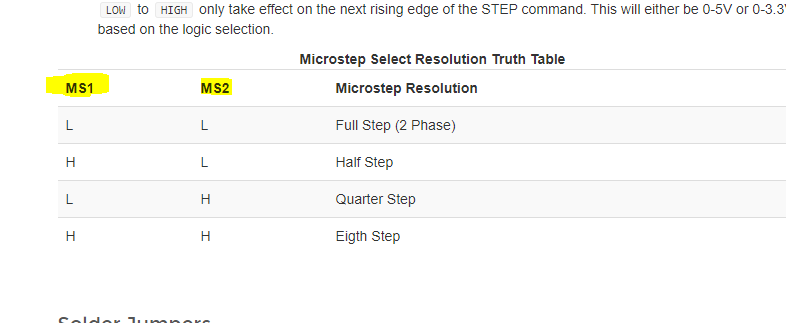
I would start with both Low, Low, to see some results (movement)@Fredbec: Sparkfun's documentation is pretty good, did you missed that ?
ARC simplifies a lot of things, but wiring less signals (2 of 5) is not an ARC's feature@ptp,
Thanks for the help. I used this (arduino) link : Easy Driver Example that showed the simple setup i used. It seems that I have been misled...:D
I am going to make the complete circuit and see how it goes. But first, I have some soldering ahead...
Please follow the wiring directions and don't forget the common ground.
Javascript code:
Let me know if it works for you.
So, I have made some testing, and some progresses.
First, I don't use the EasyDriver module anymore, because it stopped working at some stage, without any obvious reason. So, I changed for a DRV8825 (I have a lot of them). I use this kind of setup:
With @ptp's script (and my EZ-script) I am able to rotate the motor, with two main limitations: