I'm Going To Build An Inmoov, Any Advice?
Hello, Synthiam community!
I'm going to need your help. I would like to build an inMoov for the first time. I want to take full advantage of the new Quest VR skill that can control the individual fingers of a robot.
I do have experience with building the head and shoulder servos, and a bit of experience operating it. Oh yes, and I have helped build a base for the upper body. Otherwise, I am a clean slate.
I'll be using all the EZ-Robot parts that I can. I will power it from a 5V 20A power supply as I've done in the past (with the super cap mod). I may design an external power board. I like the idea of including pins and switches.
I will be using EZ-Robot prototype high-torque servos any place a HS805BB servo is needed. I might replace some with EZ-Robot HDD servos if they can handle the job, as they are pretty torquey themselves (maybe the neck).
1. I have a head printed already, should I continue going from the head down to the stomach?
2. Should I print the legs or is it a waste of time at this point since they aren't functional yet.
3. Am I ok using PLA, or should I really get into the PETG game? Or PLA+?
4. I read that 30% infill should be used, is this right or should I go thicker/thinner in some places?
5. Should I use 2 shells when printing or is 3 or 4 better?
6. What are good methods for propping up the inMoov during the process.
7. What type of lubricant is best for the worm gears? White lithium grease?
8. What are some of the biggest challenges I'll face? Are the hands quite difficult?
9. Do you recommend a particular Youtuber or inMoov build page?
Thanks in advance for any advice you can give!

hi smiller29
thanks , glad you like it . a few adjustments to make .
hi all
here some links for tiny screws and a picture how the horn is fitted. first sand the backside of the horn and put the servo screw allreddy in place . use super glue and press the horn in place . when its dry put some screws in . that prevent the horn turning loose in the gear . if you really want to get the horn for never come out .you can use weldon3 .that horn comes never out. you can by weldon 3 on ebay . it comes with a tiny bottles. fill the bottle only a small amount like excample , 3 mm hight .because it evaporates very quickly .after a day or 3 its vaporized . the weldon3 is very thin and , glues averything together . its very liquid . cheap and easy in use .fast drying about 10 minutes . keep the weldon2 in the metal container if you dont use it .
link https://www.ebay.com/itm/400431137312?hash=item5d3b8e4220:g:0p8AAOxy9eVROh9O
first picture .
links for the screws
very tiny screws
https://www.amazon.nl/gp/product/B098NYKZH5/ref=ppx_yo_dt_b_asin_title_o01_s00?ie=UTF8&psc=1
still one adjustment to make then i post the zip file .
hi jeremie and all
some last mods are bin made . first the gear cover is alot smaller .
the wrist house is modfied for using the HDD from ez robot or the MG995 servo's .
the green arrows was the problem .
and last the horn house had a dimpel in it for the head of the screw. this make the assemble alot easier . also to have a start gripping the axel from the servo . a tiny hole is there for your screw driver to be able tighten the horn on the main gear . after this the wristblock get screw on the wirst ( calibrate first servo ) then the hand gets glued on , wit weldon3 . its dry in 5 minutes .
the last test print are printing now . if all fits am done . the rest is all original inmoove parts . aldo am still goin to look for more parts to modiefied .cause if you can move servo ,s in the waist without get the pot out its much easier in use .here the foto . one window controls the two servo's .as you see in the picture , one servo is checked box . so not need to get the pot out and always perfect position , for bolt servo's .
here's the video . remember the servo's laying flat with the main gear towarts each other. thats why you check ( box ) one servo so bolt worm gear turns same direction .
https://www.youtube.com/shorts/GlXBSbqXm9s
hi jeremie and all.
wrist for small cover is reddy .tomorow print first palm in skin color .
here's the zip file .
new folder is comming.
Awesome work @Nomad! Once I get to the arms and wrists I’ll definitely try your new modifications. I just started printing the lower stomach. I don’t think I’ll print the waist portion with the two servos because I don’t see myself needing to turn the upper body much. Nice thing is if I change my mind it’s not a big deal to just print more pieces later.
In other news, I did a deep dive into FreeCAD versus Blender. Turns out that they are quite different in their design philosophies.
FreeCAD uses parametric modelling, which means that you set all the parameters and everything has a dimension and constraint associated with it. It is very structured and all your pieces and features have to link together in a logical hierarchy. It’s quite technical and has a steep learning curve.
Blender uses direct (mesh) modelling, which means you can just start sketching free form. You can edit STLs easily by moving their vertices around with the mouse. Blender has so many features available but if you just zero in on the ones you need for 3D printing, it becomes a whole lot easier.
I have decided to adopt Blender as my new go to 3D modelling program. This video pushed me over the edge
hi jeremie
i tinkering with the gears inside the wrist .i think it can a little better . i post the new zip in 2 houres .
Hi Jeremie,
I have a question for you if I send you a STL file could you try to edit out a bolt hole using Blender for me? I just downloaded Blender but I need to wrap my head around this tool. It looks really powerful so I would like to understand it better but I need to make this change fast, so any help can provide would be great.
I want this hole removed and blended in with the rest of it.
I have my email address in my profile so if you are willing to try this drop me and email and I will reply with the STL file.
hi jeremie&all
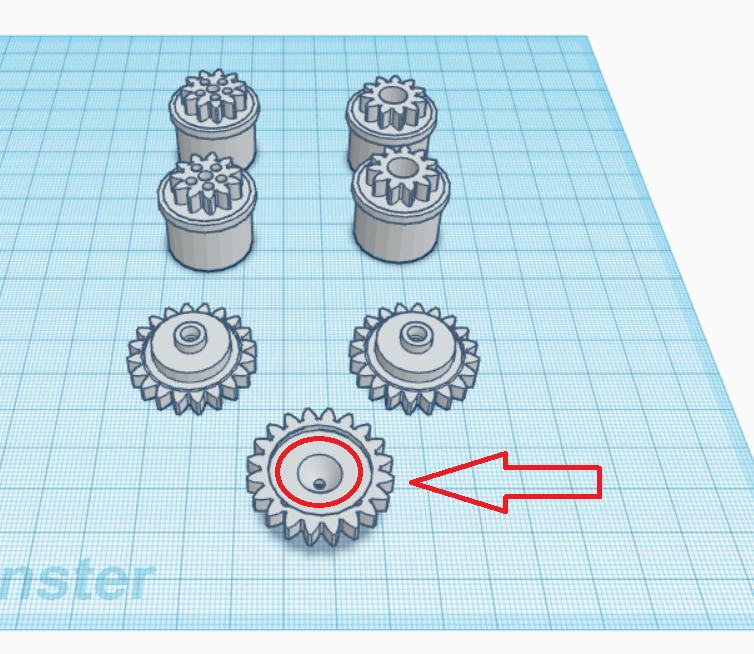
i finally got the perfect gear for in the wrist . in previous pics above you could see a gap from 2 mm . that gap is gone . i recoment using two component glue to glue the horn in the gear . remember to put the screw in the horn allreddy before glueing .
here you see the brown gear all the way to the top .
here you see perfect close case . this red case is a test case .
the hand gets glue on with weldon3 . remenber you cant take it appart no more then . when glueing the hand on , you cover up the hole were the screw sits from the servo . any ideas are welcome .
new zip folder send-folder.zip