
I'm Going To Build An Inmoov, Any Advice?
Hello, Synthiam community!
I'm going to need your help. I would like to build an inMoov for the first time. I want to take full advantage of the new Quest VR skill that can control the individual fingers of a robot.
I do have experience with building the head and shoulder servos, and a bit of experience operating it. Oh yes, and I have helped build a base for the upper body. Otherwise, I am a clean slate.
I'll be using all the EZ-Robot parts that I can. I will power it from a 5V 20A power supply as I've done in the past (with the super cap mod). I may design an external power board. I like the idea of including pins and switches.
I will be using EZ-Robot prototype high-torque servos any place a HS805BB servo is needed. I might replace some with EZ-Robot HDD servos if they can handle the job, as they are pretty torquey themselves (maybe the neck).
1. I have a head printed already, should I continue going from the head down to the stomach?
2. Should I print the legs or is it a waste of time at this point since they aren't functional yet.
3. Am I ok using PLA, or should I really get into the PETG game? Or PLA+?
4. I read that 30% infill should be used, is this right or should I go thicker/thinner in some places?
5. Should I use 2 shells when printing or is 3 or 4 better?
6. What are good methods for propping up the inMoov during the process.
7. What type of lubricant is best for the worm gears? White lithium grease?
8. What are some of the biggest challenges I'll face? Are the hands quite difficult?
9. Do you recommend a particular Youtuber or inMoov build page?
Thanks in advance for any advice you can give!

I'm enjoying the discussion on the hands because that's my biggest worry and the crux of why I'm building a full-scale humanoid.
In terms of 3D design, I've tapped out on what I can do with TInkerCAD so I am graduating over to using higher-level software.
FreeCAD, Meshmixer, and Blender are what I've been dabbling with so far, due to them being free, but I haven't committed to any one 3D-design software yet.
The bonus of FreeCAD is that it is installed with KiCAD to do the 3D ECAD models (3D circuit board view), so because I've started to invest time into KiCAD it's a bit of a no-brainer that I should learn more about FreeCAD.
The bonus of Blender is that it's very popular, cosplayers are using it, animators are using it, sculptors are using it, and support is easy to find.
At this point, I'm ready to invest more time into FreeCAD and Blender. I will likely adopt one of them as my goto 3D design software.
I did download Fusion360 but I didn't feel motivated to go too far with it because of Autodesk's restrictions on files and commercial use.
I've also dabbled with OnShape but didn't like the idea of having to have all my designs made public, especially as a beginner, so I stopped learning how to use it.
Here's a really great video about this whole 3D design software dilemma from a maker's perspective by Maker's Muse:
hi jeremie
i notest that the wrist servo gear ratio is not very good . the hand doesn turn 180 aldo the servo does . is there a another servo for this ?
higher gear if you use the wrist block .
gear mod.stl
hi jeremie
i have an idea . test tomorow for the gears . i just swiths them . if a big gear turns a small gear , the small gear will turn more rotatations . so am gessing the hand will also turn more and have the full 180 . there are holes in the small gear for the wires to go thru . if it works i need to find a way to make a cover for the big gear .
hi jeremie and all .
some major improments . i use the original horns that comes with the HDD servo . cause they are the strongest one . i made an inprint in the gear so you can easly , center the horn on to the gear . second i made the cover for the gear that comes outside , the body . i have made two gears for the wires ( rope ) go's thru . one hole for all wires , or 5 holes for each wire ( rope ) . few test prints to go .almost done . here some pics . cover for gear and inprint horn .
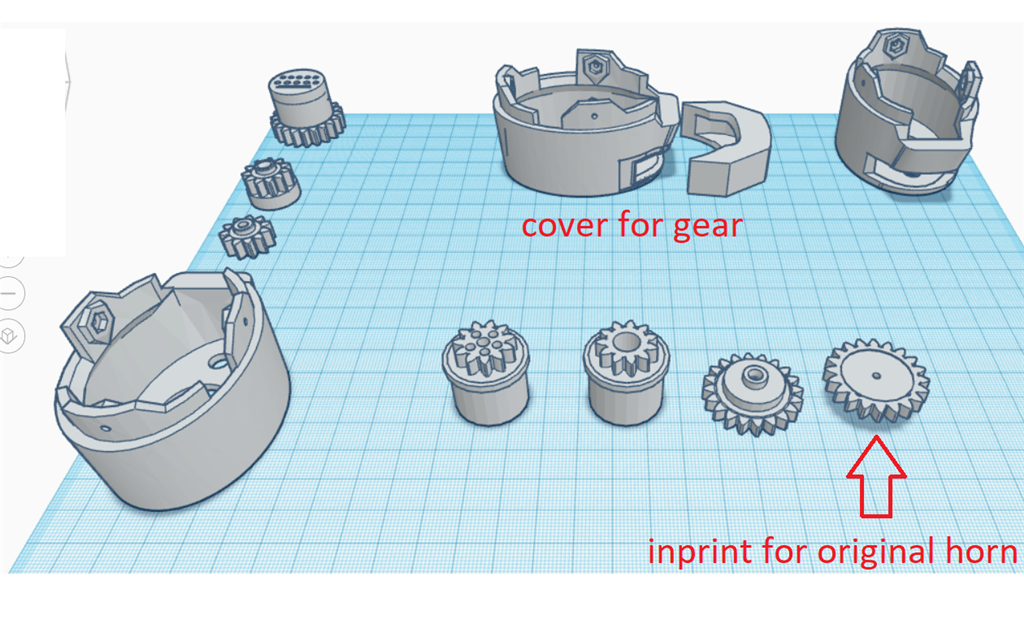
original horn can be seen .remember the line is a little curved . this hand is original . the curve is on the outside .
her's how it looks the gear outside .
i cant wait to test this .to see how far the hand will turn . earlier it has some 100 degree freedom . i hope for 180 . any idea's are always welcome . when all is bin tested i will post a zip folder here .
EUREKA.
the hand turns almost 360 with a servo from 1 to 180 HDD .
https://www.youtube.com/shorts/zcX-uIxoHD0
@Nomad, Nice work!
hey dave
thanks . i was surprized that it was possible .
Wow that really looks great nice work!!!