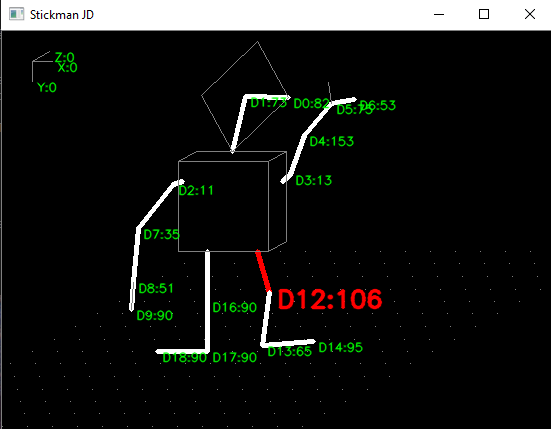
Say hi to Stickman JD (In version 1.1 I added an x,y,z axis and a floor grid so you can view the Stickman from different angles)
He is a 3d stickman of the JD Humanoid robot. You can control your real JD by dragging his joints with the mouse. When you move your real JD Humanoid Stickman JD will copy his movement as well. When JD tells you his battery is low and needs to be turned off and recharged, you can connect Stickman JD to the EZ-B emulator to continue programming your scripts or working on creating new poses.
Since stickman JD does not live in the real world, and does not obey the laws of physics, it is like operating JD when you hold him in the air. For example if you do a bow action from the ARC Auto Position control Stickman JD will move his legs up instead of moving his body forward to bow. In version 1.1 I added an x, y and z axis so you can rotate him. You can also move the floor grid up or down. So when bowing you could adjust the view so his feet are on the ground.
To install and run Stickman JD:
Download and unzip the StickmanJD.zip file. It contains a c++ program: StickmanJD.exe, the visual c runtime library: vcruntime140_1.dll, and the open computer vision library: opencv_world420.dll. As a side note I planned to create a behavior control, but I don’t think opencv runs nicely with ARC as a plugin. I also need to see more code examples to determine how best to create the control. I will post a question in the forum and perhaps it will be a project for another day.
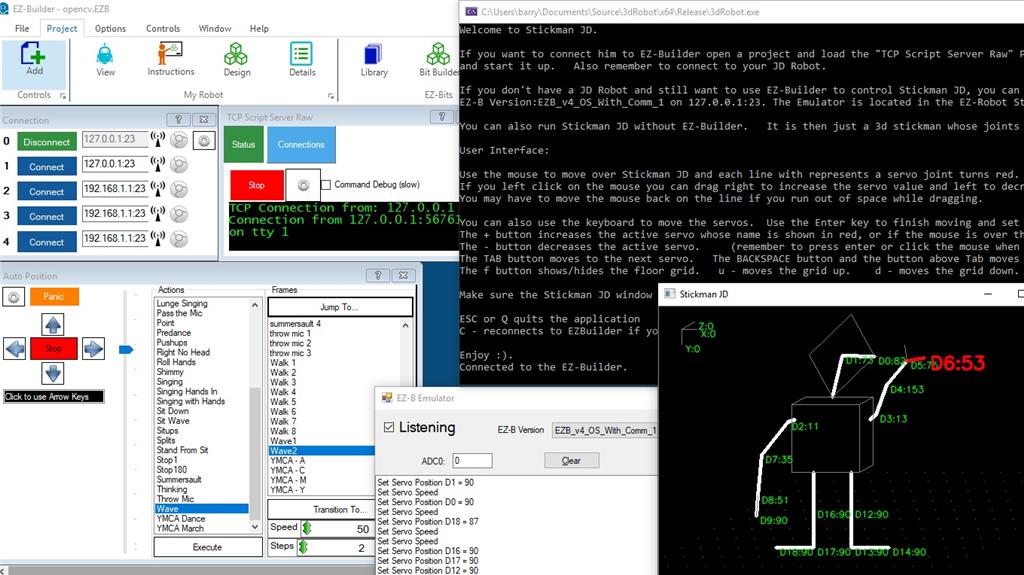
Open an ARC JD project and connect to JD Humanoid or run the EZ-B Emulator (from the ARC program folder) and select EZB_v4_OS_With_Comm_1 and click on the listening checkbox.
Add the TCP Script Server Raw control to the project and click on Start
Go to the folder where you unzipped StickmanJD.exe and run it. It may take 20 seconds or so to load up. It will open up a console window which includes instructions on how to operate Stickman JD and second window with your Stickman JD.
If the program does not run, you may also need to install the Visual C++ Redistributable for Visual Studio 2015. https://www.microsoft.com/en-us/download/details.aspx?id=48145 required: vc_redist.x64.exe optional: vc_redist.x86.exe
If you don’t have two monitors just resize the ARC window so you can use ARC and have the Stickman JD window visible at the same time. You can then watch Stickman JD move as you use ARC or use the stickman to move your real JD.
Use the mouse by moving over the Stickman joints. When on top of a line, the joint will turn red, and you can click on the mouse and drag right to increase or left to decrease the servo and move the joint. When you release the mouse button it will send the servo value to ARC and move the real JD.
Or use the keyboard TAB key to tab through the servos and the + and - keys to adjust the servo values and move the joints. Press enter or click the mouse to send the servo value to ARC. Just make sure the Stickman JD window is clicked on as has the focus when using the keyboard.
Press F to show or remove the floor grid. U will move the floor up. D will move the floor down.
Press C to reconnect Stickman JD to the TCP Script server, your JD Humanoid, or when switching over to EZ-B emulator.
To exit Stickman JD use ESC or Q.
Well that’s all for now. I hope you enjoy playing with Stickman JD. Please leave a comment below to let me know how you make out.
Other robots from Synthiam community

Goldenbot's Stickman JD Robot V1.1

Lsradets's EZ-Inmoov Robot Head


Very cool. First time I have actually wanted a JD (I prefer wheels and treads on my robots).
Alan
Well done. I envisioned something similar using webgl, javascript and a browser, but no time ! I tried and it works!
Ptp thanks for being the first to try it out and confirming the install instructions. Hopefully it will encourage others to give it a whirl. Next I might work on adding a second window with an x, y, and z axis so you can change his orientation in the world. I might also look at using the AForge library instead of OpenCV, to bring it one step closer to making it an ARC control.
I tried in another machine and Visual C++ Redistributable for Visual Studio 2015 is required.
Download: https://www.microsoft.com/en-us/download/details.aspx?id=48145 required: vc_redist.x64.exe optional: vc_redist.x86.exe
Hi Ptp thanks again. I updated the instructions in the main post above to mention installing the Visual C++ redistributable if not already installed.
I guess gone are the good old days when you could just compile a standalone program and run it on any windows computer.
Good job!! Supercool implementation of live control!!