Resurrection - Another Full Sized Lost In Space B9 Robot coming to life

Dave Schulpius

USA
robot video thumbnail

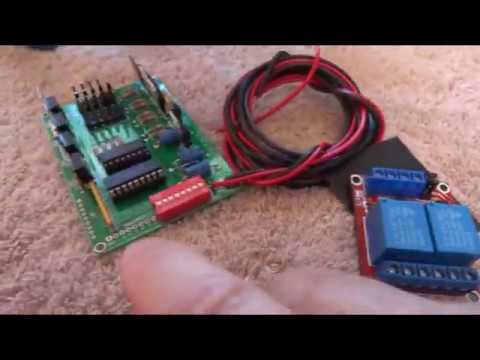
There is no control yet in this robot. However with the upgrades I'm planning for this robot, Synthiam ARC and the EZB are going to be center stage.

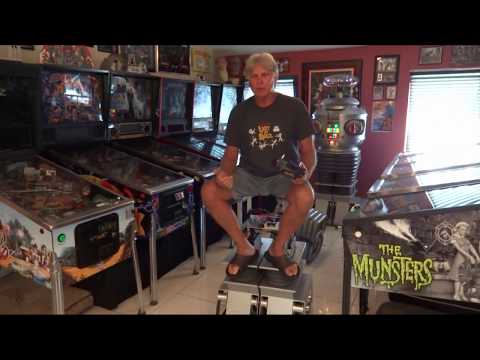
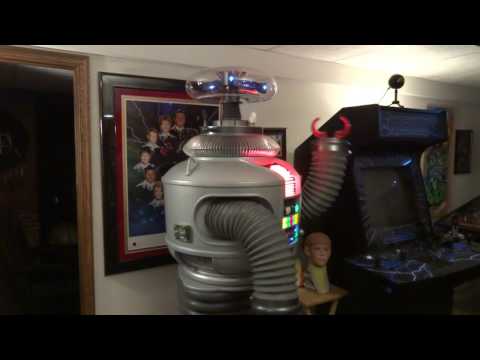
I was asked by a fellow Lost In Space and B9 Robot fan to help him rebuild his B9 Robot. He bought it a few years ago and was a bit overwhelmed in getting this poor old robot put together and working. I agreed to try to help and give it a try. I couldn't bring myself to see an old B9 Robot left to exist in boxes and never see the light of day again.

Hopefully this is the first of many videos documenting my journey rebuilding an old friend and a hero of my childhood.

Hopefully in a few months I can have him blinking, flashing and rattling off sound clips. Please enjoy this first of many video to come  where I first see what I have to work with as I unpack and discover. LOL.

By — Last update

ARC Pro

Upgrade to ARC Pro

Get access to the latest features and updates before they're released. You'll have everything that's needed to unleash your robot's potential!

PRO
Synthiam
#1  

Thanks for the detailed walk-through. This is the first time i've seen the components of a B9 robot. It's wild to see each component separately and see inside. You sure have work cut out for you!

#2  

Thanks DJ. Ya, it's going to be a lot of work but when he starts moving around thanks to your programing of ARC it will be all worth it.

United Kingdom
#3  

Wow Dave, you certainly have your work cut out there!!

PRO
Belgium
#4  

awesome.now you need your own stamp MADE BY DAVE SCHULPIUS.HAPPY BUILDING.

PRO
Canada
#5  

Awesome, thanks for sharing Dave! Looking forward to the next video. It reminds me of growing up, my Dad built a kit plane in our garage, working on one section at a time.

#6  

LOL! Thanks guys.

I unpacked for real today and filmed the whole thing. I'll post it after I splice it all together.

In the meantime.......

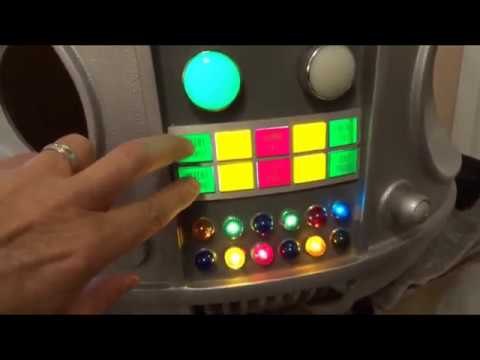
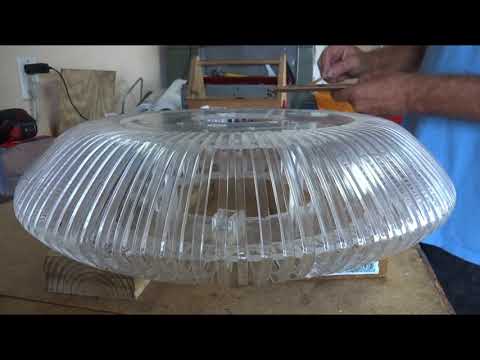
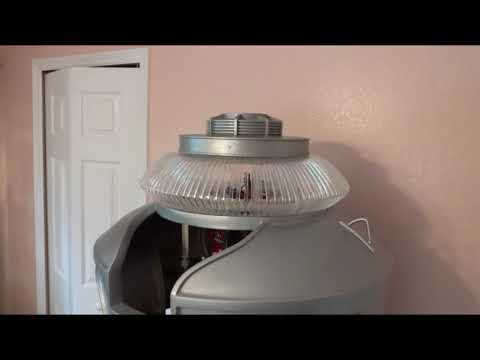
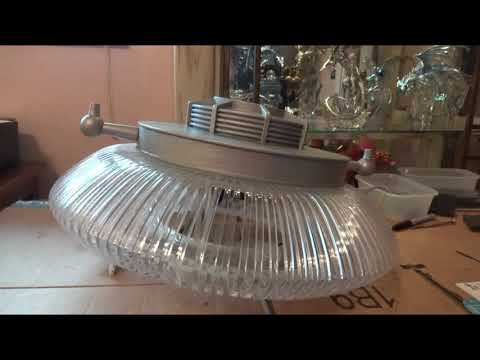
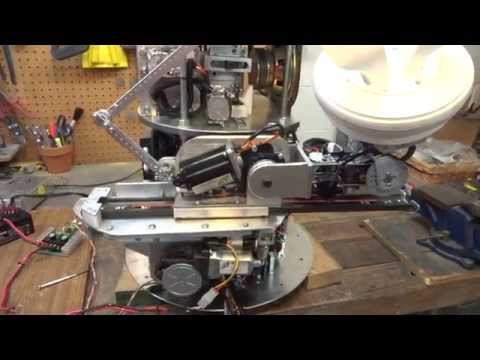
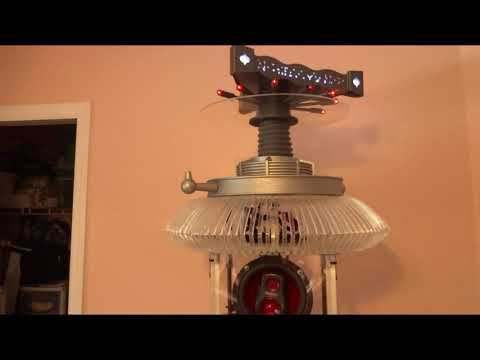
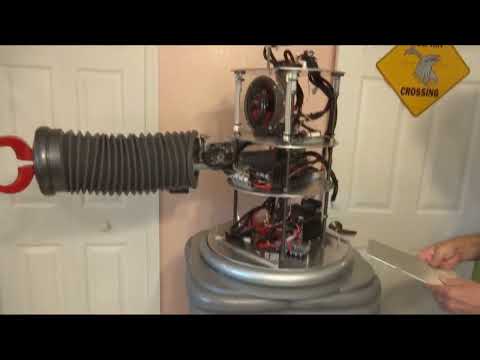
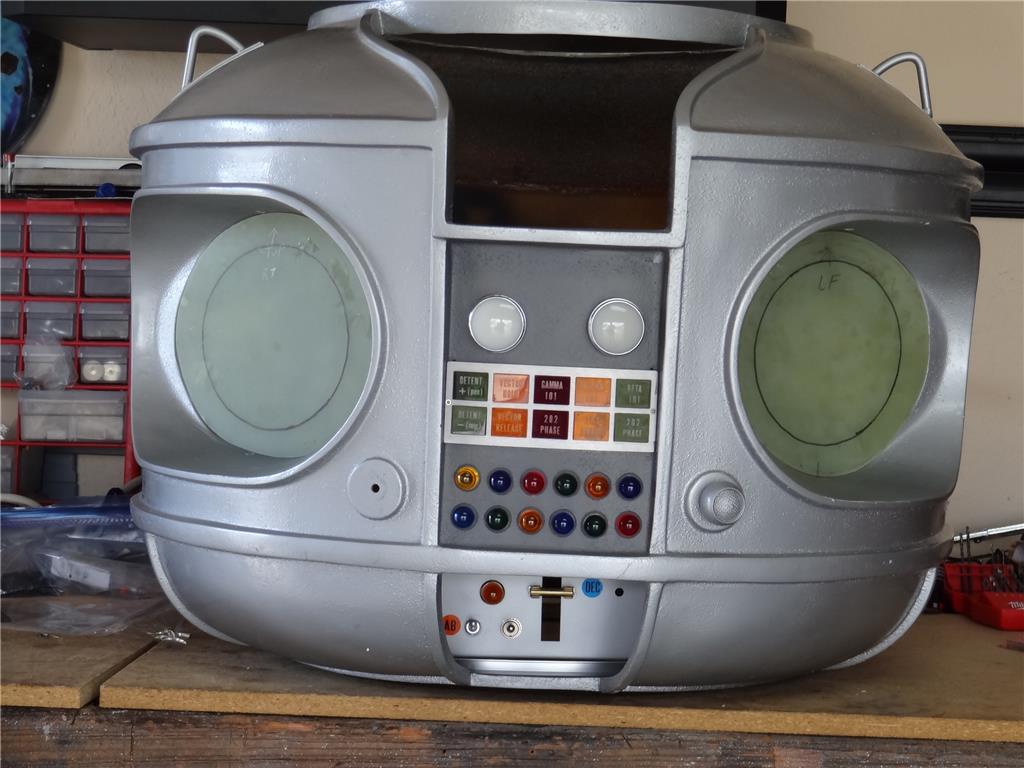
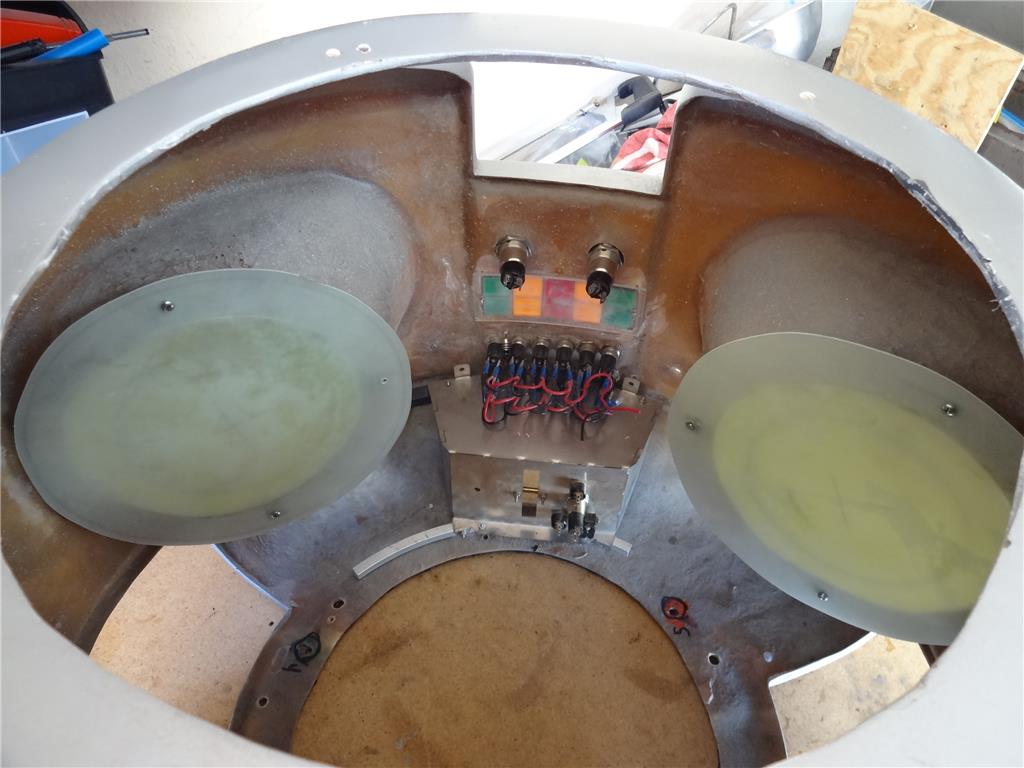
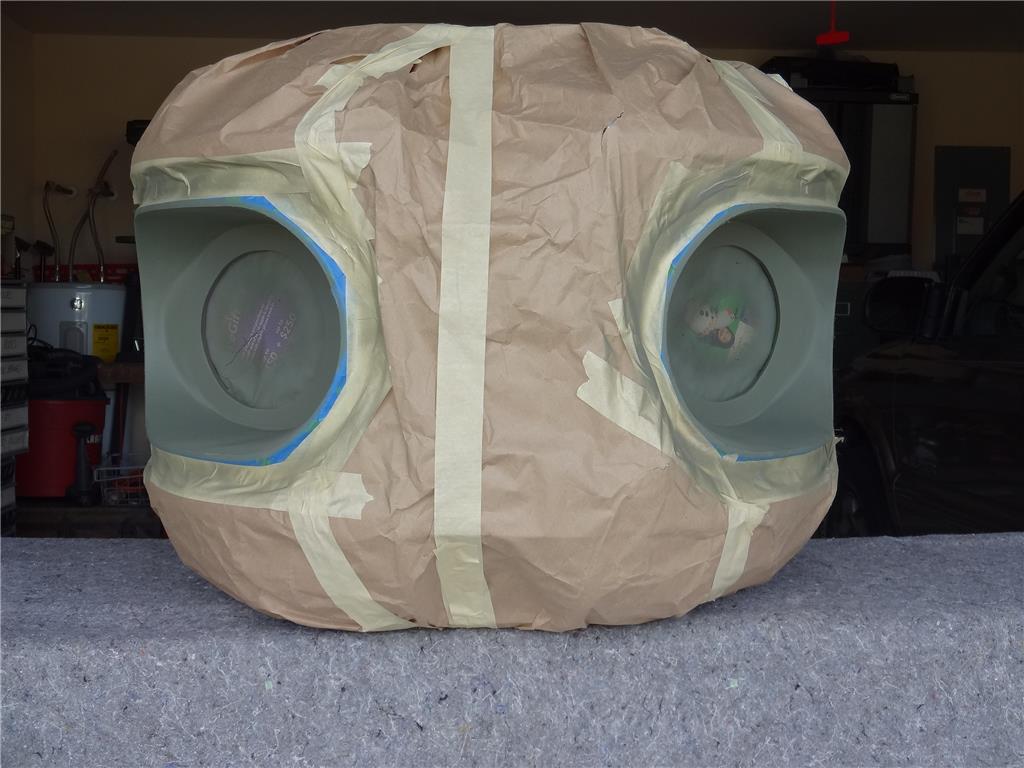
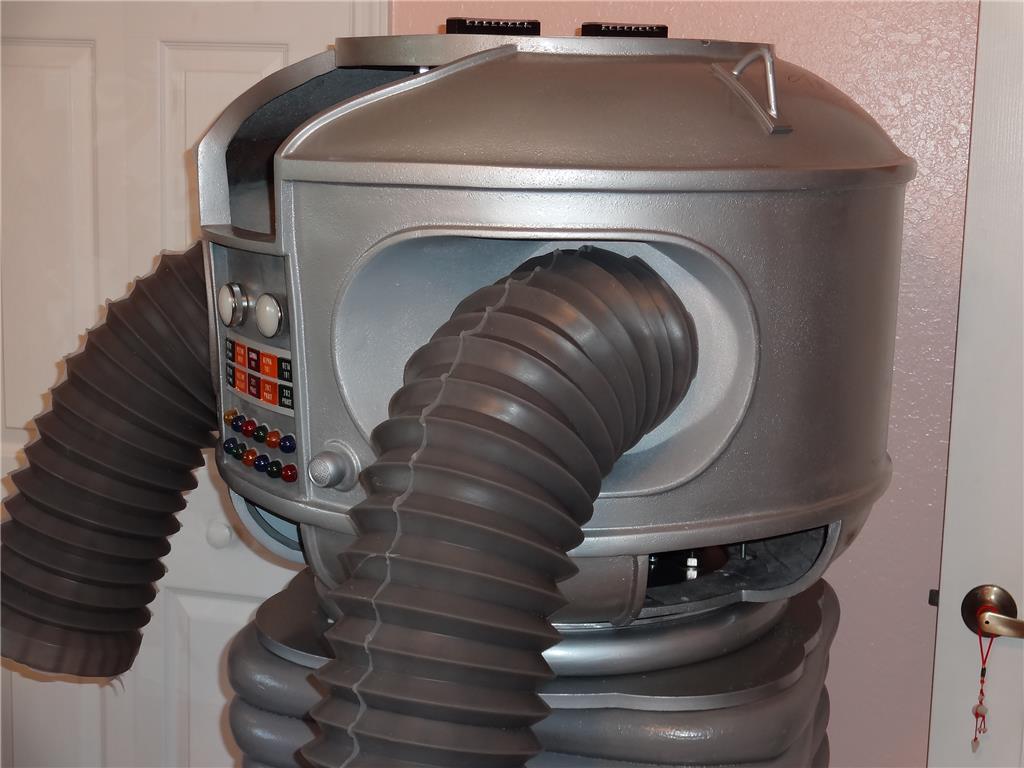
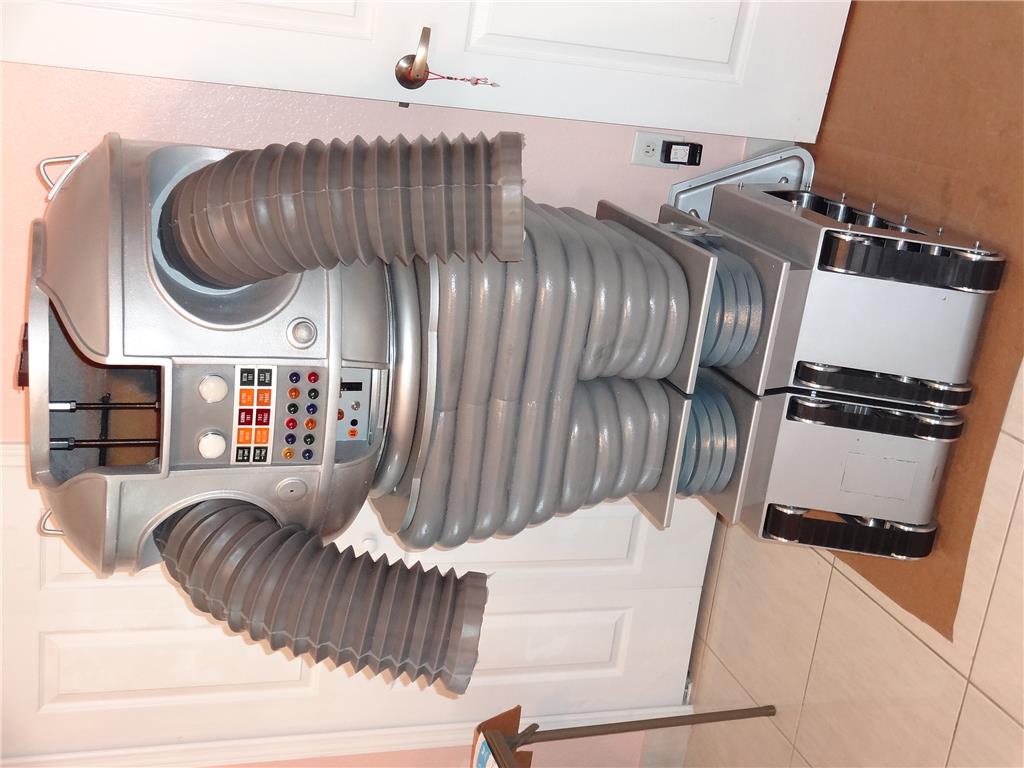
There is no bottom plate for the bubble. If a new bubble bottom plate can be bought then a whole new bubble set needs to be bought. Hopefully the bottom plate is available. #The brain pan and brain cup will look OK from a distance if they receive some TLC. However they are made of wood and plastic and are not sturdy at all. The finger light rods are in good shape and wired for light. The may be able to be reused. At this point the finger light rods are not motorized. Using the current brain pan and cup, there is no way to do so. To animate the rods a new Brain Pan and Brain Cup would need to be bought along with a motor. cam, push rods. Also a controller system designed to turn it on and off. #Lights in the brain are a tangled mess and need to be replaced with Tom W's light board. It will then need to be installed and wired. #There is no light control system throughout the robot. Tom W's light controller needs to be bought and installed and wired up. #The Radar is now static. The Radar may be able to turn if a animation kit was available and installed. Also a control system with feedback sensors would have to be designed and built to control the turning of the radar. #The bubble is static. There is no way to make the bubble rise and fall using this radar. A new radar would have to be made and a bubble lifter designed and built. Also a control system designed to control it.
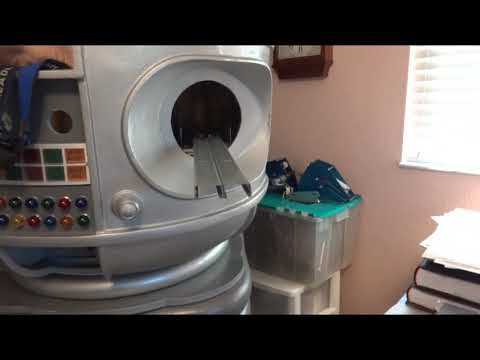
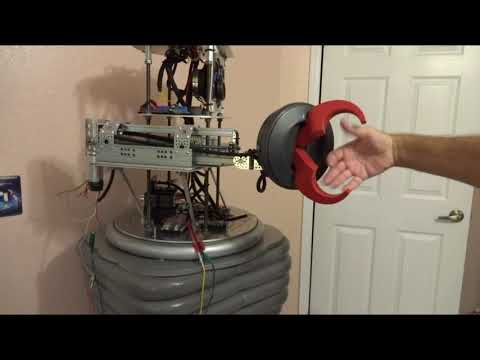
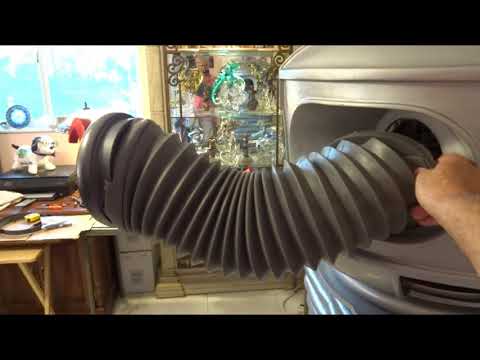
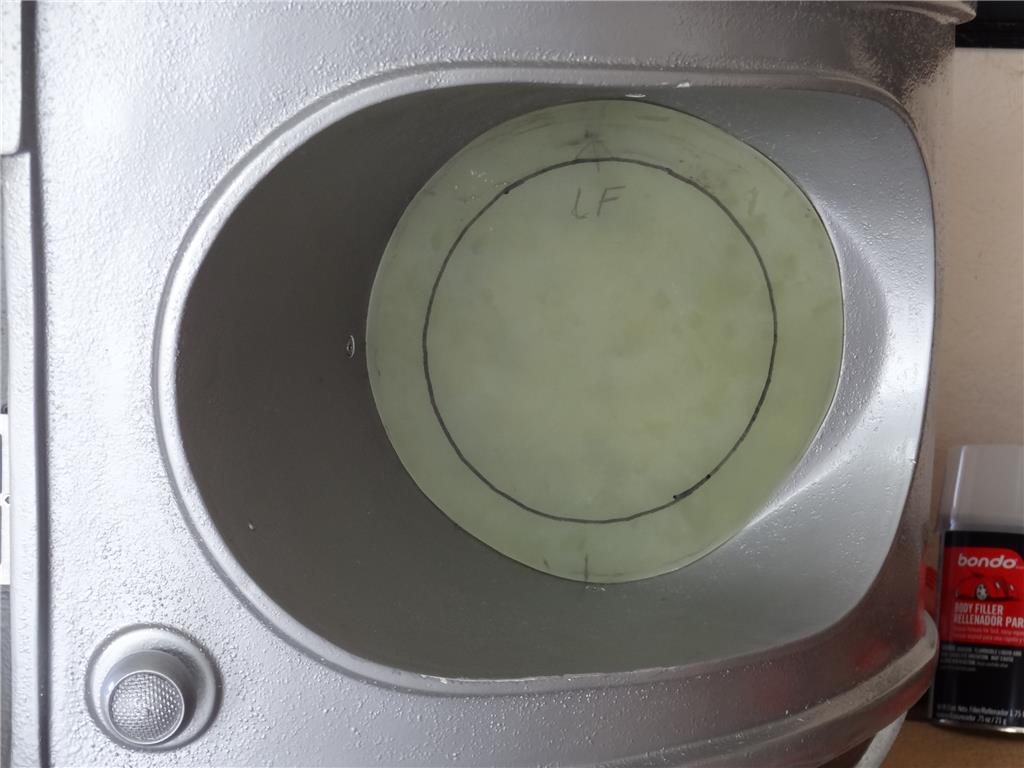
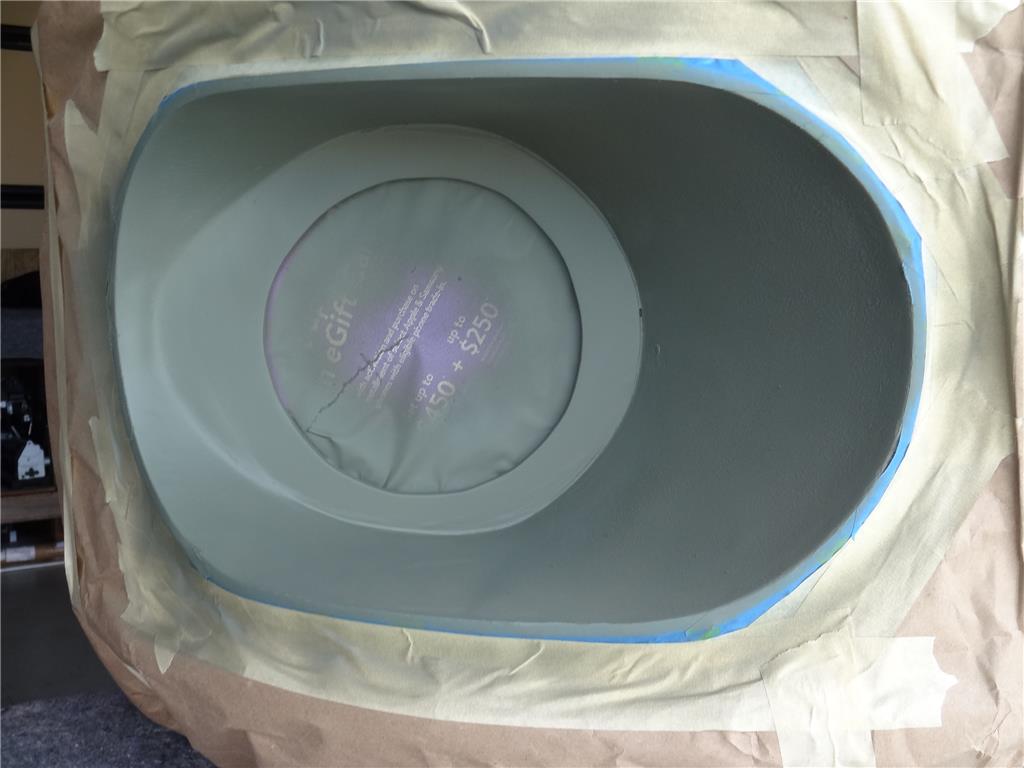
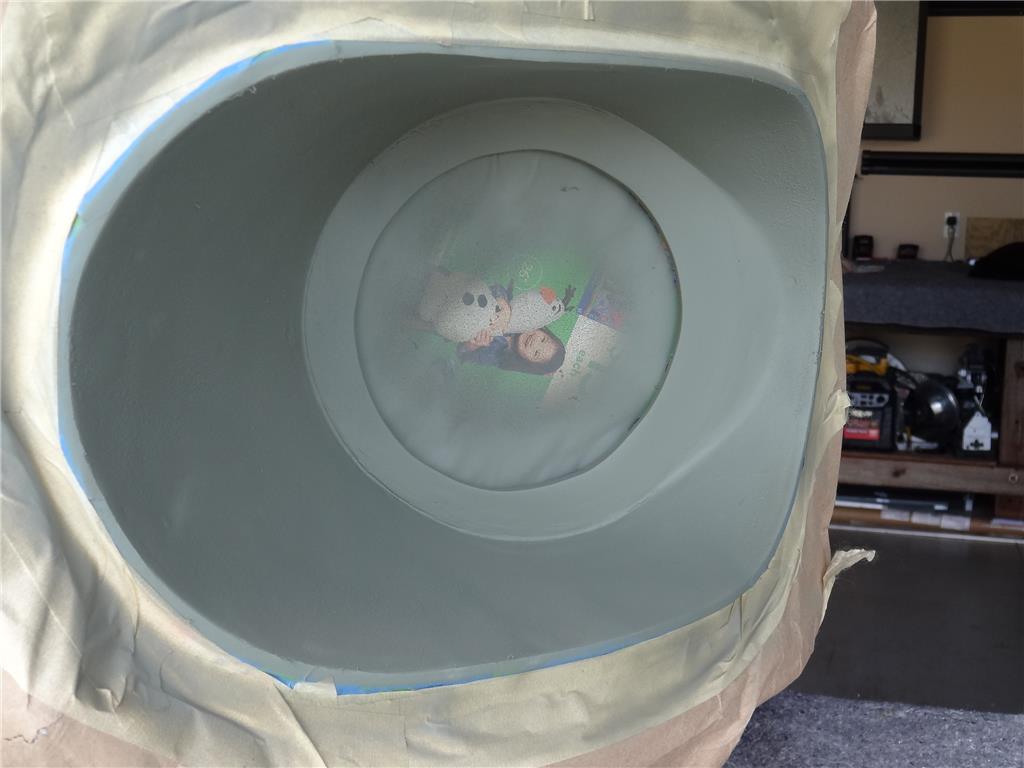
#There are no Sensor Dishes that sit on top of the ear motors. New ones need to be bought. #The ear motors need to be tested yet. They are wired for power but again there is no control system to turn them on and off. #The neon is broken. A new nwe one needs to be bought and installed along with a new backing plate. #A sound system needs to be designed and built that will flash the neon to a sound file. It could be simple with two speaker two a small mono amps, one running a voice loop and the other running the mechanical sounds. Everything for the sound system except one amp needs to be bought. #The motors in the treadection need to be tested yet. If they are good then a power system (batteries and wiring), control system and charging system needs to be designed, bought and installed. Probably RC would be the best way to go here for control. #Arms are structurally sound but need to have new servios bought and mounted to make them slid in and out. The currently will only operate if you pull them in and out manually. Looks like someone tried to make them work at one time but had a failed design. Also a control system needs to be designed and installed to make them work. Maybe RC? #The bellowed arm skins are old and stiff. Will not allow for free movement of the arms. It takes a lot of effort to expand them. I'm afraid that soon they will start to split and crack. Will Hoff has new silicone rubber parts run going on now. Hopefully I can get a set.  #There are no motors, gears, feedback sensors or control system to make the waist turn back and forth. These would have to be bought if animation is wanted. There is a Lazy Susan in place now but someone needs to manually turn the robot.

The above is a list to get this robot to the level of what I would accept if I owned it. Some is not really necessary and some is needed just to get him functional. Just to get him functional will cost a ton of money. What the true owner wants is up to him and his budget. We'll see.

#7   — Edited

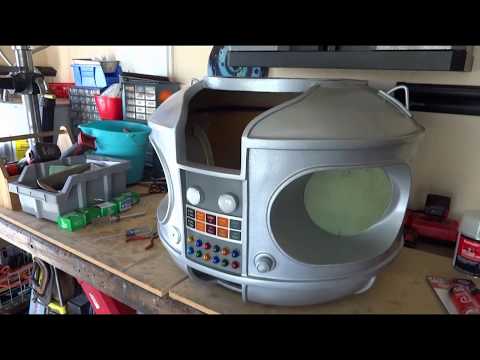
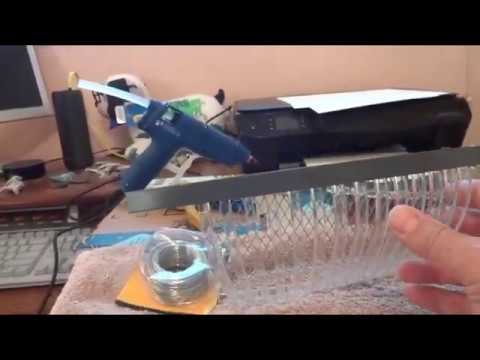
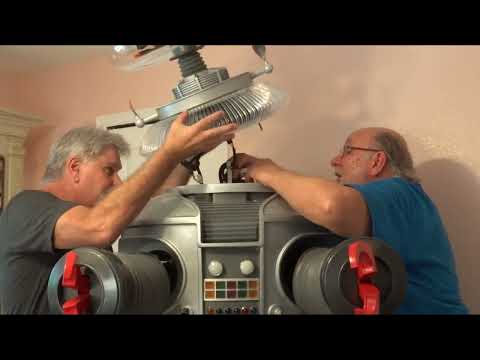
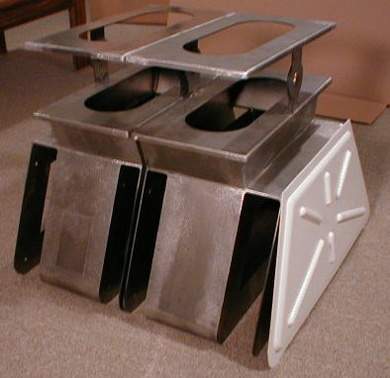
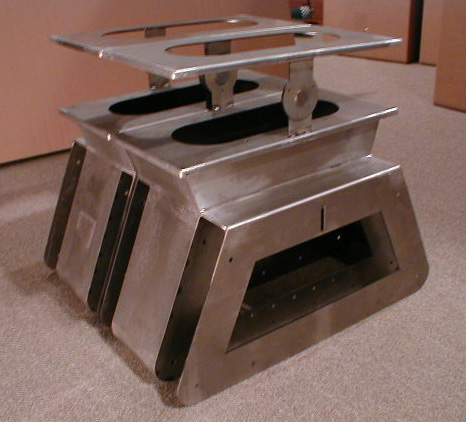
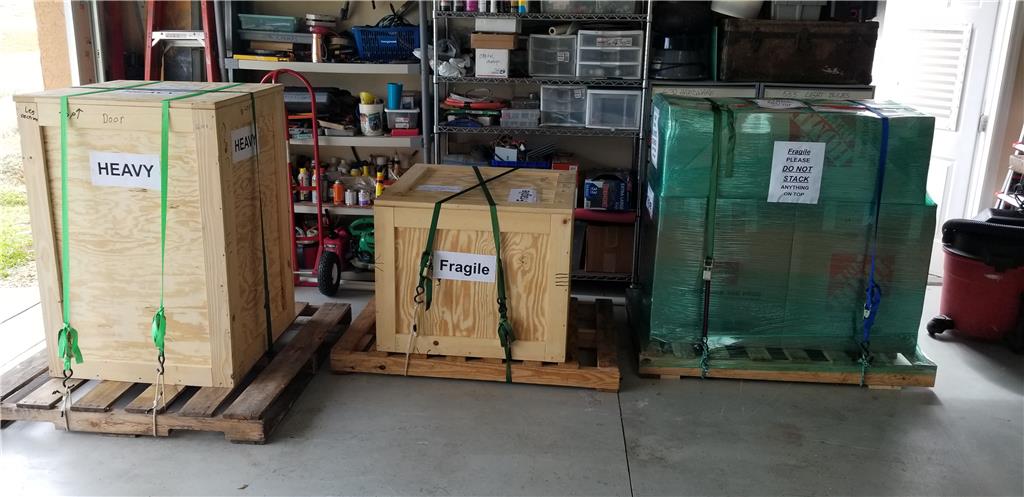
OK, Here I'm Getting a closer look at the Lost in space Robot retrofit shipment I received. I'm unpacking and taking a close look at the robot parts I have here.

Edit: I had to reload the Youtube link so it would work. Sorry.

PRO
Belgium
#9  

i always wondered from what machien is the torso made or come from?

#10  

Hi Nomad, Thanks for the comments.

As far as what the torso is made from; the original was Fiberglass made from a mold. The ones the builders use today are also mostly made from fiberglass and molds. There are two vendors that supply torso's now here in the USA. I think there is also one in Australia. One US vendor has a mold that was taken from the original Hero robot and the other US vendor's mold was taken from the stunt robot of the old TV show. Of course there a lot of builders that hand build these torsos themselves. These are always very cool to see and watch being built step by step. Some are wood, some are fiberglass and others are even styrene plastic. I saw one once made out of a outdoor Weber grill. LOL

PRO
Belgium
#11  

hi dave thanks for the explanation.silly me i though it came from a machien orso.haha its a great design.

PRO
Synthiam
#12  

That’s quite the number of custom parts available by third parties. I’m surprised at the size of the market for these robots. Are there complete kits as well? Or just parts that people piece together?

#14   — Edited

I hope this is not seen as spam but since DJ asked here I go.... I'm actually quite involved with the running and control of The B9 Robot Builders Club along with a couple other guys. I'm not the head guy but I do have input with what is happening. One of the things I do is I actually manage and take care of our club website that Nomad pointed to. There's a lot of information on building a B9 Robot there and also has a section that allows club approved vendors to sell highly accurate B9 Robot parts. I know there a few regular people here on this forum that are members of our club. Here's the proper web address. You probably need to copy and paste it into your web browser because for some reason this forum won't let links like this work:

http://www.b9robotbuildersclub.com/index.html

To answer DJ's question; There are no kits that will let people build the entire robot. Legendary Entertainment who owns the rights to most things Lost In Space will not grant us license or give The B9 Robot Builders Club permission to sell kits to build a full sized robot. However they do allow our vendors to reproduce parts for hobbyist to build their own robots. They watch us quite closely and actually have in the past asked us to shut down a few vendors that infringe to closely on the Robot's personality. There are a few of our clubs supported vendors that offer kits for some of the sub components of this robot. Kits like the Radar section, Power Pack and Claws. I'm actually one of these vendors and sell the steel treadsection that the robot sits on. I have them manufactured by a shop up in Minnesota and sell this treadsection to people wanting to build one. I sell these with accessories that include the decorative side panels, electrical outlet, upper knee plates and hinge pins. So I guess you could call this a kit. They are quite large, heavy and expensive. Over the past couple years I've sold about 20 sets. Even with the price being quite high I still sell these to builders all over the world quite regularly. It amazes me and after each sale I think it's going to be my last but the orders keep coming. There are a lot of people out there wanting to recapture some of the magic of their youth and make a childhood dream come true.

Thanks for asking!

Here's a picture of the treadsection I offer for sale:

User-inserted image

User-inserted image

PRO
Synthiam
#15  

That’s not spam at all. Very informative :). This is what synthiam is about! I’m pretty happy to hear there’s such a following behind that robot. It’s even more impressive to see what you’re able to do with programming it. I’m in Beijing right now and spent some time with a pepper robot earlier today. I can’t explain how unimpressed I am with it when comparing to what you’ve all been able to achieve - without prior programming experience. Keep it up - looking forward to seeing more updates on this since it’s a build from practically zero!

#16   — Edited

Thanks for the kind words DJ. I'm very humbled by what you just said. Truefully, you made this happen for me with your vision and hard work developing and marketing ARC and the Version 4 EZB. I still can't program in any kind of computer language. LOL. With ARC I never have to learn!

Have a safe, productive trip and journey home.

#17  

OMG...that looks like a years project of fun ahead!!! :D

#18  

LOL @Mickey666Maus. I truly hope it doesn't take years or even a year. I want to get back to work on my own Lost IN Space B9 robot. I still don't the arms on my B9 working yet after my move don't to Florida late last year.

#19  

Looking forward to see you getting that poor thing to life!! :)

#20   — Edited

Hi everyone, About 4 months ago I unboxed a poor Lost In Space Robot that a fan had sent me to try to get rebuilt. I'm happy to say that I've been having a blast getting him up and running.

So far I've basically rebuilt the leg section and wired it to operate on either external power or battery power. This is selectable using a three position switch on the back of the tread unit that operates relays to choose the power feed. Also the movement of robot is through wheelchair motors controlled with Radio Controll (RC)  through a 2x32 Sabertooth motor controller.

Bellow is that's a follow up to my last video where I unbox this poor guy and show what I had ahead of me to bring him back to life. Here's the first look at the progress I've made over the past 4 months on rebuilding a Lost In Space Robot in much need of attention and love. I've literally started from the ground up. Here I show my rebuild of the leg section from the treads up the the waist. Please enjoy this video as I give you a tour and show off a little as I take a ride a top a real B9 Robot.

FYI, in addition to RC control I plan on ARC and a couple EZB's to control other functions like light control, Voice clips and a few motor animations. Stay Tuned!

PRO
Belgium
#21  

nice long video.and a sweet dog.:)

#22  

Dave, this is really awesome!  Thanks for showcasing the restore, I love getting to see the parts and how it goes together and what parts you are using.  How can I learn more about same wiring setup you use there with the AC, Battery or Battery Charge option, that sounds ideal!

#23   — Edited

Thanks for the kind words Justin. Ya, this is really a fun project and I'm learning a lot.

The multi power source is a really cool concept and it really works. You need to watch how much amperage you will be pulling through the circuits and size your relays, connections and wire according. The magic of switching between the different sources lays in energizing the relays through a three way switch. The relays are interconnected and react to each other. They are common 40 amp SPDT auto relays. I'll try to attach a PDF file with the schismatic with part numbers and wire sizes and colors. Keep in mind I'm controlling two wheelchair motors through this curcuit that pulls about 25 amps each in addition to a couple other smaller DC motors and servos and lights. My friend Bob Ross really did a great job on this. He's posted it on a couple forums so I'm sure he wont mind me sharing it here.  B9 Power Distribution_B Ross.pdf

United Kingdom
#24  

As usual Dave, great video and restore, I really do have to admire your patience.

Didn't realize how many pin ball machines you actually had!! :)

#25  

Thanks cem. I appreciate your comments.

Ya I have a few pinball tables. They are another interest of mine. I love to fix, repair and restore them. Probably more them playing them. Sadly when I moved down to Florida last year I had to sell 5 of my babies.

PRO
USA
#26  

Great stuff, keep on Keeping on my friend

Angelo

#27  

Hi Gang, Here's the third installment of this rebuild of a B9 Lost IN Space robot. A fellow Lost In Space fan sent me this robot to assemble and animate because I have some experience in this stuff. In this video I've completed the B9's waist turning mech and have computerized it with the aid of ARC and am EZB. I've also built a basic EZB mobile app that I can control the waist with my cell phone! Enjoy!

PRO
USA
#28  

B9 Lost IN Space robot - great stuff - can't wait for 2020, only a few days, to see what is next, be well

#30  

This is another video of the B9 Robot that I'm rebuilding for a fellow fan. I've been making videos of my progress since I received it about 7 months ago. If your interested you can check them out on my Youtube page from the link below. In this video I've added a second power supply and the supporting electrical. This was needed to make the electrical system stable as to not have any power brown outs, lights dimming or electronic issues. I'll be splitting up the power load between the two supplies when it's on external power. When it's on battery power everything will be running on just the one circuit. This is selected with a switch and relays.

With this work the leg section is now complete and I can move upward into the torso.

Enjoy!

PRO
Belgium
#31  

i was thinkin yesterday,when will the next video come.and there you are. its nice to see the build up .love the video's.thanks for charing.

PRO
USA
#33  

Thanks Dave, always a great build , you are truly a "robot builder".

EzAng

#34   — Edited

x Hi Builders,

This post is not really about the electronic building of my robot but more about hands on building of the robot itself.

One of the jobs I've not been looking forward to is repairing the holes where the arms mount . This B9 Robot is from the 60's Lost In Space Tv program. The arm skins I have from (our very own Will Huff - fxrtst) just fall through the gaping holes. This torso is fiberglass and I've never really been a good fiberglass worker so I was a little worried about it. In the end I think I turned out pertty good. You be the judge. Here's a video and a few pictures:

User-inserted image

User-inserted image

User-inserted image

User-inserted image

User-inserted image User-inserted image

User-inserted image User-inserted image

User-inserted image

Sorry, Don't know why the website turned this picture.

#35  

@Dave Schulpius  I like your arm hole fix.  looks great.  Dave:  Synthiam always turns my Pictures I would hope it would display them the way they were downloaded.    What was the material you cut the new holes out of.  if it was fiberglass sheets you could cut the pieces closer to the body and put a strip of resin soaked glass cloth around the edge on the inside to make it a permanent fix.  Love your work.

PRO
Canada
#36  

@Dave and @Nallycat my iPhone always turns the pictures sideways unless I edit them (crop them a bit) and then they are fine. I have no idea why this happens but I'm guessing our programming friends know.

#37   — Edited

@Jeremie  I guess you are seeing the pictures fine on your iphone, the same with my Samsung phone,  sometimes I take the picture with the phone and post it from the phone, I don't want the hastle of editing a picture, before I post it.  Yes I agree it is a programming error, it likes pictures to be sideways not up and down.  lots of people use phones to take pictures. I have even taken pictures sideways with the  phone and synthiam will still turn it the wrong way. please talk to your programming friends.  I just thought of this have the programmers put a rotate option in he picture down load section.;)

#38  

This is another update in a series of videos showing my progress on rebuilding a B9 Robot. I was sent this robot from a collector up in the NE USA to rebuild and get functional. Here I show my progress after installing all the lights in the chest area and how they look after power is switched on. I'm using Tom Wisnionski very cool and professional light board and wiring kit.

I also show how to find out how many amps they all pull so they can be fused properly.

In addition I show a few issues I still need to overcome.

Next step will be installing the neon and interfacing it with the sound system. I'll be using Steve Neal's fantastic Neon-Voice Interface Board.

The above mentioned parts can be found on these vendor's vendor page at the B9 Robot Builders website. Go take a look when you have some extra time! B9 Robot Builders

Until then, thanks for watching this video.

PRO
Belgium
#39  

hi dave

just what i needed.a nice long relaxing video about building robot.

thanks my good lookin friend.;)

#40  

Thanks Nomad. Just for you. LOL. I'm glad you enjoyed it.

I think you need your eyes checked though is you think I'm good looking. ;-)

PRO
Belgium
#41  

am sure my eyes are fine xD.

PRO
USA
#42  

I am always amazed how you bring these robots to life, as I said, you are truly a robot builder.

Thanks for sharing

EzAng

#43  

Thanks EzAug. It's funny. The concept is really the same for little and big robots. Get enough power safely to where it's needed and turn something on. Make it move, light up or send information. LOL

#45  

Will, thanks brother. Your silicone rubber arms will be gracing this robot. They will be the highlight that brings it all together and makes him look like the real deal.

#46   — Edited

Hi builders, I just posted a short video I made of how I easily converted the Chest Dialights on this B9 Robot from the original hard to find screw in incandescent bulbs to Super Bright LED bulbs of the correct color.

As you know incandescent bulbs run hot and eat lots of current. LED's take a fraction of the power of conventional bulbs and run amazingly cool.

This is just a suggestion and required you to damage the Dialight socket. I know that is right up there with a religious sin among some of us. However you have to crack some eggs to make a cake. LOL. Enjoy!

Edit: I reshot the beginning of this video to explain more about why I needed to use 6.5vdc LED instead of 12vdc LED bulbs.

#47  

Updated Video. Please see above post for link.

If you are interested in any devices or parts in this video please see the write up below the video below the vid on YouTube here:  https://youtu.be/fsJyuHusKHI

Thanks and enjoy.

#48   — Edited

This video is a long one. Get the popcorn and enjoy!

LOL I'll be showing off Craig Reinbrecht's amazing new version of his chest button kit and how to assemble and finish it. It's a real "must have" for your full sized B9.

You can find these parts for sale on Craig's vendor page at The B9 Robot Builders Club. He may not have the Light Box or Opaque Acrylic Backer listed yet but contact him if you want to buy one of them. Here's the direct link to his page:

http://www.b9robotbuildersclub.com/pub/parts/B90032/index.html

If your link does not work cut and past this one:  http://www.b9robotbuildersclub.com/pub/parts/B90032/index.html

#49   — Edited

This is a second edited and reuploaded version of one of my recent videos of the same title. The only change is more text is added throughout the video giving important tips and explanations for a better outcome.

In this video I show how I attached the glass chest neon to an already painted back plate, wire the neon to a sound system and get it to flash in sync with voice clips I feed It. It's so exciting to see our old friend the Robot coming to life!

Parts in this video are made by: Neon: Craig Reinbrecht - http://www.b9robotbuildersclub.com/pub/parts/B90032/index.html#Neon Neon Back Plate: Dave Huber - http://www.b9robotbuildersclub.com/pub/parts/B90262/index.html Neon Voice Interface Board: Steve Neal - http://www.b9robotbuildersclub.com/pub/parts/B90658/index.html Dave Schulpius’s Breaking Out The Sound From The EZB - https://synthiam.com/Community/Tutorials/Breaking-Out-The-Sound-From-The-V4-Ezb-16292

#50  

B9 torso Repair, Power Pack Mounting and wiring up the Power Pack Pull Animation

In my latest video I cover a few interesting repairs and upgrades I'm doing to this LIS B9 Robot I'm retrofitting.

I show: *How I repair holes in the B9 torso someone drilled way to big to mount the Power Pack. *How I decided to mount the Power Pack so it can be removed by hand and replaced like was shown on the 1960"s TV show. *How I make it possible using ARC and an EZB to have a working animation of the famous Power Pack pull that deactivates the robot. I show what components I use and how to wire it up . Towards the end of the video I give a working demonstration of this animation.
Enjoy!!

#51  

@Dave Schulpius  Hi Dave I have been following you videos of the B9 build, and I enjoy watching them very much.  The power pack video is very entertaining.  and your idea for using lipstick to locate holes was a great idea.  it will be interesting to see the completed animation  with the robot drooping when the power pack is removed.  Thanks

#52  

@nallycat, thanks for the nice words. I'm enjoying making these. They are mostly for my Lost in Space B9 Builders group but I thought I'd share here also. I'm glad you are enjoying them.

My personal B9 does slump over. However this one that I'm retrofitting and upgrading for a friend up in NH has a solid hip section. He will not be able to bend over. He will however be able to move his waist back and forth.

PRO
USA
#53  

True robot builder at it again, all the best

EzAng

#54  

Thanks EzAng. I'm glad you enjoyed it. Have fun!!!!!!

PRO
Synthiam
#55  

We gotta get you scheduling a live hack so we can join and watch you build this stuff. Thought of doing that?

#56  

Thanks for wanting an appearance from me. I'm honored. I'll give it some thought and see if I can find a section of this build that will be good for a live hack event.

PRO
USA
#57  

Dave, question on your Sabertooth setup.  The boards you use for controlling the waist, do you have it set for Simplified Serial?  Can you provide a picture of the DIP Switch settings for both the Sabertooth and Kangaroo boards?

#58   — Edited

Hi Dave! Yes, I'm using Simple Serial to send control commands. You need to set Dip Switch "1" on the Kangaroo to "On" to accept digital serial command. Here's a Pic of the manual: User-inserted image

The other Dips on the Kangaroo depend on your setup:

User-inserted image

With a Kangaroo attached your Sabertooth's dips need to be set like this. Dip "1" and "2" are Off and "3,4,5,6" are ON:

User-inserted image

If I can help more just let me know.

#59   — Edited

More progress on this B9 Robot from Lost In Space that I'm rebuilding for a friend up in NH. Things are getting fun and the robot is starting to come alive!

Here's how I use EZ Robot's EZB, Synthiam's Computer control Software ARC (formally ARC), relays and a micro switch to produce the famous Power Pack Pull Robot deactivation of the B9 robot from the 60's TV show Lost In Space. Follow along and have fun!

#60  

This video is my method of finishing and mounting the torso vents on this B9 Robot from the 60's TV show Lost In Space that I'm refitting for a B9 Robot fan from NH, USA. There are many ways to finish and install this part from super easy to super complicated. I try to find the middle road here by building smarter and not harder.

In the end my way worked pretty well for me and looks real good I think.
If you have any tips or methods you think are as good or better please let me know.

Here are some links to the parts I used: Torso Vents: Andre Svacha: http://www.b9robotbuildersclub.com/pub/parts/B90015/index.html Torso vent screening and Rails: Craig Reinbrecht: http://www.b9robotbuildersclub.com/pub/parts/B90032/index.html#TorsoVents Everything else can be found at your local hardware store or on Amazon.
Enjoy !

#61   — Edited

Here's more videos of the rebuild I'm doing for a fellow B9 Robot fan amd owner. In these 3 videos I show how I take the old non animated and broken collar and radar section and refit and rebuild it. I add a very nice Radar Animation Gear Kit, a motor and encoder to the radar that will enable it to rotate once I add a motor controller, power and hook it up to the EZB and ARC (Coming in the next video). Enjoy! Part 1 of 3 URL: 

Part 2 of 3 URL: 

Part 3 of 3 URL:

PRO
USA
#62   — Edited

Hi Dave, I watched your videos, another great build of the B9 -  So precise, so meticulous.

Maybe one day if you get time, I would like to see a lesson on relays, the sabretooth and the kangaroo.

I can see you are always busy, not to highjack your room, but did you get a chance to see my new metal robot? As a beginner robot builder, I am always appreciative of your critique.

Anyway, as always, I say you are truly a robot builder.

be well my friend,

EzAng

#63   — Edited

Thanks @EzAng. I appreciate your kind words. This is a labor of love so it's really a lot of fun to do. It makes it worth while knowing some people enjoy it.

I'll be setting up the Sabertooth/Kangaroo next to control the radar motor. I plan to video the process. I'll take the time to show the process from wiring to the auto tune to the control through ARC. This is the part I really enjoy.

Your metal robot is a scream! I love it. You've done a good job designing it and making it functional. I bet you're real proud (and rightly so) and feel like it's a new little friend.

Have fun!!

PRO
USA
#64  

Thanks Dave, for your comments, I am trying

Happy you said "I'll be setting up the Sabertooth/Kangaroo next to control the radar motor. I plan to video the process."

I wait for that video, thanks again

EzAng

#65  

Great work Dave, I always followed your thread...but never left a comment, since this is way out of my realm of robotics!!  What you are doing is level up!!

Good to have you around!! Keep up the good work!! :)

#66  

So cool. Have a couple of B9 Fan Friends who would love to see this....

#67  

Thanks guys for all the nice comments. It's good to know you all are enjoying this refit as much as I am.

I debating now on whether to continue to build upwards into the Bubble and brain or wire up this radar for movement and control. I may have to continue building before wiring. Being able to actually see the components  will help me plan and place the needed wiring and controllers needed. I think I'm going to try to place a lot of the controllers up in the brain and place a IoTiny up there also to control light patterns and the ear sensor motors. That way I will only need two wires going up through the Twisting radar for power.

Stay tuned!

PRO
USA
#68  

When is it time for the , as you said - "I'll be setting up the Sabertooth/Kangaroo next to control the radar motor." You  plan to video the process."

EzAng

#69   — Edited

@EzAng, I'll do my best to video and explain.

In the meantime I've already made a video of how to wire, power and autotune a setup controlled by the Sabertooth/Kangaroo. I did this a few years ago when I was building the the arm slide unit for my personal B9. I hope this helps:

PRO
USA
#70  

That was fine, amazing hookup.

I thought you were going to do a tutorial on just the Sabertooth / Kangaroo -  I guess my error,

thank EzAng

#71  

Dave that was great.  I was watching your video Robot gone wild and that was an excellent piece of engineering .  Impressive.

PRO
USA
#72  

Hi Dave, your last video was July 26, now it is August 10 2020

I feel like I am in suspense, lol

A few of us here appreciate and enjoy your work, if you get time, please create another video,

thanks,

EzAng

#73  

LOL, Thanks @ExAng! I really appreciate your very kind words and for you looking forward to seeing my work.

I actually have one Video almost ready. I'm currently just about finished with the neck, brain and bubble section on this B9 Robot. The head is controlled by EZIoTiny. I'm just waiting on a few connectors to be delivered by Mouser. After they arrive I can mount the head onto the radar and power it all up.

Hopefully by this weekend I can publish the video that shows this work.

Again, thanks for your interest. It means a lot to me and keeps me motivated.

PRO
USA
#74   — Edited

Good morning Dave,

by the way, I do see all the you machines ( I want to say pinball machines) around you, did you revive them?

any videos on those?

EzAng

#75   — Edited

@EzAng, Actually I've restored quite a few pinball machines over the years. I've done them for other people and myself. In my collection you see sometimes in my videos I only have two left that I've resorted to high end condition.

I love doing that kind of work but when I discovered I could build my childhood robotic dreams with the help if EZ-Robot and Synthiam all my extra time went into this new hobby.

#76  

Robot Rebuild Update 8/22/2020. Here's yet another video of the work I'm doing rebuilding a poor old B9 that was in need of much love. Please enjoy watching my work rebuilding (actually replacing much of) the head section. Neck, Brain and bubble. I'll show how I put it all together, it's components and wiring. You won't believe how much I can stuff into his little brain! Actually this head section is static except for the sensor ears. Without the cam and crown motor this gave a lot more room in the brain pan to mount all the needed electronic devices and wiring. Here's the YouTube video:

PRO
USA
#77   — Edited

Thanks Dave,

What can I say, beyond amazing.

I feel I have been doing small things, I feel I am a real novice after 2 years of knowing nothing.

I watched your video with 2 cups of coffee :-)

You know, between you and Will (fxrtst) - I don't know anyone else on this forum that does these things.

I know there are the InMoov robots but no one does the explanations you do.

If you can, one day list all the supplies you use, from the wire connecter to the relays you use. ( I understand if you don't have time.)

Please keep it up, I learn so many things and products I never hear of.

One thing, I might have missed it, how did you power the unit, with what?

EzAng

PRO
USA
#78  

@Dave, Impressive the build and the number of hardware components and integrations on your build.

How much in:

  1. Frame/Chassis/Enclosures
  2. Electronics

It's almost a full time job :)

Can the robot move ? Or the main purpose is to stay put and entertain ?

PRO
USA
#79  

ptp, 

Quote:

quote:  Can the robot move ? Or the main purpose is to stay put and entertain ?
Dave has built many B9 robot over the years that move, watch some of his videos.

EzAng

#80   — Edited

Thanks @EzAng for your kind words. They really mean a lot to me. I Didn't know a thing when I started building my robot. This forum and the people on it really helped. There's still a lot of talented builders hanging around. Will (fxrtst) is one of them and was one of my mentors when I first started years ago. I have always wanted to make a list of what goes into these robots but havent found the time and it's an overwhelming task. Maybe Someday when I run out of projects. LOL

@ptp, thanks your you interest. Your nice words are great to hear. I couldn't start to figure the cost of what I've put into the first B9 I built for myself. This second one was sent to me with the frame already intact. I was asked to assemble, restore and upgrade. Just for reference the torso and waist donut would cost around 1500 USD, the treadsection with wheels and treads and hardware would cost around 3000 UDS and Will Hoff's (fxrtst) 100% platinum cure silicone rubber for arms and legs would be around 2500 UDS. The clear acrylic bubble is around 500 UDS, You could build all this yourself for much less. The electronics and motors that make it all run are probably a few thousand more but the sky's the limit according to your budget and skills. My personal robot does not more. You can see him in the video I will post below. This rebuild I'm doing now is mobile and runs on wheelchair motors with RC Control. You can see it in post #20 of this thread or just below.

As far as a full time job, almost. LOL. This classic B9 robot from the 60's TV Show Lost In Space has been a complete pleasure and privilege to work on.

Thanks again you guys!

PRO
USA
#81  

Great video Dave, thanks

EzAng

#82  

Very cool ! that was fun to watch.  Keep it going ! :)

PRO
USA
#83   — Edited

Good morn Dave,  how are you?

one question:

Do you check your email? EzAng

#84  

LOL @EzAng. Yes I check and I did see your question. Sorry, I've had a busy day with priorities. I'll answer as soon as I can.

PRO
USA
#85  

ok thanks Dave

Thanks EzAng

#86   — Edited

In this video I struggle with bending Dimension Engineering's Sabertooth / Kangaroo X2 to my will. I'm using them to give this B9's radar life. Everything needs to be right to work. Seems like nothing was. Spoiler Alert - everyone lives happily ever after.

I show a lot of detail about how I wire up this section and talk about my mistakes along with how I fixed them.

LOL. Watch and enjoy!

PRO
USA
#87  

Good morn Dave,

most of this video is beyond me, I just build a simple Mr. Metal robot  :-)

The kangaroo and sabretooth part was very informative.

what can I say, another great robot video - keep it coming...

EzAng

#88  

Thanks @EzAng. I'm glad you liked the video. This stuff was beyond me also when I first started. I needed to have this level of control so I had to learn it. Thankfully I had good and talented people here on this forum willing to work with me as I learned.

Your Mr Metal is a fun project and a great way to start out. Nothing wrong with learning with a simple little guy like him. Maybe it's time to push your limits and upgrade Mr Metal? Take yourself to the next level to what ever interests you the most.

#89  

Here's the latest on the B9 Robot from Lost in Space rebuild I've been doing. This is just a sneak peek on the arem I need to rebuild. It's mostly what I have to work with and what lays ahead on this undertaking. More to follow so stay tuned!

PRO
USA
#90  

Good morning again Dave,

Let's see how you get this broken arm going, best of luck

EzAng

#91  

Thanks EzAng. It's going to be fun. I'm looking forward to this part of the build.

#92  

I'm coming down the home stretch and hope to be sending this old guy home soon.

I'm currently working on the final stage of this robot, the arms. Other then computer work and programing most everything else is finished. It's been almost 1.5 years since I received this B9 and I'm sure his owner is anxious to get him back home.

Here's the latest YouTube vids of the work I've done to this point on the arms. This is Part 2 video and is of the building of the rail system that delivers the arm out of the torso. It's a simplistic horizontal straight out system build with underdrawer mounted slides I got at Home Depot.

This is where I am to date. Please enjoy! More videos to follow of this arm build so stay tuned! I'll list the other ones below as I complete a building stage:

Part 2 - New Arm Rail system:

PRO
USA
#93  

great build Dave,

thanks,

EzAng

#94  

Thanks EzAng for watching. I'm glad yo enjoyed it.

#95  

Just completed this fine B9 Claw kit. I'm showing them powered and running! It only took me a month to paint these things. The claws are 3D printed out of carbon fiber and are strong as heck. I've never finished carbon fiber 3D printing. It was a whole new thing for me. Not as straight forward as I had thought. I took a lot of video of that process but have not edited it yet. Lots of bondo filling, sanding, glazing, priming, sanding and top coat painting.

Funny story (not really) is that after all that prep the red top coat of the claws crackled up twice. Seems I didn't wait a week to let all the undercoats of primer and bondo cure properly. After resending and prepping again I waited a full week to apply the red top coat and all went well.

Claws and centers by Robert Rossi: http://www.b9robotbuildersclub.com/pub/parts/B90694/index.html

Fiberglass light weight wrists by Craig Reinbrecht: http://www.b9robotbuildersclub.com/pub/parts/B90032/index.html

Thanks guys! What a gas!

#96  

Wow carbon fiber printing? As a muscle car guy I find this Fascinating! Some carbon Fiber race car body parts would be interesting to make!

#97  

Robo Rad, They are strong but crazy hard. Takes a lot to sand down any imperfections. Here they are in the raw:

User-inserted image

#98   — Edited

I was rereading past posts. I saw in post #89 that I mentioned I was going to reuse the claws that came with this robot. After seeing their condition I'm glad I went with the kit that just came available! It's a much better end result.

#99  

That is why race cars like carbon fiber,lighter than metal and super strong! My 86 Fiero Gt is a mix of strange factory hard plastic and Fiber glass. Would love to reproduce some parts with carbon Fiber.

#100  

Dave, The claws look awesome, I didn't know you could print carbon fiber. Movement seems very smooth also. Enjoy your updates. Steve S

PRO
USA
#101  

Always great work, my robot friend

#102  

Thanks guys! I appreciate the interest and nice words.

I know nothing about 3D printing and what can and can not be printed. All I know is it's as close to a Star Trek Replicator I've seen (quote from Will Huff. LOL).  I'm so glad people are pushing the limits of this technology. One day when it's all plug and play and I can get a great print most of the time I'll probably get into it.

#103   — Edited

I've been working on this rebuild of a neglected B9 for a while now. I'm coming down to the finish line hopefully. There seems always to be more I notice needing to be done to this poor old guy.

One of the final items I have to complete are the arms.

These arms simply move straight in and out of the torso and are tipped and crowned off by B9 Robot Builders club vendors Robert Rossi's motorized and rotation claw kits and Craig Reinbrecht's light weight weight fiberglass wrists.

I've got one arm fully built and it's parts fully tested. It slides into place through the torso's arm holes and easily bolts down into place on a shelf attached to the CSS. Once I get this one arm complete to my satisfaction I'll be able to quickly build the second one.

What is different about my design from others I've seen is that it's driven by a finely machined lead screw and powered through a 90 degree gearbox that's powered by a Planetary Gear Motor with an encoder mounted on the rear shaft. It's a little slower then I would like but will do nicely. I love the arms to snap out quickly. This could easily be changed by swopping out a faster motor.

I have one more hurtle to jump with this design. That's cable management. I'm kind of scratching my head on this one. I need to run three servo cables out to the claw to control and power them. With the carriage sliding in and out in a linear motion I need to be able to feed about 12" of cable in and out along with the claws. I was thinking maybe bungee cord to keep things tight, Springs or maybe a drag chain. Space is a huge factor. A drag chain would be ideal but I don't think I can fit it in there.

I'll attach some pictures for your approval. Enjoy. A video may come later when I get this worked out. Thanks!!

I want to thank fellow B9 Builder Steve Neal from Down Under for his help in the early concepts on this design. The insight and skill he shared was invaluable.

User-inserted image User-inserted image User-inserted image User-inserted image User-inserted image User-inserted image User-inserted image

#104  

I've made a big step on this arm build. I figured out how to manage the wiring issue. A drag chain was the answer to handle getting the wire in and out along with the claw. It's the same part used by 3D printers to handle their wires. With this solved I was able to pretty much complete the remainder of the build. After jumping a few other minor obstacles I've got my arm to the point of adding the control system. I plan to use a Sabertooth with a Kangaroo X2 to control it through ARC.

More to come on that part. In the mean time here's a video of where I am at now:

#105   — Edited

Looking great Dave sure will be fun to see it all together and moving those arms!:D Danger Wil Robinson,Danger! That will be cool to re create.

#106  

Dave, Great solution for your wiring, works perfect. Thanks for posting updates. Steve S

#107   — Edited

@Robo rad, thanks! It is fun seeing these big robots come to life. Actually I did that Danger, Danger animation with my personal robot. It was a thrill watching him do that iconic scene from the show. Here it is: 

@Steve, as always, thanks for your kind words. It's always great to hear from you. Yes, that drag chain solution was a real God send. I wasn't sure I would be able to pull it off. Luckily I was able to find a small enough chain to fit into the space and large enough to hole the three servo cables. 7mmx7mm is what I used and seems to be the smallest size available in my searching.

Amazon is the best (for me)! Just $10 USD: Black Plastic Cable Wire Carrier Drag Chain 1M Length

PRO
USA
#108   — Edited

lol, always great robot stuff Dave,

Will Robinson

watch last night the new "Lost In Space" -  very different robot

miss the one you build  :-)

ever see the real out of space videos? https://youtu.be/taoHiZFYHkA

https://youtu.be/EBIMZVRfmz4

PRO
USA
#109  

Looking great Dave! Been so busy havent had the chance to checkin and see your progress!

#110  

Yep, you sure got the voice and animation bang on authentic, that must be great at sci Fi comicon shows!:)

#111   — Edited

I reached a huge milestone today on this B9 I'm rebuilding for a fellow fan. I completed the screw driven arms and have them mounted on the robot. I have them wired and the basic programing in place through ARC to operate them. I'll do a video later on of them in action for anyone interested.

I still have to figure out what kind of main animations that will look good on this robot. The arms just go straight out but I have Robert Rossi's wrist and claw kits installed. They open and close the claws and also rotate the claws and wrists. This should add a whole new animated look to basic arms and give me more to work with.

I was getting ready to install the rubber skin I got from Will Huff (fxrtst) over the arms. However I found hopefully what will be my last nasty surprise. The two steel arm bands that came in a box of junk along with the robot are more than 2" too short. These bands wrap around the rubber arm skin to hold them in place on the wrists. I don't see how they could have ever fit any other B9's wrists. I'm going to have to get the proper steel and construct and paint a new set.

Other then that, I'm a happy camper tonight. I'm getting close to finishing this big boy. It's been almost a two year adventure. I'm sure his owner will be happy to finally get him home, in one piece and functional.

User-inserted image User-inserted image

PRO
USA
#112  

Great work Dave, the cast of Lost in Space would have been happy to meet you - time separates us all. :-)

#113  

Thanks EZAng! I'd love to see all the cast. Sadly a few of them have passed. Actually I have a chance to meet Marta Kristen (Judy) next month in Louisville KY at Wonderfest. She is going to be there all weekend with the B9 Robot Builders Club and even attend a private BBQ in the evening being held at one of the club member's home. Don't get better then that.

#114  

Dave, The arms working is a big accomplishment. I am sure you will come up with some special movements for them. That fan is very fortunate to have you available to work on that robot. That is great you can interact with the B9 Club and cast. Enjoy your BBQ, you deserve it. Steve S

#115  

Thanks Steve! I'm looking forward to seeing this project go out the door. I've got so much other stuff I want to get to. However I've completely enjoyed doing this rebuild. I'm honored the owner trusted me with his old  Bubble-headed Booby back.

As far as animations go, I'm hoping I can come up with a satisfactory combination of voice, movements and emotions. This is not one of my strong areas. It's hard to make a reproduction with restrictions look and act like an old friend and hero from childhood.

#116   — Edited

I'm finally ready to start programing the robot arm and the rest of him with ARC to bring him to life! Right now I only have basic moves scripted.

Everything is working great now but I had some issues to work out. The rubber skin droops, puckers and it bunches up when the arm goes in and out.

I show here in this video how I solve this problem. Enjoy!

PRO
USA
#117  

always great going Dave

We are definitely make servo City rich, lol

EzAng

#118  

Thanks EzAng. Ya, I've sent them a ton of money over the years. They do have an amazing assortment of building supplies that are well thought out and quality made.

#119  

Dave, You are great at working things out, to make then run smooth. Very clever fixes. Steve S

#121  

Awesome job as usual Dave! Great to see that you are still at it....

#122   — Edited

Hi Rex, old friend! Yes, still at it. Having more fun with all this then a human should have.

Are you working at all on any of your robots? Anything new?

#123  

Trying to find the time.... Working on a large bot this time...Quester 2.0

I keep turning to your videos for Inspiration! You are the Bot Master.

PRO
USA
#124   — Edited

...good fix with the rod for the arms getting stuck!!

#125  

@Rgordon, Rex, you're too kind. Questor 2.0 is a great name for a robot. Post some pics if you can. I'd love to see it.

Thanks @Fxrtst, Will. The sliding rod really turned out good and does the trick. I liked a little bit of "sag" in the arms. It had the same look that the robot had back in the show when Bill May had his arms in there and puppeting the robot. However if there is a lot of sag then the arm bunch up underneath as the arm goes in.

#126  

If you've been following this B9 Robot from Lost In Space build you know it started as a box of space junk. Two and a half years later I can finally say he's ready to go home to his owner. In this vid I'll show how he turned out and some of what he can do. Enjoy.

#127  

Wow Dave, that looks great. You really have these down. What did you use for the voice?

#128  

Wow, it came out awesome. Can imagaine the fun at any party. Great job.

#129  

Thanks my friends. I appreacheate the nice things you said. Parties are a blast with him running in the background.

Perry_S, For the robot's voice I used pre recorded sounds clips that the original actor, Dick Tufeld did years ago before he passed away. A little trivia about Dick, He also did the voice for Tony the Tiger in the Kellogg Cork Flakes commercials back in the day. As far as the clips of the different actors and robots my B9 does impressions of I recorded them from Lost In Space Blue rays, and other sound clips I had and found on the internet. I then cleaned them up and resampled them in the sound program Audacity.

United Kingdom
#130  

Truly Amazing work as always Dave!!

#132  

Dave, Amazing how you turned that into an awesome robot.  I like how there was an option for RC control for safe maneuvering. Great video and it shows your work that was accomplished. Thanks for sharing. Steve S

PRO
USA
#133  

Well, what can I say, as always, you are "the" B9 robot builder, great job!

EzAng

#134  

Thanks again guys. Steve and EzAng, your kind words mean a lot to me.

@Steve, good to hear from you my friend. Hope all is well and you and your loved ones are safe and happy.

#135  

Your Final B9 robot video was great to Watch after years of reconstruction.  Very impressive.  Great job!  Thanks for sharing your videos as you put your B9 back together.

#136   — Edited

Thanks Merne. I appreacheate the nice comment. Thanks also for hanging in there with me and keeping track of this undertaking. :)

The owner of this B9 seems impressed and excited to get him home. He also just told me he acquired another B9 robot that needs work and wants me to do the honors. I'm not so sure I really want to take on another project on this level for someone else though. I have so many thinks I want to do of my own and these big robots take up so much time. ;)

#137  

Ouch.  That would be another big commitment on your part, however, you’ve done a great job on both your B9’s I can see why he’s asking you to do another.  It seems like you need a break to work on your own projects or just may be a little relaxation.

#138  

@Merne, I totally agree. Unless this new one is a "quick fix" I don't see myself taking it on.

#139  

Hi everyone! I'm calling this project complete! It's now on the way home to Road Island, NY and a hopefully happy owner. The shipping company picked him up yesterday. This B9 robot is packed up in wooden crates and HD boxes and strapped down to three pallets. I really tried to protect this robot as much as possible. I'll attach a picture of the three waiting on a puck up from the Shipping Company.

User-inserted image

One problem I have is guiding the new owner in assembly of this rebuild. He's over 1000 miles away and the owner is somewhat non-technological. I built it to be able to easily take him apart and reassemble. Mainly three parts and then the arms. Still there are tricks and tips that make assembly quicker and easier. So I decided to make two separate videos. one to assemble, one to dis-assemble. These two vids are really only for the owner but I thought I'd make them public. Maybe someone will find them useful or entertaining. Here's the YouTube links. Have fun!:

Robot Assembly

Robot Dis-Assembly

PRO
USA
#140  

Spectacular Dave and Jeff

You are Mr. B9 robot builder :-)

EzAng

PRO
Synthiam
#143  

Wow so cool!! So that’s what keeps you so busy :D

#144  

Thanks guys!

Yes @DJ. This project has taken way too much of my time. I've neglected to many of my other passions. I'll miss the old guy but now I can get to other things that are important to me. Like reprograming and upgrading my personal B9 robot. I have so many ideas from the improvements in ARC since I last worked on him. One of my goals is to learn JavaScript and redo most of my B9 scripts. I have a lot of them.  cool

PRO
Synthiam
#145  

That's a good idea to move to javascript. let me know how i can help!

#146  

Yes @DJ. Thank you for the offer. I'm sure I'll have some questions.