

Hello All, I have been away from building everything since last year, first there was the pandemic stuff, then I was diagnosed with cancer and out of commission for 6 months. I'm getting back into the swing of things. I already did the first design for LEVi Rover, but he was never built. My Robo R1+ 3d printers both bit the dust literally on the same day, the parts for a fix were not avail from Robo anymore. Those printers were all I had at the time halting the printing of parts. My step kiddo AJ, now 7 years old started talking about how cool it would be to build a rover like on mars and control it on missions pretending it was on another planet. Sooooo, I guess he talked me into it .
.
This time around I have a larger printer and newer filament type, PETG from Overture. This material has more toughness though it is slightly less rigid than PLA. However PLA is more brittle. PETG is the same material that most plastic bottles and other clear plastic containers are made off. This is better suited for outdoor use, where this little guy might live when in use.
Discover more robots
Nallycat's Cog A Social Interactive Robot
Rgordon's Project Questor

Ok so far I have 3 of the right wheels printed with 4 shells and 25 percent infill from PETG material. I reversed the image of the STL and now the 4th wheel is printing for the left side. Each wheel is taking about 50 hours as I have the print speed significantly reduced for increased print quality. I will add some pictures after this wheel is done tonight.
Hi jstarne1, I haven't logged onto this site for a while and I did tonight soley to respond to you. You have always been that constantly going guy with the bigger projects so I was saddened to hear about your issues. A printer meltdown is a terrible thing but your health is much more important. Sounds like you are doing better though. Post some pics when you can, love to see the new work. Cheers bro
@Perry_S Hey Thank you for the message! I appreciate your support. Maybe I can be that going guy again!
I am on the 5th wheel printing right now which should finish Saturday night some time. Then the 6th wheel on Monday night. I think I will take pictures and update then.
jstarne1, Looking forward to your rover build, sounds like AJ is a great encouragement for you. Steve S
@jstarne1 Sorry to hear about you issues you had. I hope it’s in remission. Glad to see you’re back. Looking forward to your rover build and many more.
merne
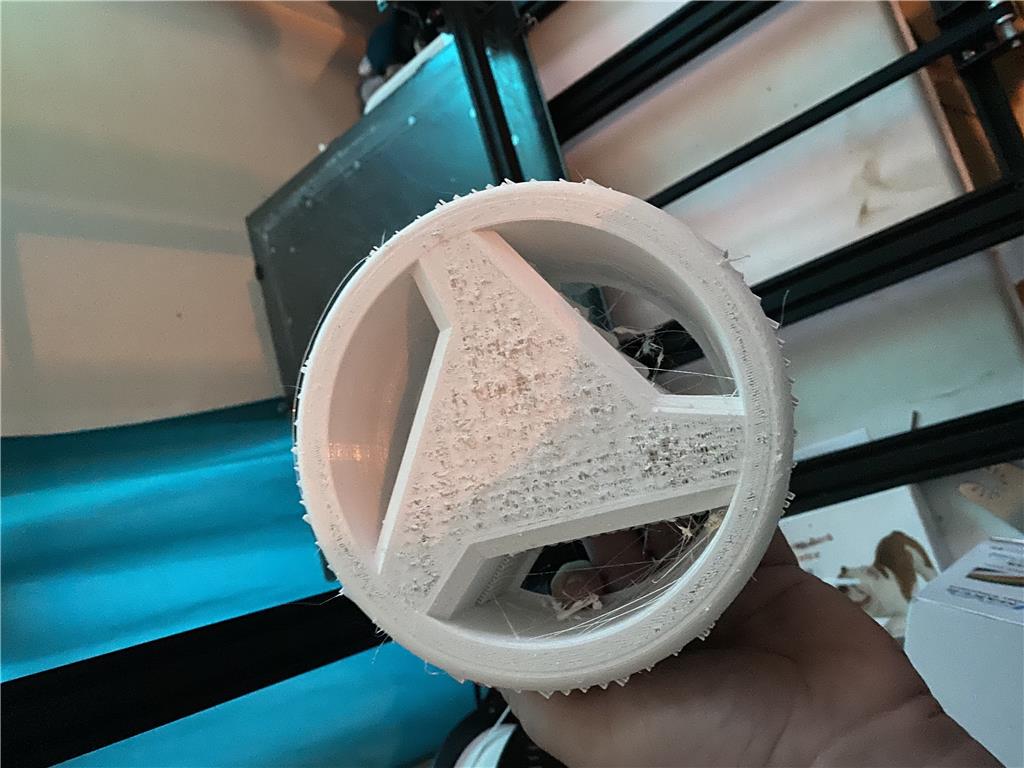
Hello , update after 1 week of printing PETG. I have 4 of the wheels printed. On the 5th wheel I developed what I believe is a partial clog of the extruded nozzle.

Here is the failed print.
Then I have 4 of these guys made and looking great from PETG. I want to stick with PETG at the moment so that the bot is strong and heat resistant in the hot sun.update: It appears the bed was also now out of level, I level and then when gcode starts the nozzle is far away from the bed again. What the heck. Maybe after a few prints the gcode is corrupted? Maybe the micro SD card is bad?
Great to see you are building again. I have had a lot of success with PETG it is a fairly versatile material for robotics. Yes stuff still breaks but you can always print a new part. Looking forward to your latest build and hopefully you let us all take a remote drive on faux mars.
hi jstarne1 hi all
i see you are using a glas for your bed . this is how i do it . mark your glas on two sides . see picture . print a cube turn the glas and take notes . do that 4 times and see witsch side is best . when you have that side mark it with a marker . glas tend to bend in diff ways .when you dont mark the glas and put it in desame position, avery time .then you will keep on adjusting the bed on and on . hope this help . as you can see i marked mine front and left . i put it always in this position .