Introducing....HEMI or HHCB1 (Home Health Care Robot)

RoboHappy

USA

Hi Gang !  So Ive finally got my project to a point to where Id like to show what I have been working on, which I actually started around october of 2019. Its still ways off from being finished, but I wanted to show you the major part of it.

User-inserted image

Meet HEMI... or HHCB1 (Home Health Care Bot #1)

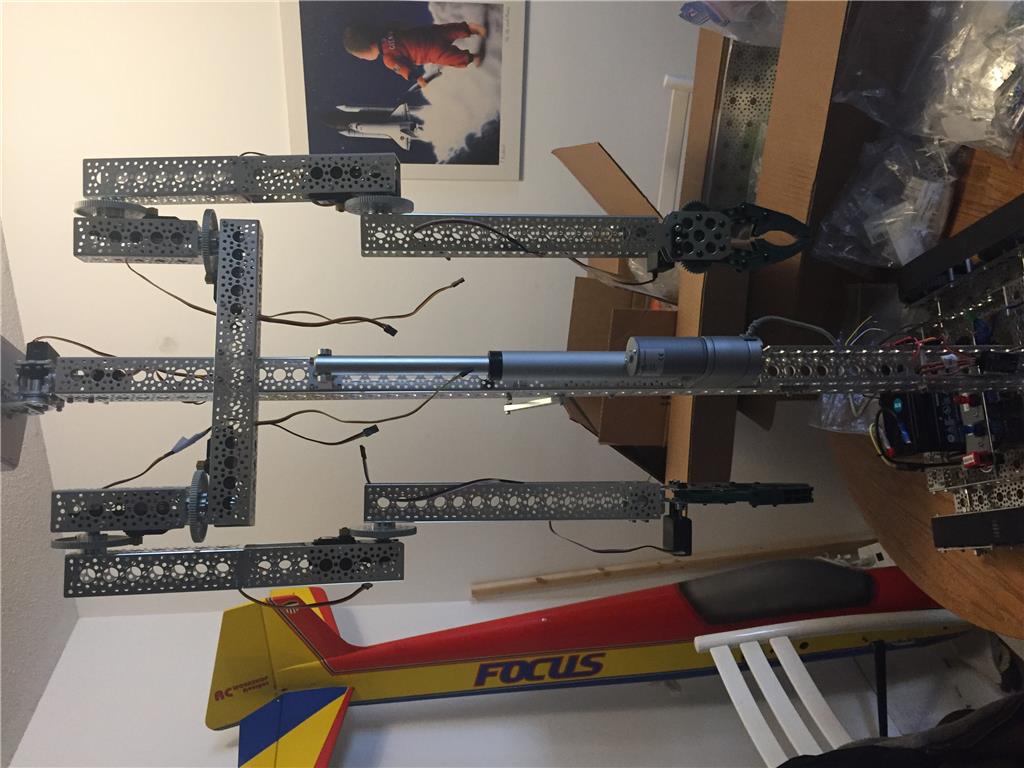
This design stands a lil over 65 inches tall. Currently weighs in about 40lbs.  Is mostly made from Servocity Actobotics metal parts and some very high torque servos (3402 oz/in), a torso actuator(180lb thrust) ,Vex grippers and much more...

The main goal of this design is to help lift a person up; as in from a sitting position from a chair or wheelchair ,turn, then lower the person back down onto another chair (they call this "Transfering" among the nursing community). I got the idea from all the times that either me or an aide/nurse has to lift and move my mom around in her home. I know that there are lift chairs out there than do this, but I want to see if a real robot could be built to do it too.

User-inserted image

An inital test of  HEMY bent over foward. the arms would also be reacing outward at this point.

HEMI is currently partly RC controlled right now, but I will be using EZB along the way to perfom the many task that the EZB can do. One thing you will note in this picture is the 2 white pvc tubes protruding outward from the front. these in time will have an Ultrasonic sensor and a bumper switch, and will be used to carefully roll up to the person sitting in a chair (your feet would go in between the white tubes and your toes would touch a large rubber stopper when the robot comes to a stop,holding the feet in place before the lifting. The idea then is that HEMI will bend over forward, while its arms extend outward, safelty grabbing and holding the person, then will rise up till the robot is basicaly fully upright and the person is now in a standing position being held up by the robot. Then to be turned and lowered back down onto another chair ie: wheelchair for an aide/nurse to do whatever is next.

User-inserted image

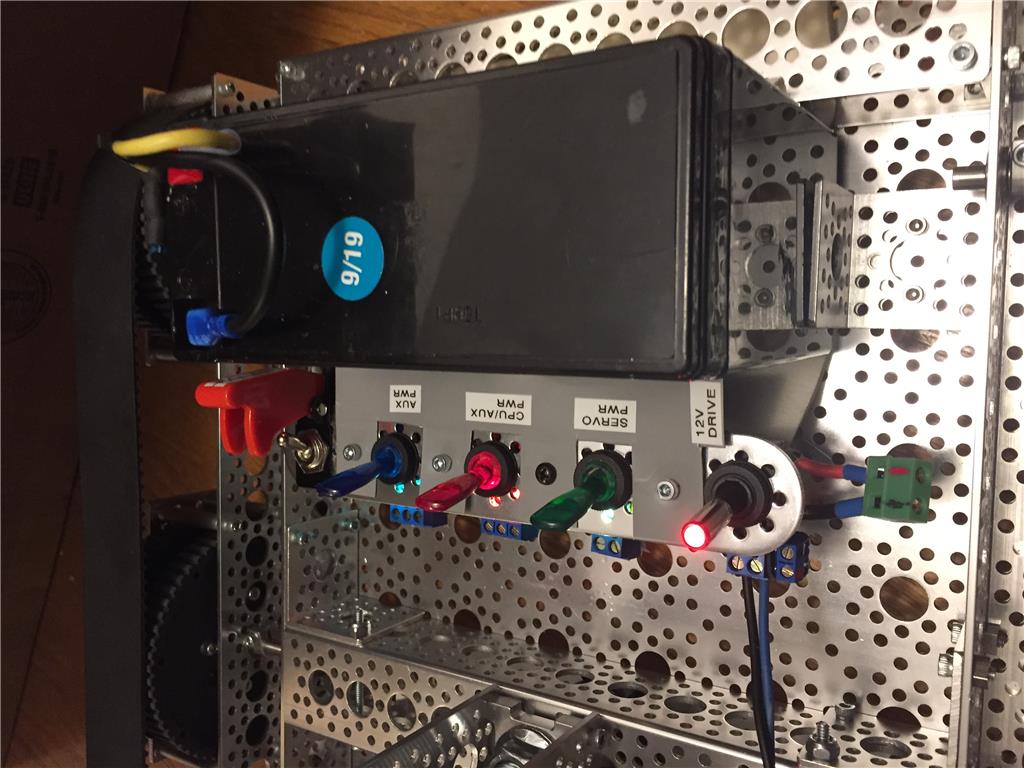
Shown here is the drive train, which is controlled by a DE Sabertooth. A 12V 10ah battery and the power control panel.

More pics and a couple videos to come as I keep adding to it. Next major hurtle is to add a SSC32, wire the servos and the means to power them.

By — Last update

ARC Pro

Upgrade to ARC Pro

Become a Synthiam ARC Pro subscriber to unleash the power of easy and powerful robot programming

#1  

What drive motors are you using? Do they move that much weight easily? Thanks

#2  

The drive motors were part of a kit from Servocity. Can look up Agent390 on their site . The motors are 313rpm , and the kit can move up to 50 lbs, which I am sure I am getting close to now. :)I've seen a video of the drive system  carrying a large bottle of water, or pushing a person along while sitting ina office chair.  The robot moves right along , fast, when using an r/c controller. Just don't stop sudden, it tends to wanna rock a lil bit,but is fine when going around slower.
#3  

User-inserted image

A close up of the power panel. Was just the drive system wired up so far.
User-inserted image

These are some serious servos

PRO
USA
#4   — Edited

what are the parts from servo City you have here in this robot?

EzAng

#5  

@EzAng The structure  is made from Servocitys Actobotics line. The material is Aluminum and is made to accept 6-32 hadware. All Servos in the arm are high torque custom design by Servocity and are each capable of over 3400oz of torque. The grippers are from VEX. Im using Sabertooth 2x15 motor controller and a SSC32 servo contoller. I have made a couple changes to the drive base and head, I will post some pics shortly.

PRO
USA
#6   — Edited

Good morning RoboHappy, thanks for responding,

More pictures will be nice

I noticed the arms move up and down, you put some round pieces there, that hold it to the body, what are they called?

Are they Actobotics Round Mount Bases?

I will look at servo city's site today, thanks

By the way, if you are looking for a 3d printer, I just ordered again on Amazon the Creality 3D Printer CR-10S Pro V2 with BL Touch Auto-Level, Touch Screen, Large Build Volume 3D Printer 300mmx300mmx400mm with Capricorn PTFE 2019 Newest 95% Pre-Assembled Printer

EzAng

#7  

@EzAng Thanks for the printer info.. that one has become rather recommended all over I notice.   On the arms, those large round disk are actually large gears built into the servo structure itself from servocity, and yeah, these servos really can hold some serious weight and still draws minimal current. You will also notice the large linear pistion on its body, thats capable of 180lb lift.
#8  

User-inserted image

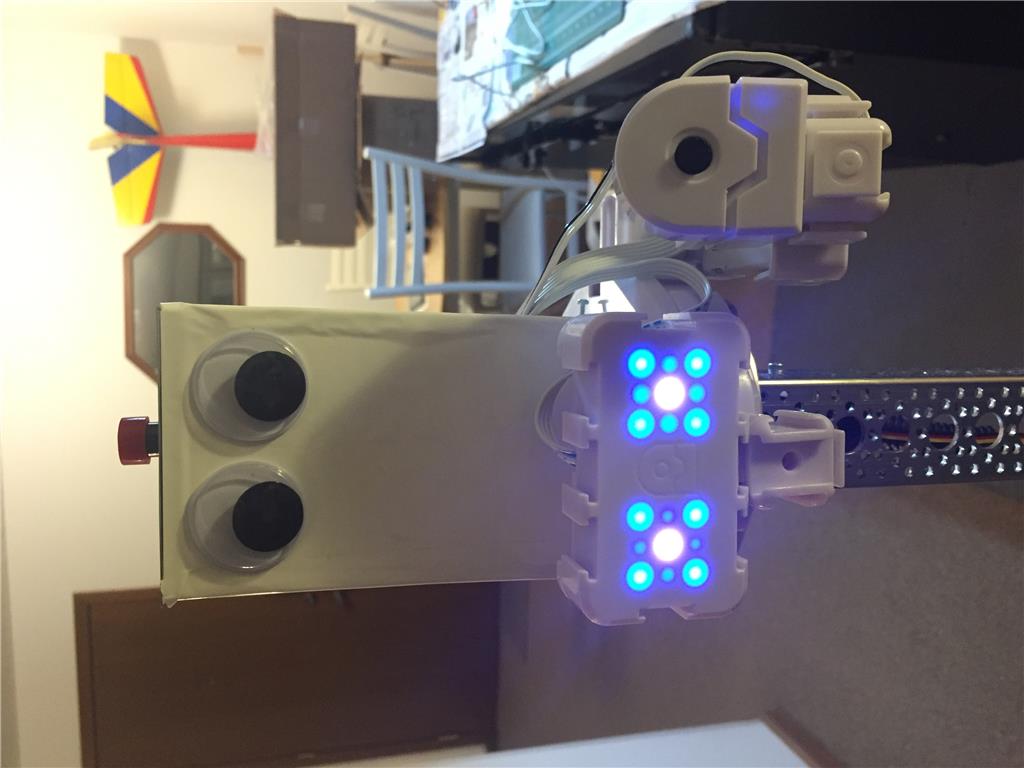
Hemis New Head....The EZB V.4 is inside, sitting on the base of a "six" base with a  servo under it for neck turning. As you can see I added the camera and RGB module. On top is an "emergency stop" button.

#10  

For the center channel, I use both the 36" and 48" pieces, as the design isto be 5 feet tall.

User-inserted image

Backside of Hemis Head. As you can see, I use the base from a Six.

User-inserted image

User-inserted image

The  The redesigned base. Shown here is the forward sendor and a bumper switch. The idea here is, when the robotrolls up onto the person sitting, their feet willfit in between these to devices (toes prerssed against the foam). The sonar helps slow the bot down as to not run over someones feet and the bumper switch presses against the chair, and the bot stop forward motion. I also plan on doing this via a typical R/C control system, as well as the Mobile app.

PRO
USA
#11  

I got to say, this is quite a machine you have.

I am starting out with a few pieces from servo City to see what I can come up with. I hope to incorporate my Mr. Roman talking head...

I might just use a tripod or just get a few 36" channels, We'll see...

thanks for all your help, thoughts and concepts,

EzAng

PRO
USA
#12   — Edited

Any other Pics are always welcome, thanks again

My  MyMoov, not InMoov is on it's way of looking good...

EzAng

#13  

Soon more pics, Im making slight changes to drive motor electronics, ands need to put the arms back on. I have a short video of how the torso moves, and will post the once I figure out how to again lol. Stay tuned...:)

#14  

Wow that is a great mobile base you have on that!

#15  

@robo rad Thank you. The base is the Agent 390 from Servocity. I do like it, it really moves right along and im happy to see that it navigates just fine on both a hard floor or a carpeted floor.

User-inserted image

The back side of the base. Im not too happy with how ive got the batter held in place. I could use  a few suggestions on something a little nicer looking maybe. I also need a nice way to mount that digital battery meter.

#16  

User-inserted image

Updated Electronics in the base. Two DE sabertooth 2x12A. The one on the right will be operated via the EZB, the left one operated by an typicla R/C controller. The dial slide switch assembly in the middle selects between the two.

User-inserted image

I was thinking of adding this in line from the battery. Gotta love those analog days, lol

PRO
USA
#17   — Edited

Great pics,  again I got to say that is quite a machine you have.  :-)

Almost got my robot together

I am just using a ARC with a Ezb4 controller and a iotiny controller for the four Ez 360 HDD servos for the two arms, two 996R servos for the grippers, an Arduino for the head, eyes and mouth movement servos and DFRobot rotation hex base.

from servo City: 4 gearboxes , 7 channels, parts, extensions etc...

Pics soon

EzAng

#18  

That sounds pretty cool. Look forward to seeing pics of it:)

PRO
USA
#19  

the rest of my parts are coming in tomorrow and Friday, hope to have some pic by then

Thank

EzAng

PRO
USA
#20  

Here is what I got gone today, tomorrow I will have more parts: I will also have a video

Roman the robot - New Robot 2020 - Arc software:

I am using an Ezb4 controller, battery, a EZrobot 1300 with four Ez 360 HDD servos for the two arms with 4 servo City gear boxes 4 servo City channels for arms a iotiny controller / battery, a EZrobot 1300 for camera servo, and two 996R servos for the 2 servo City grippers An Arduino - with a shield /power USB off my laptop 2 Micro servo Motor for the eyes, a Micro servo Motor for the mouth and a 996R servo for the DF-Robot rotation hex base

Servo City plates for front of robot -  tomorrow Using a stand I had and a shirt. Four 13.5 servo City channels to form a platform for the head and accessories. Misc. mask with hair, Styrofoam head cut, hot glue, screws, nuts, wire extensions etc

User-inserted image

#21  

@EzAng Nice. Good to see those Actobotic parts. Those gearbox servos are very strong. I even have the same claws, but havent decided on what to use them with still. Im hoping I get the arms mounted back on mine soon.

PRO
USA
#22  

Here is another pic today 5/22/2020

User-inserted image

Legs may com later :-)

video next, thanks

EzAng

PRO
USA
#24  

Those actuators work great, what do you power them with?

EzAng

#25  

RoboHappy and EZAng it looks like your robots are cousins with the similar ServoCity parts!:D

PRO
USA
#26   — Edited

lol, yes, RoboHappy turned me on to servo City

just added a 4 pieces at bottom

User-inserted image

video coming

EzAng

PRO
USA
#27  

Hi,

question, can the servo city Agent 390 run on an EzB4 with battery?

Here is my robot  https://youtu.be/CESWU7Td99o

User-inserted image

Using 2 Iotiny with 2 EzB batteries

Servo City parts - need wheels - power - Can I use a EzB4 with battery?

#28  

@EzAng Per Servocity, the Agent 390 is best run with a 3s (11.1v) 5000ma Lipo battery. What battery are you using now? The Lipo is great if you want to keep the weight down on the base. I opted for a little heavier, so I went with a single 12v 10A SLA to power everything. My power distribution is via two DC/DC converters. Both are adjustable, with one being @ 3 amp max, adjust to 7.4vdc for the EZB and other small electronics, the other can deliver up to 8amps and is also set for 7.4v for all the servos. Finally I use the 12v to drive the base motors and the big Torso actuator.

PRO
USA
#29  

I am using 2 EzB 1300 mAh   -  7.4 V

2 iotiny boards

can this run the the servo city Agent 390  ?

EzAng

#30  

Should be ok.  I need to take another current measurement, now that I have added some more wight to the bot. The agent 390 is designed for up to a 60lb payload, yet on the servocity videos, it shows pulling a person in an office chair across the floor...   The Agent 390 base by itself does haul across the floor pretty good too.

PRO
USA
#31  

Thanks, RoboHappy, I will try the servo city Agent 390 and use the EZB4 controller with the 1300 mAh, 7.4 V batteries - I will use a h bridge motor driver for the motors.

I will see what happens, trial and error again :-)

EzAng

#32  

User-inserted image

Made a battery cover. It holds the LCD Battery monitor. The cover is easy to remove to gain access to battery terminals for charging.

User-inserted image

Not the best view, but this shows Hemis torso bent over and arms extended. This is the basis on how I hope I be able to lift a person , say from a wheelchair. I Also still have to route the wiring better.  (note my Cybot nearby , lol )

PRO
USA
#33  

I still very new at 3d printing, maybe in a week or two I will get back into that.

Your Cybot looks cool there :-)

I have relatives coming to town, great to see them but all the projects stop. :-(

talk again soon,

be well RoboHappy,

EzAng

PRO
USA
#35   — Edited

wow, like an InMoov

had to watch a few times

can you make a longer video, up and down?

what kind of actuator is that?

EzAng

#36   — Edited

The Linear Actuator is another Servocity product. They have light,heavy and super duty versions. They come in different thrust pulls and stroke lengths. The one I use is a heavy duty, 10" stroke, 180lb thrust capacity.Ran me about $130.

PRO
USA
#38   — Edited

The Linear Actuator works great for up and down movements of a body - Torso movement.

I had to use 2 controls for each for the arms to move properly

Look at the right - 2 controls for each

User-inserted image

min. and max - vertical servo control 72 and 97

forward and reverse - continuous servo control this is a good control. it has a "stop" function 50 and 37

#39  

User-inserted image

The arms all wired up....

User-inserted image

Evey All wired up to the SSC32 . Some day I can give Hemi a nice covering.

PRO
USA
#40  

Your robot is "Looking good", send videos when you can, thanks...

Refresh my memory, what is the  SSC32 ? is it the  SSC-32 servo Controller ?

By the way, I put the Prowler Robot Kit together in the midst of  my relatives, lol.

By Wednesday I should be able to power the Prowler Robot Kit up for a test.

EzAng

#41  

@EzAng

Yes the SSC32 is the controller from Lynxmotion and communicates via serial to the EZB.

Very cool that you got t he prowler built and ready to go . Its gonna be fun to see it in action

PRO
USA
#42  

Hi, question, what did you use for your motor controller?

4 motors

EzAng

#43  

The Agent 390 base only uses two motors. I used a Dimension Engineering 2x12A controller that is controlled via EZB, and the 2x12RC version for R/C control of the base as well. I then am able to switch between the two controllers via a slide switch setup (hard to see in my later photos). I plan on using a relay setup in place of the switches soon.

#44  

User-inserted image

I had to replace the EZB ultrasonic sensor after it was crushed from my lil Terminator like maylay,lol. You will notice I also decided to created a simple protective shied around the sensor.

User-inserted image

This view shows how I had reposition thearms at the elbow servos. If you look at previous photos,the arm sections(with grippers) was more inward. I had to make them outward after I realized I needed more outward room. Luckily it was very easy to turn them around.

PRO
USA
#45  

Same message as in my thread:

Wow, this week went fast, back at the country/ farm land again.

Hard to get too robot activities when there is so many other things to do here.

Have a nice, safe 4th of July.

Be hope to back Sunday afternoon

RoboHappy, how are your projects going?

EzAng

#46  

Taking a lil break from it as I play around with my new 3D printer. I picked up a large professionall printer from XZY Printing. Already printed a couple add on pieces for Hemi. I willl post soon. I want to get back to the bot, Im still having "turn" issues with the bot. Seems the Sabertooth or the Roboclaw show same issue, I cant get the robot to stop turning left or right when I speak the command, Im still working that out, despite everyone saying it works fine.

User-inserted image

the XYZ DaVinci Super 3D printer....:)

PRO
USA
#47   — Edited

I understand, in speech recognition I just use -  stop()     to stop anything

nice 3d printer, great , send pics when you can.

I have not seriously messed with my 3d printer yet - that is another thing to do

Back in city life, will start this all again I hope.

Be well -

EzAng

PRO
USA
#48  

RoboHappy, I did not want to hijack your thread, but

Did you read Steve G, Info?

https://synthiam.com/Community/Questions/Sabertooth-2x25-And-Ez-b-V4-Simply-Serial-Connection-4271

give this a try, may help, I don't know, I don't have a sabretooth to play with.

Steve G says:

I have also read that some members had trouble with the 38400 baud rate, and used 9600 baud rate with the fallowing dip switch settings...

Simplified Serial at 9600 Baud Rate.

Switch 1 Up, Switch 2 Down, Switch 3 Up, Switch 4 Down, Switch 5 Up, Switch 6 Up.

Connection initialization script.

Place the following code in the EZ-B "Connection Control" script editor, or "Init" script that connects to the EZ-B connection control.

Code: #Connection INIT command to put motors in a "Stopped" state.

#NOTE: If using 9600 baud rate, edit the following script from "38400" to "9600".

SendSerial(D0,38400,0) - SendSerial(D0, 9600,0)

#49  

Hi EzAng, Yea, I did  read that, and have been trying it at both  the 38.4 and the 9600 bauds with same results.  But I think I may have  discovered something that may  have been the issue. I have to experiment more before I conclude the results. Will see:)

#50  

User-inserted image

Found some EndCap files for the Actobotics C channel that I could 3D print, orinted them in PLA.

PRO
USA
#51   — Edited

did you figure it out?

PRO
USA
#52  

Good morning RoboHappy,

How is it going? Any robot advancements?

EzAng

#53  

Nothing too new, I have re-editing some of the Auto positions I've been working on. Playing around with Pandora some, and looking to change out the  controller to the Torso Actuator to gain some better Auto Position control.  I  still havent 100% nailed down the drive issue with the sabertooth moving on its own but have noticed its not such a big issue with the a Roboclaw controller, odd yes. Had to move a Head servo from the SSC32, so that I could get the servospeed function to work (way better now). Face req and object req are on the list down the road:)

Might even look into building HEMI #2, The idea is to build it better based on what I'm learning from Hemi #1.  Stay tuned.....

PRO
USA
#54   — Edited

in the Auto position, what do you use to go forward and reverse in a script? for robot arms not wheels

#55  

I sorta go the route of the old movie maker idea. Moving one joint at a time.  I create afram for each jooint seperately, one frame for say a Left elbow up, then another frame left elbow down, same for the shoulders and grippers, Then I can of course create Actions based on the those frames. In a script, which is activated by a voice command, I look for the Autoposition  that was created under the Cheat Sheet section and simply click and paste that into the script.  I can try and take a snapshot of how Im doing it if that will help.

PRO
USA
#56   — Edited

ok sounds good, a snapshot

On a different note, have you heard of James Burton, robot builder?

If so, what is your take on him.

Thanks

PRO
USA
#57  

RoboHappy, when will you produce a video of your work, would like to see it my friend.

Thanks

EzAng

#58  

EzAng,  Id like to say soon, but dont know just yet. Been a lil busy with some other issues. So balanceing some time hasnt been  working right for me. Maybe by the weekend, I will produce something to show. Ive been liking everyone elses vids lately, so yeah I wanna contribute:)

PRO
USA
#59  

Ok, my friend, no rush,   :-)

We all have many things to do in life besides robot stuff, I understand.

Be well, thanks

EzAng

PRO
USA
#61  

Great, I will have to watch them when I get to a better WIFI

I am at the country / farm life, no internet only my phone hotspot

thanks

EzAng

#62  

Happy, it looks like your videos are set to "private" on YouTube.

PRO
USA
#64   — Edited

Just watched them - good work - Like the movements - can you turn left or right?  At this time, I don't have enough power to turn, just forward and back.

Servo City changed their website -  15% gone

Thanks - onward!

EzAng

#65  

Hi EzAng, I am able to turn left or right, just not so easyon carpet I have found out. Takes a lil practice, Right now, I can trive the robot via R/C controller. I can run it in AI mode,but with the Sabertooth still acting up (still dont know why), Im only wanting to run him in AI mode in a more open room, which I still need to run test on. My place is small and it could easily crash into something. I the AI mode works great for everything else as youve seen,and I am still working on better arm movements. I liked the servocity 15% deal too, I picked up another 3 ch, r/c car controller that way:)

#67  

Hi EzAng, Yeah, I did watch the demo about the Sabertooth. The issue I keep having with the sabertooth is just weird. I recently switched over to a roboclaw since I found out its pretty much the same. Of course the issue at hand still followed. Recently , made a change to how the torso actuator will work fors oem better control. I also had to replace a servo gear on one of those Servcity servos I use in the arms. Somehow I managed to strip a metal gear.

PRO
USA
#69   — Edited

RoboHappy,

very good moves and voice commands-

I thinks our robots move as well as the InMoov  robots, what do yo think?

Also we are mobile   :-) we move around, lol  they don't.

Just noticed 5 hr. past, I guess I am the only one here. EzAng

#70  

It is cool to see our creations move about yea. Gets even cooler once we figure out what we can make them do for us in the real world. I still have a lil more hardware changes/ideas to improve upon. Programming is still my weak point but it needs ot be done. I just learned the other day how to get the Bing speech and the Pandora features to work together, although I find the time from asking it a question and receiving an answer to  be super slowm unlike videos I have seen DJ do with JD.

PRO
Belgium
#71  

robohappy

cool robot.love the choulders goin outwarts.

PRO
USA
#72   — Edited

RoboHappy, if you need help with the the Bing speech and the Pandora -  I know how to do it, just let me know.

Have a good day.

EzAng

#73  

Thank you Nomad:)  And many more little movements to come.

EzAng, yes I prob could use a lil help with that. Its odd that it takes so long to process and reply to an answer. Is this really normal? also seem to have the Pandora lose link up while using it.

PRO
USA
#74   — Edited

ok: You need an internet connection for PandoraBot In the PandoraBot control, I put - Audio.say(getVar("$BingSpeech"));

User-inserted image

notice above: speak response

I having it speak out of the PC

to speak out of the robot:  check "use ezb v4 speaker"

you can use Audio.sayEZB(getVar("$BingSpeech"));

in the Bing speech I put ControlCommand("PandoraBot", SetPhrase, $BingSpeech)

User-inserted image

I use AIMLbot so I can write my own responses in xml format

AIMLbot resides on you computer, no need of internet

for AIML bot it is about the same:

Bing speech - ControlCommand("AimlBot", SetPhrase, $BingSpeech)

AimlBot - Audio.say(getVar("$BotResponse"));

that's it, start your conversations  :-)

EzAng

#75  

Recently added some 3D printed Actobotics Endcaps....

User-inserted image

User-inserted image

PRO
Belgium
#76  

robohappy

nice clean finisch part.looking good. is the ubove cap glow in the dark?

#77  

Nice work. I like that 3D printing gives the ability to make custom parts like this. It really finishes your joint and smoothes it out.

I really need to get into this technology. It seems to be starting to mature nicely. I have so many uses for it.

#78  

Thanks guys

Nomad - the material is  called "Clear Yellow" PLA. this once does not glow in the dark, but yeah they do make that, and now I may have to look into getting some, I like the idea of a glowing robot, lol

Dave- The 3D work is def fun. Have been in it for just around 5 years now and have printed so many cool things I found online. Have yet to learn to design my own,  Just wish the 3d printers were more reliable. They require way too much TLC. In fact the printer that did these parts broke down yet again, in less than a month, glad its still under warrenty at least.

PRO
Belgium
#79  

robohappy

the glow in the dark is not for long periods.only about maybe 20 minutes.

User-inserted image

#80  

Nice one Nomad, thats very cool...

#81  

Yep, the maintenance part and low resolution (print level lines) is what's keeping me from buying a 3D printer.

PRO
Belgium
#82  

i use my printers almost a year.never clean them.stil works fine. if you use primer two layers and then paint .the lines are gone. sanding is an option.

PRO
USA
#83  

Hi robot guys, RoBoHappy, Nomad, Dave  - looks like things are goin well,

3d printing - my shot at this,  this week, I hope. I am green at this - I guess trail and error again -  should be home today in my city life to give it a chance.

I purchased a month ago  Creality 3D Printer CR-10S Pro V2 with BL Touch Auto-Level, Touch Screen, Large Build Volume 3D Printer 300mmx300mmx400mm with Capricorn PTFE 2019 Newest 95% Pre-Assembled Printer

Oh well, I hope I succeed  -  thanks again - looks lime you guys print with ease :-)

EzAng

#84  

@EzAng- Ive heard alot about that printer model. I hope it works ou. Please let us know what you think of it, I have been thinking about getting it as a backup printer for home, since my bigger XZY Super printer is at my job for now.  Would also love to hear from others as well if they happen to use that same printer, would like to get real reviews:)

PRO
USA
#85  

Perry has this printer, waiting for some pointers from him. He told me this yesterday -

EzAng

#86  

Over the weekend, I decided to add a USB power outlet. Its a typical 12v 1a car plug in type I adapted to the robot, just in case I ever needed a standalone phone charger or other device if I should lose power at home and be turned on/off independant of the rest of the robot.

User-inserted image

PRO
USA
#87   — Edited

Hey robohappy,

I asked Frank where did he go :

Here is his response, sounds like what you want to do

Hello Angelo, EzAng

I’ve been focusing on some bigger robots such as Loomo and Temi for Elders note the drink delivery system

Here is my robot channel: https://www.youtube.com/channel/UCETxxjaU981xReTul-6rA3A

Here is my Elder channel: https://www.youtube.com/channel/UCBVxf646R95nXLHqVe3GPOw

I also now write a column for a senior-focused website where family members want to help their elderly parents with technology: https://www.techenhancedlife.com/articles/diy-technology-solutions-things-bothering-my-aging-relatives

I’m also creating Alexa Skills for seniors: https://www.techenhancedlife.com/solutions/time-day-dementia-patient-alexa-skill

Thanks for reaching out to me, Frank faengelm@gmail.com

By the way I have been 3d printing many things now

EzAng

PRO
USA
#88  

Hey RoboHappy,

What's going on your way? any new projects?

#89  

HI EzAng

Not much in the way of robots right now.  This is the time of year where I focus on the much paperwork as conservator, I do for my moms care.

Not too long ago I sidelined Hemi because I wasn't able to put forth more time into some programming it needs, esp for making all the gaits it would require to perform the idea of lifting/lowering a human to and from a wheelchair and such. Turns out its way more involved than I ever thought, and I would need assistance in its programming and worse, finding a test dummy to practice this all on:)

I also discovered, over time, that the servocity agent390 track-system really doesn't do as well on carpets as I hoped.

So now, once im freed up with some time, you might see Hemi 2.0 (or whatever new name lol) appear.  New goal, bigger bot, though not sure I will continue the human lifting idea again. larger wheels drive system (looking into one from SuperDroid.com), some of same actobotic parts , with some mix of 3D printed parts and Corkboard (great with poster board projects- makes a good strong body).

Stay tuned....

PRO
USA
#90   — Edited

superdroid.com - great site

I understand we all have a life besides robot stuff....

Ok,  be well. I will stay tuned  :-)