
rbonari
Using Ezb Hbridge To Control Rc Truck
I am looking to control a basic RC Truck using an HBridge from EZ-Robot. The RC truck is quite simple in that it has one motor for forward and reverse. It has another motor for left and right steering. With the regular RC Controller there is no PWM to control the speed going forward or reverse. My goal is to use the EZB controller along with a mobile app to control the RC Truck and add headlights, the EZB camera in the truck bed, etc.
My thought was to use the HBridge PWM Movement Panel along with the joystick pads in the mobile interface builder to control the truck motors to simulate the original RC Controller. I need to control the motors separately. It looks as if the EZB HBridge PWM Movement Panel is set up to control a left and right motor to give you the forward, reverse, left and right functions. This won't work in my case because there is one motor for forward/reverse and another for left/right.
I wanted to control the motors separately and not in conjunction with each and I have looked at the EZB HBridge PWM Movement Panel and the Joystick Pad in the Mobile Interface Builder to see if I could make them work like I want with no success.
Is there a way to do what I want with the existing Movement Panel and joystick pads and if not can the movement panel/joystick pad controls be modified to accommodate cases where one might want to control the motors individually? Ideally I would like to have one joystick in the mobile interface builder control the forward/reverse function with PWM and another joystick pad to control the left/right functions with no PWM required. Doesn't look like the existing HBridge PWM Movement Panel and Mobile Interface Builder in their current forms won't work. This is my view and I certainly could be wrong. Any thoughts on this matter would be much appreciated.
I think an HBridge PWM Movement Panel/Mobile Interface Joysticks that allow the motors connected the HBridge Hardware to be controlled individually would be useful not only for my application but also other applications. Again, any thoughts on this are much appreciated and other solutions are also welcome. 

You will have to use a Custom Movement Panel and code your own directions. Control the speed of PWM with the PWM() command. More information here: https://synthiam.com/Tutorials/Help.aspx?id=182
The one motor will need pwm control and direction control. Can I also add a pwm slider to set the speed of the forward/reverse moror? I like the mobile app joytick pad as it returns to off when you let up on the joystick. Can this be done with the mobile app and custom movement panel. I was looking to use two of the new joystick pads in the mobile app. One for forward/reverse and one for left/right. Thanks DJ
Using a custom movement panel, you create the code that is called for the movements (i.e. forward, left, right, stop, reverse). The speed may be used in your code because it is visible as a variable. The information necessary may be found at the Custom Movement Panel page here: https://synthiam.com/Tutorials/Help.aspx?id=182
The Joystick control in mobile interface (or any movement command in ez-script, camera, etc) is unrelated to your code, because the joystick controls movement panels. There is a link to the Movement Panel tutorial on the above link. However, here is a direct link to how movement panels work: https://synthiam.com/Tutorials/Lesson/77
Once you have an instance of a Movement Panel, it doesn't matter what control you add that uses movement - because the Movement Panel will take care of the movements. In this case, the discussed Movement Panel is Custom Movement Panel
I updated the Movement Panel tutorial to include a mention of the Custom Movement Panel. You may see the update in the community news feed, or by clicking on the links in my previous responses. Have fun!
Oh oh oh, this is my last spam on this topic, i promise . Although you will need an HBridge for the rear wheels, it will also be easiest to use a servo for steering. So, ensure your r/c vehicle has a servo for the front wheel steering. If your r/c vehicle uses a motor or electro-magnetic coil, you'd need an hbridge or transistor, respectively. On that note, adding an hbridge for steering won't give you analog steering.
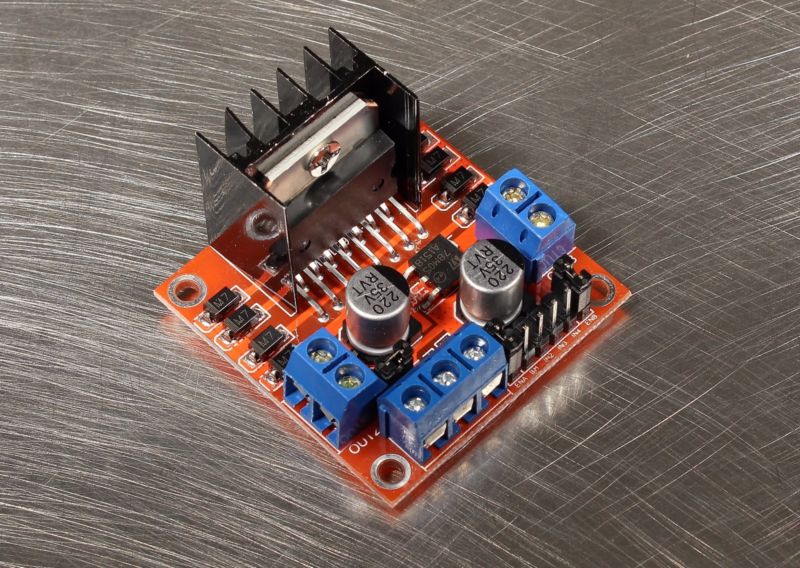
Just to echo what DJ already mention above. I have accomplished exactly what you are trying to achieve with custom script and custom movement panel. Here is a link to my thread as a reference point https://synthiam.com/Community/Questions/9826 . I Will take it apart tonight and share the internal wiring with you. Just using a cheap H-bridge controller from eBay.
Thanks much PJ_Dtechy. I will take a look for sure.....Rick
PJ_Dtechy,
What do you use the sliders for in your mobile app? Is your project uploaded to the cloud? Thanks....Rick