United Kingdom
Asked — Edited

Spray Paint Disaster

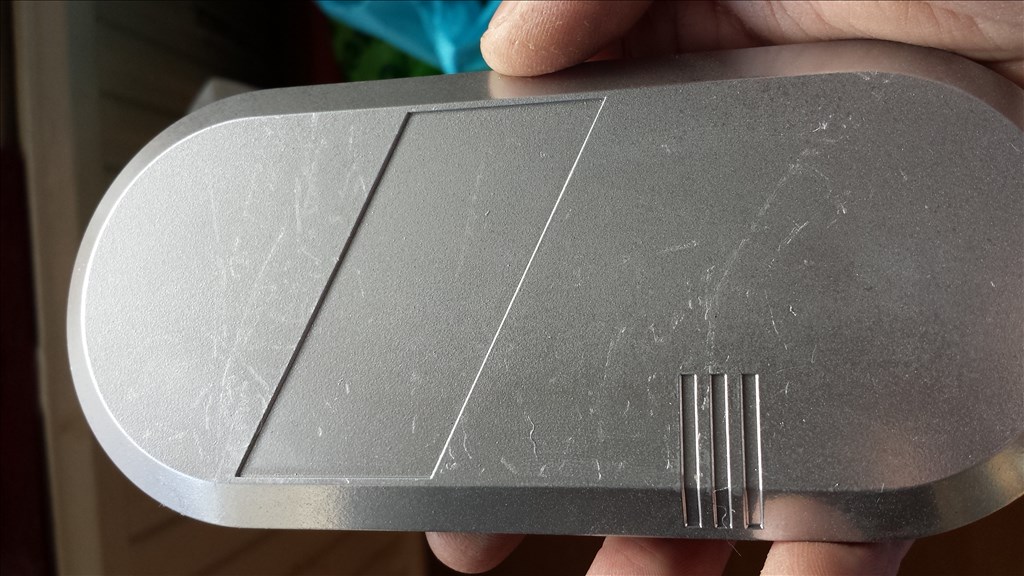
I used a chrome spraypaint to change my robots colour, the one I used is normally used on cars.(I put a primer on first) I did a really good job, let them dry and stored the bits in a box individually wrapped in plastic to protect them.

I unwrapped them today to put some decals on and the paint is all scratched on certain parts, I rubbed it with my finger nail and it scratches easily... what have I done wrong?

Gutted, now I'm gonna have to remove all the paint and start again:( right now my motivation has been destroyed, not looking forward to removing that paint!
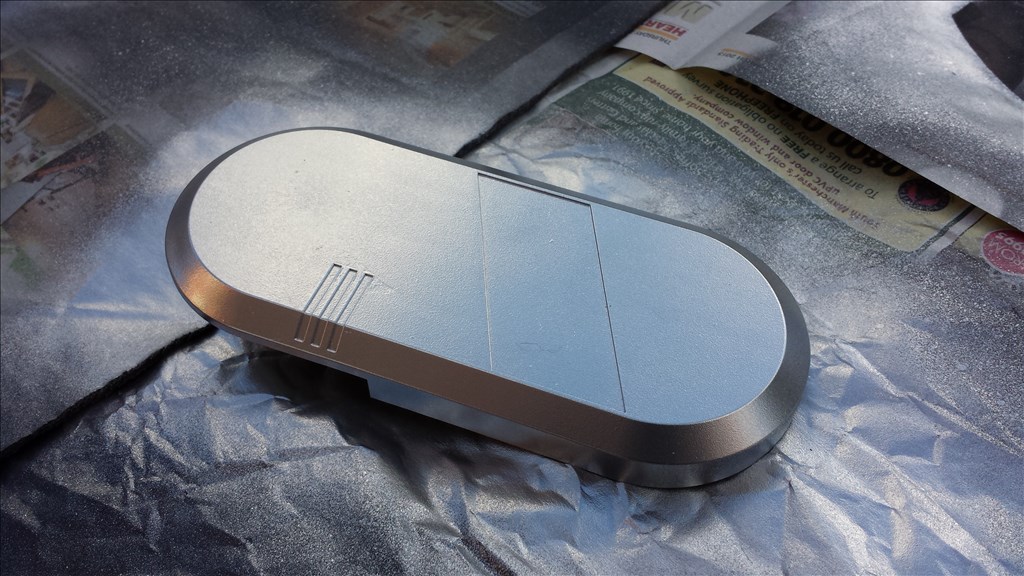
Before

User-inserted image

after

User-inserted image


ARC Pro

Upgrade to ARC Pro

Your robot can be more than a simple automated machine with the power of ARC Pro!

Canada
#1  

I'd leave it. Adds Character.

#2  

My experience is that first coat turns out fine, but if you put more than one coat, it all turns to carp. :(

United Kingdom
#3  

Give it a quick sanding with some fine grit wet & dry, this will rough it up nicely for a new layer of paint.

Look at what you have as a nice base for the real top coat :)

#4  

If you put on a new coat of the chrome spray paint you might consider putting a coat of clear over the top of it.

#5  

I'm with @Lumpy. Leave it be. In fact when my bot is done I'm gonna dry brush it to look weathered/battle damaged.

But if you really want it pristine, get some 0000 steelwool, scrub it down, lay another coat.

to protect it, get some Castin' Craft Resin Spray.

User-inserted image

Do not mess with crappy clear coats, they are finicky and may not be compatible with the chrome basecoat and may wrinkle your precious paint job. Resin spray dries in a few minutes, dries hard and crystal clear (applied properly of course), is chemical resistant, and wont care what the base coat is, as long as its dry. Plus it's cheap.

United Kingdom
#6  

Thanks for all the responses. With it being my first build I would like him to look fresh and clean cut lol...

I will be rubbing him down and reapplying a fresh coat, not sure whether to use a more durable spray to finish him off yet or use a clear spray or a clear resin spray as a final coating yet, although the resin spray seems hard to find here in the UK.

But at least it doesn't seem as bad as it was earlier when I first discovered the scratches :)

will keep this thread updated and open until I've decided.

#7  

Rustoleum has a plastic specific line of spray paints. I used it when I repainted my omnibot white and red. I just scuffed the plastic with a scotch bright pad and started spraying. Obviously mine isn't chrome but I had really good results with very little work (and no scratching or chipping). I know they have tons of colors and metallics so maybe they'll have something that can work better for your robot!

User-inserted image

United Kingdom
#8  

If the base coat comes off then it doesn't really matter what you put on top of it, that'll come off too. The paint needs something to bind to and to be honest, rattle cans generally don't need a top coat.

The most important step when spraying anything is for the surface to be rough so the paint has something to stick to. I haven't started painting Melvin yet but when I do the process will be this;

  1. Clean all parts avoiding any silicone based cleaners (silicone is your enemy, the paint will not stick to it at all).
  2. Rough sand all parts.
  3. Apply plastic primer.
  4. Apply 2 to 3 coats of paint.
  5. Wet sand.

It's pretty much the same way I've done any car repair. While it may be painting plastic rather than metal the basics are the same and the paint is the same. It will need that rough surface to bind to, it will probably need the wet sanding to remove any runs and blemishes and give that high quality finish.

A wet sand followed by another coat (or 2) should fix any problems. The sanding will remove any loose paint and key the areas that need the paint to bind to them, the next coat should cover the bad spots and a final coat followed by a very fine wet sand should even out the paint, remove runs, blemishes etc.

#9  

For plastics you can use etching primer. It chemically glues to the plastic and then use rustoleum brand chrome paint and then cover it with spray epoxy. I prefer cutting steps out when I can. Sometimes you can get lucky and find rustoluem epoxy paint which it much tougher and doesn't require s protective top coat. I used epoxy white on squeegee.

#10  

Be careful with a clear coat over chrome paint. I did that once. The chrome paint looked perfect; it was like a mirror. I put clear over it to keep it that way, but as soon as it went on it turned to flat grey. I then read the cans more carefully. I don't remember now if the clear said not put over chrome, or the chrome said not to use clear, but it was stated somewhere not to do it.

#11  

Here are a few pictures. For the two large lights, I used milk jug covers painted silver. I used gloss black Rustolium Plastic paint, with Duplicolor Chrome paint over it. It is hard to see in this picture, but they look pretty good. This is where I had the trouble with the clear coat over it though. I had to soak them in paint thinner, clean them off and start again. I have had no problems with peeling, wrinkles, etc.

If you are interested, the torso itself was painted with Rustolium Textured Metallic over automotive primer. User-inserted image

User-inserted image User-inserted image

#12  

@Danger Gotcha! Thats why I recommended resin spray. I do it a lot, I build custom guitars and I make metallic finishes that way...chrome base, transparent paint on top, then resin clearcoat. The clear is not exactly paint, but polyester resin thats thinned enough to spray. It dries like a shell, so crappy basecoats are somewhat forgiven. It also fills in imperfections.

If you want to see my work:

www.ikoncustoms.com

If not sorry for the spam.

#13  

Thanks for the tip @Doombot. Maybe I'll try that. I would like to protect it from dulling, without ruining it again. PS. Your link didn't work. I would like to check it out.

#15  

Some clear is really horrible and milky. If you use spray epoxy or jewellers epoxy it's 95 percent clear and you don't need to spray a thick coat on. If you hold the can 12 to 16 inches away and mist like I did on my snakeskin paint job it leaves a thin Matt finish. You can gloss it over if you want but Matt will look closer to the original finish.

Best suggestion would be to try out Rustoleum Hammered Metal. I used it on all my costume pieces to make it look like metal. It has a awesome texture ans is a rugged scratch resistant finish.

United Kingdom
#16  

Cheers for the advice all...

And thanks @Rich for the step by step instructions you gave earlier and all the other advice you've given me.

@Danger, I ordered some rustoleum clear paint already so I will be careful and only do a small area first to see if it reacts with the chrome. I'm gonna rub it down so it's nice n ruff and then respray the original chrome spray and then a layer of the clear paint. It's the cheapest option at the minute seeing as I already have a few tins left, If that fails I'll take the advice @Doombot gave and try the resin spray. Nice guitars by the way Doombot, would love that job lol I used to repair musical instruments so can appreciate the work thats put into them ;)

@Danger just copy the link and paste it to your browser bar. By the way I like the retro looking light fittings on your robot :)

@jstarne1 I may try that paint if all else fails with the chrome I have:) Thanks for the help and advice.

#17  

Here is a link to the Amazon listing:

Castin' Craft Resin Spray

I promise you I DO NOT work for them hahaha I only do the guitars on the side, my main job is in the oil industry. I'm a Senior Electronics Tech. I'm a frustrated F/X guy haha. I know a few pro F/X people in Hollywood and I'm pretty knowledgeable about materials/sculpting/electrical/animatronics. Long story short this is how I stumbled upon EZ-b. It's an awesome little board.

I really can't wait to show everyone what I'm working on.

Good luck with that paint job now!