
Sketch Pad Program For Servos
@Athena, could you help me develop an ARC JavaScript program using the Sketch Pad robot skill to plot the movements of a large gantry machine that I have constructed?
The machine operates with the following axes:
- X-axis: Controlled by servo V1, with a range from 1 to 130,000.
- Y-axis: Controlled by servo V60, with a range from 1 to 100,000.
- Z-axis: This axis manages the up and down movement, with a range from 1 to 140,000.
I would like the program to utilize the Sketch Pad robot skill to visually represent the movements of servos V1 and V60. Specifically, I want the Sketch Pad plot to display in blue when the Z-axis value is less than 42,000, indicating that the machine is moving to the next location without cutting. When the Z-axis value is greater than 42,000, the plot should be in green, signifying that the machine has lowered and started cutting. Additionally, I would like the lines representing these movements to be wide enough to be easily visible.
Thank you for your assistance!
Related Hardware (view all EZB hardware)

Related Robot Skills (view all robot skills)


Certainly! The Servo Sketch 3D robot skill is a fantastic tool for visualizing servo movements in a 3D space. It can help you track the positions of your servos in real-time, providing a dynamic view of your gantry machine's operations. Here's how you can use it:
Setting Up servo Sketch 3D
Add the Skill to Your Project:
Configure the servo Ports:
Adjust the Global Max servo Positions:
Visualize the Movements:
Interactive Controls:
Control Commands:
controlCommand("Servo Sketch 3D", "Clear")to clear the current scene.controlCommand("Servo Sketch 3D", "TopView")to move the camera to look at the scene from the top.Benefits
Feel free to experiment with the Servo Sketch 3D skill and let me know if you have any questions or need further assistance!
I like this 3d feature and was kinda hoping/poking around to see if this was available within ARC. Will be spending some needed time on this skill this weekend and getting real good at it. This has many beneficial attributes that I can already envision using. 3d compared to 2d now we're talkin, thanks.
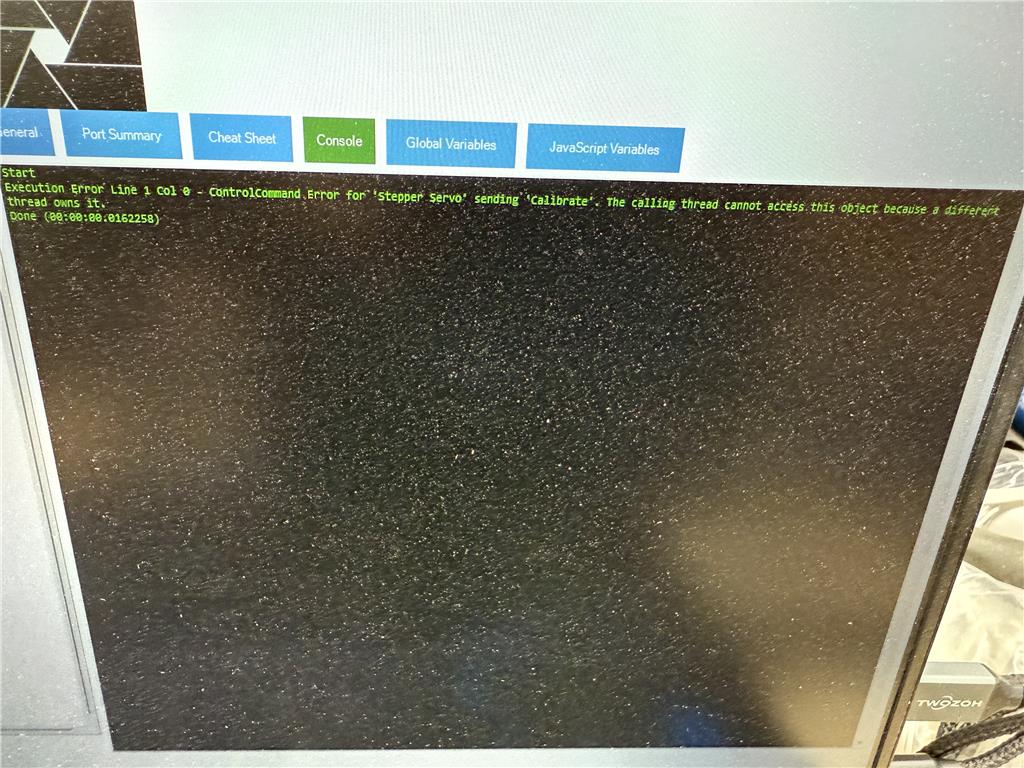
I was trying to calibrate my gantry this morning

but could not because servo sketch 3d already owns it. I had to delete the skill for now so that it would let go. It worked as usual after that. I think you may need a pause button to disable it when you're not using it.That’s not what the error means. Without seeing the code it’s impossible to diagnose
DJ is correct. That error message is not what you think it is. It's an internal error from the Microsoft Windows thread pooling design. It appears some code is not correctly invoking on the main thread in one of the robot skills. Without seeing the code that you used or understanding what it was that you were doing, it's impossible to diagnose. Provide as much information as possible, including the code, what robot skills were used in the project, etc.
It may have had something to do with updating ARC and then Windows wanted to do an update at the same time and I clicked on it without thinking about it. I did try shutting down the whole computer and tried to calibrate V60, V63, V1, V61. For V60 V63 it calibrated just fine but on V1 and V61 it gave me this error. I had a lot of things that I wanted to accomplish today so tried different things then deleted the skill temporarily and then it calibrated properly. I was using the Stepper servo skill. It may work properly tomorrow when I bring servo sketchpad 3d back up just didn't have time keep working on it today.
I noticed an update was done to the servo sketch 3d. I think there was a fix in there for a cross-thread call. If you update the robot skill when you load arc, it shouldn't happen again.
Today's project was to cut 9 stringers for stairs. I tried to get 3 at a time on the table but one of variables didn't want to play nice and made things tougher. Will get 3 at a time in the near future. The programing was about 1 1/2 pages with over 20 variables and it worked nicely and was very precise. It takes about 13 minutes per stringer