jstarne1
Just like i did with the Solidoodle I am sharing my overall experience purchasing a new makerbot. I will compare some of the same prints i did on the solidoodle with makerbot. Take in mind 80 percent of the difference is firmware for the "reprap" makerbot controller and the Makerbot slicer is more consistent than the open source SLIC3R. Also I have a used unit that I have had for a week while still waiting on the new one. First things you should know is I like to get the best reasonable deal i can. I discovered a few Promos for Makerbot you can also take advantage of if you call their sales line. Take in mind not all promos work on their website. Currently ( as of April 7 2014) Replicator 2 systems are on sale at 200 dollars off without a promo code as well.
$200 off purchase price PROMO MAKERBOTFRIEND
Free Shipping PROMO LASTCHANCE
( this is emailed to you if you add any item to you cart and don't complete a order)
Filament 15% off BIRDHOUSE
at this time buy any 4 spools of filament get additional 10% off
20% gold conference pass BOT
Alternatively Amazon has makerbot filaments with free shipping if you need them quicker as well.
At this time the filaments i have and price before discounts to use are:
- Makerbot 4 rolls of white ( 8.8 pounds) $48 x 4
- Makerbot 1 roll of clear ( 2.2 pounds) $48
on the way are:
-Makerbot 1 translucent red (2.2 pounds) $65 -Makerbot 1 black filament (2.2 pounds) $48
-Ninja Flex black 1.1 pounds $60 -Ninja Flex red 1.1 pounds $60 -Ninja Flex white 1.1 pounds $60

Hi I am going to buy a 3d printer but I want a really cheap one so I was wondering where did you get the makerbot for so cheap please send me a ling
I called makerbot in new York at their sales line. Their website is makerbot.com. The end price is 1799.00 because of the free shipping and 200 off promo that their sales line approved.
Ok so to start off i would like to say overall the makerbot software is very user friendly. Within ten minutes I was printing a widget and it did a excellent job one thing other printers struggle with is overhangs as well as printing over large gaps. Due to the slicing software it does a great job formulating a plan for the print and then writing it to gcode. My experience so far is with the used model. I am still waiting on the new one from makerbot. I have been waiting about 2 weeks since I ordered. They shipped it out but the package was lost or stolen so sadly I'm dealing with that right now. Makerbot says ups has still not responded to their claim so they are in a holding g pattern awaiting approval to re ship me a replicator 2. In the meantime I have started printing some of our prototypes Anthony has been envisioning as well as popping test parts out for zero rover. It's exciting to have these. A chines to use.
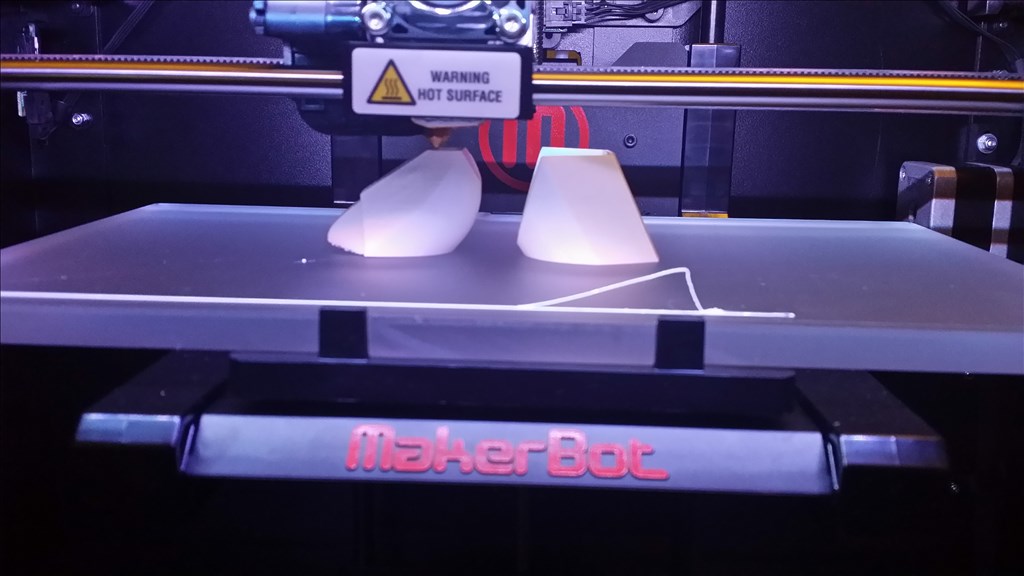
ironman thumb costume piecesAll these finger segments are 4 sets of the same fingers. Thumbs , index , middle, ring and pinky. They are standard definition pieces. In the future I may try printing on the finest settings but it also drags out print time. Since these pieces will be sanded and primered before paint it is not a issue.
Something I HAVE noticed is the makerbot has banding issues like the solidoodle and a fairly simple mod fixed the problem so i will search for a similar solution for makerbot m it has to do with the Z axis wobble as the bed drops or raises between layers. The white filament color hides this in pictures but it is there.
Here is a 14 hour print , the xlr6 body prototype.
Those prints look really good Cant wait to see your Concepts take shape!
Just as a reminder we added a 3D printing category a couple of months ago that's perfect for this kind of thread. I have been really enjoying seeing what the community is 3D printing and try and answer as many questions as possible
Oh yeah? Where have i been? I didn't realize there was a dedicated 3d print section. Well I guess I can copy n past it over their then , is that cool?
And thankyou for the well wishes on prototyping
I think its ok I just meant it as a general reminder for anyone who didn't know.
Ok tiny update , for some reason my used printer extruder keeps stopping up so i am trying to figure that out. Maybe I will remove and clean the tip better. It has clogged and ruined 3 prints so far. I tried the basic trouble shooting steps and re leveling the bed. The extruding works fine for like 1 to 4 hours then clogged agian. I count my stars that the 14 hour body print was able to be finished. I have heard that a bit of wd40 in the extruder right before the print helps prevent this problem.
On the bright side I had probably had 12 to 14 prints go perfect so i guess this is part for the course on the error rate.
As for the new makerbot I believe they are finally shipping it out today and I will have a confirmation of that when I email them. They respond to emails usually in a few hours but I have noticed they are not proactive. I did get refunded 200 bucks because the price dropped after I placed my order but before the printer was shipped out.
We have this problem every once in a wile. I like to take a can of compressed air and insert the straw it comes with into the extruder as if it were filament. It wont feed all the way through because the straw is much larger then the filament. Then I blow out the nozzle till its clean. After that I do the same with WD-40. If the WD-40 comes out of the nozzle in a nice straight clean stream then you should be good.
You do this with the heat on or off?
With the heat on for both the air and the WD-40. Sometimes i have to go back and forth between air and WD-40 to get it cleared out but I always end with WD-40.
Ok I cleared it and back to printing. This time with a live video feed so i can see if it messes up.
Where did you mount the camera? That's a nice angle.
Update from makerbot , they shipped it to me overnight by fedex and should have it tommorow.
Thanks man! The Camera is sitting on the back right corner , it's a ez robot version 3 wireless cam taped with painters tape. It was the best view i could find. It is almost the view the new makerbot version 5 has.
Ok so the new makerbot is here which i have already put to work prying the part that the used printed kept messing up. I'm using painters tape now.
Unfortunately I cleaned the heck out of the extruder with wd40 and canned air. I did this till canned air and wd40 sprayed right through in a even stream. Then I tried the print agian and the extruding stopped even quicker this time! Ugh. Furthermore I am wondering what these wierd patterns are on my first layer of large items..
each time I restart it's like it gets clogged up even faster. I checked a couple things , first making sure that there were no snagged area of filament or tangles. I also checked temp of the extruder once I noticed the clog which was probably about 3 min after it happened and it was still hot enough to melt the pla. I read online i could put thermal past under the heatsink to the extruder but I don't know if they even makes sense. Any help here makerbot pros?
I've never seen the wrinkles that bad before that's crazy! The wrinkles typically tell me that the nozzle is to close to the build plate but since they are really bad I suspect there is something else contributing, unfortunately i'm not really sure what that could be but I'll keep thinking about it.
I always recommend people to use rafts for everything. They can be a real pain to remove sometimes and the first layer is never as smooth. However I have found that rafts help with reliability and warping dramatically. When using rafts everything has more room for error, for example build plate levelness, environment fluctuations, warped build plate, weird wrinkles, etc. I have two recommendations to make your life a little easier when using rafts though.
The thermistor on the rep 2's are not very durable. If you continue to get air prints I would remove the thermistor and test for faults. It causes more problems them you would think. If its intermittent and the temperature dips for just 5-10 seconds the plastic starts to thicken making the feeder gear work harder which starts a grove in the filament that it then struggles to get out of. That's just one scenario out of an endless list.
After getting many failed prints in a row I always get Jeremie to check the thermistor, most of the time it turns out to be intermittent from a break in the cable. Typically its right at the beginning were its bends to go up and out of the extruder assembly. Be really careful when removing it they are seriously fragile don't take any shortcuts go slow and remove any parts in the way to give you the room you need. We run on a tight schedule so I know how attractive shortcuts are but it will only make your day worse.
Try turning the model just a bit so that the lines are not straight on the X - Y plate and re-slice, then try a print.
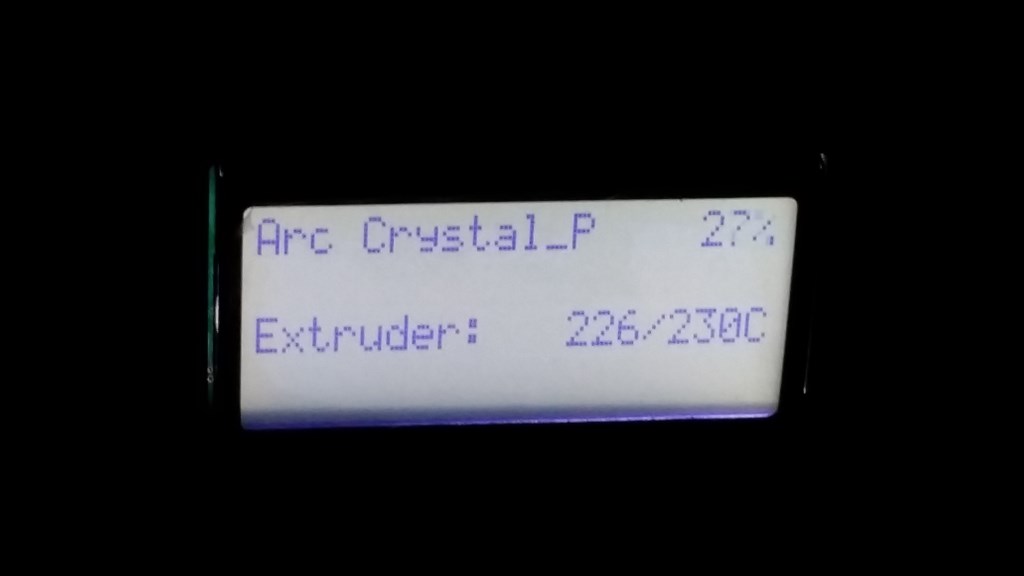
As boring as it sounds i watched a test print for 18 min and it appears that the makerbot has trouble holding temperature. It is set for 230 but never makes it up there. It is hovering around 226 to 227. Several have suggested maybe I have a dud thermosistor. I will email makerbot tommorow. I basically had to be sure this was not user error first.
Ah ha! , the dang makerbot filament has kinks in the filament!
I caught the kink before it made its way into the extruder. If there were more kinks like this then I can see why the extruder was stopping up.
Do you have the spool in the correct position? Should look like the picture below.
I'm sure there are guys with more experience than me, but thought I would chirp in as I've had exactly that first layer 'bubbling' in lines issue before on a previous reprap machine when printing PLA. Two things caused the problem .... First was as Corey suggested, the nozzle to bed height was too close .... And secondly there was an occasion where it was a bad batch of filament.... It generally seemed to print like it was greasy (although it obviously wasn't) bed sticking problems etc. I switched to Faberdashery filament, adjusted the nozzle height and had perfect first layers.
Cheers,
Jay
Ps if the nozzle is having trouble hitting the required temp, I would imagine its going to either be a thermistor that is under reading and the psu / hotend is unable reach the now higher actual target temp due to power limitations, or I have seen it where the psu isn't kicking out enough voltage - the control circuit reading accurately but not enough power to hit the target temp.
Hope things get sorted for you quickly
Yup , it's in the correct position. I managed to print a part. I got up tonight to get a drink of water and saw it had completed. So great progress there. I will try another part while I am at work and check on my lunch.
I have been watching this thread with interest. I was considering getting a 3D printer but I'm wondering if 3D printing is going to be worth the money, time, and effort you have to put into it. I'm still on the fence.
I have 950 hours of print time on my Replicator 2, here's a couple of things I've learned; The best filament is RepRapper filament. No question! I had a lot of problems when I was using Makerbot filament; air prints, extruder problems. It's way cheaper too. I have found that to get things to stick to the build plate it must be level and it needs to roughened up a bit. The plate gets scraped up over time from prying builds off the plate and that's a good thing. I never use painters tape. Also, make sure the plate is clean before you start a print. I use those handy wipes. My extruder runs at around 227 degrees as well when printing , Most filaments have a temperature range they melt at, so a couple of degrees shouldn't make a difference. Some kinks in the filament can be caused by the user. Make sure you never let the loose end get lost in the spool. I hope some of these comments help.
@bhouston , thankyou for your input. I tried the makerbot filament to have something to go off of. Because of the discounts applied and the additional 200 off they gave me I basically got the 4 rolls of filament free. I do believe I will switch to a alternative filament that I'd avail on ebay and amazon for around 25 dollars per 1 kg / 2.2 pound roll. It is much cheaper than makerbot but I want to have something to compare for quality control.
@Jaultman - is it worth it? That depends more on you than the machine. I have had a couple minor hiccups but overall the new customer experience is stellar over the acclaimed competitors. My last printer was a solidoodle 2 and it required a ton of manual tweeking and had very limited resources if how to do that. Just a forum full of users with the same problems making suggestions but having trouble attaining their goals of great prints.
Buying used may get you a better price , but I wanted to get the new warranty and the support.
It is up to you if you get your monies worth.
I would recommend learning to use 123d design or similar program so you can learn to make your own objects.
Buy yourself a flatbed scanner and a micrometer caliper to measure stuff. It makes it easier to draw a part with the right size if you enter the correct size in mm to begin with. The flatbed scanner allows you to enter a flat shape into a 3d program then use "extrude" to give that item physical thickness you measured with your calipers. It's a neat cheat I hear people use often.
Once you do that make the 3d printer your first go to for any new or alternate parts in your projects. People use them around the home to make trinkets but that's up to you. I noticed once I bought my printer friends and family came up with all kinds of ideas. Cup holders , custom candle molds , cookie cutters , keychains, Christmas ornaments and other widgets.
Update since last night , the old printer made it all the way through a 5 hour print for a candle holder with no issues. Also the top of the xlr6 body printed fine too. Something I did different here is applied thermal paste arctic silver between the heatsink and the extruder block and that seems to level out the temperature.
@jstarne1 - I'm here to learn what it takes to make one of these things work consistently. It's a fairly large expense and I'm willing to pay to get one that works (mostly) out of the box. I've been checking out MakerBot and that's why I am watching this thread....to see what you experience with it. Learning to design on stuff for it shouldn't be a problem, I have worked in the the CADD field before and did some 3D modeling. I'm sure I can find things to make. I'm learning from you what tinkering is going to be required if I do decide to pull the trigger on one.
If it counts at all , once I bought my first used printer I immediately called up makerbot to buy a new one lol. It took forever to get but I got it for 1800 , because of the promotion codes I mentioned. Used they are 1200 to 1400 so it's not a great deal more for a new one with 1 yr warranty.
Later today I will post my failed prints as well.
If you have a background in 3d design then you already are a step ahead from everyone else. Email me at [email protected] and we can have a better discussion.
$1800 is still a lot of money to drop on a printer when there are print services out there which mean there is no initial outlay on the printer, no servicing costs, no wasted prints, no problems with the printer... I'm still in 2 minds about getting a printer or just continuing to send off for someone else to print for me for a reasonable fee.
How much would it take in order for the printer to pay for itself? That's the biggest question I have always running through my head. I know there would be benefits of having the printed item in 14 hours or however long it takes to print rather than having to wait a day for it to be delivered but that doesn't outweigh the initial costs, maintenance costs, hassles etc. you get with owning a printer.
Recently I've had a fair amount of things printed up and have a lot more to go too so watching this one (and any others about printers) closely.
What I really like about having my own printer is I can design something, print it and then tweek it if I have to. Sometime it my take 2 or 3 prints to get it just right - that could get expensive sending out to a printing service.
Yeah that is a down side however, so far (touch wood) I've not had to do any reprints. I am at an advantage where I have been professionally doing CAD work (mostly 2d but it's not that different to 3d as far as accuracy goes) for over 15 years now though (not to sound too egotistical but I must be pretty good since I charge 3 times what anyone else nationally charges and I am turning work down).
On the same token though, re-printing must get pretty expensive too. I haven't worked it out but it's something I plan on doing when time permits, that's to see the difference in cost between the material cost of the PLA/ABS/Nylon/whatever plus whatever power is required for the few hours it takes to print a part and the cost if a service prints it.
Then there is always the option to lease a printer too, smaller initial outlay, repairs and servicing taken care of but it's paying for something and not owning it after 5 years.
Anyway, I digress and don't like to hijack topics
At the place I have been using, basically it works out that whatever I (or they) can fit in a 4" cube will be £90. It's around £30 for 1Kg of PLA over here, so that's 3 x 1Kg spools of PLA... How much PLA would it take to build a 4" solid cube? Knowing that will be a huge help on me deciding if I should bite the bullet and lay down some cash on a Makerbot or if I should just carry on doing things the way I have been.
I could print a 1 " cube and then you can use some math to figure out what a 4 inch cube is. I can weight it in grams. I was surprised how far pla goes on these prints. So are they charging you by " the volume" of a 4"x4"x4" cube or any item smaller that 4"x4" ?
It's based on volume, basically they take the longest part on each side and make a cube that will totally enclose the part, then base it on that at 9p per cubic cm. I fit as much as I can in that cube (or cuboid to be precise). So I basically combine all the parts I need in to this theoretical box, they print them, separate them and boom, done. But it does take quite a lot of messing around to fit everything in the best positions to maximise the amount I get for the money.
Don't print anything just to find out though, I'm sure the answer is on the internet if I take the time to google it
Tiny update : I printed both the candle holder and the top of xlr6 this morning and wow they were really stuck to the print bed. I had to use a full size grill spatula for this one. I tried using the painters tape square makerbot gave with the machine but the print was peeling away from the bed during the first couple layers so i pulled it back off. I have regular 3m painters tape I have not tried yet.
@Rich - It will very by brand of filament but one example is a kg of PLA is 330 meters. So if my math is correct that would be 1000/330 = 3.03030303030303 grams per meter. I sliced a 4x4x4 cube in slic3r and it said it would take 283329.5 mm. 283329.5/1000 = 283.3295 meters. 283.3295 * 3.03030303030303 = 858.5742424242424 grams. So it would be a little less than a gram I'm guessing. Like I said, depending on the source, your mileage may very.
Latest print , this time for once I started using painters tape. I did a pair of legs last night that were stuck so hard to the platform I had to destroy them with a hammer to get them off. All the other prints didn't stick that well. It seems like as the platform gets more use and scratches it sticks to pla more.
I have the printers in a closet that has a vent. Unfortunately I think when the ac kicks on the closet temp drops causing the print to peel up on the edges. So as a remedy I made quick work to find a metal utility cabinet for the fair price of $10 it can hold 2 maker bots and maybe 3 stacked on shelves.
Tommorow I will pickup some brackets and shelves to mount the makerbot inside and also a overhead rod over each machine to hold a few spools of filament each. Maybe 4 or 5 each. There is a key lock so maybe I can buy a new mechanism with a key for security in case of a break in or whatever 4000 in makerbot don't walk off.
sorry about pictures being sideways , this is the first time I have had this problem.
So instead of spending a couple hundred dollars making plexiglass cubes to go over the machines I went with a different route. It serves the same purpose and also allows me to save some space by stacking the machines in one cabinet. Total cost was 74 dollars. I used closet hardware to mount it all. One adjustment able shelf and two spool mounts to store filament and also feed from overhead reducing snags and overall resistance. One of my problems was temp instability inside my downstairs closet due to a ac duct that passed through it. If temp drops even 4 degrees suddenly I notice the edges of the print peel right up. It's also a good idea to keep the machines away from vents and windows all for the same difference. Overall the machines like to operate in higher heat than room temperature. Being in a cabinet will help shield from drafts too.
Great enclosure set up Josh.
@Josh Very clever idea, you do what you gotta do and well it looks good :-}
Great idea Josh! Good place to let bread rise as well I never walk into a thrift store/Home Depot with conventional ideas/needs.
I did several ironman hands. One pair for each of my friends going to Dragoncon. That is our version of comic on in Atlanta Ga. A couple came out perfect but the rest had several layers screw up. They are usable though. Just glue the layers and fill with body filler. All printed from the same machines and same files. I printed them one after another. I wonder if I need to turn them off in between prints? It seemed strange the same printer with same gcode would render different results every couple prints. I will post the screw ups too.
The glove in the pic above looks fabulous! I know you will figure it all out using your amazing determination
@Josh - How stable are the shelves? I had a hard time finding a place i felt was solid enough for my SD2. if your printer is wobbling around on a flimsy base, that could cause those odd errors in the prints.
@antron , ironically the printer on the floating shelf seemed to print the same if not better than the one on the bottom. I had your same concern but my best prints have come from the top printer. The errors I believe are caused by temp drops from the heater in the extruder. I'm going to email makerbot about it today.
Ok so i have been away from the keyboard a couple days. I wanted to share my findings. The second printer was most likely jamming up the extruder because of inconsistencies in the filament. 6 times the extruder clogged. I was super upset I couldn't finish a print to save my life. I literally watched one clog happen and found it to be kinks in the filament. It looks almost like a knot and when it gets past the extruder. That ofcourse didn't explain how the temp drops a few degrees every couple minutes. Makerbot is sending me a replacement part to swap the thermocouples.
Between the inconsistencies in the quality of makerbot filament and the fact the "clear" made prints that look like bees wax I considered looking at outside vendors for filaments.
This is a 5 inch "ironman style" ARC reactor I was printing and the ring and center pieces call for a semi transparent material that I thought the clear PLA would work well in. I have two rolls of clear makerbot pla filament and found the filament to be brittle and like in the picture has a yellow discoloring to them. I will just use it to test fits from now on as it is useless unless I want to print a honeycomb.
I placed a large order online for these rolls. I only ordered 7 rolls but they sent an extra two white rolls and a coupon code for 20 percent off and free shipping for my next order. My only complaint is the hole in the center of the spools is tool small to fit onto my original spool holder so I can ONLY use these smaller rolls in a hang over the top feed position. No guide tube is used for this position but there is always a risk of filament tangles. To reduce this chance I Butt a couple rolls of the same size on each side of the spool being used.
This shows the overhang spool position works great for the bottom printer.
even with the cabinet warmed to 80 degrees the thermocouples are still struggling to maintain temp.So far this filamex branded filament is doing much better than the makerbot. It's not as brittle and so far I am not seeing yellow.
The top printer is chugging away making the ARC reactor cage and face parts. I noticed black makerbot filament is not extruding as smoothly as the white. It appears thicker when heated. I have been told this is due to the larger amounts of tint used to color the black filament. I could not print without a raft as this filament didn't squish as well as white Pla does.
Josh, this is all good info. Keep it coming.
BTW, what is the best way to contact you about a possible 3D printing project?
[email protected]
This parts are just pressed together here. I must add in several leds to light the unit. 5mm holes are already in the bottom of the clear centerpiece for leds. One piece snapped as I was separating the raft from it. The black pla is much more brittle than the clear Filamex PLA. Anyways overall it looks pretty good.
Email sent. Read over it when you get a chance.
Hi guys I have been away from a keyboard a couple nights due to really bad tornado weather. I recieved my replacement part for the makerbot on Saturday , phenomenal fast shipping but have not installed it yet. In the meantime I did get a couple things printed for my hulkbuster costume project.

I'm new to 3d modeling so i am getting practice making stl for my hulkbuster costume. So far I have rendered the exhaust stacks on the shoulders and the afterburner for the center of the back. Both i believe I will have super bright color change leds. I cannot take the credit this build is a community effort as far as the 3d design goes.After getting a couple hundred hours of printing experience I have found the perfect tool for removing even large prints without cracking your print.
A 3 dollar pie knife with sharpened edges , my secret 3d printing weapon!
Great innovative idea Josh! Strawberry/rhubarb ..my favorite
I really like your website and I wanted to know what web builder you used to build your website
Hi Josh, I am wondering if you have noticed that as you add shells to a print, the shells are added to the outside of the print, thus making it bigger than designed.
Hi muhammad , i don't know what website building tools Anthony uses but I'm pretty sure there are a few. Last time I built a website I used Front Page 2000.
@bhouston , yes rating the number of shells adds to the horizontal x and y axis walls. This is importantly mostly when printing items with strong curves. You can adjust the infill percentage but if you need your item solid then use 100 percent infill. My hulkbuster smoke stacks I printed over the past couple days had 10 shells and 15 percent infill. They are very very sturdy. I needed them that way so I can mount them with screws to the costume later.
I searched front page 2000 it said it was discontinued in 2006 unless i went on the wrong page if you find the right page please send me a link
Check out www.1and1.com They offer to host your domain name (if available) and also provide the design templates so you can build your website. Basic fee is $10 per month for the website and domain name.
Don't use frontpage, it will not produce a cross browser compatible website, it will build a website which only displays correctly in IE 99% of the time. It's old. It's discontinued.
Personally speaking, and I am old school, I hand code all websites I build using raw html, css etc. However, I have used some programs in the past and in my professional opinion DreamWeaver is the best of the bunch.
A lot of hosts (myself included, however I'm restricted to the UK only) offer browser based website builders. It'll be listed as a feature.
Also there are a lot of pre-made backends such as Wordpress, Buddypress, Drupal, Dragonfly, Nuke (a whole lot of them). Some hosts offer one click installs of these (again, it's something I offer on my packages) but if not then they aren't difficult to install. They do have downsides though, mainly security.
There's no substitute to having a professional build your website though. Sure, you can get the tools and build it yourself for $20 and a whole load of hours but you get what you pay for. People wouldn't pay me what I charge if it wasn't worth it. Even EZ-Robots have an in house developer. Do yourself a favour and hire a professional developer who works strictly to W3C for cross browser, multiple OS, mobile browser compatibility.
I don't know what Anthony uses to build the website however a quick look at the code has indicated whatever it is hasn't done the best job. No disrespect to anyone but a lot of bad practice and errors are in the code from things such as having the css in the html rather than a css document, no correct doctype defined, meta tags aren't great... I could go on and on (and on)... All of these things will mark the site down on any search engine.
@mohammed , lol last i used it was in 2003 to 2006, chrome was not even invented then i believe so multi browser compatibility was not a issue. Last website I built was tenoaksvitamins.com I believe.
So anyways , back to 3d printing..
messing around i decided I would like to make myself some souvenirs. Some are little 3d printed robots but I tried printing a 3d starship Moya from Farscape and on the other printer I did another ironman ARC reactor scaled to 3.25 inch wide for Justins War machine suite.
I never said it didn't work, I said (XLRobots) contained errors and bad practice. W3C Check shows some errors.
Your flowernow site (homepage only); Website does not display correctly on mobile devices. Website does not display correctly in Firefox at 1024x768. No robots.txt No sitemap.xml
SEO report score of 52% Google pagerank of 0
I could continue but there's no point as it seems you have taken offence to my comment where it was meant as advice. I don't dispute the site loads and brings in sales however, from a web development point of view it isn't great and gives a very poor google page rank.
XLRobots falls to the same issues. Unless people are given the link in one form or another it's difficult to find the site.
Hi Anthony I was wondering which web builder you are using for xl robots
Thanks
Do you pay per month or anything like that
So it's like a once of thing
Ok , so giving some thread CPR here. I have been through i would guess about 150 hours or more of printing on the replicator 2. Unfortunately BOTH my replicators extruder clogged the same day. Both are stuck like chuck. I have done the normal troubleshooting to get it unclog get so now I'm looking for more extreme method. I was bummed I have not been able to print today.
Basically I have been printing practically non stop except maybe 2 to 3 hours between prints in some cases. I am printing the hulkbuster helmet is several segments I cut up from another 3d model a friend gave me. This was the progress in dark grey.
replace your heater
Alright , taking Dj and Ants suggestions I utilized maker care for one machine and had to shovel out of pocket 153 dollars for a new hot end for each makerbot replicator 2. I received one yesterday and another in a couple days...
Hi @jstarne1. I solved the problem by purchasing new extruder tips. When it clogs I simply put a new one on and it is good for another x hours. I have however learned how to clean my old tips but I have a complete machine shop so it was easy for me but probably out of the norm for most. A new tip is a lot cheaper than a new extruder, heater or whatever. Just my experience.
@bookmaker , where are you getting your tips from? How much are they?
I wanted just to get a tip buy they wanted to sell an assembly. Maybe they were out of tips? Hmm. Your feedback is appreciated , I'm looking for a supplier that makes perfect direct replacements for the makerbot rep 2 and I will order a few of them for future use. Agian thanks
I run a E3D v5 hot end and I know a lot of Makerbot guys use them. I don't know how much trouble it is to adapt but I bet since so many are using them that their forum would be a good source.
E3D
It may even fit, I have never seen a Makerbot up close, just coveted it for a long time.
Ok so the makerbot support was nice enough to give me the model print nozzle they use. Mk6 .2mm extruder nozzle. I believe I found them for about 3 bucks each verses the 20 each from makerbot. Also they appear to be out of them right now..
Also I found a cleaning tool set as well for easier cleanings in the future...
I myself have been ok with 4 to 6 hour prints being unattended however i like to setup a camera so i can watch my printer from anywhere. Just in case a part peels up , or clog in the extruder i can stop it remotely.
Personally i prefer to hang the spools overhead about 16 to 18 inches on a wooden rod. It makes storage easy , feeding filament is effortless since you no longer need to use the guide tube when feeding from an over hang. I have used about 6 spools of makerbot filament and they have a thin but long spool which helps keep the filament from unspooling on accident. I have been using alternative filament without an issue. Every clog i have had was with makerbot filament.
Oh and thanks , ironman does rule haha
What brand of filament do you use? I bought a bunch of filament when I bought the unit... and it was all Makerbot brand. The pricing of their filament is high and their winding is garbage... I wonder if they wind it by hand? Lol. I need to get some more filament soon because I am running low so now is a good time to switch to an alternative! Also, how do you stop printing remotely, is there an input on the electronics for that? I might use such a feature with a filament monitor I might build.
Plug it in through usb port and use remote desktop to that pc. Then use a webcam or wireless ip cam to watch your print job.
http://www.ebay.com/itm/291017053164?_trksid=p2059210.m2749.l2649&ssPageName=STRK%3AMEBIDX%3AIT
store is faveprices
14.80 plus 7 shipping per spool , a little better price than makerbots 60.00 per 2.2lb spool plus shipping and 9 dollars insurance.
That is a solid deal on the filament! Thanks again! I mainly queue most of my long jobs on SD card as my main machine is a Microsoft Surface, and it's pretty mobile.
The surface uses windows RT unless you have the latest model. I do have a dell venue pro 8 and a acer w3 as well , similar windows x86 distro tablets.
No, I have had the Surface Pro 2 and docking station running Windows 8.1 64 bit. It's a full PC and like an ultrabook. I run Geomagic Cad on it, Makerbot software, CAM...and all of my work Windows software...QuickBooks, CooCox programming environment for ARM, Atmel Studio, Visual Studio, Office 365 etc.
It totally rules, but I wish I new that the Surface 3 was coming out so quickly.
BTW, Surface was introduced with RT on the ARM model and WIndows 8.0 on the Pro model from the very beginning and at the same time: The first-generation of Surface devices (Surface and Surface Pro) were both announced on June 18, 2012.
Yea the "PRO" is the difference lol