
Movement Scripting Help Please?>
Can anyone help with scripting? I need to be able to have the speed of the G-Bot be ramped up and down rather than full on/off or there is a serious risk it will topple.
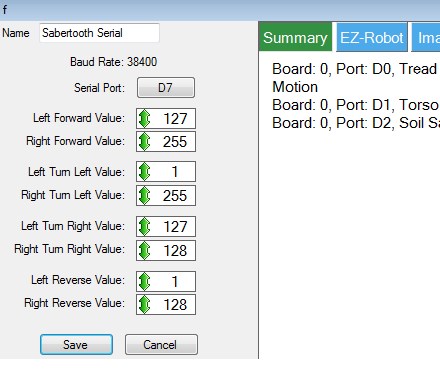
Right now I have the sabertooth control set up as in the attached photo. I have joystick 1 of the joystick control controlling it but I only get full on or off or full clockwise or counterclockwise rotation. Also, the joystick is 90 degrees off what I'd like( '3 o'clock' = forward, '9 o'clock' = reverse, '12 o'clock' = clockwise in place, '6 o'clock' = counterclockwise in place - but I can live with that for now if I have too).
I've been reading and watching tutorials and it seems like the movement scripting control is designed to do this but the input lines are different between the movement script control and the sabertooth control(stop, forward, reverse, left right versus 'left forward', 'right forward', 'left turn left', 'right turn left', 'left turn right', 'right turn right', 'left reverse', 'right reverse') and I have no idea how to write a script command to appropriately include a variable to do what I'm trying to do (OMG, that high school curse had come true! It comes down to algebra! doesn't it? Oh noooo!)
Can anyone take mercy on us and our Halloween plans and suggest some script to try and tell me which lines should go where?
PLEASE, PLEASE, PLEASE?
Thank you, Gwen

That's very nice of you @Rich
Thanks
It's what I do, I'm more than happy to help when it comes to writing scripts and solving problems However, I do make you work a little bit for it.
Since I don't use a joystick I wasn't aware that you couldn't map scripts to directions and since (at least my joystick) sends the joystick x and y values all over the place when centred (very sensitive I guess) my original plan didn't quite work however, mapped to buttons works, possibly better.
I also don't have a sabertooth to test with. Using the custom graph I think I've got it all around the right way but a real sabertooth test is needed.
I've uploaded an example set of scripts and joystick control with mapped buttons (xbox controller, A and Y are forwards and reverse). You can download it here
What it does is this... On connection the init script must be run (set up on the connection control in the example project). This defines the motor speed variables. Without it being run it will fail on error as the variables don't exist.
The ramping script is called with control command. See the Test script for examples. However before using ControlCommand you need to set the desired end speeds. Simply set the $motor1speed_end and $motor2speed_end variables before the control command. For instance, if you wanted to ramp to full speed forwards you would use this code
If it's part of a sequence or larger script change ScriptStart to ScriptStartWait to hold the script calling the command until the ramping is complete.
With the joystick buttons similar is done. Set the two speed variables as before and call the ramp speed script to run.
The ramp speed script simply increases or decreases the speed as required based on the current speed. This also means that if you suddenly need to go from forwards to reverse it wont stop quickly but ramp down then back up.
You may want to add in some emergency stop command though, as previously mentioned, just in case as ramping to stop positions may take some time, and in that time you may end up with a robot covered in furniture or a very squashed small child.
I didn't have time to comment the code properly but there isn't much that needs changing. Also it made it more difficult for me to follow when I was putting notes in it. Since it's easier to add these notes after making the script I'll do it now by annotating the main ramp code below
The ramp code is as follows;
That's pretty much all there is to it.
Just set the desired speed to ramp to (variables $motor1speed_end and $motor2speed_end) Run a controlcommand ARC does the rest and smoothly ramps from the current speed to the desired speed.
Check the sabertooth direction values, I didn't double check them.
Hopefully that's at least enough to copy & paste and get it up and running by halloween. It can be improved though and I'd be happy to revisit it when we both have a little more time.
Ask any questions you have, I'm always around to answer them (except for on the 31st when I'll be busy with my own Halloween stuff)
@Rich,
To script the joystick positions (as opposed to buttons), you use a custom movement panel, and script the movement directions there. A joystick will automatically drive the Movement Panel directions and center/stop (as will the arrow keys on the keyboard).
Alan
Thanks (see I don't know everything ) I'll update the project file in a bit to use the movement panel, I don't know why I didn't include a Movement Panel to begin with to be honest, too focused on making the script work without any sudden starting and stopping I guess.
Thanks Alan!
Looks like I had a major brain fart on that one... I did know about the joystick moving the movement panel, I even unchecked the box for it!..
Project updated on the cloud, also fixed a couple of other things (such as the forward and reverse values) and added in ramping for turning too, however I'd be interested in knowing if the method works...
Also renamed the two graphs (the hard way - sidenote: DJ, any chance of having that in a future update? It would be really handy to know which graph does what)
Same link to the project as before or click here
I know you are helping... OMG
So I'm trying to sort this out... Your download link opens an .xml file which confuses me greatly. OMG more code. Sorting code from code... Oh my...
I tried to grab the relevant code from it. I will parse it bellow. Can you describe (as explicitly as possible blush ) please exactly where to place which pieces of code?
Sorry I'm so obtuse with this... Nuclear medicine is easy, this,... isn't.... lol
I could assign the code to the cross joystick Not sure if that's what you call it but the ARCs software see its four deflections as buttons with the possibility of commands being issued when its depressed and when its released) on the game controller.
:P
ok, I have to go out soon so I wont be able to decipher more and experiment until later tonight (~9:30pm or so ET)
Why when I click the link you provide do I get .xml with even more code to work through?
Also @thetechguru, when I was experimenting with my previously listed verbose ramping script, I did enter it into a custom movement script control and it seemed to ramp and function as expected when executed but when I tried to move it with the joystick it didn't work. I wasn't sure why I was using a clean project for experimentation..
The download should download a .ezb file (which yes, is an xml file if you want to get technical). It should open in ARC though, don't try to understand it or copy it from a text editor, that's how problems happen
If you struggle to open it from downloading via the forum it's on the cloud so try opening it from within ARC. Under the File ribbon menu on the right is the EZ-Cloud. Click Open Then choose Public Library at the top of the dialogue that pops up In Catagory choose EZ-Script Examples In User select Rich (currently has a 32 after it) Hit search It should be the top one, sabertooth ramping
Open it. Save it locally
You can then merge the required controls. These would be...
Custom Movement Panel Movement Controls
Note: If you have a Movement Panel already you must remove it before merging.
Then, in your connection control click on the gear icon for the config In the top box 0 - Connection Established Cmd: put
An even better option, attach your current project to this topic, I'll download it and add in the required "bits" that are needed and upload it.
Yes you could add it to the d-pad (the cross joystick) provided it is seen as buttons by ARC.
Provided you have merged the script manager (renamed to Movement Controls) in to the project just use the following code snippets.
All of these are on button down.
Forward/Up
Reverse/Down
Left
Right
Now on all of those On Button Up needs to be