
Can anyone help with scripting? I need to be able to have the speed of the G-Bot be ramped up and down rather than full on/off or there is a serious risk it will topple.
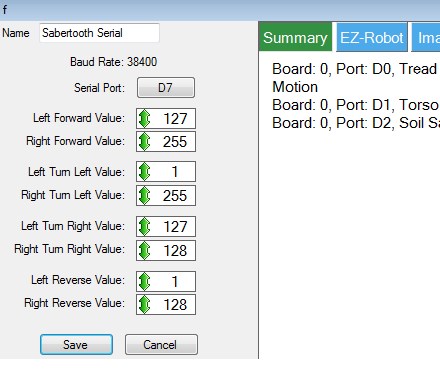
Right now I have the sabertooth control set up as in the attached photo. I have joystick 1 of the joystick control controlling it but I only get full on or off or full clockwise or counterclockwise rotation. Also, the joystick is 90 degrees off what I'd like( '3 o'clock' = forward, '9 o'clock' = reverse, '12 o'clock' = clockwise in place, '6 o'clock' = counterclockwise in place - but I can live with that for now if I have too).
I've been reading and watching tutorials and it seems like the movement scripting control is designed to do this but the input lines are different between the movement script control and the sabertooth control(stop, forward, reverse, left right versus 'left forward', 'right forward', 'left turn left', 'right turn left', 'left turn right', 'right turn right', 'left reverse', 'right reverse') and I have no idea how to write a script command to appropriately include a variable to do what I'm trying to do (OMG, that high school curse had come true! It comes down to algebra! doesn't it? Oh noooo!)
Can anyone take mercy on us and our Halloween plans and suggest some script to try and tell me which lines should go where?
PLEASE, PLEASE, PLEASE?
Thank you, Gwen
I'll add it to the list
If not, is there a work around? Can I use another control to control the sabertooth that might support ramping?
something like below is serial commands to tell the sabertooth to move forward (depending on your motor wiring... loop this a few times changing the variable values will give you your ramping to some extent
Code:
Changing the values of $leftMotorSpeed and $rightMotorSpeed) will either slow, speed up or reverse the corresponding motor...
I posted a quick example of a ramping script a while ago, I've no idea what topic it was in though and it's probably quicker if I throw up another quick example of how to gradually increase or decrease a variable...
As always, this is an example so will need to be tailored to your project and probably used as part of a larger script.
Code:
I haven't tested it and it was written straight in to the forum so there may be some syntax errors (there shouldn't be but there may be).
You could take the first 3 variables out of this script and save the script as a ramping control script triggered by ControlCommand() from another script. Have the script which triggers this one set the start speed, end speed and speed steps and it'll save you having to rewrite it over and over if you need ramping for other actions.
If that last paragraph doesn't make sense I'll knock up a quick Example Project which would explain it clearer, just ask.
Hope that's of some help
Is anything after # a comment?
I have the script manual but it doesn't seem to include a primer or rules on syntax. I am unsure how to loop etc. Do I separate commands with commas? Do successive commands need to be on separate lines? Is there a 'loop' command etc?
I will experiment with this as I'm sure its my best option to get something going soon.
Is there anything like a scripting primer?
Thanks so much for giving me something to work with anyway!
Gwen
@Gwen yes, the # is a comment out marker same as // is to C
The loop is the RepeatUntil() part and ends at the EndRepeatUntil. If you wanted a constant, forever loop you could use a :label and Goto() to achieve this or set a RepeatUntil() to have an impossible statement i.e. RepeatUntil(1>2)
You don't need to change much in my example I posted (however refresh the page as I noticed I made a mistake and had the code incrementing from 65 to 127 not decreasing from 65 to 1). Just the start point, end point and number of steps per loop of the code.
To move the other direction the script will need modification as far as the following goes;
Code:
To increase in reverse (for motor 1) it needs to add $speedsteps to $newspeed not subtract it so change the - to a +
Motor 2 works the other way... the Sabertooth likes to get confusing to follow
As for separating commands. They are separated on a new line. The scripts run stupidly fast (like thousands of lines of code per second) so if you set one line to move motor 1 then another to move motor 2 both would appear to move at the same time, the delay in starting is so small it's not worth even trying to think about.
What's a "scripting primer"? (I guess that means no lol)
1) Load ARC
2) Press the OPEN button from the project tab under FILE
3) Press the EXAMPLES button
4) Select either EZ-Script Examples or EZ-Script Function Syntax
EZ-Script Function Syntax: This is a folder with examples of every EZ-Script function. For example, if you search for the word repeat in this folder, you will find an example that shows how to use repeat
EZ-Script Examples: This is a folder with examples on how to write code to perform some things. As well as demonstrating some syntax, this folder is more "functional" examples than syntax examples.
Additionally, the EZ-Script Examples Lesson will be of use to you. Here is the link: http://www.ez-robot.com/Tutorials/Lesson/22
Code:
And here is the code that makes my robot slowly accelerate in reverse:
Code:
when I insert these sets of code into the movement script in the appropriate 'Forward' and Reverse' boxes, the robot gently accelerates forward and reverse when using the respective onscreen control buttons. but its difficult to control this way.
When I have the joystick control the movement script, the acceleration is nice but there is no way to decelerate. I have to reverse direction which if done from full speed is herky, jerky. There is no way to ramp down. and there is no stop when the joystick is in the middle. It stays on in either direction. The only thing i could think of was to enter a stop command in the stop line of the movement script control
Code:
That sure stops the robot. Stops dead from any speed when the joystick hits the middle... Not good.
I figure this is solvable but am pretty sure this would be complicated and way beyond my primitive scripting abilities at this point.
Any suggestions are welcome...
You'll need to do some calculations, and possibly throw an IF in there to avoid a sudden stop, something like;
Code:
However this would lose the ability to suddenly stop it if there is a problem, you would need to add an emergency stop command somewhere.
Also, you can greatly reduce the lines of code for ramping with a simple counter and repeat.
This
Code:
Becomes something like
Code:
I think you may want more than one emergency stop button. One that ramps quickly (maybe just sets your speed increment variable higher) and one full stop. With something top heavy like a B9 I would be concerned that a full stop at full speed might tip over, but you still want the ability to full stop for emergencies since it is so heavy and those motors are so strong. Don't want to run over children/pets/etc.
Alan
I may just have to control the sabertooth with my Futaba R/C for now.
Any scripting gurus want to write the code for me and help me work it out via Skype today?
I dont have a ton of $ but coud PayPal a small consulting fee ($50)...
I don't have a sabertooth to test with but I'm confident that it'll work.
No consulting fee required, helping is it's own reward.
Thanks
Since I don't use a joystick I wasn't aware that you couldn't map scripts to directions and since (at least my joystick) sends the joystick x and y values all over the place when centred (very sensitive I guess) my original plan didn't quite work however, mapped to buttons works, possibly better.
I also don't have a sabertooth to test with. Using the custom graph I think I've got it all around the right way but a real sabertooth test is needed.
I've uploaded an example set of scripts and joystick control with mapped buttons (xbox controller, A and Y are forwards and reverse). You can download it here
What it does is this...
On connection the init script must be run (set up on the connection control in the example project). This defines the motor speed variables. Without it being run it will fail on error as the variables don't exist.
The ramping script is called with control command. See the Test script for examples. However before using ControlCommand() you need to set the desired end speeds. Simply set the $motor1speed_end and $motor2speed_end variables before the control command. For instance, if you wanted to ramp to full speed forwards you would use this code
Code:
If it's part of a sequence or larger script change ScriptStart to ScriptStartWait to hold the script calling the command until the ramping is complete.
With the joystick buttons similar is done. Set the two speed variables as before and call the ramp speed script to run.
The ramp speed script simply increases or decreases the speed as required based on the current speed. This also means that if you suddenly need to go from forwards to reverse it wont stop quickly but ramp down then back up.
You may want to add in some emergency stop command though, as previously mentioned, just in case as ramping to stop positions may take some time, and in that time you may end up with a robot covered in furniture or a very squashed small child.
I didn't have time to comment the code properly but there isn't much that needs changing. Also it made it more difficult for me to follow when I was putting notes in it. Since it's easier to add these notes after making the script I'll do it now by annotating the main ramp code below
The ramp code is as follows;
Code:
That's pretty much all there is to it.
Just set the desired speed to ramp to (variables $motor1speed_end and $motor2speed_end)
Run a controlcommand
ARC does the rest and smoothly ramps from the current speed to the desired speed.
Check the sabertooth direction values, I didn't double check them.
Hopefully that's at least enough to copy & paste and get it up and running by halloween. It can be improved though and I'd be happy to revisit it when we both have a little more time.
Ask any questions you have, I'm always around to answer them (except for on the 31st when I'll be busy with my own Halloween stuff)
To script the joystick positions (as opposed to buttons), you use a custom movement panel, and script the movement directions there. A joystick will automatically drive the Movement Panel directions and center/stop (as will the arrow keys on the keyboard).
Alan
Thanks Alan!
Project updated on the cloud, also fixed a couple of other things (such as the forward and reverse values) and added in ramping for turning too, however I'd be interested in knowing if the method works...
Also renamed the two graphs (the hard way - sidenote: DJ, any chance of having that in a future update? It would be really handy to know which graph does what)
Same link to the project as before or click here
So I'm trying to sort this out... Your download link opens an .xml file which confuses me greatly. OMG more code. Sorting code from code... Oh my...
I tried to grab the relevant code from it. I will parse it bellow. Can you describe (as explicitly as possible *blush*
Sorry I'm so obtuse with this... Nuclear medicine is easy, this,... isn't.... lol
I could assign the code to the cross joystick Not sure if that's what you call it but the ARCs software see its four deflections as buttons with the possibility of commands being issued when its depressed and when its released) on the game controller.
Code:
Code:
Code:
Code:
Code:
Why when I click the link you provide do I get .xml with even more code to work through?
Also @thetechguru, when I was experimenting with my previously listed verbose ramping script, I did enter it into a custom movement script control and it seemed to ramp and function as expected when executed but when I tried to move it with the joystick it didn't work. I wasn't sure why I was using a clean project for experimentation..
If you struggle to open it from downloading via the forum it's on the cloud so try opening it from within ARC.
Under the File ribbon menu on the right is the EZ-Cloud. Click Open
Then choose Public Library at the top of the dialogue that pops up
In Catagory choose EZ-Script Examples
In User select Rich (currently has a 32 after it)
Hit search
It should be the top one, sabertooth ramping
Open it. Save it locally
You can then merge the required controls. These would be...
Custom Movement Panel
Movement Controls
Note: If you have a Movement Panel already you must remove it before merging.
Then, in your connection control click on the gear icon for the config
In the top box 0 - Connection Established Cmd: put
Code:
An even better option, attach your current project to this topic, I'll download it and add in the required "bits" that are needed and upload it.
Yes you could add it to the d-pad (the cross joystick) provided it is seen as buttons by ARC.
Provided you have merged the script manager (renamed to Movement Controls) in to the project just use the following code snippets.
All of these are on button down.
Forward/Up
Code:
Reverse/Down
Code:
Left
Code:
Right
Code:
Now on all of those On Button Up needs to be
Code:
SabertoothRamping3.zip
Extract it to My Documents/ARC/My Projects
You should then find a project in your projects called Sabertooth Ramping 3.ezb
There may yet be hope...
You are the UNDISPUTED MASTER OF THE SCRIPT! WWWWOOOOOOO HOOOOOOO!
The movements are great!
You are right about the ramping up and down not stopping quickly. There is a little lag when starting, stopping and changing direction but WAY F'ING COOLLLLL!
Would it be too difficult to make the following changes:
Change the direction of the joystick control for forward and backward? Right now, forward deflection (12 o'clock) of the joystick makes the robot go in reverse and rear deflection (6'oclock) makes it go forward. BUT THE TURN DIRECTIONS ARE SPOT ON.
Change the max speed of turns down a bit to maybe 80%?
OMG....... I am sooo exicted! Up until now I've been afraid to take him out of the garage. There is a small bump leaving from the concrete pad to the asphalt and I was worried he'd go over if I tried to have him go over it fully assembled and at full speed.
OMG, Ill do some testing with him outside tomorrow! (getting dark now and I really have to be somewhere soon.)
Woooooooooooooo Hoooooooooooo! @Rich is THE MASTER!
HAPPY, HAPPY JOY, JOY!
Click on the gear icon on the custom movement panel
Click on the small pencil to the right of the box that says Multiline Script for whichever direction you want to change
You will see lines 1 and 2 are something like this
Code:
Adjust the numbers to suit.
So for forwards change them to 127 and 129
For reverse change to 1 and 255
For turning just tweak the numbers down a bit (you may need to play around with them).
I think these are right (Richard R will correct them if wrong, I'm sure he knows them)
Motor 1 full forwards the value is 1
Motor 1 stop the value is 64
Motor 1 full reverse the value is 127
Motor 2 full forwards the value is 255
Motor 2 stop the value is 192
Motor 2 full reverse the value is 129
If you need to make it ramp slower you need to edit the Ramp Speed script, just adjust the variable $rampdelay on line 9. Increase it for a slower speed ramping, decrease it for a quicker speed ramping. The shorter the delay the faster the speed will increase, the longer the delay the slower it will increase.
If you have slower turning speeds than forward and reverse speeds the script will automatically ramp down to the slower speed too.
@Rich, I can't thank you enough!
Motor 1 full forwards the value is 1
Motor 1 stop the value is 64
Motor 1 full reverse the value is 127
Motor 2 full forwards the value is 255
Motor 2 stop the value is 192
***Motor 2 full reverse the value is 129 needs to be 128 not 129****
Alan
@Alan, funnily enough when I started the script I over complicated it. It's amazingly simple how it works which is great however it did take me 3 attempts to get it right (and I suspect there are one or two things that could be written better).
@Gwen, I'm happy to help out. Writing scripts is an escape and despite me claiming I was going to stop spoon feeding and force people to get the end result themselves it's always good to get stuck in to a useful script
Im thinking an e switch on the power to the sabertooth but am not sure how to make it cut out in the event of a disconnect. The e switch might have to flip a relay too beacause of the current. I don't have an amp meter but i know its drawing over 20 amps at startup...
Any thoughts?
The good news is, the digital ports on the EZ-B will go low on disconnection so you could use this to de-energize the relay. You would need to set the digital port to high/on in some kind of init script though otherwise the power to the motors will be cut until it's set high.
edit: here is the thread: sabertooth one-way cutoff
The Sabertooth has regenerative charging, so if you are pushing the bot around so that the motors spin, they will act like generators, that the Sabertooth will push voltage back to the batteries. If there is no where for that voltage to go, the Sabertooth can be damaged.
So, absolutely need an emergency cutoff, but should be designed so that it only stops flow from battery to sabertooth, but not from sabertooth to the battery.
Alan
So a relay which switches between straight through connection to the motors from the battery (for normal operation) and switches to the same but with diodes to only allow flow from sabertooth to battery to happen for when emergency shut off?
Quick and dirty schematic time
When energised it works as normal. When power is cut it allows current flow in only one direction (i.e. regenerative)
I realise I have the relay backwards and I may even have the diode backwards, it's not meant as a proper schematic but an aid to my description above
P.S. Don't judge me on the schematic, I did say it was quick and dirty
If you are short of discretionary cash, but are serious about wanting to get one, I have two thoughts for you.
1) The 2x12 is functionally identical to the 2x25 but costs about 1/3 less.
2) If you want either, and still have copious EZ-Robot credit, you could order me some EZ bits that I need and I'll order you a Sabertooth, so you get the Sabertooth as a thank you for answering so many questions, and I still get the bits I would be buying anyway.
Alan
I also have a large pile of things I have been wanting to get through for a while now and it's getting bigger. BlinkM, TellyMate (all variants), LCD displays, I2C communication with other controllers, JD, Six, a bunch of EZ-Bits... I think I need to clear at least some of that pile before I add more to it
Thanks for the offers and advice as always though.
The bad new: He ended up off the driveway in a ditch tipping JUUUUSSSST shy of going over... wheww... The control is a bit unnatural due to the lag and the way the ramping seems to continue for a time after input stops. Add to that my driveway is uneven and mildly inclined plus, my notebook seemed to be working hard. There seemed to be a com delay too.
Note to self: Do not wear flip flops while experimenting with a 300 lb robot and NEVER get the front of one under a tread...
Note to self two: Get a wireless game controller and NEVER let the cord of the current one get under a tread... Very bad...
It was much better when I got him into our street which is level. One of my neighbors drove by and stopped next to him. The G-Bot escorted him down the street for a short bit... very cool.
The good news: He DIDN'T go over and my and my neighbors had some great fun!
I'll do some more practice with him tomorrow when my Son will be home. That should be fun and hopefully we'll figure out enough to get a few Trick or Treaters going on Friday...
I'll put up a short vid later tonight
Alan
Here is the video from yesterday's testing...
@thetechguru
@rich
@Richard
@Richard R
More next week after the dust from Halloween settles...
Enjoy
Thanks for all your help guys!
Not sure if its the code or com or my cpu but sometimes there is a long lag, like several seconds before the robot begins to move again.
either way its definitely an improvement and its ingestion merged into the rest of the Halloween routine!
Thanks again Rich!
I think it doesn't like multiple joystick inputs. Seems to paralyze it. Not really sure though.
I would do it but I'm away now until the end of the weekend.
Alan
No worries though, I have the G-Bot set up with v1 of the ramping code and am ready to go...
The G-Bot's Halloween 2014 development phase if officially closed. Its showtime!
Lots of lessons learned ... Lots of fun...
Scared the heck out of my grandson...