
ed_eilers

I would like to get some help on serial bus servo's that use almost the same protocol as dynamixel.
BUT all the dynamixel instruction packets and status packets start with:
0xFF 0xFF and then you get ID> Length> Instruction>Parameters>Checksum
like this
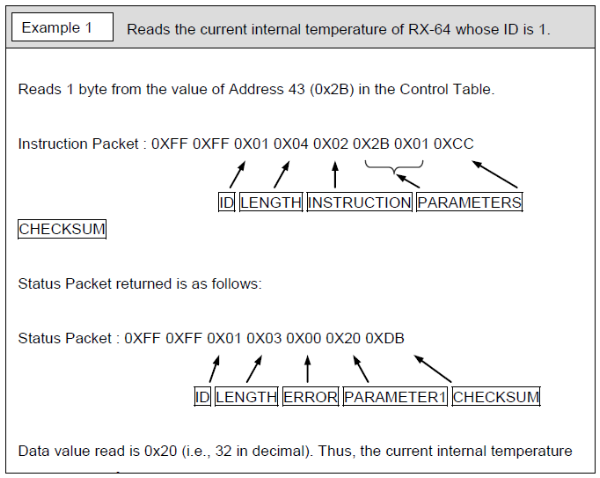
The servo's I want to use are Lobot LX-16A that use the same protocol with one difference: the packets start with 0x55 0x55 and then ID> Length> Instruction>Parameters>Checksum
so my servo's don't react on the dynamixelplugin
How can I or someone change the 0xff too 0x55 in the plugin?
Is it possible too get the source code for the plugin?
or is there another solution?
I can't afford real dynamixels and this seemed a good alternative
thanx in advance for your help
@DJ is this one open source and am I right that the link is missing?
Alan
I hope that I can get this to work will take some time but if I got it working i will post it for other people too use.
I think these are nice servo's and it will open some new possibilities for my Ez robot
Can tell you that I'm very happy with Ez robot and the effort that is put in it.
thanks guys
https://www.dropbox.com/sh/b3v81sb9nwir16q/AACkK-tg0q39fKJZcSl-YrqOa/LX-16A%20Bus%20Servo?dl=0
The communication protocol is fairly well documented
https://www.dropbox.com/sh/b3v81sb9nwir16q/AACkK-tg0q39fKJZcSl-YrqOa/LX-16A%20Bus%20Servo?dl=0&preview=LewanSoul+Bus+Servo+Communication+Protocol.pdf
haven't managed to get to work with EZB yet. Tried the dynamixel plugin but no luck as per above it initialized with 0x55 not 0xFF
I opened source to change to 0X55 but two pages of errors in visual studio ... I think I will go play with the UART
Follow the tutorial on creating a plugin to familiarize yourself with visual studio and programming. It’s fun, even if it takes a while!
I ordered a servo to test with.
Now I use ez-robot to generate the commando's as a virtual servo them send the value and id serial to a arduino that translates it to the right protocol and that goes serial to the interface and that controles the servo.
stil having trouble to send and the servo value and the id from ez-robot to arduino in a good way as i can't figure out how to do this in the scripting language
the visualbasic did not work for me also errors and sleepless nights
Glad more people picked this up and maby DJ can add this servo to EZ-Robot because it opens a hole lot of new possibilyties to EZ-Robot
Greetings ED
think you need too use the interface.
i will test it tonight
I would not be to sure about quality of lewansoul though they say they are up to 8v and can run off a 2s lipo but turns out motor according to this thread is 4.5v I quickly threw a voltage regulator on to be safe. http://forums.trossenrobotics.com/showthread.php?14684-Lewansoul-LX-16A-bus-servo
These are the HDD servos, @Ed...
@Nink, I don’t have faith in those LewanSoul servos either... there’s only two servo brands I trust: ezrobot HDD’s and DYNAMIXEL. Anything else is a waste of dollars.
Time and time again I watch people on here try to save a buck by purchasing eBay and poorly made cheap servos. It ends up costing the user more because they end up having to purchase proper servos - or they abandon the project all together...
By supporting these poorly manufactured cheap servos in a plugin, ezrobot is not supporting or endorsing these fire hazards. My only initiative to support these servos is because enough community members have asked for support. And that’s what ezrobot does, whether we agree or not
Are you referring to the plugin? The servos would connect directly to the EZ-B via the specified UART in the config of the plugin. I recommend using the hardware UART and not software (unless it's an IoTiny)
They give you a little protocol converter controller. So you go EZB D5=>Controller=>LewanSoul
I tried D5 to LewanSoul direct as well
https://www.amazon.com/LewanSoul-BusLinker-Debug-Board-LX-16A/dp/B073WRLJB2
Also, there's a bunch of reference to using the USB/TTL Debug servo Board. Which I cannot seem to find any documentation of - specifically no communication protocol documentation. Unless it uses the same communication protocol as the servos, in which case it "should" work.
I wil send later some pictures and a link with al the info i have got plus the arduino code that drives these servo's via the interface with is needed to make it work.
thanks for the effort so far
Regulated power in the ezb is absolutely NOT for motors or high current. There’s an amperage limit in the datasheet. Make sure you check the datasheet when building a custom robot.
I keep my common datasheets printed and taped to my wall for quick reference. Here’s the ezb datasheet: http://www.ez-robot.com/Tutorials/Lesson/18
Regarding the Arduino setup - are you connecting the servos directly to the Arduino or using the usb/ttl board? I’m confused by this magical usb board because it’s referenced in their documentation and nink mentioned it as well. Maybe the plugin should be communicating with that board instead?
and connected the hardware UART vcc from the EZ-B to the UART interface VCC plus TX RX and GND and that did killed my EZ-B *stress*.
I have been trying to get the plugin to work but On the hardware UART no joy and software UART TX->RX also nothing happens, the thing what i could not get right in EZ-B script was the adressing of the low and high byte:
#define GET_LOW_BYTE(A) (uint8_t)((A))
//Macro function get lower 8 bits of A
#define GET_HIGH_BYTE(A) (uint8_t)((A) >> 8)
//Macro function get higher 8 bits of A
#define BYTE_TO_HW(A, B) ((((uint16_t)(A)) << 8) | (uint8_t)(B))
//put A as higher 8 bits B as lower 8 bits which amalgamated into 16 bits integer
#define LOBOT_SERVO_FRAME_HEADER 0x55
#define LOBOT_SERVO_MOVE_TIME_WRITE 1
#define LOBOT_SERVO_MOVE_TIME_READ 2
#define LOBOT_SERVO_MOVE_TIME_WAIT_WRITE 7
#define LOBOT_SERVO_MOVE_TIME_WAIT_READ 8
#define LOBOT_SERVO_MOVE_START 11
#define LOBOT_SERVO_MOVE_STOP 12
#define LOBOT_SERVO_ID_WRITE 13
#define LOBOT_SERVO_ID_READ 14
#define LOBOT_SERVO_ANGLE_OFFSET_ADJUST 17
#define LOBOT_SERVO_ANGLE_OFFSET_WRITE 18
#define LOBOT_SERVO_ANGLE_OFFSET_READ 19
#define LOBOT_SERVO_ANGLE_LIMIT_WRITE 20
#define LOBOT_SERVO_ANGLE_LIMIT_READ 21
#define LOBOT_SERVO_VIN_LIMIT_WRITE 22
#define LOBOT_SERVO_VIN_LIMIT_READ 23
#define LOBOT_SERVO_TEMP_MAX_LIMIT_WRITE 24
#define LOBOT_SERVO_TEMP_MAX_LIMIT_READ 25
#define LOBOT_SERVO_TEMP_READ 26
#define LOBOT_SERVO_VIN_READ 27
#define LOBOT_SERVO_POS_READ 28
#define LOBOT_SERVO_OR_MOTOR_MODE_WRITE 29
#define LOBOT_SERVO_OR_MOTOR_MODE_READ 30
#define LOBOT_SERVO_LOAD_OR_UNLOAD_WRITE 31
#define LOBOT_SERVO_LOAD_OR_UNLOAD_READ 32
#define LOBOT_SERVO_LED_CTRL_WRITE 33
#define LOBOT_SERVO_LED_CTRL_READ 34
#define LOBOT_SERVO_LED_ERROR_WRITE 35
#define LOBOT_SERVO_LED_ERROR_READ 36
//#define LOBOT_DEBUG 1 /*Debug ï¼print debug value*/
byte LobotCheckSum(byte buf[])
{
byte i;
uint16_t temp = 0;
for (i = 2; i < buf[3] + 2; i++) {
temp += buf[i];
}
temp = ~temp;
i = (byte)temp;
return i;
}
void LobotSerialServoMove(HardwareSerial &SerialX, uint8_t id, int16_t position, uint16_t time)
{
byte buf[10];
if(position < 0)
position = 0;
if(position > 1000)
position = 1000;
buf[0] = buf[1] = LOBOT_SERVO_FRAME_HEADER;
buf[2] = id;
buf[3] = 7;
buf[4] = LOBOT_SERVO_MOVE_TIME_WRITE;
buf[5] = GET_LOW_BYTE(position);
buf[6] = GET_HIGH_BYTE(position);
buf[7] = GET_LOW_BYTE(time);
buf[8] = GET_HIGH_BYTE(time);
buf[9] = LobotCheckSum(buf);
SerialX.write(buf, 10);
}
void setup() {
// put your setup code here, to run once:
Serial.begin(115200);
delay(1000);
}
#define ID1 1
#define ID2 2
void loop() {
// put your main code here, to run repeatedly:
LobotSerialServoMove(Serial, ID1, 100, 500);
LobotSerialServoMove(Serial, ID2, 500, 500);
delay(1000);
LobotSerialServoMove(Serial, ID1, 500, 500);
LobotSerialServoMove(Serial, ID2, 600, 500);
delay(1000);
LobotSerialServoMove(Serial, ID1, 900, 500);
LobotSerialServoMove(Serial, ID2, 700, 500);
delay(1000);
LobotSerialServoMove(Serial, ID1, 500, 500);
LobotSerialServoMove(Serial, ID2, 600, 500);
delay(1000);
}
LobotSerialServoMove(Serial, ID1, 100here, 500);
LobotSerialServoMove(Serial, ID2, 500here, 500);
will make the servo move from 0-1000 0 deg to 240 deg
the id is the servo you want to move and the last value is the speed
void LobotSerialServoMove(HardwareSerial &SerialX, uint8_t id, int16_t position, uint16_t time)
{
byte buf[10];
if(position < 0)
position = 0;
if(position > 1000)
position = 1000;
buf[0] = buf[1] = LOBOT_SERVO_FRAME_HEADER;
buf[2] = id;
buf[3] = 7;
buf[4] = LOBOT_SERVO_MOVE_TIME_WRITE;
buf[5] = GET_LOW_BYTE(position);
buf[6] = GET_HIGH_BYTE(position);
buf[7] = GET_LOW_BYTE(time);
buf[8] = GET_HIGH_BYTE(time);
buf[9] = LobotCheckSum(buf);
SerialX.write(buf, 10);
}
But to get the low byte, in any language supporting binary operation, you’d do this...
$lowbyte = $value & 0xff
And high byte would be...
$highbyte = ($value << 8) & 0xff
void LobotSerialServoMove(HardwareSerial &SerialX, uint8_t id, int16_t position, uint16_t time)
so (0x55&0x55,ID,movement value 0-1000, servo speed 0-500)
movement value is 16 bits, first low 8 bits and high 8 bits
speed value is only the high 8 bits
but i could not in EZ-Script separate 16 bits in to low 8 and high 8
haha
you are my hero DJ
Hope that you get the plugin to work
thanks
It appears you can only communicate to their servos using this circuit. The Lewan Soul servo's I have been testing I put on the bench and exercised overnight and they are now both hot and grinding at 6.7v no load.
I like the idea of servo's with feedback as we really need a way to teach robots through copying and replaying human movements. This is essential when learning and performing human task and training fine motor skills. I also like the ability to extract sensor data (motion, position, speed, temperature, torque...) to build models and predict failures. Unfortunately I suspect that predicting future failures in these particular servos maybe a lost cause (But I will persist).
https://www.dropbox.com/sh/b3v81sb9nwir16q/AACkK-tg0q39fKJZcSl-YrqOa/LX-16A%20Bus%20Servo?dl=0&preview=LewanSoul+Bus+Servo+Communication+Protocol.pdf
I have made some sort of a plan how to i think it has to be inplemented in EZscript and maby someone that's good with the EZscript can translate this:
program steps
Get servo ID from EZ-B
Get wanted servo angle from EZ-B
Translate 0-180 to 0-1000
Translate decimal value servo angle to hex
separate hex value into low bits and high bits:
( 500 dec = 0x1F4, low = 244 dec is 0xf4, 256 dec = 0x100 or high 0x01)
Send the 10 byte word to uart
10byte word is: [0] 0x55 hardware id1
[1] 0x55 hardware id2
[2] 0x00 Vn the servo that has to move now V0
[3} 0x07 don't know this one but is 7
[4] 0x01 command that tells the servo it has to move
[5} 0xF4 low byte servo movement
[6] 0x01 high byte servo movement
[7] 0xF4 low byte servo speed speed=500
[8] 0x01 high byte servo speed speed=500
[9] checksum of some sort see below
start over again
checksum in arduino:
byte LobotCheckSum(byte buf[])
{
byte i;
uint16_t temp = 0;
for (i = 2; i < buf[3] + 2; i++) {
temp += buf[i];
}
temp = ~temp;
i = (byte)temp;
return i;
}
so hope someone gets this
Thanks.
You can’t read position with the plugin. Use Auto Position and create the frames, which is more reliable anyway.
I didn’t set the servo id. I used the Id that the servo came with (default 1). Use their usb uart board and utlility to set the id.
There will be no further development on this servo. It’s barely worth supporting after experiencing it. Kind of upset if it’s poor quality, specially when the ezrobot HDD servos are ten times the quality and reliability for lower cost.
Have fun!
in other news. For sale 4 working Servos and one burnt out servo and a UART controller. Fully compatable with EZ-Robot and EZB
You can buy the H3S (similar to H3P without the controller or sensors etc just frame and servos ) for ~$350 CAD from China on eBay. Just add iotiny Battery and some sensor is my logic but i don’t own one yet. I would buy if the LD 2015 and LD 2701 lewansoul worked.
MeccaNoid servos would also be good.
But that’s a great robot price for the number of servos. You’ll have to hack a power house EZ-B v4 to it
http://www.dongburobot.com/jsp/cms/view.jsp?code=100782
Just a suggestion. They are pretty impressive and are TTL...
It looks like there are 4 wires power, ground, and tx/rx. I'm going to order one of their servos and the programmer and do some dynamixel comparisons.
As always the manual is lacking...like there is no manual at all, so will have to test some of the other features on their programmer to better understand their function.
I have been thinking of changing my servo setup to a Daisychainable servo with positional feedback...
But when I see how bad you guys talk about them, I might wait for a better option yet to be discovered?
Any thoughts on this?
The LewanSoul and the HerculeX are both listed as being an option to using Dynamixel Servos,
so I was having my hopes up high when I saw the implementation of the LewanSoul servo here!!
https://hackaday.com/2018/07/05/wrangling-rc-servos-becoming-a-hassle-try-serial-bus-servos/
https://www.trossenrobotics.com/dynamixel-xl-320-robot-actuator
[color=#111111][size=3][font=Verdana, Arial, Helvetica, sans-serif]https://www.trossenrobotics.com/dynamixel-xl-320-robot-actuator[/font][/size][/color]
Running those on a Raspberry Pi is still not very well documented, and I am kind of glad having everything pieced together and working, that is why I delayed it always for later!
But now with ARC and Dynamixel Support running on the Raspi, that is quiet a game changer for me!
But obviously I would also want to use Python to control my servos, since I am always tinkering, and sometimes it is not ARC related!
If you guys have any recommendations, I would be happy to get the same brand...makes progress a lot faster if stuff is unified I figure!!
Would you mind to share how you wired up the Dynamixels? I guess I will burden myself with hours of remodeling my robot, and spend quiet some money...but now I got it stuck to my mind, and I am willing to give serial bus servos a try!
The things that kept me from it so far was, its not really well documented for the Raspberry Pi...there is the option to purchase hardware that should get the job done, but I am afraid to purchase something that will proof useless in the end!
What I found was the following
https://www.trossenrobotics.com/open-cm-904c
or these two USB connected products
https://www.trossenrobotics.com/usb2ax
https://www.trossenrobotics.com/dynamixel-u2d2.aspx
Any hints on which route I should go...
They other thing that kind of annoyed me is, that at the moment all the boards and servos are running on 5Volts, so I would have to get a new power supply, I was thinking of some power supply with different fixed Voltages...like the ones you put into a PC?
But all in all this would mean, I will basically on the way to rebuild my robot completely!!
So I could also spend that time trying to get my Unity App working better, rather than just putting a lot of effort into having better servos...while the functionality of it basically stays the same?
What are your thoughts on this?
Dynamixels are easy to set up. Just make sure you get the TTL versions. The motors have T at the end of their nomenclatures. You are correct the voltages vary per product but can go as high as 14 volts for some bigger ones.. The ideal voltage is 11.1 which is what i run all my robots on. So that might be an issue for you or for the battery pack location etc.
You don't need another control board for them (as you linked to trossen) the EZB does it all.....I usually make a separate voltage for the servos and just output the signal wires to the ezb and share a ground wire. Connect the first servo to D5 and you are on your way.There is a bit to do inside the plug in to get the servos to work. That includes changing the Ids (easy) baud rate and activating the port.
If you choose to do that then I can make you a real quick video on how to set up just one servo youll understand how to set up the others from there.
I'm all up for you working on the unity app. Its something I want to revisit soon. Getting a version working with ARC/synthiam is a must so we can use sensors etc with the servos.
Always do what cost the least..lol.....
It's actually really easy to control those servos with the Pi using ARC and EZBPi: https://synthiam.com/Hardware/Hardware/Raspberry-Pi-17681
I heard that the DYNAMIXEL AX-12A is the most favored servo for robotics?
And yes, cable management is a reason, plus getting feedback on servo position is something that is a very cool feature!!
I am happy to hear that you do not need any additional hardware to get them running...
So I might give it a try with my EZ-Bs!!
But connecting them straight to the Raspi is not possible?
@DJ Sures, you said something about turning the Raspberry Pi into an EZ-B...so that would mean I could get the Dynamixels to work straight out of the box?
Most information I found was at least having to deal with building a small circuit system to get things working out!
I would like to drive the servos with ARC and also with my Python applications if possible!
So sad I cannot join in for the stream!! Gotta go to bed now!!
You gotta get on our time so we can chat live! Remember you can sleep when you are dead!
ARC on the Pi is a milestone!!
Thanks for bringing up Unity too...that was another one!!
Soon we will piece it all together!!
So one thing I figured is that I would be buying a PC Power supply to have multiple high amp power outs...
Am I correct on that, or how are you dealing with this is issue?
And secondly, I was trying to figure out cable management.
So given that those servos would be wired to an EZB or Raspberry Pi directly,
you could daisychain them.
But it would also mean that you'd have to run them down one arm/leg to the hands/feet,
and then back again to the torso, to start stringing up the other limb?
Am I wrong here? The EZB/Raspi only connect to the first servo, no second connection is possible right?
So would this mean that given the scenario of a robot driven by serial bus servos,
some kind of controller board would be necessary,
if you would not want to end up having a very messy cable management...
I ordered some LewanSoul Servos, sincce they seem to run on 5V and I dont burn a lot of money in case I break them!
First try on serial bus servos, so lets see if I will be able to produce some magic smoke!!
It would be kind of better to not have the download link public though!!
Seriously, just set the servo positions and send the packet. It's real real real simple - it can't be any easier than it is. Perhaps you're attempting to send the packet from multiple threads? That won't work. You can only have one client transmit the servo position packet.
I put the whole thing to GitHub back in the days, when we were still developing, and took it down for that exact reason!!
Would you also recommend utilizing it?
I am still doing research on the whole topic, so I might be off...just taking guesses here!
My LX-16A will take a month for shipping, I did not py attention and ordered them from China!!!
So I guess I will order a pair of Dynamixel now, they offer faster shipping and I am really curious now and want to test serial bus servos!!
I am kind of in the middle of figuring out the servo setup for my robot, and would like to know if its worth using them in my project!!