rregister
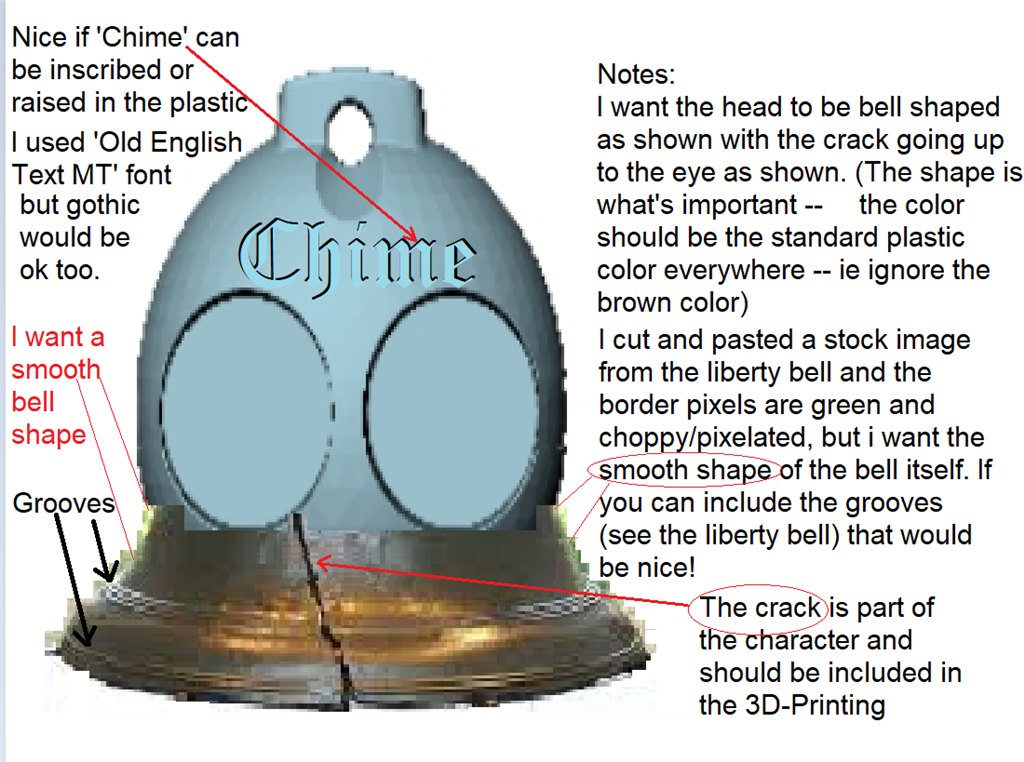
Hi all, this is my first post, and so i apologize in advance for etiquette problems (and i will try to learn and improve rapidly.) I'm starting an ambitious project with mutliple EZ-robots (love this system!) and i would like to modify the standard JD head front-piece by adding a 'bell-bottom' as shown in the photo attached (i did try to follow the instructions posted in this forum for attaching a photo) for this character called 'Chime'.
The idea is to keep everything the same and hopefully have no impact on JD's behaviors (e.g. head stands) but add some superficial plastic as shown to add character (so that his head looks like a bell), and it would be ideal if the 'Chime' name could appear centered on the forehead similar as shown. My problem is i have 1) no 3D printer and 2) no experience in this area (other than those 2 issues, i'm extremely well-positioned for a 3D project like this:). If anyone out there has a moment to point me in the right direction, i would be VERY grateful -- thank you! -Richard 'twitch' R.Notes: This character has a crack in his bell, like the liberty bell (this crack can be molded cosmetically in the bell-bottom and does not have to be an actual crack -- ie think of it as 'a scar'). I lifted/overlaid an image of the liberty bell to try to convey to you what i am hoping for, and the result shown in this photo is pixelated/blocky/blotchy/green-brown at the bell-shape perimeter, but i want a smooth bell-shaped perimeter. It would also be nice to have the beautiful concentric grooves at the bottom, which the liberty bell also has. (Note that i intend to use the standard head back-piece molding, because the front is the most important part (but if somebody felt it was no big deal to also add the bell bottom to the back piece somehow, that would be a nice addition).


Haha - that's a real neat modification.
I'm not the right person to help tooooo much, but i can try! My 3D design skills are quite limited - but i do have a little experience to know that it's very doable with a little effort.
The program that I have experience with is Solid Works, and it's really expensive and unnecessarily confusing because it's designed for serious manufacturing. What you could use is one of the many free and easier applications. Such as TinkerCad or Vectary or Clara
I've played with TinkerCad and there's a TON of great tutorials around it. Here's a few links to free programs for editing...
https://www.tinkercad.com/
https://www.vectary.com/
https://clara.io/
Hi to all again -- and especially to DJ (wow can't believe i got a reply from the robot overlord himself! I think all your videos and tutorials are amazing and great and i have been learning a ton, thank you so much!) Thank you for these tips and links. I visited and checked them out (Vectary seems well-suited to starting with an existing design and customizing it, and Tinkercad looks great and to be a bit easier to understand overall). To be honest tho, it looks very daunting to climb that 3D model learning curve (and especially to get it right without having a 3D-printer and no knowledge thereof). If there is anyone out there who has this understanding and capability and would be willing to work with me, it would help me out tremendously. I know everybody (and especially DJ) are super-busy with their own projects, so no worries if this is 'above and beyond' -- i totally understand. very kind regards, -Richard 'twitch' R.
Hi Richard,
I can probably help out. I have a lot of experience with 3d design and 3d printing.
It would help if DJ can get me a real cad file for the head , Solid Works or .step file ?
Working with a STL file is cumbersome.
Hi there Holy1, that sounds fantastic -- thank you for your generous offer and i really appreciate it (I was just looking at your CD stepper with limit switch example via arduino in thread 11075, wow that is amazing to me -- i keep my junk around too, and my kids make fun too, but i have never put it to such good use, ha)
DJ can you help with making this (Solid Works or .step) file available for the JD head front and back pieces? thank you!
-Richard 'twitch' R.
Hi Richard, Just to correct you the -CD stepper with limit switch example via arduino in thread 1107 was done for me by member PTP. He did the arduino code for me to operate my door. We'll wait a bit for DJ and if he can't provide a cad file I'll get started without.
Regards, Tony
Hey gang - I’m traveling and don’t have access to a solid works pc until late next week
Hi DJ and Tony,
>don’t have access to a solid works pc until late next week
Ok thanks, late next week is fine of course.
>the -CD stepper with limit switch example via arduino in thread 1107 was done for me by member PTP
Oh i see that now Tony, ha, (i somehow got the msg order confused), and so you have the bi-fold door project, got it -- yes kudos to PTP, wow
thank you!
-Richard 'twitch' R.
Hi DJ and Tony,
>don’t have access to a solid works pc until late next week
Just a reminder nudge about these 3d files thank you
-Richard "twitch" R.