Welcome to Synthiam!

The easiest way to program the most powerful robots. Use technologies by leading industry experts. ARC is a free-to-use robot programming software that makes servo automation, computer vision, autonomous navigation, and artificial intelligence easy.

Get Started
Asked — Edited

Help To Print A New Jd Head Design (Adding A 'Bell-Bottom') For A Character

Hi all, this is my first post, and so i apologize in advance for etiquette problems (and i will try to learn and improve rapidly.)
I'm starting an ambitious project with mutliple EZ-robots (love this system!) and i would like to modify the standard JD head front-piece by adding a 'bell-bottom' as shown in the photo attached (i did try to follow the instructions posted in this forum for attaching a photo) for this character called 'Chime'.
User-inserted image

The idea is to keep everything the same and hopefully have no impact on JD's behaviors (e.g. head stands) but add some superficial plastic as shown to add character (so that his head looks like a bell), and it would be ideal if the 'Chime' name could appear centered on the forehead similar as shown.
My problem is i have 1) no 3D printer and 2) no experience in this area (other than those 2 issues, i'm extremely well-positioned for a 3D project like this:).
If anyone out there has a moment to point me in the right direction, i would be *VERY* grateful -- thank you!
-Richard 'twitch' R.

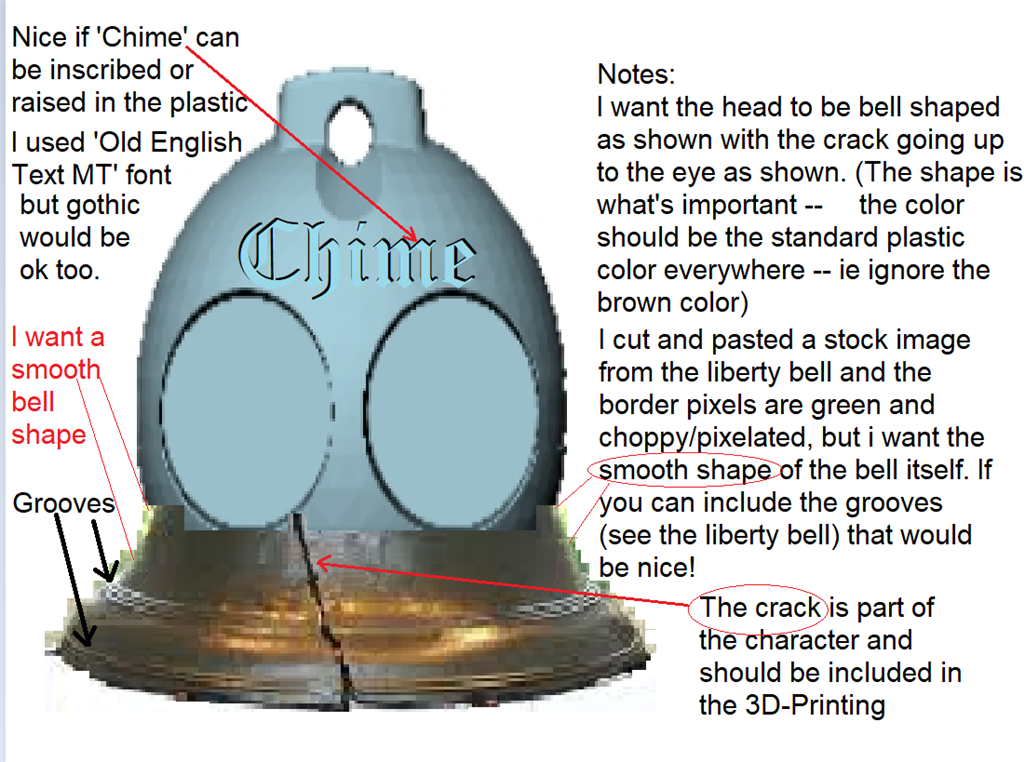
Notes: This character has a crack in his bell, like the liberty bell (this crack can be molded cosmetically in the bell-bottom and does not have to be an actual crack -- ie think of it as 'a scar'). I lifted/overlaid an image of the liberty bell to try to convey to you what i am hoping for, and the result shown in this photo is pixelated/blocky/blotchy/green-brown at the bell-shape perimeter, but i want a smooth bell-shaped perimeter. It would also be nice to have the beautiful concentric grooves at the bottom, which the liberty bell also has. (Note that i intend to use the standard head back-piece molding, because the front is the most important part (but if somebody felt it was no big deal to also add the bell bottom to the back piece somehow, that would be a nice addition).


ARC Pro

Upgrade to ARC Pro

Experience early access to the latest features and updates. You'll have everything that is needed to unleash your robot's potential.

#20  
Hi Tony,
(yes it seems unlike DJ based on what i've seen throughout the forum -- he's always so enthusiastic and helpful about people's projects, which is really great -- but I will respect his reasons, whatever they may be, and hope that he will clarify the matter for me eventually when he has time.)

>When imported into a CAD program they (STL files) are represented in (tens of) thousands of triangles so don't always play well with new geometry.

ok -- so that is why the solid works file would be a better starting point -- makes sense.

>I am involved with another project at the moment so can't give a definite date for completion.

ok i will be very patient! (and please let me know if i'm being otherwise). (and I like the new 3dPrinterGuy moniker)
best regards and thanks again,
-Richard 'twitch' R.
PRO
Canada
#21  
Hi Richard,

While you wait you could always try printing the JD head and the Bell as 2 separate pieces and then combine them with super glue, hot glue, acetone, etc. It might help with the designing process as you can mechanically see what works and what doesn't.
PRO
Synthiam
#22  
I'm not able to get the origin of the 3d printed STL for you. The origin of the stl's appear to have been misplaced. All we have are the injection mold origin files in solidworks, which are not the same thing.

I'd go with what Jeremie mentioned - for two reasons

1) i can't get u the original files

2) printing the head with the bell is gonna be a nitemare of support material anyway

I do agree with Jeremie and design a skirt for the existing head that converts it into a bell. And attach it with super glue:)

That way you maintain the integrity and strength of the original injection molded plastic
#24  
@rregister You can do what you want to do just in TinkerCad in about 15 minutes or so. Find a STL file of the liberty bell and import it to Tinkercad ...Cut off the part you don't want... Now import JD's head and merge the portion of the liberty bell (skirt) that you do want to JD's head to the position where you want it in... Combine the two parts then download them as one STL file... Done

However, I would do what Jeremie suggested (post #22) to do because of the amount of support material that is going to probably be needed if you print them as one big part...
#25  
I loudly echo everything Jeremie and RichardR said, they are spot on with their advice!

The only part not mentioned is the desire to have "Chime" scrolled on the forehead and rather than 3D print that (like RichardR pointed out, you could do this in TinkerCad and take the JD head .stl and place raised letters on the forehead) I would ink print a sticker on clear sticker paper for a "Chime" forhead tattoo.

For the Bell though, instead of the one Patrick found, I thought this one had the 2 sets of groove rregister wanted: https://www.thingiverse.com/thing:138580
#26  
Thank you Jeremie, DJ, Richard R, Nomad 6R, and JustinRatliff
I really appreciate your help and advice.

>try printing the JD head and the Bell as 2 separate pieces and then combine them with super glue, hot glue, acetone, etc.

I am printer-less and obviously a complete 3D printer novice and this solution sounds perfectly fine to me (tho I don’t fully understand the tradeoffs involved)

> printing the head with the bell is gonna be a nitemare of support material anyway

It seems everybody agrees this superglue skirt’ is the best approach, ok great.
But to be honest it’s not clear to me why one needs a lot of support material for a single print of the head+skirt, but don’t need the support material for the superglue-skirt approach? Is this a matter of the superglue being stronger than the printed-plastic? (that was probably a dumb question but thanks for any help on this)
(Perhaps the idea is that the superglue-skirt will lack strength, but would be readily replaceable when it breaks, whereas the broken head would be a pain?)
(Or maybe this is a time-to-print and cost of material, but if I need the head printed also, it seems the total cost/time-to-print would be similar or should I try to use my existing headpiece from EZR?)
One more question: I kind of imagine that the part of the skirt that attaches to the head via superglue would have to be exactly the right shape and size in order to get a decently-solid connection, does that pose a serious challenge? (I guess it is still easier than getting a single piece to be the right size).

Those 2 bells from thingiverse look great. The thing:138580 has a smoother bell shape and better groove pattern based on the view provided thank you for finding these!

I’d like to hear what 3dPrinterGuy thinks about all this information, and whether any of it changes your willingness to help with it Tony? (no worries if this is all getting to be above and beyond...)

thanks again everybody! -Richard 'twitch' R.
PRO
Belgium
#27  
can you just print the bell complete and then cut in half ?


User-inserted image
Canada
#28  
@rregister. Well, I'm a "maker". I like to do things right and while arts and crafts are fun, @JustinRatliff comments made me shudder. (no offense JustinRatliff)
I don't even own a hot glue gun or have any super glue.

I'll probably model up and entire new head (with built in supports).
PRO
Synthiam
#29  
The amount of work to design a new jd head with the skirt would be crazy - and 3d printed parts don’t look great compared to the real robust injection molded plastic.

But - if you really want a 3d printed head - use the stl file and merge a bell stl into it. You can’t crop the bottom of jd’s head anyway because that holds the Servo. All you’re doing is merging a bell stl into the jd head stl:)

Now is a good time to learn tinkerCad if you’re interested in 3d printing:D have fun!
Canada
#30  
@DJ > Now is a good time to learn tinkerCad if you’re interested in 3d printing Grin have fun!

Thanks for the advice, (if that was directed at me), but I am well acquainted with tinkercad and have been 3dprinting for many years.
#33  
Hi Nomad 6R -- i downloaded it and listened, sounds great -- yes i'd like to use it -- thanks for that!
I'm not sure how best to use ARC to move this mp3 from your ARC project into mine. I tried to use 'Merge' but this gave me a 2nd sound board called "Soundboard V4" -- i guess i can just rename it to be another name and use use it, but it would be nicer to have this added as a new entry to my existing Soundboard control.
(if anybody is willing to spell this out please do, but i'll see if i can figure it out from the help and trial and error. )
-Richard 'twitch' R.
#35  
ah thanks looks like a great resource.
PRO
Belgium
#36  
yeach lots of bells.are you making a full jd with bell head ?
looking forwart to see him.
#37  
Hi Tony,
I don’t know whether you have had time to explore this head-print yet I’m still excited about it, am making good progress on the overall project and eager to hear any news from you whenever you are ready and in the meantime I had an idea that you probably already considered but I thought I would throw it out as an alternative to see if you prefer the approach: Would it be easier and/or superior to design/3D-print a bell shaped thin helmet’ that fits snugly over JD’s existing head (with same-sized holes for the eyes and camera) and included the cracked-bell bottom? This is just a thinking out loud’ idea and I don’t want to derail the original approach, especially if you prefer it.

(And if your situation has changed and it’s not feasible to work on this in the near future no worries just let me know thanks)

BTW I enjoyed seeing your T-One robot in the intro video, I really like the way T-One’s arms appear from behind your wife, and then his head pops out to the side with a grin incredible work on T-One wow. (also playing the violin jingle bells that is great) The two thumbed hand has an interesting look and seems very practical.

Thanks again and Talk to you soon,
-Richard twitch’ R.
Canada
#38  
Hi Richard, Thanks. T-One was a lot of fun to build, although he has been idle for some time.
I'm sorry to say that I'm just not getting the time to work on your idea. My day job is taking over big time so my hobby time is nonexistent and will be until at least November.
Can't play until I make some dough!

You'll have to come up with another plan. Sorry about that.
Best Regards,
Tony
#39  
Ok Tony, i understand completely and no worries.
(I'm not sure whether i can take on an investment in a 3D printer and climb that learning curve for this, but i'll figure something out one way or the other:) )
kind regards, -Richard 'twitch' R.