hamchenko
USA
Asked
— Edited
I don't know how I stumbled on this site a week ago but since I've started reading about everyone's projects, in that week I've already purchased my Omnibot on eBay and put in my order for my ARC kit.
I've been fascinated with robots since I was a kid and been a mild tinkerer all my life, but never have I tried to embark on a project of this magnitude. The closest I've gotten to a robot in my adult life is the tattoo of a robot I have on my leg.
Just a fair warning, I'm sure I'll be on here asking a million questions during my build process. Thanks everyone in advance for all your help.
Adam

Well hello new adam!
A tattoo of a robot is a good start I'm sure everyone here will be more than happy to assist!
Tattoo of a robot , oh that gets you like 50 cool points lol. I have two Omnibot projects if you want to take a look. Between me and other members there are lots of cool omnibot ideas , places to mount ezb , and best placement for long runtime batteries. https://synthiam.com/Community/Questions/530
I hope this sparks some cool ideas for your awesome upcoming project! Post updates and pictures I would love to see what you do with such an awesome toy! Have fun ! - Josh
Here's the tattoo!
but, if you love 'em, why flush 'em?
The story goes like this.
On my 6th birthday I received a robot just like that one above.
Days later my little sister was playing "car wash" with my robot down the toilet.
Fast forward 17 years, for my sister's birthday I tattooed the incident on my right thigh so neither of us would ever forget.
LOL ! that's a cool story ! JW
Hello All,
Folon
Welcome folon
If you want to dishwash your omnibot, you got to take out all of the electric stuff first!
Good luck
Thanks DJ Sures for your reply, I am anxious to make this "thing" work. And thank you Niek for your reply, Your video was very informative, good job!!
LOL, no I won't put him in the washer without taking him apart, he won't fit,..
I am shopping for batteries as I have ordered the EZ-Robot kit and the 2.5 Amp Motor Controller. I was wondering if you have to use 2 batteries or can one good power source be good enough to run both motor/ezboard. Will the 7.2v 2000mha work for a time between charges? Is it a NiCd battery pack or a sealed lead type, like in a UPS? Any good sources online to order from?
LEDs? Just regular blue LEDs with wire leads?
Thanks for your help,..
Here is Mr. Filthy, man is he dirty,.. 4 years in storage
Welcome to EZ-B I used the original style battery to power my omnibot - Bob. He works fine on that. See my build under "Robots" "Bret's Omnibot and Bob's Debut". I did a lot of mods and he works fine with 6 volts. I got it for 10 bucks. Bob Debut Bret's Omnibot
Thanks Bret! I really like your postings, your omnibot has some great mods. I keep looking to see how you moded it. Ordered a claw and some leds today, the claw is more practical than the original, good job!! I think the claw is a must have now on the omnibot, lol. You got me thinking about color now. The black and silver is sharp vs white. How did you get the front lights to work? The flashing is wicked. They add a darth vader look, heh. Got 6v battery on the way,... you were right, $11, amazon. I am starting the teardown tonight,...
Sweet! For the chest lights I used a running light circuit I got as a kit. I just replaced the red LEDs with different color ones and mounted them in a random order.
Ok, I have spent several hours looking for an led running circuit. I found out how to wire my own leds but I do not think the EZ-board will flash them. I have found led strips, led custom boards (over my head) and just leds themselves. Can you let me know what kit you got? There are too many to determine what will work. And, what did you use to cover the holes the leds are flashing through? Silicone? Is this a 9v power to the led board (I see so many of those online) , or direct connect to the battery? Thanks for any help,..
Teardown is going well. I have decided on an R2-D2 look; White/semi-gloss body with some blue here and there, silver head, blue led eyes, with some blue on the head. Blue on the arms, where the stickers were and silver on the plastic leads on the arms. I am planning on extending the clearance of both arms by like 2 inches or so. I'm going to try and get some pvc pipe and connect it to make clearance for the arm/claw. I noticed it hits the body easily. With some extra clearance it won't bind. Just thinking out loud, any suggestions are welcome,..
Thanks all,.. Folon
THere are several kits available - LED Chaser Kit - I tied mine into the EZ-Board directly so I could turn them on and off by it. Here are a couple of good ones (I like the tiny cylon one). These are on ebay but you could also check velleman and all electronics.
Kit 1
Kit 2
Thanks a lot,.. This helps me a great deal. I just was not finding anything good like this. Really appreciate your time,.. I am probably going to get the kit 1. It looks like just what I need without messing with resistors, and since the EZ-board will power it, even better.
Thanks!!!!
:D
You will need a TIP120 transistor you can get at RadioShack - Linky and a 1K resistor. I will find a schematic on the wiring and post it for you.
On the holes, I used some clear refractive plastic (an old camera filter I had) and glued it in place behind the chest panel. I used two 3mm LEDs and just mounted them in the two holes on the bottom left. Then 5mm LEDs everywhere else. When I wired them up I used two LEDs per output of the board. Then I just hot glued everything in place.
Wow, great. I pass Radio Shack after work, I'll stop by. Yes please let me know how to wire this, never done it before. Sounds straight forward on the rest, now that I have an idea of what to do to cover the holes with. I am ordering the eBay kit today. Thanks a great deal, I would not know what to do without your expertize. Omni needs lights, heh
Thanks again, I am sure I will have more questions, as I progress,if your up for it, lol
Folon
Hey all,
Folon
Here you go.
Thanks!! I am not sure this makes since to me. I don't quite know how to read this. (I am a beginner with electronics, sorry) stress
This is to go in front of the chaser kit (device)? Then the B E C wires go to a normal servo connector for the digital side of the EZ_Board to power/on off switch? I just confused how this routes to the battery, EZ-Board and chaser kit,.. So:
Sorry and thanks for any help,.. just don;t wnat to blow up any more things,. lol that's how I learn I guess,.. lol
Powering from the EZ-B you would do the following: Using a standard servo connector, connect the red (+) wire from the LED Kit to the red (+) wire of the servo connectior. Connect the black (-) wire from the servo connector to the E pin of the transistor. Connect the black (-) wire from the LED Kit to the C pin of the transistor. Connect the white (signal) wire of the connector to a 1K resistor and then connect that to the B pin of the transistor. Plug the servo connector wire to the EZ-B and you are good to go.
Powering from a larger source (direct to the battery) just connect the red (+) from the LED Kit to the red (+) terminal of the battery and don't use the one on the servo connector. However, you MUST use a common ground - the same ground from this battery must be the same ground to the EZ-B - you are just bypassing the EZ-Bs drop in voltage to the DIOs and using straight voltage from the battery.
I hope that is clear enough for you.
@ falon , I tested the regular omnibot base with 40 pounds of weight and still trucked along fine , no stalling and drew 3 amps current. If you want to make the led area usable there are cheap LCD kits that fit in that spot. On mine I have it showing battery charge level , battery temp , current draw and avg watts used.
I have not done it yet and won't till after paint but I will use one of those switching transistors to turn on LEDs and my led spot lights.
Yes, thank you I think I get it now; it is not as easy as I had hoped but I will give that a shot. With your instructions I should be good, thanks a million!!
Jstarne1, that sounds like those old motors are pretty tough to haul 40lbs!! I like your display concept; sounds like you know what you are doing. I'm still having issues with the light chaser kit I bought and how it intergrates to the EZ-Board, but with time and patience and great instructions from Bret, I am sure I will have it blinking in no time,.. sheesh all this trouble to make a Christmas tree lights blink, lol. Just excited my Omnibot's motors work and I can finish my teardown/paint job. I am a bit behind, but I see that that is normal with these things looking at all the forum links. I just hope I can get the amp controller to work with the h-bridge next,..
Still a newbe,.. and not many tools
Thanks, for the continued support,
Folon
If you do not know how to solder, you had better get a buddy that knows how to do this for you. Lots of people around can save you many headaches later. It is a skill that it takes time to learn.
Just my 2 cents.
Mel
That is great advice. I have done soldering in the past so not to shabby. I am practicing on old computer boards and scraps so when it gets to the real deal I won't "glob" it up. I really do not want to destroy the real parts, so after this weekend I should be ready to finish my light chaser kit.
Thanks for making a good point, I need all the help I can get,..
Thanks MovieMaker!!
Folon
Question: Do I still need an H-Bridge with the 2.5 Amp Motor Controller to drive the motor? I thought the Amp Controller would do it all without an H-Bridge,..
Folon
The 2.5a motor controller is an H-Bridge actually.
No, you don't need an H bridge if you are using a motor controller (it is the H bridge). Here are some pics of the drawing from above that might help with your light chaser.
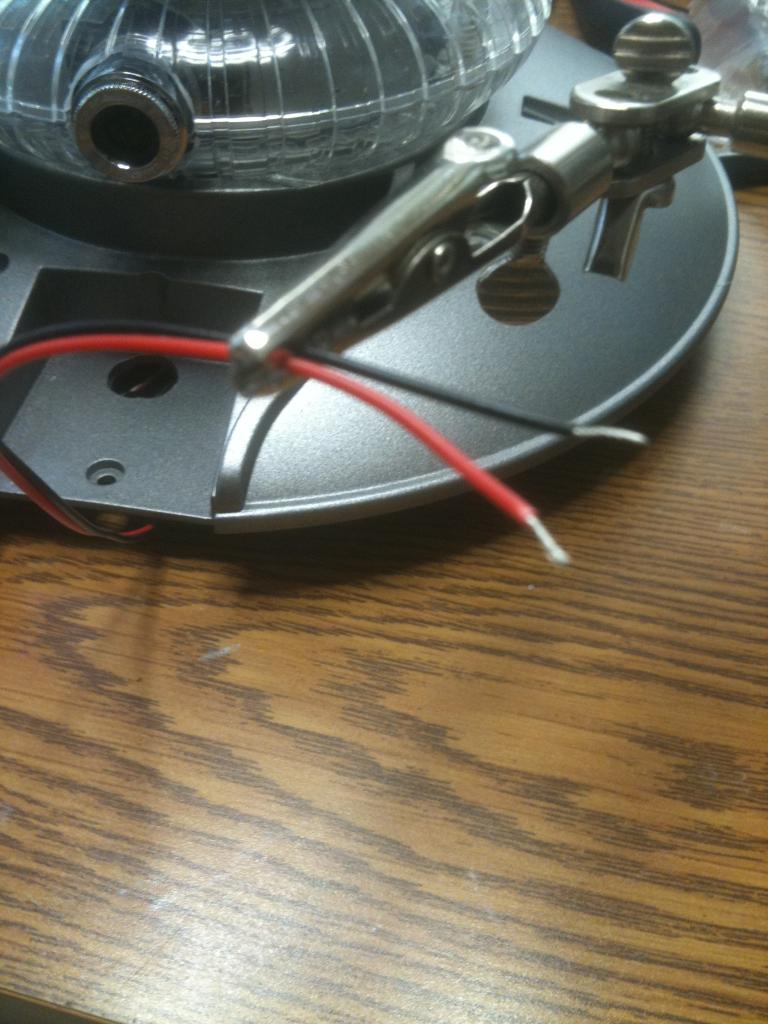
this is the red and black from the lights.
this is the red, white, and black of the servo connector wire.-634735535168281250.jpg)
this is the TIP120 and 1K resistor-634735536412968750.jpg)
The resistor is tied to the white signal wire.-634735536891093750.jpg)
Then soldered to the transistor-634735537226406250.jpg)
The black from the lights goes to the center pin and the black from the servo connector wire goes to the other pin of the transistor.-634735538051718750.jpg)
Tie the two red wires together (to get power from the EZ-board) then protect it all with heat shrink tubing or electrical tape.-634735538742031250.jpg)
Hope this helps!What happened to the diode going from Emitter to Collector? What was it's model number?
Thanks Ndavid79 and Bret, I thought so but wanted to make sure,..
Wow does that ever help, thanks,.. Im printing these out now. I am sure this will help a lot of other people too. Thanks for your efforts. BTW I am not doing good with my $6 solder iron, im ordering a Hakko - FX-888. It has great reviews and I see they last forever. This will get better soldering done.
Wow, Thanks,.. impressive,..
Folon
You only need a diode when it is an inductive load like a motor. I don't know which diode it is.