Asked — Edited

Arduino Mega Is Being Powered Through The Uart Serial Tx/Rx Connection

So I want to control the Arduino power using this RFP30N06LE MOSFET and that works as expected when hooked up to EZ-B D0. However, if the serial TX/RX is connected to the Arduino it get's power via the serial lines bypassing the D0 MOSFET. Any comments / ideas on controlling power and having Serial TX/RX lines connected?


ARC Pro

Upgrade to ARC Pro

Join the ARC Pro community and gain access to a wealth of resources and support, ensuring your robot's success.

#1  

Don't know that much about the Ardunio but TTL/com is normally gnd and (+)3 vdc. Is there something that can be turned off on the Arduino ports ?

PRO
Synthiam
#2  

Are you controlling the gnd with the mosfet? Sounds like it - because generally any port on any micro when it's closed low will gnd the ic and power it.

If you can control the vcc instead, it'll be good to go

#4  

Okay guys thanks so far. I can not resolve this problem; it is out of my scope of knowledge. If any one could help me that would nice.

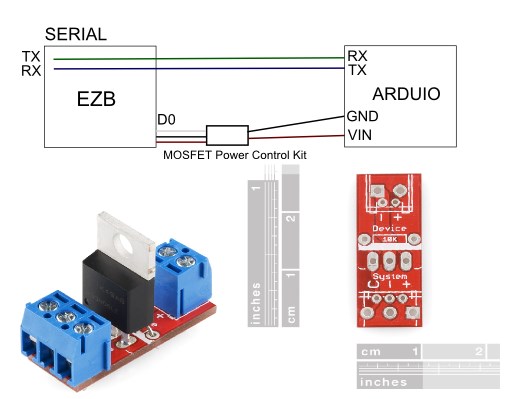
I have an Arduino hooked up to the ez-b using serial tx/rx lines. I want to control it power with this device:

MOSFET

User-inserted image

Here is how I hooked it up and it does not work. As the EZ-B supplies power to Arduino regardless is D0 is high or low.

If I removed the serial lines then the mosfet works perfectly and can control the power of the Arduino.

I then tried what I thought was DJ's advice and removed gnd from output and the input from the mosfet and the power is still being supplied. Just not sure how to control the power to the Arduino with the serial lines connected.

#5  

Do you have a multimeter? Can you check the voltage of the RX and TX lines from the EZB?

PRO
Canada
#6  

I am sure this isn't the case but your wiring diagram scared me a little, the red wire from the EZ-B seems to be connected to GND on the Arduino (through the MOSFET board).

It should be red wire (Vin) power from the ez-b to the '+' on the MOSFET board and the output '+' on the MOSFET board to Vin of the Mega.

The other wire, the black one, should be connected to GND from the ez-b to the '-' on the MOSFET board and the output '-' on the MOSFET board to GND of the Mega.

When a high (3.3V) signal from the ez-b D0 goes to the 'C' on the MOSFET board this will turn it the Mega On and a low (0V) signal from D0 should turn it off.

I should ask if the 10K pull down resistor is installed? This will ensure the N-channel MOSFET is turned off by default.

If all the wiring is correct and the Mega is still staying on, then try removing the wire between rx on the ez-b and tx to the Mega. I'm guessing you don't need bidriectional communication between the ez-B and Mega but rather you are running the Mega as a slave, correct?

#7  

Dang it, sorry for the diagram. Here is the updated one. User-inserted image

I have the mosfet connected as you suggested. This is the condition I described above with the described results.

Yes, I have the resistor installed.

If only the Arduino TX and EZB RX are connected the issue seems to be resolved.

Although, I need Bi-directional communication between the two.

#8  

Well, I think I may have ruined my EZB. I can no longer connect to it. The blue light flashes and I can connect to it in windows but ARC won't connect and it no longer dings when I power it up. Other then that the light flashes normally.

Is it possibly I could have short circuited by accidentally switch the serial tx/rx lines?

PRO
Canada
#9  

Naw, reversing the tx and rx lines wouldn't do it, both the EZ-B and Mega have 5V tolerant I/O.

Are you sure your battery isn't low?

PRO
Synthiam
#10  

I feel the arm micro on the eZb is damaged by sinking the mega over the I/o lines. The trouble is with what I had responded to earlier. The latch on the mega's I/o is holding the pin to gnd, which is sinking from the I/o of the ezb.

That is the trouble with this approach. I have some interesting experience in the video game industry with a historical application that my father had designed which allowed multiple games to exist in a single cabinet. A switch would allow the user to cycle between the pcbs. He had to use relays on both the power and I/o due to a similar issue. The GND would connect across the separate pcb I/o ports and power the games all at once - causing all sorts of issues. The solution as to use Relays on every I/o, which of course isn't what you need to do. The solution for your application is to use a mosfet which controls the Power, not GND.

Internally, on microcontroller I/O (or any I/O IC) are something called "latches". Specifically on a multi-use I/o, the latch configures the operating mode. However, on digital I/o it really simply switches between floating, gnd or vcc. When the power is off, the I/o latches to GND - I believe gnd generally is the native logic state.

So, in short... the ez-b was providing a GND short for the atmel through it's I/O which was latched to GND and voila.... power. Sadly, the ez-b's ARM was damaged because it is unable to sink enough current for the atmel and its peripherals.

PRO
Canada
#11  

After sleeping on it I think I understand what happened now. The wiring was correct it was the component selection that wasn't.

DJ is correct in saying that the ez-b likely was sinking the current needed by the Mega through a ez-b serial I/O line. This is because the N-channel MOSFET you chose toggles the ground connection ON and OFF, but the Vin line passes right through and was always connected, since by default the N-channel MOSFET was not active and the ground line was open and the circuit looked for the path of least resistance to ground and that was through the ez-b. Unfortunately the Mega draws more than an I/O pin can handle.

I also verified this morning that a powered up ez-b does not power up a Mega through the serial lines, just in case someone had that question in the future.

What was really needed was a P-Channel MOSFET that toggles the Vin line ON and OFF.

As an example: In common H-bridge design, P-Channel FETs switch the positive voltage side of the circuit and N-Channel FETs switch the negative side, this is how they are designed to be used.

#12  

Okay, here's my lesson. I took the details for granted on sparkfun's site concerning the MOSFET Power Control Kit from reading the product summary it seemed like a good fit. What I failed to realize, do to my very limited understanding of electronics, was the very details that were not obvious on their site concerning the mosfet. I did not do the research I should have done even though I probably wouldn't have understood it. Since I did not understand mosfets or ic grounding I just day dreamed I was gonna be able to put the robot in a low power state using the mosfet as in turning off arduino and peripherals. The storm clouds were gathering and I decided to hook up two of these

User-inserted image

NeoPixel Ring - 16

and crack! EZB goes down permanently! I assume because of the current draw and the grounding into the serial lines as I had removed the grounding wire on D0 thinking I was removing the grounding controlled by the mosfet. Serious bummed ezb no connects to ARC.

So, several lessons were learned here. Grounding what is and where's it going. Component research is a good idea. Finally, before I go cowboy maybe I should run my plan by the helpful experts here on this forum.

Blue smokes 3, Leversofpower 1. The struggle continues... eek

PRO
Synthiam
#13  

lol! Love that story - well written. We will help you get up and running :)

#14  

For other robot builders:

p channel mosfet is used on the positive side of the load whereas an n channel mosfet is used on the negative or ground side of the load. When triggered, a p channel mosfet connects the input on the load to the positive source whereas an n channel mosfet connects the output from the load to ground or the negative source.

So I am assuming n-channel probably doesn't have a lot of uses with ezb and power controlling shenanigans.

On a side note I did find it interesting that the EZB can be damaged and you can still connect to it wifi directly and connect to 192.768.1.1

PRO
Canada
#15  

So curiosity got the better of me and I had to try out turning input voltage on and off with a P-Channel FET. Turns out that a few more components are needed to make it work. Here's the circuit diagram:

User-inserted image

Here's the reason for the extra components:

  • In order for a P-Channel MOSFET to be deactived by default a pullup resistor (R2) must be added to the gate of the FET, since P-channel FETs are activated with a low signal

  • If R2 is present then you cannot control the MOSFET's gate with an I/O line because the I/O would be pulled up to the input voltage and would be damaged, so we need to add a simple switching transistor to bring the gate voltage low

  • If a transistor is being used then a inline resistor is needed to activate the base since transistors are by nature a current activated device

  • The MOSFET I was using is an older style FET and needs a large voltage at the gate, there are new MOSFETs on the market that are meant to be switched with TTL (3.3/5V) logic so using one of those I may have been able to do away with the transistor

If you'd like to see the circuit in action I've uploaded a video of the operation to dropbox.

United Kingdom
#16  

@leversofpower at least you look at it as a lesson not as a disaster. I'm sure you're aware of how helpful the community is so double checking circuits is always a good idea, especially if you don't have much/any knowledge in electronics.

@Jeremie, thanks for the schematic, that's going to come in handy! Consider it saved with all of the other useful schematics and info I seem to have acquired over the last 2 years.

#17  

Sorry I missed this thread. I had struggled with high side switching a few months ago here on this forum when I was trying to figure out how to turn off a Sabertooth motor controller. I can confirm that the circuit shown works as I've built a couple to let ezb switch off the positive side of the power feed to my motor controller. Here's the whole thread if you'd like to read through the struggle and see my circuit design. Turning off a Sabertooth User-inserted image

R2 needs to be reduced to at least 10 to work with an EZB v4. This was designed when I had a V3 ezb.