Step 6. Writing to a file
Now comes the fun part, writing to a file. The example script "1. WriteFile" will write data to your "myfile" for servo positions if your EZ-B is connected. If it is not connected or an error occurs it will delete your "myfile.txt" file.
Lets create new script, by going to Project/Add Controls/Scripting and select EZ-Script. Your new script control will pop up with the default name of "Script". Click on the gear "setting" for the script and rename the script "WriteTest".
Then enter the following code, then save the script:
#WriteTest

$filename = "c:\temp\myfile.txt"

FileReadClose($filename)
#FileDelete($filename)

$TestValue1 = 24
$TestValue2 = 10
$cnt = 0
$max = 3

:START

print("Writing line " + $cnt + " of " + $max)


FileWrite($filename, "Time: " + $time)
FileWrite($filename, ", Left Servo: " + $TestValue1)
FileWriteLine($filename, ", Right Servo: " + $TestValue2)

$cnt = $cnt + 1

if ($cnt = $max)
  halt()
endif

sleep(100)

goto(START)
What we are doing here is creating a new version of the same write script included in the example but we are manually adding in test values for our servos so that we don't have to have the EZ-B connected or servos connected to certain ports.
We have also commented out the line to delete the file. Deleting the file is handy if you wanted to log data with a refreshed (or clean) log file. With the delete file line commented out with the # we are ignoring this option and each time you run this script it will keep adding to the file, retaining what was previously written to the file.
the $cnt and $max variables are used to tell the script to loop through the number set as $max, in this example 3 times.
This is a great example of a few different ways you can write data to a file all in one script, but it might be a little busy. You can greatly simplify writing to a file.
Add a new script control and name it "WriteTest2" and enter the following code, the save the script:
#WriteTest2

$filename = "c:\temp\myfile2.txt"

FileReadClose($filename)

$TestValue1 = 24
$TestValue2 = 10

FileWrite($filename, "Time: " + $time)
FileWrite($filename, ", Left Servo: " + $TestValue1)
FileWriteLine($filename, ", Right Servo: " + $TestValue2)
FileWriteLine($filename, "EZ-Robot is awesome!")

sleep(100)
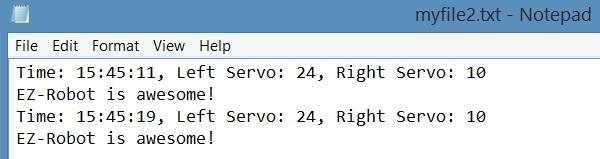
This code will write a single file line with the time, Left servo value and Right servo value (because it does not write the line until we tell it to do so with FileWriteLine) and then it will add a second line that says "EZ-Robot is awesome!".
We also added a new file name. We do not have to create this file ahead of time. If the file is not there, it will be created. If the file is there, it will be added to with new lines each time you run this script.
If you run this script once, it will write this data once and you'll have two lines. Each time you run this example, 2 new lines will be added to the file.
You can simplify the write process even further in this example, add another script control and name it "WriteTest3" with this code, then save the script:
#WriteTest3
$filename = "c:\temp\myfile2.txt"
FileReadClose($filename)

$PingValue = 124
FileWriteLine($filename," Ping ," + $PingValue)

sleep(100)
With this code, we are just writing the word Ping with a comma and then the variable we set as the value. As you can see, this could easily be the actual variable you use for your Ping sensor values.
Lets say you wanted to add a time stamp to this example. Would this work? Give it a try by modifying the line as seen below.
FileWriteLine($filename,$time + " Ping ," + $PingValue)
This will allow you add a time stamp to the line.
Another option is to comma separate all the items you write in a single line:
FileWriteLine($filename,"Time:," +$time + ",Ping," + $PingValue)
Writing data to a file is all well and good. It can be handy if you wanted to log data and review it yourself. But if you want to make use of it within EZ-Builder, you need to write it in a specific way that your can script read it so your robot can make use of it.

What about the script manager? Wouldn't that be the same thing?