


Hello All!
Omnibot #1 arrived today.
I'm still waiting on Omnibot #2 to arrive. Soon hopefully.
Going with a Black / White Spy vs Spy theme.
The wife and I decided on their personalities. The "evil" black Omnibot will have Mr. T audio clips and the white "good" Omnibot will have Pee Wee Herman Audio.
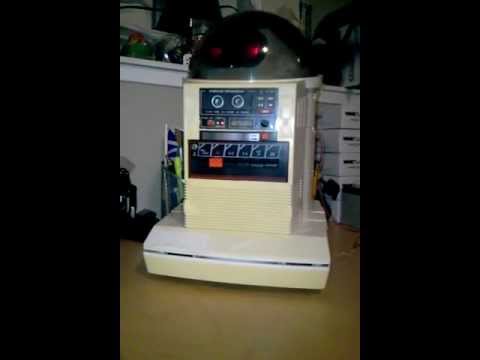
Here are some quick pics. The electronics were DOA. Thankfully the drive motors are all good.I want to preserve the original look of the front so I gutted everything. Clipped off the front of the PCB to preserve the switches. This Omnibot will be wet sanded and painted white.
I'll be adding a few things along the way. Fricken laser beams too!
Omnibot #1 (White)

Omnibot #1 (White)

Next to his decapitated pal R2.

About 5 minutes later. 

PCB chopped!

Stare into his eyes!

The Saga Continues...
Other robots from Synthiam community
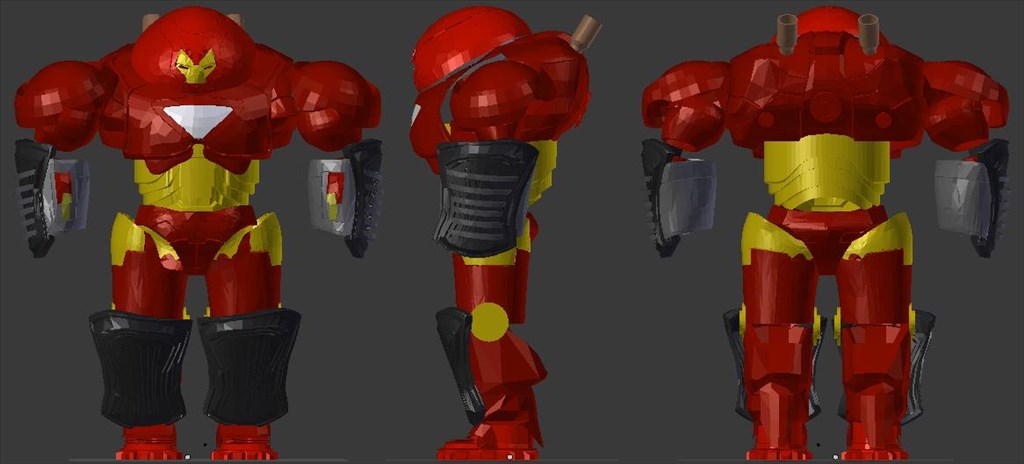
Jstarne1's Hulkbuster Ironman Suite , Lighting, Sound...
Jim's Armadeus Mk. 11

I'm on page 67 of my omnibot build going since I received it in January. You can take out just the purple lense ans use led holders from radioshack @ 1.79 pair to mount in your choice color of LEDs , maybe blue for the black bot green for your white one? Spy vs spy? Give each of them a gun arm .) Play airsoft or lasertag . On eBay I found 9.8 amp hour batteries that are excellent , just search for 12v lithium ion. If you want to use your heavier lead acids you can fit two in the bottom of your torso. I did a YouTube video testing the base with 40 pounds , best weight would be keeping it under 30 pounds. Take in mind those lead acid batteries are 6 pounds each. Also over the years the rubber on omnibot treads my crack but you can carefully paint or spray on a couple coats of black tooldip and they are good as new
 .
.
@Lumpy For some reason I can not see or click on any of the pictures that you post. Does anyone else have this problem? I would really like to follow your build.
Nice, it will be like R2 had twin boys.
Omnibot #2 "Higgins" arrived today.
He's got yellowing on his front end. Electronics look to be functioning.
I guess his name was "Higgins". He also came with a 1983 Julio Iglesias in Concert cassette tape!
Only glitch is he's down 2 tracks. I don't think they are repairable. I'll have to figure out some new ones.
Not too worried about the yellowing as this with be the black "evil" Mr. T omnibot.
Just waiting on the wife to get home, then I'll scoot out to the garage and tear him apart.
Then off to the dishwasher they will both go.
Such a great idea....spy vs spy......would make a cool video to have them interact and smack each other around a bit.....of course not to damage...but so they have personality!
This looks like being a great idea. Good base to start with too. Perhaps if you painted the evil one RED, rather than Black, then you can use the color tracking with the camera, or even a 'GLYPH' camo paint ? I would love to see a Mr T mohican hairstyle on a Omnibot
Looking forward to further updates
Ya we thought Spy vs Spy / Mr. T vs Pee Wee Herman would be a good contrast.
Dang! That's a great idea. I'll do a Mr. T mowhawk / beard on the dome. The other I'll do a red bowtie.
Awesomeness.
Mr T. can chase Pee Wee's bowtie.
I'm collecting .mp3's for the trigger boards now.
What you talkin about fool! I know you are but what am I?
All naked and ready for the spa.
Off to the dishwasher they go.
Anyone run their Omnibot motors at 12V?
Spent some time tonight carving out the head pieces to get them ready to mount to a servo.
I was worried on how to do this and make it look good. I ended up running a sharp knife along the edge repeatedly. I came out nice and a little sanding it looks perfect.
Also shopping for H bridges and batteries.
Wondering is a 7.4V 2200mAH Lipo would be good enough to run the EZ-B, MP3 Module/Amp and Omnibot motors?
The original batteries were 6V 4.5Ah. Thoughts anyone?
I have ran the omni motors at 12v for testing . Are they going to be autonomous ? I wouldnt go with a batt that small 2.2 amp hr , get something bigger than the ub645 , on eBay its super easy to find lithium batteries , for example the 12v 9.8 ah , you could fit one in the same space as the ub645 battery they usually use , as long as you are using standard servos ezb can provide power to them and stock motors seem to run fine on 12v , they will for sure have the torque they need to tread over carpet using 12v
Finally got some time in the garage.
I've been working on the dome plate. It is friction fit into the Omnibot body. It fits perfect where the front/rear tabs used to be that were removed from the head body.
The plan is to mount the servo directly below the plate for head rotation. Also toying with the idea of hanging the Sonar from it as well. Just thinking about how to link the Sonar to scan via a servo. Some proof of concept photos.
Also drilled the holes for the power switches.
Still waiting on the MP3 Modules / Amps to arrive.
Ordered (6) 2.5A Motor drivers tonight. (2) for this project, the rest for some other future projects.
Dome revision ver. 3.0 finally worked. I was having clearance issues with the head vs. dome. So I chopped down the head base to follow the inner contours. It looks great and works.
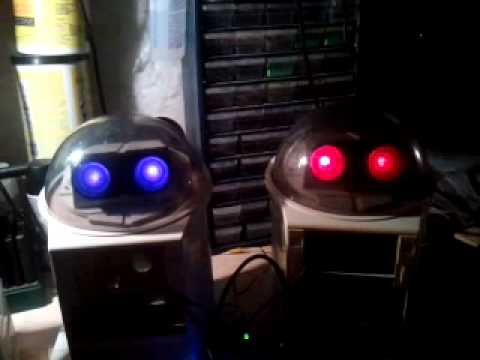
Did up my eye LED's tonight. One will stay with red and the other will be purple (White LED's).
Here is a quick vid. They are hooked up to my C6C setup (Wireless 6 Channel PS2). The Omnibot on the left has some sort of interference/issue going on. Hopefully that will go away when connected to the EZ-B.
I'll have to get my cameras ordered soon. I won't drill them in until I have them in hand.
Next up will be mounting the Sonars and servos for arms.
Things are slowly progressing along. Waiting on parts sucks.
Mounted my sonars. I went fixed position for now.
Received my MP3 modules and little 3W amps arrived for the Omnibots.
Worked on wiring them up and all was well... for a little bit. :-( One of the MP3 modules just crapped the bed on me. I've sent a note off to the E-Bay seller. We'll see what he says. I need to order (3) more of them anyways.
Still waiting on my motor controllers. Working on a new idea for making the Omnibot arms move with high torque servos and shaft adapters.
After that I'll get my batteries ordered then it's off for final paint and some dome polishing.
Anyways, on to the pictures! Everybody loves picture right?
MP3 module mounted and wired. 3W amp mounted to the left.
A further back view. You can see the nuts for the EZ-B mounting posts.
Mounting posts in place for the EZ-B. Only drawback is it won't fit the DC barrel jack that comes with the kit. Ordered some 90 degree plugs from the bay.
MP3 module mounted. View from the front. Lots of room to spare.
Sonar mounted. Going fixed position for now. Still need to drill holes in the plastic front plate for it.
Head mounted on head plate I made. Head is attached to servo mount. Front lip locks it into Omnibot body.
Servo mounted from below. Solid and a rock!
Another view of the servo mounted.
That's all I got for today. When both MP3 modules were working it was hilarious!
MrT - "Enough jibber jabber fool!"
PeeWee - "I know you are but what am I?"
Once I get the module replaced I'll fire up a video.
All very neat and tidy there Lumpy , Good work. I cant wait to see the video .
Steve_C.
I can't see any pictures on Lumpy's post and a few other threads on the forum. All I see is a little box that says click for actual size.
Anyone else have this problem?
I am doing the Omnibot conversion with EZ-B. I need help from start to finish.
Cybersarg confused confused
@cybersarg congrats , start your own thread , post your ideas of what you want your robot to do and look like , what color you want ect. There's lots to do with omnibots and there are several people here nodding them.
I love your head mount set up, I only wish I had been as clever with B.O.B. Check out my omnibot build, I have some pretty good instruction on mounting high torque servos for the arms. B.O.B. Finished
B.O.B. Work in Progress
Hey Bret,
Checked out your pics.
Looks good. I'm going to get some heavy duty servos on the go either way.
I'm looking either to do direct drive like yours or maybe something a little out of the box.
I'm looking at these Servo City Shaft Couplers then just drilling straight through the arm pivot point. Epoxy in a shaft and connect to servos.
I could mount the servos to the cassette internals fairly easy.
Just not sure of torque and strain?.
It's just a thought for now. Your type of setup is probably the simplest/smarter route to go.
Didn't get much done on the Omnibot's lately.
Still working on a game plan for the arms. Not sure if I need heavy duty servos or not?
Wired up power switches and charging port.
Just about ready to paint. Weather is going to be good for the next few days.
Scored some Wii remote (Clones) for $5.00 at the local Liquidation World. One for each of them.
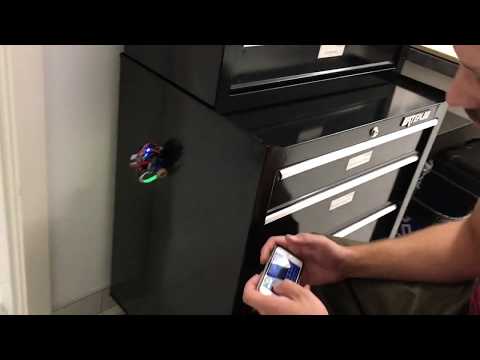
A quick vid of armless MrT. giving me attitude. L298N motor driver via Wii works great.
Hello,
Received my replacement MP3 module and 3 more today.
These modules are great for simple robot projects. Simple and easy to setup in ARC.
Supplier replaced my (1) dud free of charge, no questions asked. My other one is still going strong in Omnibot#2.
They sent along these pots. Still not sure what they will do for me.? My amps are adjustable.