United Kingdom
Asked — Edited

Using Two 2.5 Amp L298 Motor Controllers With One Ez-B.

Hi everyone.

I posted a question in regards to reducing the speed of my two 12v motors on the forum last week and I have been pointed in the direction of using motor controllers, and after a response I got from Rich, I found out that it is possible to use two controllers through one EZ-B, so I have ordered two 2.5 amp motor controllers from EZ Robots.

The reason why I need to use two is because the drivetrain for my robot build runs off a 12v battery and has two 12v drive motors that draw about 0.50 amps while running, but can hit about 1.4 amps peak for a split second, so using both channels on the 2.5 amp motor controller with a max peak limit of 3 amps per channel, that takes care of the drive motors.

The drive train also has one 12v steering motor that runs at 0.24 amps with a peak of about 1.3 to 1.4 amps, so apart from needing a third channel I wanted to leave a safety margin, that's why I will require a second motor controller (only using one channel) connected to the EZ-B v4, which I wasn't sure could be done. But as I mentioned above, Rich told me that although it is not done often, it can be done but the second controller would require scripting. So what I would like to ask is...

1.) Has anybody else done this with a similar set up to my example?

2.) Are there any examples of this in action? e.g, controlled via on screen sliders ect.

3.) I'm assuming that I will have to run 2 pairs of power leads from my 12v battery and connect to each L298. Is this correct?

4.) How would to L298's be wired up to a single EZ-B with speed control? I know Rich has a tutorial but I would also like to hear from other members who have done this. synthiam.com/Community/Questions/4096

5.) And finally, and this is the main point I am unclear of, one L298 can be controlled through the EZ-B via on screen sliders, smartphone or Wii remote accelerometer movement, voice control ect ect. But I have read that the EZ software will only have these controls for one L298, so how will I be able to control the second L298 for the steering, say for example if I wanted to use it in a "radio controlled" scenario, with both the drive motor control slider and the steering motor slider on one computer/touch screen?

I am waiting for my first batch of EZ goodies to arrive sometime this month, so I am new to all this and only going by what I have read and seen online so far, so any help and/or advice any of you kind people can offer would be gratefully received. There is not that much mentioned about using 2 controllers with one EZ-B on the forum so hopefully any answers or advice given will go towards helping others too. Rich has already offered me help in regards to scripting a second controller which I surly will take him up on, but it this "how will my finished robot physically be controlled Via an iPhone of tablet PC once its scripted" thing I'm scratching my head over.

Thanks everyone.

Steve ;)


ARC Pro

Upgrade to ARC Pro

Take control of your robot's destiny by subscribing to Synthiam ARC Pro, and watch it evolve into a versatile and responsive machine.

#1  

I have been thinking about your setup, and I have some ideas, but it will take some experimentation to get everything right.

First, for the drive motors, you could set them up with the H-bridge movement panel. Technically, with a little re-design, that is all you would need. It will do differential steering (ie, when you turn, one motor turns faster than the other, or even goes backwards) so you don't need to have a powered steering wheel at all.

However, since your physical build is already started, you may not want to redesign to make the single wheel just a passive caster.

Instead of the H-bridge movement panel, you would use a custom Movement Panel and script commands to send signals to the drive wheels H-bridge for forward/back, and PWM speed control, and to the steering motor H-bridge for left/right turning.

Alan

United Kingdom
#2  

Forgive me if I go too fast, just ask if anything doesn't make sense.

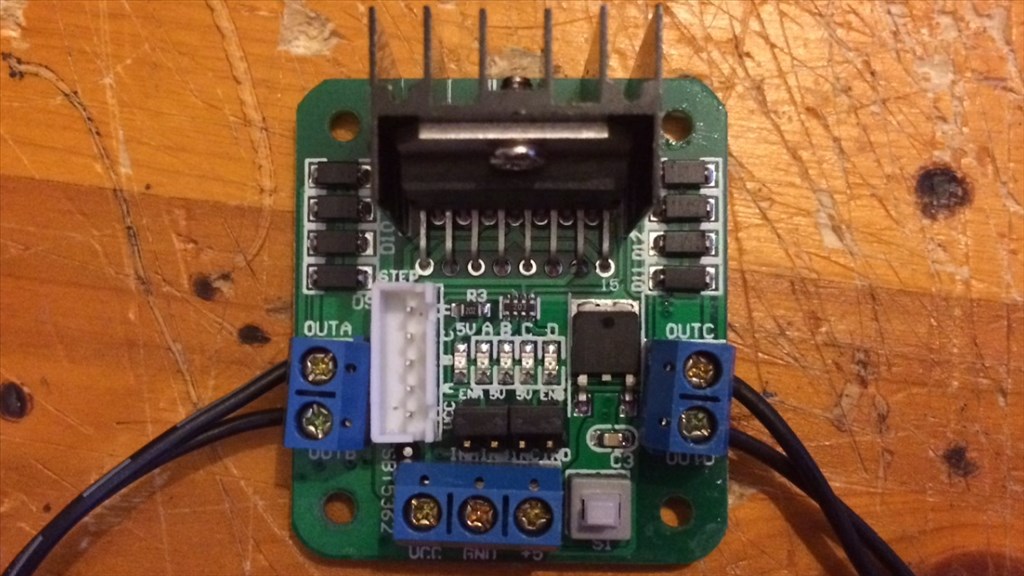
To connect them up is pretty much as my tutorial. In1, In2, In3 and In4 need to connect to 1 free Digital Port Signal pin in each case (so 4 pins). If speed control is used then EnA and EnB need to connect to 1 free Digital Port Signal pin each also (you could combine them like I did and have uniform speed over both channels or you could leave the jumpers in place and have them set to full speed).

The second H-Bridge we only need In1 and In2 (and possibly EnA if you want speed control). These connect to free digital port signal pins also.

So to list out the connections (ports can be changed if required, the below are just an example).

H-Bridge 1 (drive Motors) In1 connects to the Signal pin (white) of Port D8 In2 connects to the Signal pin (white) of Port D9 In3 connects to the Signal pin (white) of Port D10 In4 connects to the Signal pin (white) of Port D11 EnA Connects to the Signal Pin (white) of Port D16 EnB Connects to the Signal Pin (white) of Port D17

H-Bridge 2 (Steering Motors) In1 connects to the Signal pin (white) of Port D12 In2 connects to the Signal pin (white) of Port D13 EnA connects to the Signal pin (white) of Port D18

Notice I have put the Enable pins on a different "block" of pins, this isn't necessary I just like to do it this way. You could put the enable pins of D12 & D13 for the first H-Bridge then move the second H-Bridge up a bit and put it on D14, D15 & D16 if you wanted. (Hope that didn't come across too confusing, if it did just ignore this paragraph, it's not that important at this stage).

Then this is where the custom Movement Panel comes in to play.

With the custom Movement Panel you script the controls for forwards, reverse, left and right. Then the arrows will perform those tasks.

It will involve having 5 (maybe even 6 with speed control) scripts written based around the L298n truth tables.

First work out what needs to happen for each movement command. I'll do the first so you can attempt the others (I find it's a better way of learning this way)

Forwards Both motors need to move forwards, steering motor needs to stop.

Reverse

Stop

Turn Left

Turn right

Once you have all of the movement requirements figured out you need to convert that in to EZ-Scripts which tell the H-Bridge what to do. In my tutorial I posted the "truth tables". These are simple tables which tell you what happens when specific combinations of pins are high and low. (A high is basically the signal pin of the EZ-B going to +5v (or +3.3v in the V4), a low is the signal pin of the EZ-B going to ground).

I'll give you the first script for forwards as an example.

So for forwards, Steering Motor wants to stop (if moving) Left Motor (Motor 1) wants to move forwards Right Motor (Motor 2) wants to move forwards

We look at the truth table


 In4 | In3 | In2 | In1 | Function
-----+-----+-----+-----+--------------
  0  |  0  |  0  |  0  | Stop/Free Wheel
  0  |  0  |  0  |  1  | Motor 1 Forward
  0  |  0  |  1  |  0  | Motor 1 Reverse
  0  |  0  |  1  |  1  | Motor 1 Brake
  0  |  1  |  0  |  0  | Motor 2 Forward
  1  |  0  |  0  |  0  | Motor 2 Reverse
  1  |  1  |  0  |  0  | Motor 2 Brake

On the drive H-Bridge; We see that we need In1 set to 1 (high) and In2 set to 0 (low) to move Motor 1 forward. We also see that we need In3 set to 1 (high) and In4 set to 0 (low) to move Motor 2 forward.

On the steering H-Bridge; We see we need In1 set to 0 (low) and In2 set to 0 (low) to enable "free wheel" or stop.

We do this with the Set() command.

Assuming we have used D8 (In1), D9 (In2), D10 (In3) & D11 (In4) for H-Bridge 1 (drive) and D12 (In1) & D13 (In2) for H-Bridge 2 (steering) the code to achieve the above would be;


# Stop the steering motor
Set(D12, Off) # In1 Low
Set(D13, Off) # In2 Low

# Move the drive motors
Set(D8, On) # In1 High
Set(D9, Off) # In2 Low
Set(D10, On) # In3 High
Set(D11, Off) # In4 Low

That right there is the script required for Forward movement in the custom movement panel.

To save this becoming a huge post with too much information causing information overload and a headache I'll leave it here for now. You should be able to follow the same logic above to produce the scripts needed for the other movements. If you think you have the script for another movement sorted post it and I'll give you some feedback on it (the same goes for anyone else, you can all give this a go and test your scripting abilities.

United Kingdom
#3  

P.S. Alan has a good point. I thought that earlier today too however it depends on your robot. That method is common, it's how most of my robots steer and it works very well on them. I don't know enough about your build to know if that method would work or not, it would certainly be a lot easier.

#4  

I realise this is a moot point here, but when my Roli arrives, I am throwing the H bridge in the garbage or I will give it away for whom ever wants it and is willing to pay for shipping... I am sticking with sabertooths, they are so much easier to use...

United Kingdom
#5  

See I would rather use the L298n H-Bridge personally but then I do know it inside out and could probably build one on a piece of perf board blind folded now :)

The only real reason I see the Sabertooth being "better" than the L298n is for saving of digital ports on big builds and for larger loads. If the motors are under 2.5a and you have 6 free digital ports (4 if you don't want speed control) then there's no reason to pay a lot more for a device that will do the exact same thing. But that's just 1 man's opinion, everyone will have their preferred methods of doing something, if we were all the same it would be a pretty boring existence right :)

#6  

.... with the soldering iron in your left hand and after downing a few guiness.. LOL... I like the simplicity of the sabertooths as well... Trade off is price, however...

United Kingdom
#7  

Thanks for the advice there Techguru. I did originally play with the idea of differential steering before I started. I am making a full size K-9 (from Dr Who for those not in the know) but with a few differences, and I know the original prop had exactly that steering set up. But the reasons why I went for front wheel steering was

1.) I don't have a lot of room in my house so I wanted more of a "point & shoot)" set up and not have so much over swing from his head and rear of his body when turning. 2.) The current set up is R/C and I may incorporate that at a later stage so he has about 100 meter driving range if he is ever out and about.

So I don't really want to change the chassis, plus I put a lot of work in to it so it's balanced right, building the steering system, and under chassis lighting I've added but I appreciate where you and Rich are coming from.

I didn't know that the ARC had the feature to create your own "custom" control. That really is a neat feature and answers one of my questions, so if I have this right, controlling forward/backwards motion plus adjusting it's speed and steering left/right plus adjusting it's speed, all from one screen ect. So thanks for the info buddy.

Hi Rich. No mate, not to fast at all. I understood it, mostly. Thanks for feeding me the first little bit of script. I do like being spoon fed but I know it is not good for me, so I appreciate you "giving me the fishing rod instead of the fish". :D I can't wait for my bits to arrive to give this ago but if I do get stuck I will give you a shout for some pointers. I've supplied a photo of how the chassis is set up if anyone's interested and hasn't seen it on the other thread.

Thanks for the offer Richard but I ready have 2 ordered from EZ Robots with free shipping. Someone else maybe interested. Anyone?

Steve. User-inserted image

United Kingdom
#8  

See, up until 2 months ago I hadn't even heard of Sabertooth let alone know what it did. Just shows his much of a novice I am at this micro processor controlled robot malarkey. :P

I always played about with R/C and spare electronic bits and peaces, but I really want to learn about it all. The Sabertooth is something I may look at if I do another, bigger robot build (and have more beer tokens saved up). ;) but first things first.

Steve.

United Kingdom
#9  

The two L298's have been ordered and should be winging their way to me soon. I'll post an update when they arrive and when I have them installed. Thanks for the advice everyone.

One thing, how do I close the question and say "Congratulations" to a member for answering the question? There wasn't a link in the question update emails I received, and I wanted to close this by thanking Rich.

Steve ;)

#10  

Steve, no need to ID the contributor that helped the most since you did not start the thread as a question needing help.

United Kingdom
#11  

Ok thanks for that Doc. I'll make a note of that for next time.

Cheers,

Steve.

United Kingdom
#12  

@Rich.

Now my goodies have arrived I am starting back on my build, and one of the first things I will be doing will be to connect the motor controllers. I have read through your detailed post again, which once again I really appreciate you doing, and will follow the info you supplied, and if I get stuck I will give you a shout.

But, I do have an additional question for yourself or anyone else in regards to wiring up, specifically "power". The two drive motors (going to L298 number one) and the steering motor (going to L298 number 2) are all 12 volt and have their dedicated 12v battery. The EZ-B will be running off a 7.4v LiPo for EZ-B power, servos, sensors ect. So my question. How do I wire this set up correctly? I have a rough idea, but apart from "plug 7.4 LiPo in to EZ-B", I am a little unsure and want to make sure I get it right.

Cheers, Steve. :)

#13  

Steve, I am going to let Rich answer.

I use three h-bridges in my project garden-bot.

He runs great. I HAD it wired for v3 and now wired v4.

Each was a different wiring. Motors ran off 7.4 power supply. V3 controller off different power source, and supplied power for h-bridges. I used two pmw controls for left and right power control to motors. So I could make him go in circles or tight turns.

It is similar to what you are doing.

V4 wiring is different.

But still used the same ARC project did not add or remove any controls.

I will later in the day make it public in the cloud if you wish look at the project.

J :D

United Kingdom
#14  

Thanks for the reply jdebay. I've looked through Rich's tutorial and DJ's video and I'm almost there. I just need to get the power wiring sorted as I mentioned in post #13, and a little confused to "common ground". confused

(-- EDIT --)

Forget post #13. I've just realise that my questions had already been answered in this thread. Sorry about that. Crazy week. eyeroll

One thing. Could someone confirm for me, where do I wire up the common ground between the EZ-B4 and L298. Is it...

from L298 "ground" to the barrel jack "ground" that plugs in to the V4,

or L298 "ground" to any "ground" pin on the digital ports? Thanks.

United Kingdom
#15  

User-inserted image

@Rich.

I need to take you up on your offer for a little help if something didn't make sense. (Or to anyone else who can help. Okay. So I'm in the process of wiring up my two L298's but I've hit a snag. I have been following Your advice and tutorial, but the L298's I have are a little different to what your and other pictures I have seen in other threads. As oppose to 6 pins I have seen, I only have 4.

Which is the correct way to connect the L298 to the EZB4 for left/right motors, and to have combined speed for both motors, not independent?

Thanks. confused

United Kingdom
#16  

Don't worry about the last post. I worked it out. I do have another question however. I have got the 2 H-bridges working together, but the issue I have is with steering. I have used an expletive script so I have got the steering to turn left and right. How do I get the steering to center? I just can't figure it out.

Cheers.

United Kingdom
#17  

You have 8 pins, 4 are covered by jumpers (EnA and EnB to +5v). Remove the jumpers and connect a PWM to EnA and another to EnB if required or leave the jumpers on if you don't need speed control.

As for steering, how is the steering done?

United Kingdom
#18  

The steering in using one channel from one of the H-bridges. If I use the Hbridge PWM movement control, the 2 sliders move the steering on one H-bridge, while the arrows control the 2 drive motors on the second H-bridge.

Then I went to try the 2 H-bridge example and forward, back, left, right all work. But when steering goes left it goes fully left, and same for right, but can't find a way to center the steering.

I just had a bit of a scare when writing the last post. When the steering was fully locked right, there was no noise so I assumed that it had stopped turning. Then all of a sudden thee was an electrical scream and smoke. I killed the power and the steering H-bridge was REALLY hot. It cooled down and it is all still working. Phew. eyeroll

#19  

Is that your bot on the pervious page? Two drive wheels and a single front steering wheel? If so, a servo would have been a better choice for steering due to it's 180 deg positioning ability....

Or you could remove the motor and H-bridge from the front steering mechanism and just use the front wheel as a castor (swivel back and forth freely). Then use tank type differential steering for the drive wheels...

United Kingdom
#20  

It sounds like a little bit of being unaware of what a H-Bridge does and what are the best ways to do everything.

I agree with @Richard, a servo would be the better option for the front wheel. A servo will have position feedback where a H-Bridge (without extra parts) doesn't.

The H-Bridge would have been telling that motor to turn in one direction, no mention of how long for and no feedback to tell it to stop therefore it would, or could, have been spinning it clockwise or anti-clockwise (counter clockwise for the Americans) until told otherwise.

Changing it to a servo would mean you can have position 90 as centre and forwards. Position 30, 45, somewhere around there (trial and error to find what works best) for turning one direction, 125, 140, again trial and error, for the other direction.

Or, and this is dependent on the servo used and experimental... Strip the guts out of a servo, use the servo board to power the turning motor. Use the feedback pot to let the servo board know the position of the wheel... basically rebuilding the servo outside of it's casing. I did similar in Melvin's eyes (however have no photos of that unfortunately).

But personally I would change it for a normal servo. One port, comes with position feedback too, no messing around. Just would require a simple script for the movement panel

United Kingdom
#21  

Hi Richard. Yes that is the chassis of my bot. The reason it has a motor for the steering is because the bot has a secondary R/C system when I can't use WiFi. I agree with you about the servo idea but when the bot is finished it will weigh a heck of a lot, too much for a servo to steer.

The other point you make about diff steering again is a valid one, but due to the design of my bot (based on Doctor Who's K-9) and available space I have in my humble abode, I wanted more of a "point and shoot" design to limit any head or tail over swing. (hope that made sense).

I know there is a way to limit the turning circle but I havnt figured it out yet.

United Kingdom
#22  

Throw in limit switches and feedback pots if that's the case.

Dave had some on his B9, I think the details are in his B9 showcase post but if not just search for limit switches and feedback pots and they should pop up.

United Kingdom
#23  

Thanks for the advice Rich and to Richard too.

Ive bit the bullet and spent the last couple of hours doing a bit of redesigning on the chassis making it in to a front wheeled, differential steering drivetrain and now only using one L298 and a coaster wheel Richard mentioned. Not the way I wanted to go, but on the plus side it has given me a little more room to work with losing the steering section and relocating the drive battery.

In regards to the H-bridge, it was more of I was misinformed rather than I misunderstood. I am aware what a H-bridge does and what it's function is, its just that it was hinted to me that I could do what I wanted to with 2 H-bridges with ARC but that's obviously not the case, although I don't see why not. Motors through H-bridge, H-bridge to EZ-B, and say to EZ-B with an editable slider control or peace of script "This is center. I only want you to turn this far," or "40 degrees left and right from center maximum" just like a servo does. The EZ-B seems to have the ability to do so, so perhaps it could be something for a future update.

Anyway, I read what you said Rich, about the jumpers on the L298. I didn't realise they were removable jumpers as I haven't seen it mentioned anyware, and thought it was a board redesign I was unaware of blush . So hooking up 2 more wires to the EnA & EnB to 2 more signal pins on the EZ-B will give me vairable speed control? Quick question, what ARC control do I use for this? I don't think I've come across it yet. Only arrow controls with one speed.

Cheers, Steve.

#24  

There is no way to update ARC or the ezb4 in order to read position of an H-bridge controlled motor... It's the motor's and controller's job to relay this position back to ARC. With an H-bridge and a dc motor this is impossible because there is nothing to measure position with... The motor has no idea where it is rotation wise... A servo measures it's position with it's built in potentiometer... You might be able to do it using a Sabertooth motor controller and a Kangaroo board, however...

United Kingdom
#25  

Interesting. The reson I said I thought it might be possible is if you could set it up manually. Eg, you center the wheel or wheels (steering) manually to start, then with a slide controller with ARC for example and, with some trial and error, drag it to the maximum turning lock and set it as full lock, or have the wheels turn for a set amount of time (so many milliseconds) and set this, then save this as a project control (only useful for that specific project due to the motor size/power ect).

But I stand corrected and get exactly what you mean about why it's not possible. Just a thought.

:P Richard, I've got to ask, don't you ever go to sleep? I know we are in different time zones, but you always seem to reply to posts at all hours day and night lol. :D

United Kingdom
#26  

Time based would be the only method without the use of encoders, a feedback pot or limit switches however it is incredibly inaccurate.

#27  

Ha, ha I do sleep.... More than 8 hours a night actually... Rich is the night owl... If you can find a way to use a strong servo (quarter scale are seriously strong) in the steering mechanism (I am sure they can handle the heavy loads you require).... This would solve your problem....

United Kingdom
#28  

@Richard.

Ahh, you do sleep then. I thought you was like "using the force" or something. :P

Anyway, in regards to using a servo yourself and Rich suggested, I slept on the idea and figured if, using the single wheel for steering, I build a steering frame with the wheel, attach a lazy Susan bearing which I have, fix it to the chassis and have a HD servo turn the lower part of the bearing with the wheel. The bearing should take a lot of the overall weight and still be able to turn quite easily. Sound feasible?

After a trial with the differential steering there was just too much over swing and would have ended up causing damage to the bots body.

@Rich.

I thought the timing idea might work. Like I said, it was just an idea that I thought might work with a little coding of script. Something to maybe experiment on one day. ;)

United Kingdom
#29  

Ok. So I have gone with the HD servo I got from the shop and initial testing seem okay. 1 thing though, when the servo holds position either left or right, it makes quite an annoying buzzing sound. Is that normal? Although it doesn't make the noise when the servo isn't fixed to anything.

#30  

A little buzzing is normal... Just check to see when the servo is left or right it's not binding on anything (pushing against the stops or end of travel)... If it is adjust the servo position until the buzzing goes away or is at least reduced.. Centre position it should not buzz too much...

United Kingdom
#31  

No Richard, deffo not being obstructed by anything and I have reduced the end of travel for left and right on a control. It seems the closer it gets to end if travel, the louder it gets. Not excessively loud, but louder than I was expecting. Center position no noise at all.

The new steering set up with the servo and lazy suzan bearing seems to be working great now, even with the weight of the bots chassis and body fitted, So thanks for the advice. Really appreciated. ;)

Steve.

#32  

That's normal... Glad it's all working for you... One tip (since you're going to add more weight to the bot)... make sure you distribute the weight as evenly as possible... You don't want the majority of weight over the servo... 40/60 front to back might be a good ratio....

United Kingdom
#33  

Thanks for the tip buddy. I replanned the equipment layout thIs afternoon so It's been taken care of. ;) . I've lost all the R/C gear which was all located at the front, and have no need for it now, and the main drive battery will be located over the rear drive wheels. When the head is attached to the body this should give me roughly the 40/60 weight ratio you mentioned.