Asked — Edited
Resolved Resolved by CochranRobotics!

Too Hot Or Too Colt

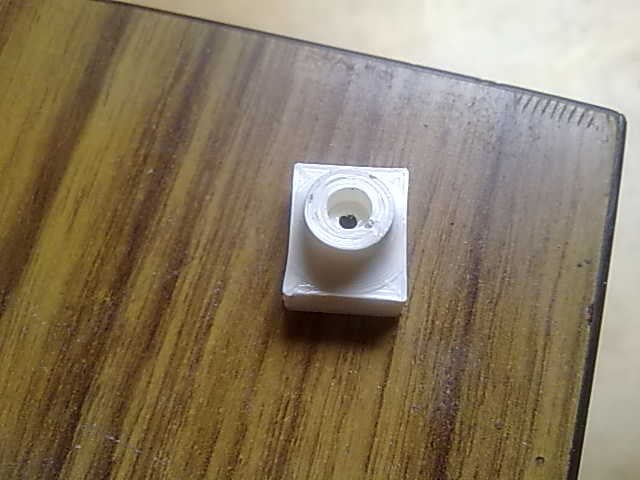
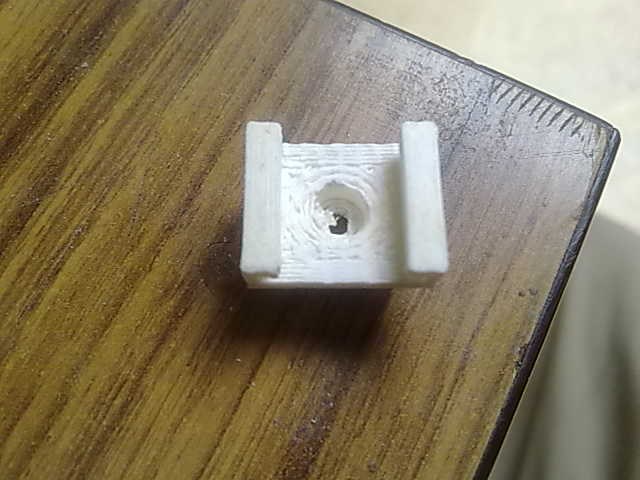
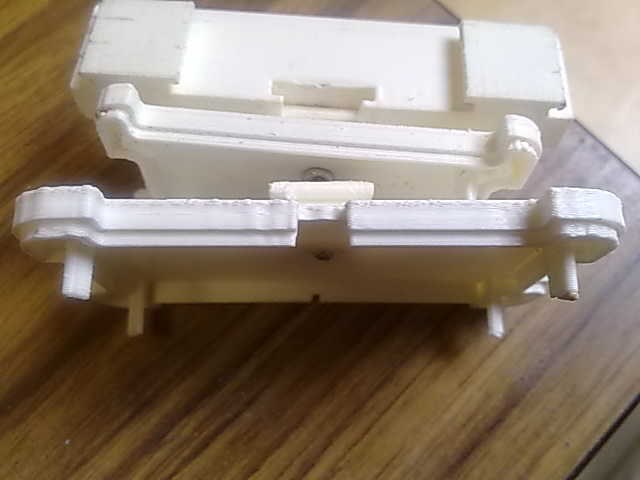
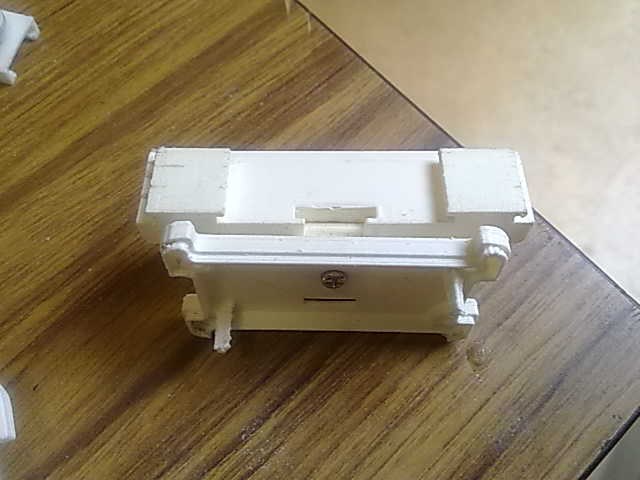
hi hope anyone knows this problem.i got some 3d parts ,but they look useble but, are not what it supose to be.i think its a problem whit heating or so.

if i can get a solution i can help the person in the shop.

User-inserted image no gear is in the hole

User-inserted image very ruff parts

User-inserted image edges are also very ruff

User-inserted image


ARC Pro

Upgrade to ARC Pro

Synthiam ARC Pro is a new tool that will help unleash your creativity with programming robots in just seconds!

#1  

what material is it, ABS?

They dont look bad actually. A little bit of sand paper or post processing would help.

look up using acetone for post processing 3D printed parts. You will use a razor blade to clean up most of the rough places, and then sand it down. This is pretty common output from a 3D printer.

#2  

as for the no gear thing, I would take apart a metal servo and heat the end of it, slide it into the hole that you want the teeth in, and then remove it again. You could also use a screw and some red locktite to hold the horn onto the metal servo. This will allow you to remove the horn when you need to.

3D printing isn't exact. you will have rough edges on holes. you will have a lot of cleanup to do.

PRO
Belgium
#3  

am not sure whits material is.good idea to use metal axel.

#4  

if this is ABS, you will need to heat it to about 165-175 C or so to get it to start to melt the plastic without turning it into goo. If it is PLA, you would want to heat it to about 140-150 C to do the same. Heating it too much will just make a mess.

also, if you are going to use loctite, use the weaker stuff (think its red). This will hold but when you want to get the part off, you can. From a quick scan of their website, they have a lot of different products now.

#5  

They do look rough in some places. It looks like the 3d printer used needs a good bit of calibration. It is most common on the cheaper diy 3d printers. I remember my solid oodles had little gaps and oozing at times when it was printed. A Dremel and variety of tips is your best friend for cleaning up buggers off a 3d print.

Try printing in the future on the slowest setting and use the thinnest layer height. That is usually .1 mm and you will have the smoothest possible product.

#6  

My results are opposite from cochrans, unless I keep the temp up the layers do not go down smooth. I keep my tip at the factory setting on makerbot 230c for PLA and no heated bed.

#7  

I use a 230 for ABS, with a hotbed at 110C, PLA, I run at 200C with the hotbed at 70C. and close the door to the room and close the vents to the room. A lot of the temp also depends on the quality of the filament used. The PLA I had ended up in the trash can and more was ordered.

I was speaking of heating the servo gear to make the gear teeth in the piece.

#9  

I tried heating the servo gear and it did not work well for me. It would eventually strip very soon. You can try increasing the resolution to 1.0 or 1.5. Also, you can visit the forums for your particular type of machine.

PRO
Belgium
#10  

hi moviemaker

also problably the gear wouldn position good in center.i ask ez if i can order straight from, the factory or so.

#11  

Really fine detail parts, I would try to order injection molded. As mentioned here and everywhere else, 3D printing really fine parts isn't there yet. I have tried on 4 different printers including a Replicator 2 and a Replicator 2X that are both maintained weekly. Its just not possible to get that high of detail with where 3D printers are at this point. If you 3D print these parts, you will have to use some other method to depend on the really small teeth that are used for servo gears.

PRO
Belgium
#12  

yes its not really what am looking for.now i think how can i get tree servo next to eachother. i think they need to be on the byers page sinds they allreddy excist in the chest jd.

PRO
Belgium
#14  

cool robot,think very exspencive

#15  

I agree. I was talking about how they did shoulders or hip joints. 3 Servos in same area working to make a joint work.

PRO
Belgium
#16  

these are very exspencive servo's whit bearings and all

PRO
Belgium
#18  

wow.are you gonna build this robot?

#19  

I am working to build a school program that will allow students to decide what kind of robot they want to build, and then build it. They will work with teams to build robots and learn how to design, print, build and program a robot over the first 4 years of the program. The 5th year, they will build a robot of their own.

Prior to this program, students will have gone through up to 2 years of introduction to robots using Six, Roli and JD, and 2 years of implementing the things they learned into existing robot designs.

4th and 5th - Introduction to robotics using ARC and Six, Roli and JD 6th and 7th - Implementation of robotics technology 8th thru 11th - Designing and building robots as a team and building a 3D printer 12th - Build your own robot from the ground up.

Because of this, I am experimenting a lot this summer with a lot of things.

EZ-Builder EZ-SDK Building a Wall-E with the V4 Built a 3D printer Getting back into CAD Printed a Rapiro head to demonstrate what can be done with 3D printers Designing parts for use with various robots.

I am ready for school to start.

PRO
Belgium
#20  

you cant have a better school.its very awesome what you teaching them.

#21  

I cant wait to start publishing videos. You know, the coolest thing that they will learn is how to teach themselves through research and experimentation. Phase 1 starts September 1st.

PRO
Belgium
#22  

wow that just one month from here.i will sure follow your video's.

#23  

A little late to the party but, I'm pretty sure the acetone smoothing method only works with ABS parts because they are petroleum based.

#24  

Yea, you are right. Acetone is for ABS. I also mix acetone and printed scraps to make a paste that goes inside of open printed parts. This offers a non layered plastic to be joined to the layered plastic, making it much stronger. It also can be used to bond parts together.

It works on abs. I don't like printing pla. It could be the product I was using, but it is very inconsistent compared to abs.

#25  

@d.cochran... I've used the "abs glue" mix too and it works great. I also have some clear PLA and haven't been to happy with it either. Also, using unprinted scraps works even better than the printed scraps. I use the little bits that get "chewed" by the extruder when I change filament and it seems a little stronger.

Greece
#26  

HI , My 2 cents on this....

Once I needed to close a gap... Of course the part design allowed me to do the following.

I selected the cleaning of print nozzle mode ...

When the extruder nozzle started to extrude... I put the pat with the gap and managed to close the gap... It made a good bond...

Also you could use a 3d print pen.... Bu this cost at least another 75US...

The ABS glue though is another perfect solution...

@ D.Cohran.... CONGRATSULATIONS...

I like when see people with your passion and want to make children better for their future... I WISH COULD HAVE YOU FOR TEACHER BUT MOST WISH I COULD HAVE YOU FOR MY KIDS....

GREAT JOB... KEEP ON WALKING and KEEP US INFORMED.