
Tellymate Tiny
Since it was mentioned a few days ago it has been at the forefront of my mind bugging me to play with it, so let's play
First I will cover the wiring of the TellyMate Tiny to the EZ-B and then I will cover how to use it.
So, when you get one it'll turn up and you have a bunch of bits;
- Composite Video Cable
- TellyMate Tiny board
- Angled Pin Headers
- Straight Pin Headers
- 3x2 Pin Header for ISP
First things first, ignore the pin headers. The simplest way to connect this to the EZ-B is with a accessory extension cable (or servo extension as they are sometimes called).
All the TellyMate Tiny needs is a Vcc, Ground and Serial data. Vcc can be 5V so direct from the EZ-B is fine, ground as usual can connect to any common ground and serial data is sent from the EZ-B signal pin, this needs to be received by the TellyMate so connects on to the RX pin not the TX.
First cut off the one end of the extension cable and strip back the wires (similar to the camera mod, Ultra Sonic sensor etc).
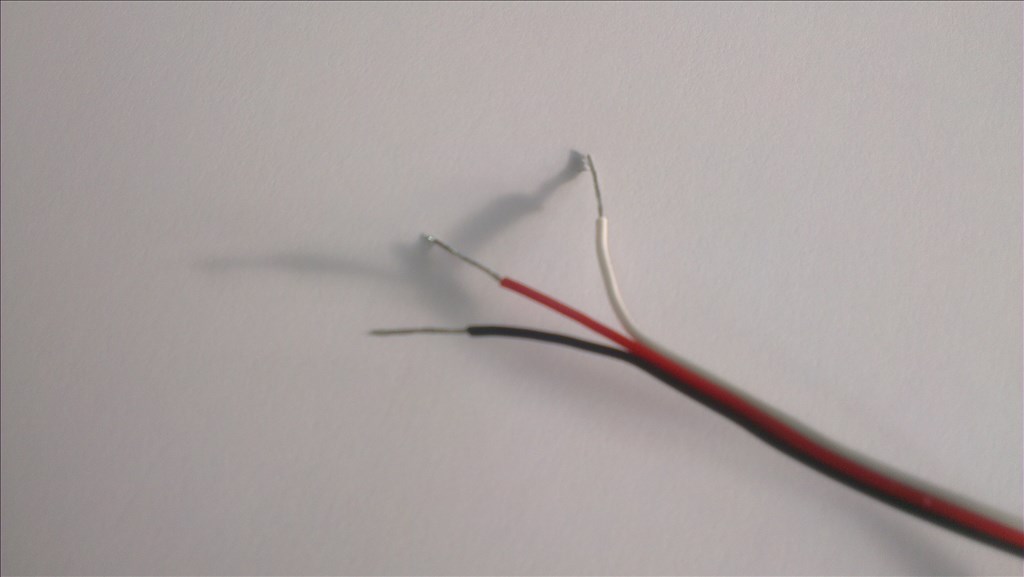
Next you need to solder the wires like so; Red to VCC Black to GROUND White to RX
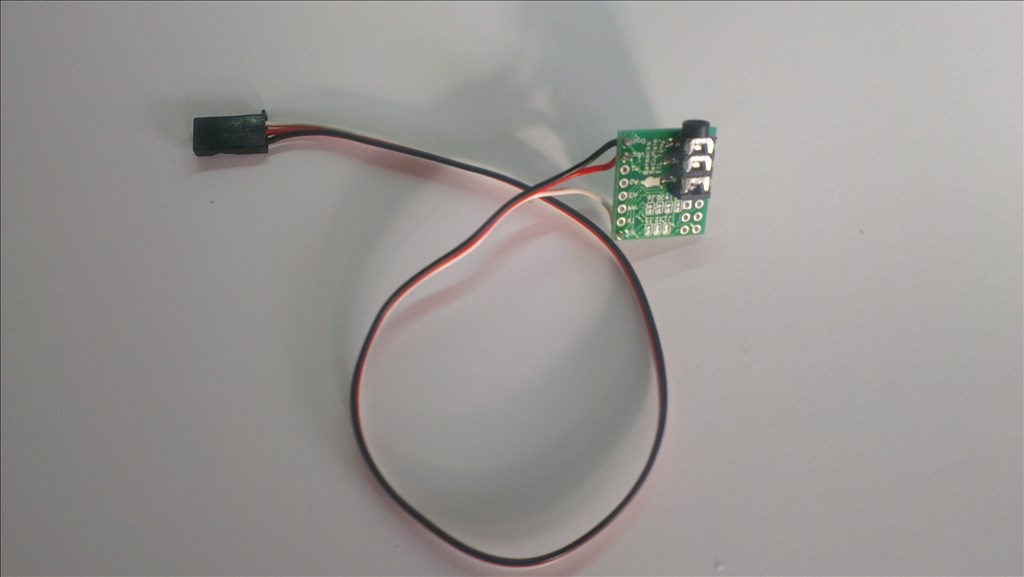
That's it, it's ready to plug into any of the digital ports on the EZ-B. It really is that simple
One slight oversight is there are no mounting holes on the TellyMate Tiny. A small piece of sticky foam tape would be ideal to mount the board. Provided you leave access to the jack for the AV cable this will cause no problems. Sticking it to the back of the LCD screen/TV/Display seems like an ideal location too.
Now, in order to use the TellyMate you simply need to connect the output to a TV via the composite video input, select the correct channel and send the serial data to the TellyMate using the SendSerial() command in EZ-Script.
Further details to follow on the scripting and operation plus a quick review of the product and it's capabilities to aid you in deciding if it's right for your project. Stay tuned for updates

Below are some of the more important commands that will be needed. It is assumed you will use port D8 however you may change it to any Digital Port, just remember to change the port in the script.
These codes will work in all variants of the TellyMate
Note: Any in the code sections should be replaced with a single )
Reset the TellyMate
This will reset the TellyMate device to the state when it is first powered on.
Line Feed
This will move the cursor to column 0 of the current line without deleting or removing anything on screen.
Form Feed
This will clear the screen and move the cursor to column 0 of the last line i.e. the lower left hand corner.
Carriage Return
This will move down one line but leave the cursor in the current column.
Enable Auto Carriage Return
Turns on Auto Carriage Return - Will automatically carriage return on line feed.
Enable Auto Line Feed
Turns on Auto Line Feed - Will automatically line feed on carriage return.
Disable Auto Carriage Return
Turns off Auto Carriage Return.
Disable Auto Line Feed
Turns off Auto Line Feed.
Clear the screen and return home
This will return the cursor to the home position and clear the screen.
Return Home without clearing
This will return the cursor to the home position without clearing the screen.
Show diagnostic info
This will display the diagnostics information of the TellyMate on the screen.
Change font to single width single line
This will set the font to single width single height.
Change font to double width single height
This will set the font to double width single height.
Change to Single Width Double Height (top)
This will set the font to single width double height for the top half of the text. A duplicate line of text will be required for the bottom half using the bottom half code prior to the text code.
Change to Single Width Double Height (bottom)
As with Single Width Double Height (top) but will display the bottom half.
Change to Double Width Double Height (top)
As with Single Width Double Height but will display at double width also.
Change to Double Width Double Height (bottom)
As with Single Width Double Height but will display at double width also.
Turn the cursor on
This will turn the cursor display on.
Turn the cursor off
This will turn the cursor display off.
Enable Line Overflow
This will enable line overflow. When text extends beyond the final column of a row it automatically moves the cursor to the first column of the next row and continues to output the text.
Disable Line Overflow
This will disable line overflow. When text extends beyond the final column of a row it will display characters on the final column with the final character of the text string being displayed.
Turn On PAL mode
This will set the TellyMate to PAL mode for the output.
Turn on NTSC mode
This will set the TellyMate to NTSC mode for the output.
Invert the Output
This will inverse the output i.e. will display black text on a white background.
Revert to normal output
This will revert the output to normal i.e. white text on a black background.
Positioning the cursor
This will position the cursor in the upper left corner (position 0,0). By altering 0x20, 0x20 it will specify a different position. Positions are hex beginning at 0x20 (32 in decimal) for 0. For example, position 10,15 would require SendSerial(D8,57600, 0x1B, 0x59, 0x2a, 0x2f)
Moving the cursor Up
This will move the cursor up. If the cursor is already on the top line it has no effect.
Down
This will move the cursor down. If the cursor is already on the bottom line it has no effect.
Right
This will move the cursor right. If the cursor is already on the right hand side it has no effect.
Left
This will move the cursor left. If the cursor is already on the left hand side it has no effect.
Display text
This will output the text (within the quotation marks) to the screen at the current cursor position in whichever display mode is currently set.
Further descriptions and examples of the above codes will follow along with demo videos and photos.
This is the result of just using the display text command. Notice how the next text follows from the old, no overflow, no picture mode and requires a lot more work.
This is set to return to home and clear prior to outputting however no picture mode has been set and therefore the display is incorrect. Also, cursor is set to on (note the _ after the text).
This is with the script correctly set up to output in the correct format and picture mode, with double height double width text for the "EZ-ROBOT.COM", single height double width for the "TellyMate Demo" and single height single width for the remainder of the text.
A short video which shows different sections of the text in the last image being displayed.
Another video which shows some of the various functions mentioned above, so you can see what they do.
Further videos displaying the above control sequences will also follow shortly.
This post is reserved for any questions and answers posted by the community.
Lol I really would like to take advantage of this feature , but I'll let you get bugs worked out first.
@Rich ...nice to see you back albeit not 100 percent I am sure..........Thanks for the easy to follow pics I too am thinking of the advantage of sending serial data to a TV, when 99.9 percent of users have an LCD screen......unless you want to create a cool effect something similar to the old program (the old timers will remember) Twighlight Zone, where Rod Serling took over "your regular broadcast". Shades of the government taking over the internet. This effect might be pretty cool on an old black and white!
RICH i see you like my idea on the tellymate tiny,since i bought it up awhile back. THE wiring was the same i did for mine ,and i did a simple script "hello EZB world " and worked great
Here is a simple serial script that DJ POSTED. tellymate script.
ezB_Connect1.EZB.Uart.SendSerial(Digital.DigitalPortEnum.RD0, Uart.BAUD_RATE_ENUM.Baud_57600, "This is text!");
SAME script i used on my serial
EDIT sorry guys i put the wrong info up on the script i explain the script i used thats the same as RICH uses where i got the info DJ has script help in setting and has many examples like this one example : sendserial (DO ,9600 "THIS IS TEXT" )
ONLY item i change was how it was mounted,i put it on a small board just a little bigger and added a tie wrap to hold the video cable since it may break and added a few holes to mount the board on your robot.
IF you dont need to may be use hot melt (ugh) or tape around the board so doesnt short out
@robotmaker, great to know you tested and have it working! If I had a Telymate I would definately post a pic of an old fashioned BandW TV with some text that says "Hello EZ world, I am from the future and it is filled robots helping mankind" It would be tuff to find and old Black and white tv...might have to look in granma's basement Just my thoughts
@irobot, thanks. I don't stay down for long The tellymate is ideal if you want to go for an old fashioned, retro style robot with a TV in it. Something like an old 70s or 80s style robot.
@robotmaker that is for the SDK not ARC. All of DJs work with the TellyMate was prior to ARC existing. If you paste that into EZ-Script it will not work. Also the code you posted is only for adding text, the graphics commands, clearing the screen, positioning of text, turning on and off the cursor etc. are all in there too somewhere, it's all on the datasheet I just need to wrap my head around it
Your post brought it to the forefront of my mind and since I'm not 100% and taking some time off work it was a good time to play
I'm only bench testing it so mounting it is not an issue for me, it is an oversight since there are no mounting holes, so a bit of breadboard and the pin headers may be needed after all, depending on application etc.