Cameron
USA
Asked
— Edited
Hey Everyone!
I am currently stuck on how to code these 2 sound sensors (1 on left, 1 on the right)(picture below) on the head of my robot. I have a servo (D18) that goes up to 180 degrees and I want the head to turn towards the loudest noise level. I have looked at some examples and I still dont have any progress.
Any help would be appreciated
Thanks,
Cameron
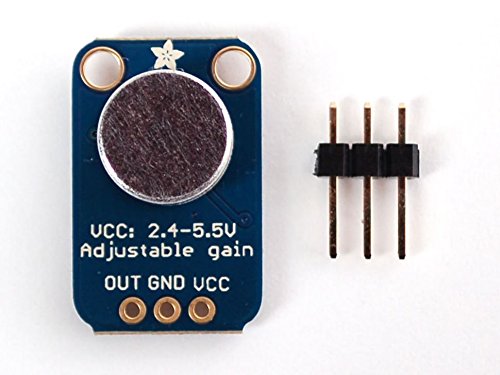
Very straight forward... This sensor plugs into an analog port... sample code would be...
Thank you very much Richard!
How would I fit the servo in there?
Using if statements... Here's a simple (in english wording) way to look at it. Once you get the logic worked out you can use script commands to achieve what you want
if sound level on left side great than a certain level move servo left else if sound level on right side greater than a certain level move servo right end if statement
Now just convert this to ARC script... I can do it for you but you won't learn anything... Take my example from my previous code post and take a shot at adding if/else statements to move your servos... You will need another variable for the right side as follows...
Yeah I'm someone who doesnt always just wants answers. I want to learn so I'm on the same page with that. Thank you Richard I will play around with it.
@Richard R So I think i'm missing something here...Servo seems to move but only the the left right away back and forth not picking up values...
:top $LevelLeft = GetADC(adc0) $LevelRight = GetADC(adc1)
if($LevelLeft > $LevelRight) Servo(D18,180) else if($LevelRight > $LevelLeft) Servo(D18,1)
endif
sleep(100)
goto(top)
Pretty good, but you may need a bit more...
If you dont have it yet, under Scripting in the controls, add a variable watcher. This will let you see what the $LevelLeft and $LevelRight variables are being set to.
Also, the sleep command is probably to short. This is 1/10 of a second. Try increasing the sleep command to something longer like 1000 (a second) and see if that helps you out.
Richard handles that in his sleep 2000 statements above. Also, he is centering the servo. If you dont have it, I would still add the Variable watcher so that you can see what is happening along with using it to see the set variables too, which will help you debug.
Gotcha! Thank you!
@Cameron You may need to tweak the values a little to get it working the way you want it to....
Will do!
@Richard R @CochranRobotics
Soo....it still is continuing to always move back and fourth to the left confused
I did check and set the variables to what it said. I even messed with the values from the last example and it still is doing the same thing. Is there an example that is spot on? I have looked, tried changing it and it still is going always one direction when the code is running. Always goes just to the left..
Can you post your entire script here? If I don't get a chance to look at it, someone will.
You can debug by setting the parameters in the script to see if the reaction is as expected. Then, you just need to see what the values of the variables are from the VariableWatcher control to see what you are actually getting for values.
Post the script and I will take a look at it to see if I can see anything specific that might be causing an issue.
Try this and see if the head moves right
Also, do you have the Variable Watcher in your project? If not, add it so you can see what the variables are being set to. If so, please let me know what they are being set to. I suspect the issue is with the sensor more than the script.
Something else that I would do is break this into two scripts. The reason for this is that the first script would monitor sound and be able to loop more in its own thread. The second one would handle the head movement. I will give you an example shortly.
Here's a script that I've used and it works pretty good. I don't remember who originally posted it but it's not my work. Adjust the values to tune it into your sensors as well as the ADC ports to match yours.
It did move to the right. and I did add the Variable Watcher;.
In the second script, I would do something like this...
In the first script I would do something like
uncomment out the 3rd and 4th line and then comment out the 5th and 6th line in the second script listed above.
What are the values that are being seen in the variable watcher when this runs?
Just saw a mistake in the script and fixed it. You might have to change the servo value for left and right in the first script, and then also adjust the values in the if($LevelLeft>500 or $LevelRight>500) to be lower, but you will have to test and see what values you are getting in the Variable Watcher.
I put those you posted in 2 seperate ones. And only one will last a few seconds. Is that right? Or shoupd they both stay on? Both values are over 12,000
1 will just run for 3 seconds to move the servo. The other one will run in the loop to read the sensor. The sensor one will stay running.
Now you just need to modify the multipliers and the 500's to be what works for you.
Why do I do it this way? I am glad you asked
This will let you test the motor movement by itself. Once you know the motors move like you want it to, you can quit messing with it and know it will work. You can also reuse this script for other sensors added later if you want to.
The sensor reading script can be tested without calling the servo script. Once that one works as you expect, you dont have to worry about it anymore and can reuse it if you want to.
I try to make my scripts do one thing only to eliminate extra stuff in a script that makes it difficult to change or modify in the future.
@CochranRobotics
I adjusted the values a few times and it still goes to one side and not the other. Here is the script I am using:
I even tried the 2 put together you posted and it still did the same thing. I know I am missing something here just not seeing it...
Hi Cameron, I posted that script. Have you ran the script in the RUN window to see if you are getting the <-100 and/or >-100 values for each sensor, if so, are you? If not, perhaps there is something wrong with a sensor. Try switching the sensors around and see what happens
@bhouston
Yeah im sorry i meant to add you to the thread as well. I have ran the script multiple times and it does show 1 having a bigger value in the variable list. But at another time they are both over 100. I'll try again and even switch them like you said.
Thank you
Run it in this window and you can see exactly what the script and the sensors are doing as you run the script.
I see that you have - if($Direction>-100) - I think it should be >100.
What is the "*100" in the following part of the script:
Are you trying to comment out the 100 for your reference? Unless I was not aware of this being OK, I don't think you can use a * to comment out something. I've always used this character: #
it was to make the value obviously high.
I think he has a sensor that os messing up or reporting much lower than the other but that is just a guess.
So this * forces the ACD reading to a wanted value? I'm not understanding this. Sorry. Can't find this in the EZ Script manual. confused
if the value is 50 from the adc reading, it makes it 5000. if it is 51, it makes it 5100. it was an attempt to get the values high enough as I didnt know what he was getting at the time. It could gave been *10 but I just set it to something in his script to see what he was getting for a value.
It may be that one mic has a lower return for some reason. He can use this multiplier to get both of them close to the same by setting one to *84 and the other one * 100 for example.
Going back to the reason that this should be in two scripts like before, the motor can be tested to work correctly, which it was. The other script can be used to test the sensors and adjust a multiplier as needed for each ADC sensor.
Use this script and then follow the directions recording the values of the left and right sensor after the value is stated by the robot. This should help you determine what is going on.
There is a pot on the back of the sensor. You can turn this to increase or decrease the level that is reported if the sensors are not reporting similar values when you are speaking from the front, or if the left is reporting lower than the right when speaking on the corresponding side.
Check out this thread. https://synthiam.com/Community/Questions/6814
@Dave Schulpius. The * is for multiplication.
Hey Everyone just wanted to touch base and say thank you for all that you guys have posted to help me. I really appreciate it.
The closest I got to set them to are:
Left Side 86 Right Side 78
I tried to adjust and made them as close as i could with the sound test script that @CochranRobotics put up and it did help. Now I just need to figure out how to adjust and multiply accordingly?
Here is the script I have been trying to still use: (Which I have messed around with numerous times and still nothing)
Maybe i'm wrong... I don't think the initial idea will work.
The OP hardware is this: https://www.adafruit.com/product/1063
this is not a sound sensor, this is a microphone with an amplifier, if you read the documentation you will find:
this means in a perfect scenario no sound will be 128 = VCC/2, also the value will oscillate below and above the DC Bias.
more info here: http://www.instructables.com/id/Arduino-Audio-Input/
bhouston posted a thread: https://synthiam.com/Community/Questions/6814
The hardware used is different: v2 version: https://www.dfrobot.com/wiki/index.php/Analog_Sound_Sensor_SKU:DFR0034 v1 version https://www.dfrobot.com/wiki/index.php/Analog_Sound_Sensor(SKU:_DFR0034) I'm not 100% sure but the amplification (check the schematic) is different is a linear value.
In the same thread, Richard mentioned an ebay sound module similar to this one: http://henrysbench.capnfatz.com/henrys-bench/arduino-sensors-and-input/arduino-sound-detection-sensor-tutorial-and-user-manual/
the sensor is different, you setup a set point, and the sensor will return a single value HIGH or LOW if the sound is above or below the set point.
If someone has a working solution, please share the hardware/script used.
@ptp... Good catch man.... That would explain why simple code isn't working with it... This one should work. It has both analog and digital output and it works with 3.3V Sound sensor
@ptp
Thank you for your help with that. And thank you to everyone else as well.
@Richard R thank you as well. Ill get that sensor