
budel0
I have made this thread because I use them (for about 4 months now in my robot) and I have noticed lots of people struggling with h-bridges. So I hope you all can use it and understand what I'm trying to tell. (THEY ARE EASIER!!)
What is an Rc ESC? An Rc esc is a motorcontroller used in about every electric Rc Car/plane/boot and every other Rc vehicle in the rc world that is more advanced than your standard $5,- toy. ESC stands for Electronic Speed Controller, it uses the same plug as your standard servo. And will work with the EZ-b.
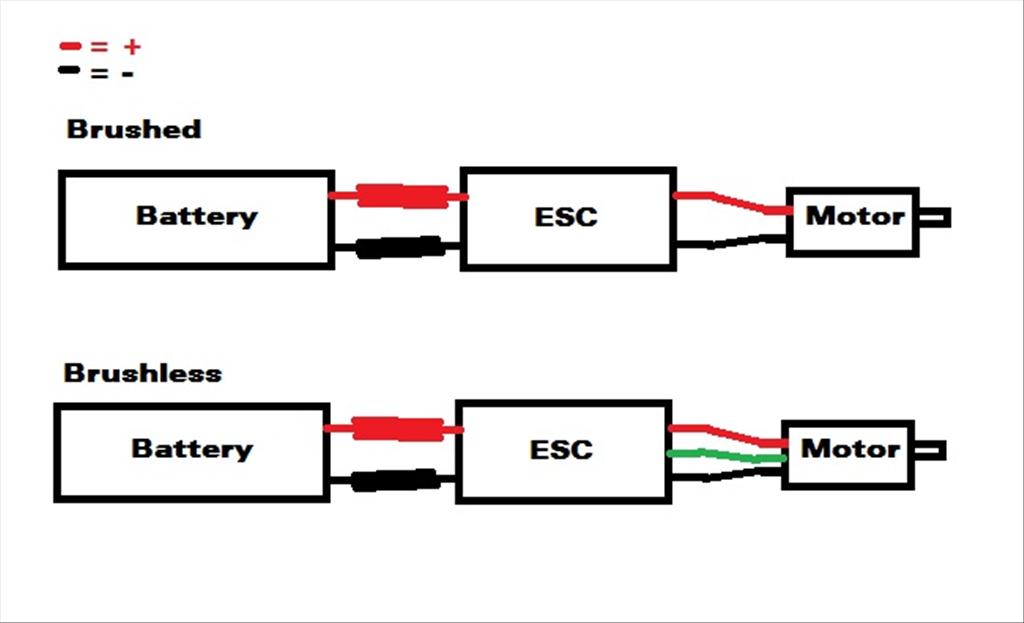
ESC types: There are 2 types of ESCs, this is because there are 2 types of electric motors. You have brushed and brushless motors. The differance is that brushless motors last longer and provide greater speed. Brushless motors also have 3 wires to control it, this means that there is a special type of ESC for it. A brushless motor has 3 wires because it has 3 coils inside. They are also known as a three-phase inductionmotor (they are brushless because they generate a rotating magnetic field which makes the anker, the thingy that is attached to the axle of your motor rotate).
How they work: ESC's for brushed motors puls of the maximum voltage to the motor, the faster the pulses the faster it will rotate. ESC's for brushless motors work in a simular way but they let the brushless motor create a rotating magnetic field by powering 3 coils, The faster the field is rotating, the faster the axle will rotate.
Brushed:
Brushless:

NOTE: there is a third type of esc but this one exists within brushed and brushless ESCs. These ESCs are different because they make the motor rotatie only one way, these are mainly used for rc airplanes and helicopters (where only one way of rotation is required).
How to wire it: Every esc has wires specified for the motor and the battery. So with brushed motors you will have 4 wires, 2 for an electric motor and 2 for the battery, a servo plug and an on/off switch. With brushless motors you will have 5 wires, 2 for battery and 3 for the motor and ofcourse a on/off switch and a servo plug.
So... Connect the red wire to the + pole of the motor and the same for the black wire. Same for the battery. There is almost noway to do this wrong! As usually one side of the ESC is for the battery and one side is for the motor and if not it will be written on it. Yes it's soooo easy! Note: never mix up the battery with the motor, you might fry the esc. Next up is connecting it to the EZ-b. And tadaaaa you have everything connected.
How to use it in ARC: As an electric motor can rotate two ways (back and forth), the neutral stance will be the middle of a vertical/horizontal servo control in the ARC. And that is 35, since the v13 update. To make the motor rotate move the bar up or down. Note: it will not work automaticly with the modified servo panel. It does work with Movement Panel but then you will need scripts.
As we now have achieved to make it rotate you can also use it with the movement panel, for everyway of motion I have created scripts to slowly start it up and slow it down. As it will jump directly to the speed you have set. There are 5 scripts required for each direction if you want to use the modified servo panel.
Script (when using 2 esc): servo(d0, 35) servo(d1, 35) sleep(50) servo(d0, 39) servo(d1, 39) sleep(50) servo(d0, 42) servo(d1, 42)
If you notice that one of your set of wheels is rotating the otherway around, then deduct the amount that you are adding to the 35 of the 35 ( 40-35 = 5 --> 35-5= 30)
Pros:
- Masive speed, up to 160mph (fastest Rc boat, I've seen, maybe even faster).
- Automatic lipo cut-off, this protects you lipo batteries from getting drained to far.
- Brushless motors
- Low prices.
- For every motor there exist an ESC.
- Most ESC's have an automatic BEC, BEC stands for Battery Eliminator Circuit, in the RC world the BEC is used to power the receiver(they usually give of 5v at 1 or 2 amps). In my experience with the EZ-b I have noticed that the batteries powering the EZ-b have lasted longer when I have my ESC's turned on, instead of off.
Cons:
- You will need scripts to control them with a movement panel.
- There aren't as much ESCs for brushed motors as there are for brushless motors, because brushless are so much better (in the rc world though).
- They only work from a certain value to a certain value, when used like a servo in ARC .
Important things when using a ESC:
- Always power up the EZ-b before the ESC.
Most ESC's their neutral position is set buy the first signal they receive from the
object it's connected to. And here is where the config of the connect button comes in, you can use that to creat a boot sequence which would set your servo position to 35 ,which is the neutral position. - Always turn of the ESC before the EZ-b, it can suddenly run of! If not, just do it, else you EZ-b wont turn off. This is because the BEC, BEC stands for battery elliminator circuit, when it's used in a rc car you don't want to carry batteries around, so they came up with BEC you could then ditch the receiver battery and use the battery you use to power your electric motors.
How to pick an ESC: ESCs are available in about every size up to 320A up, maybe even more. ESCs are rated in Amps, so you first pick your motor and then the esc that matches it.
Example: I have a 25A motor. Then you could buy a 25A ESC, but it could occour that you wheels or what ever get jammed and your motor could drain a bit more like 30A or more, this would fry my ESC... So I am choosing a 30A ESC for a tollerance of 5A. You could choose a higher tollerance, thats up to you. Almost all ESCs are able to burst power for 5 sec and 1 sec. Ofcourse the 5 sec burst is less powerfull than the 1 sec. In a burst they can double their output current, but briefly to prevent damage. Note: An ESC can get very hot, for rc racing cars they have ESCs with a small fan on top of it. Also if you pick a higher tollerance, it will take longer to get hot or wont get hot at all.
Next thing you look at are the batteries for it. They are displayed in the amount of battery cells or in voltage. When displayed in cells there are 2 ways, for Lipo and nihm. Most of the times they are displayed both so users can stay within budget as Lipo batteries are expensive.
The lipo way: 1 lipo cell is 3,7 volt, this means 2 cells are 7,4 volt and so on. They are displayed on the ESC like: 2s-3s or 2-3 lipos, this means it alteast requires a 2 cell or atleast 7.4 volt to work.
The nihm way: 1 nihm battery cell is 1,2 volt, this means that 2 cells are 2,4 volt. On the ESC they are displayed like: 8s -12s or 8-12 nihm.
The difference between Lipo and Nihm: Lipo batteries provide a larger amount of current per second than nihm batteries, this means you can go faster with Lipo batteries.
Things you look at when buying an ESC:
- Brushed or brushless, this compleetly depends on the motors you are using. NEVER and I mean NEVER try to connect a brushed esc to a brushless motor or viceversa!! Only if it is specified on the esc that you CAN use a brushed and brushless motor!
- Is it able to rotate 2 ways, it will be displayed as "reverse" if it's not displayed or you can't find it in the specs, contact the seller or try to find more information on that ESC.
- Does it have a auto cutt-off. This is VERY important when using Lipo batteries! You can destroy your Lipo batteries if it doesn't have this function. This function will stop your motor when the voltage that the is supplying falls under a certain amount (the minimum per cell is 3v, lower than that and it will DIE!!) and it will drain only a ver small amount to keep the ESC alive. Also handle Lipos with care. They can explode or start a large fire.
How to pick batteries: ESCs channel the voltage of the battery to the motor, so if your battery is 7,4 volt your motor wil receive 7.4 volt (not sure about the channeling part, I'll try to find out how that exactly works)
The lipo way: Using the examle of 7.4v you will need a 2s lipo, but there is more. A has 3 points of interrests:
First: the amount of cells (s). The more cells, the more voltage.
Second: the amount of energie stored inside (mAh). The more mAh the longer it'll last
Third: the amount of coulomb (C), those who know know what coulomb is ,but for those who don't know what it is. Coulomb = Amps per second. The more C the larger the amount of current per second that will go to your motor, this also means the more C you have the faster your battery will be empty (depending on the amount of mAh).
A forth point to always keep in mind: will it fit in your robot!
The Nihm way: Still using the example of 7.4v. When using nihm batteries you will never be able to get 7.4 volts, thats why it is written on the esc how much nihm cells you would need. Usually it's 6 cells or 7 to reach 7.2v or 8.4). When buying nihm batteries you should look out for:
The amount of cells. The amount of mAh, the more, the longer they last. The size.
For now I think I have told everything you need to know if you want to use an ESC, how to control it, how to pick it and even how to pick batteries. If you have questions, just let me know. Also check out my robot, it uses ESC to power it's motors.

@budel0 I'll be glad to throw something together to show how. I was planning on creating a tutorial on how to build my project anyway, however as of right now there is no stabibility built into it so it can't,well shouldn't, fly yet.Thats almost the only thing left on my project besides creating a sleeker interface.
@orwnic82 Nice, I know what I'm going to build once my current robot is finished ^^
@budel0
Start off with the idea that you know how to place tool objects on the form, such as a button. By double clicking the object on the form it brings up the forms program menu and creates the method for the button_click void Button1_Click(Object sender,EventArgs e)
First you'll want to declare a global variable that will be used to increment and decrement the servo line. unsigned int servo1_variable = 0;
By placing two buttons and creating their two methods you'll have the ability to click one to increment the servo line up and one to decrement the servo line down.
#region Increment void Button1_Click(Object sender,EventArgs e) {
#endregion
#region Decrement void Button2_Click(Object sender,EventArgs e) {
#endregion
The variable will be changing and setting the servo line as the button_click is initiated. increment: servo1_variable++; decrement: servo1_variable--;
The next portion is to set the servo lines based on the servo1_variable ezb_connect1.EZB.Servo.SetServoPosition(EZ_B.Servo.ServoPortEnum.D0,servo1_variable);
so void Button1_Click(Object sender,EventArgs e) { servo1_variable++; ezb_connect1.EZB.Servo.SetServoPosition(EZ_B.Servo.ServoPortEnum.D0,servo1_variable); } void Button2_Click(Object sender,EventArgs e) { servo1_variable--; ezb_connect1.EZB.Servo.SetServoPosition(EZ_B.Servo.ServoPortEnum.D0,servo1_variable);
This should give you the result of incrementing the ESC lines up and down from your form. However do remember to place value restriction on the buttons as if you increment the servo line higher then the Servo.Max it will give you and error.
Simply: void Button1_Click(Object sender,EventArgs e) { if(servo1_variable < Servo.Max) { servo1_variable++; ezb_connect1.EZB.Servo.SetServoPosition(EZ_B.Servo.ServoPortEnum.D0,servo1_variable); } }
If you wish to use scrollbars instead of buttons DJ has already created a small sample video on his youtube account: www.youtube.com/user/aliencurv#p/u/38/Mvh5Njx7jog
Last note do remember to add the ez_b.dll file to your references also list using EZ_B; Follow the video DJ supplied to add the connection tool to your form.
@DJ you said...
"You can swap the bluetooth module with Xbee or synapse or what ever it's called. There is also WIFI too. A thread on here discusses it. That should fix your distance issue."
Where is this tread?
Dave
@ Dave I think he meant to add a link to the "here", but forgot it so I'll add the link, because wifi has nothing to do with this thread. It was meantioned because I had a ranged problem and fixed it by adding a my robot. I also made is connect via USB.
Oh right, the Link . I believe it's this one.
Thanks
Dave
Hello budel0 I would like to ask you about the ESC kinds that have the capability to rotate a 3-phase BL Dc motor bidirectionally?
and if these two kinds of ESC below can do that:
My Best Alkalla

www.mikrocontroller.com/index.php?main_page=product_info&cPath=69&products_id=812&zenid=ifhbc82udejllukk2ids3v3o01
www.hobbyking.com/hobbyking/store/_7188__Turnigy_Brushless_ESC_60A_w_Reverse_prog_v2_2.html
@Alkalla This forum post is so old, and I doubt that Putt Putt still is active. As for your question, I couldn't access the first link, but the second looked promising. Is it a brushless or brushed?