Asked — Edited
Resolved Resolved by Jeremie!

Breaking Out The Sound From The V4 Ezb

Hi all,

EDIT: the below post has been changed to reflect changes to correct wrong information and show the successes I had with the proper wiring information I received from the fabulous EZ Robot Support team:

I spent some time over the past couple days seeing what I could do with the sound that can be streamed from my computer and played through the EZB V4. First I gotta say I'm no sound engineer or even a weekend garage installer. Just a simple guy trying to stitch this all together and learning along the way. Sound systems are one of my weak points (among a lot of other stuff :) )

Anyway, I first have to say that the little speaker on the V4 EZB does an amazing job for it's size and what is asked from it. It sounds pretty good but if I relied on it for the voice if my 400 pound B9 robot he'd sound like the Mayor of munchkin town. :P

My B9 has 4 sound systems. One is stand alone and plays background mechanical sounds through it's own amp and speaker. Two more (EZB V4's streaming sound and a Bluetooth receiver) play through the same amp and speaker and are sorted out by an auto AB switch. They play through the CF Sound system's auto switching input jack and it that can also play it's own sound files. The robot's chest neon is triggered by one of the CF3's speaker outputs.

So, what do I do if I want to Stream my sound files through my B9's main sound system with EZB? The V4 EZB has two little holes on the bottom board marked "Speaker". There you can solder in a couple wires and add another somewhat larger speaker. I first tried to wire in my sound system to these two holes and quickly found I had to also add a ground wire to one of several spots on EZB's grounding grid. I chose the square solder pad marked GND that's right next to the power plug on the bottom board.

However, when I wired my speaker and amp to these speaker through holes I quickly found that the sound was flat and tinny. EZ Robot support quickly explained that that is because these two breakout holes are "after" the onboard amp. So, If you are using a setup where you wish to use the amplified audio from the EZ-B, then the two solder points marked SPKR on the EZ-B are to be used. To get high quality sound output to my own amp I need to use the provided solder pad that is located before the onboard amp. Jeremie from EZ Robot told me: "We made a small solder point called a via available at the input stage of the amplifier and true high quality audio to be used for inputting into an external amplifier. The via is located to the top right of the amplifier chip when looking at the main board from the top, you should see it no problem from the bottom too as it's the only other through-hole pad that isn't soldered in that area of the board.The connection will be as follows:Via to right (or left) audio channel. GND to GND audio connection"

So I rewired like Jeremie suggested and was amazed at the difference. The sound was crisp, clear and deep. Here's a few pics of the process and a video where I hope you can hear how well this sounds.

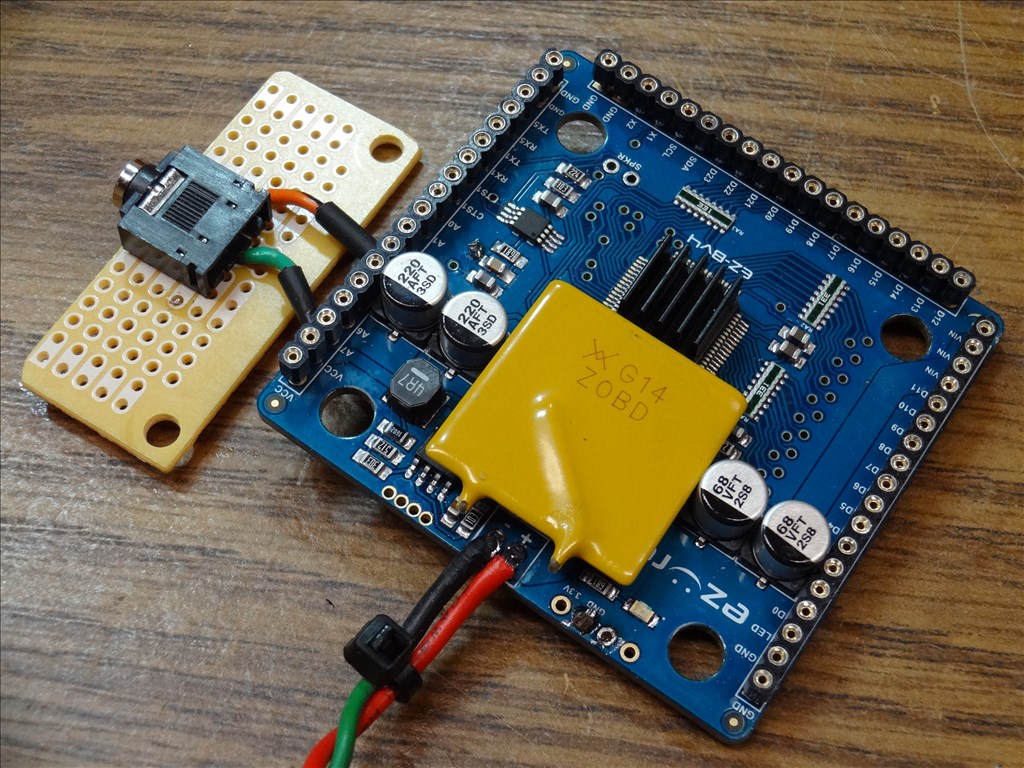
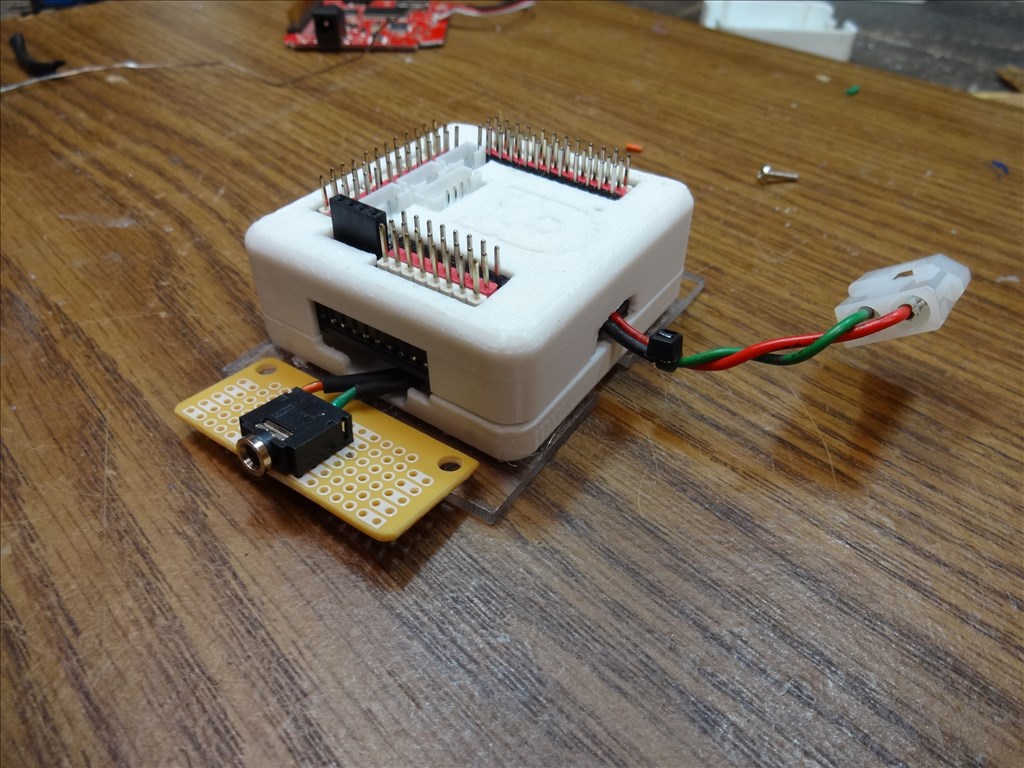
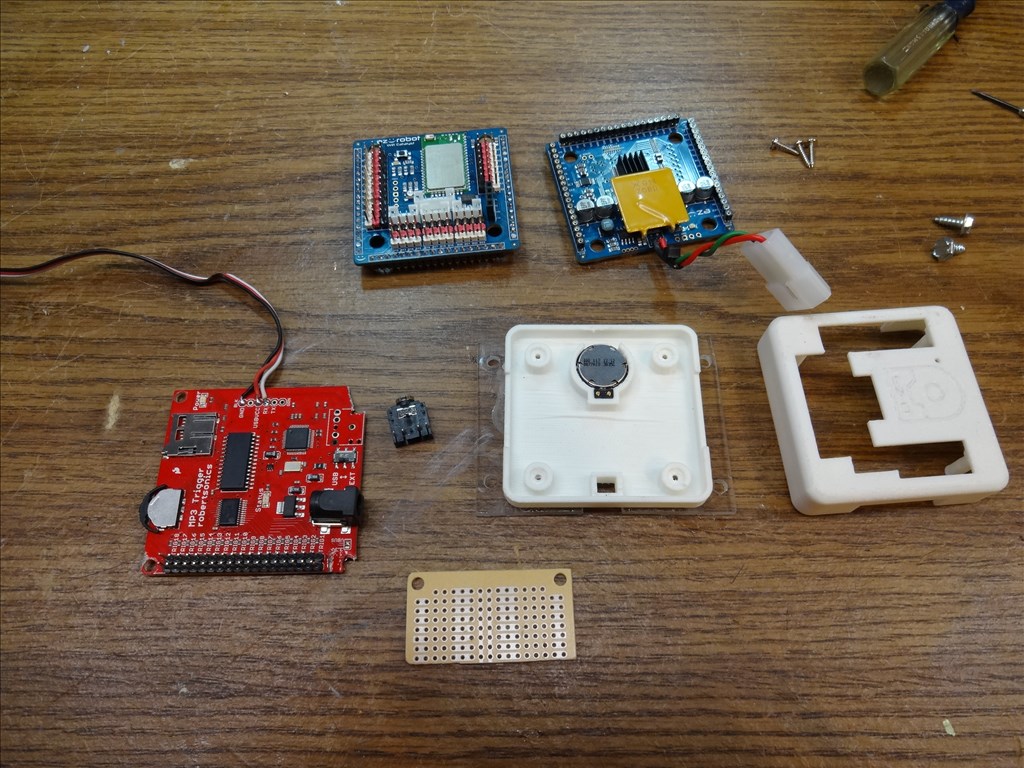
I damaged my MP3 Trigger the other day beyond repair so I de-soldered the 3.5mm Mini Plug and built a breakout board to easily plug into. Here I have everything laid out and ready for assembly:

User-inserted image

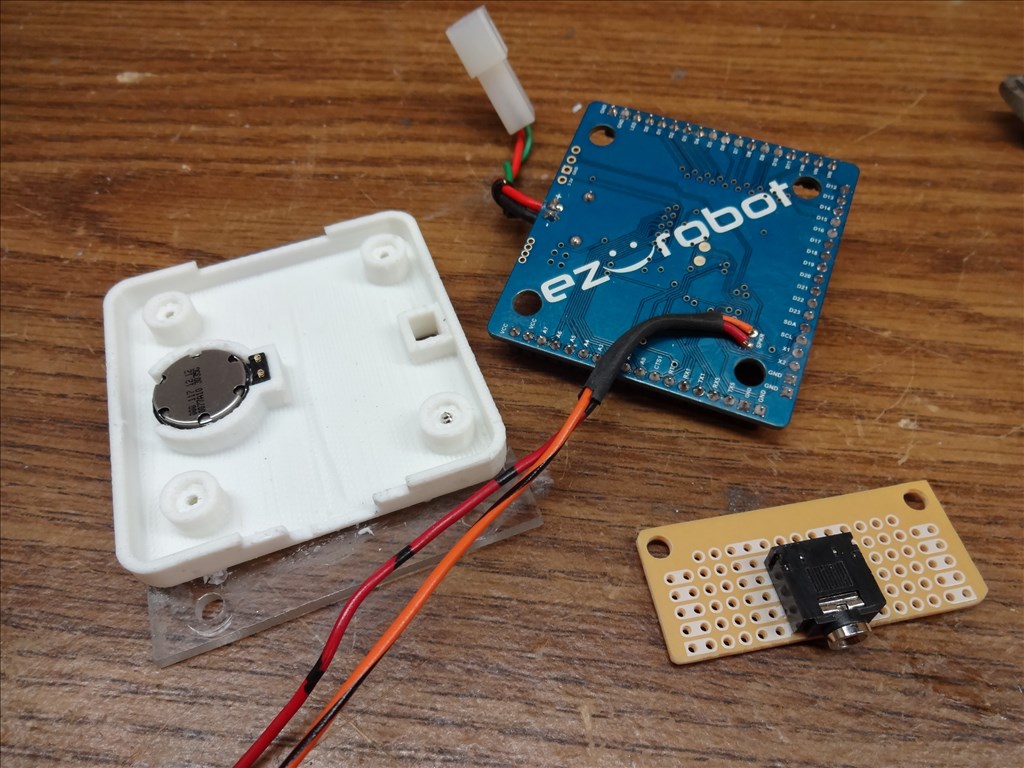
If you just want to add a small un amplified external speaker this is where you solder the wires, Important: adding the black shrink tubing helps to keep the solder joints from digging through the insulation of the wires and a causing short. In this shot you can also see I've removed the little power pin that sticks out the bottom of the board and installed my own Piggy Tail power connector using wire and a Molex connector :

User-inserted image

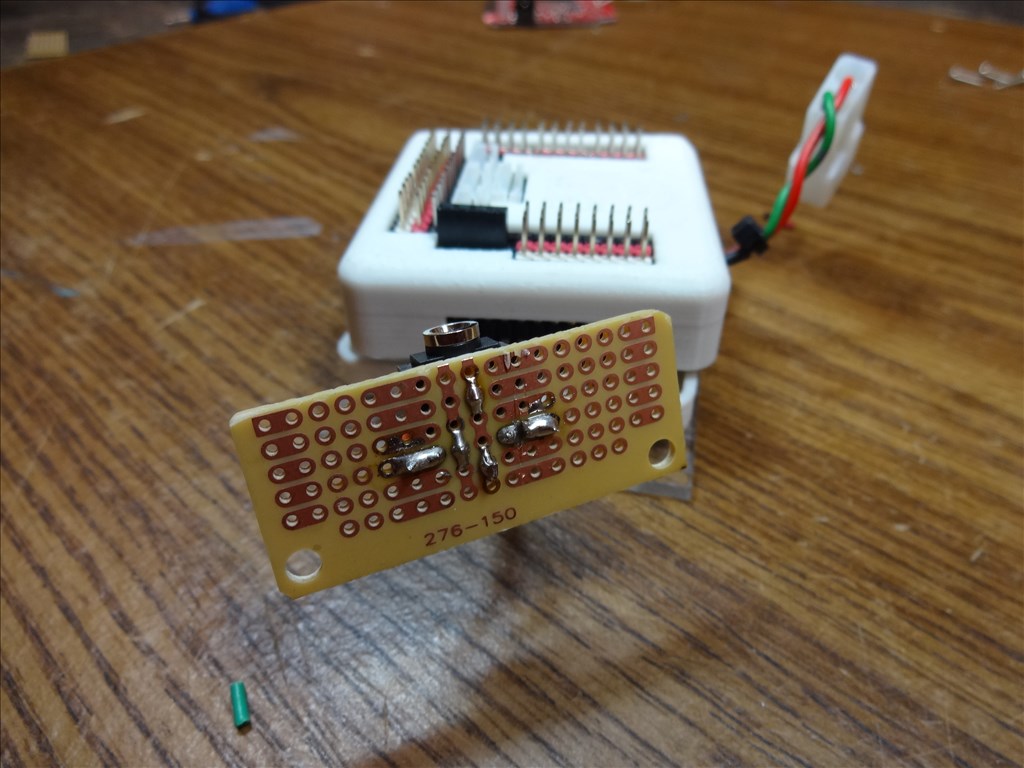
Here's a shot of the solder job under the project board that I bought from Radio Shack and cut to size:

User-inserted image

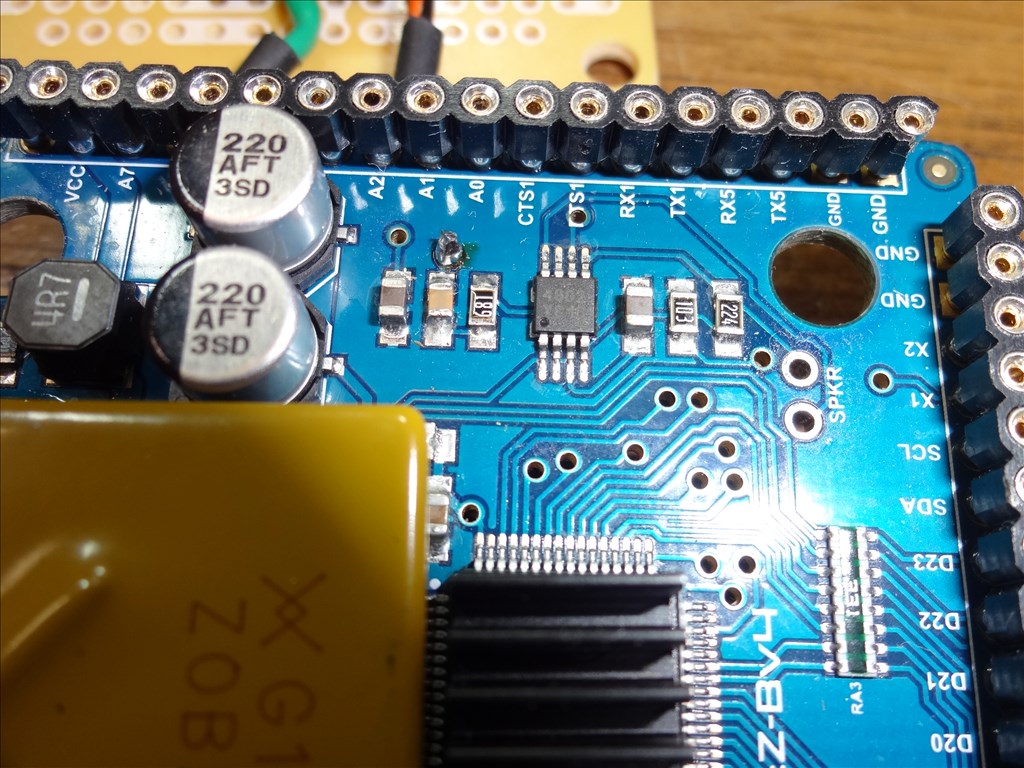
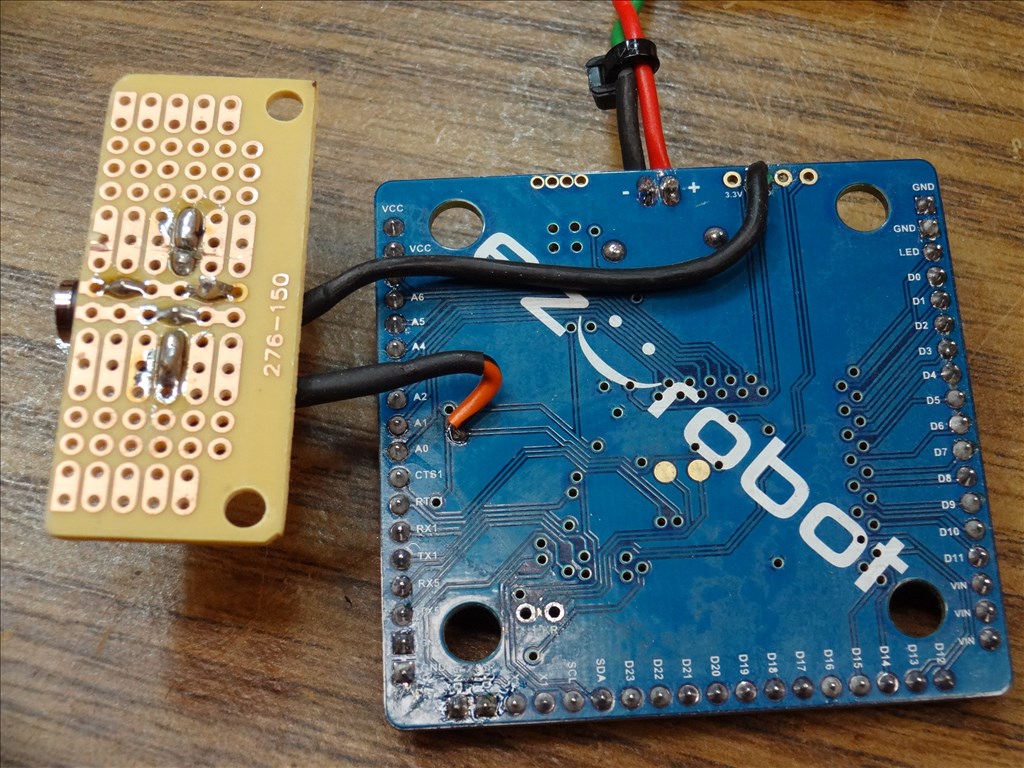
Here are a few pics of the locations I soldered the the wires to "before" the onboard amp:

User-inserted image

User-inserted image

User-inserted image

User-inserted image

User-inserted image

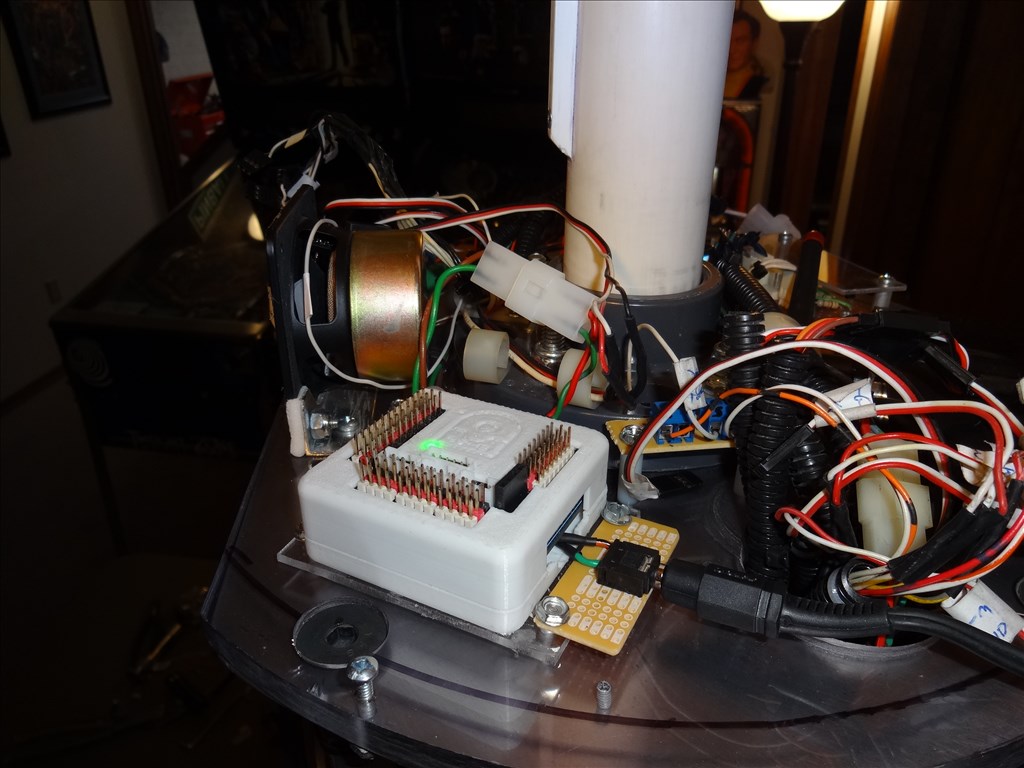
Here it is all put together and mounted in the neck of B9:

User-inserted image

User-inserted image

Here's a video I made showing it in action and attached to my sound system through the 3.5mm Mini Plug that attached to the amp. I try to compare the fidelity of the already installed CF3 sound system and the streaming V4 EZB. Both play through the same amp and speaker.

I conclusion; EZB V4 does an amazing job making it easy for you to stream sound right from your computer to the board itself. Adding an amp and large speaker can be easily done and the sound is very nice. I'm thrilled how clear and deep it sounds. However I think your true results will depend on the quality of your sound files. I both .wav and .mp3 files and and heard a range of fidelity. Again, the better the sampling the better your file will sound. Also you can adjust sound quality with the controls on the amp and a good speaker will make all the difference in the world.

Before I got the V4 and tried to stream my sound files over the WiFI connection from my laptop to the EZB v4 I was using a SparkFun MP3 Trigger and the V3 EZB. The current setup is much easier to use and the sound when sep up like this is comparable. Again in the end it will all depend on your sound file's quality and how nice of a amp and speakers you use.

I hope this helps and you enjoyed.

Dave Schulpius

ARC Pro

Upgrade to ARC Pro

Synthiam ARC Pro is a new tool that will help unleash your creativity with programming robots in just seconds!

PRO
Canada
#1  

Hey @Dave,

Thanks for the detailed post and video!

Before you go back to the MP3 trigger I wanted to suggest that you try something else. You see the speaker ports you tapped off of are the output stage of the onboard audio amplifier and are tuned for a 8ohm 0.5W speaker which doesn't allow for much bass to get through. We thought of this and made a small solder point called a via available at the input stage of the amplifier and true high quality audio to be used for inputting into an external amplifier. The via is located to the top right of the amplifier chip when looking at the main board from the top, you should see it no problem from the bottom too as it's the only other through-hole pad that isn't soldered in that area of the board.

The connection will be as follows:

Via to right (or left) audio channel GND to GND audio connection

You should just be able to change the 2 solder points that you connected to the SPKR pads to the ones above and you should get some great sounding audio.

Hope that helps!

#2  

Wow, great news! Thanks!

As I said I'm no expert so I need to ask a couple questions. I marked the hole I think your talking about. Could you confirm this is the place to solder to:

User-inserted image

User-inserted image

Also, There is only one Via through hole you point to. Where do I attach to Ground? The holes I soldered to that are marked Speaker there are two holes. Are one of these considered Ground? If so which one?

PRO
Canada
#3  

Yep, that is via! Neither of the two SPKR connections is Gnd so you'll have to take that connection from either the four unlabelled vias beside the micro deans connector, the pad labelled Gnd on the other side or just tag onto an already populated pin labelled Gnd. The later is probably the easiest.

#4  

Also, technically if you got a larger speaker with the same power rating wouldn't that be louder too?

#5  

Thanks for the video and explaining v4 sound.

:):):) :) J

PRO
Canada
#6  

@Technopro yes, you are correct that a larger speaker cone usually produces higher volume audio, just be sure to impedance match (you'll need an 8 ohm speaker rated for 0.5W or higher).

PRO
USA
#7  

@dave,

Hopefully you have time to update the pictures on the suggested connections from Jeremie! Always a great help when searching in 6 months for the post and info!

#8  

@Jeremie- As I understand it, Dave has 3 soldered points, 2 at SPKR and 1 at a GND. When/if he moves his set up will he only have 2 connections then? One at VIA and I imagine he could keep his GND.

@Dave- Thanks for the info and vids showing off your V4. I have a Roli kit ordered so I won't have mine for a few months still, I'm guessing. Amazing work. I can't wait to hear the difference once/if you re-wire it using the VIA.

#9  

I will definitely updates all the pictures movies and info. :)

PRO
Synthiam
#10  

@Antron, no Dave has only 2 solder points ever.

  1. If you are using a setup where you wish to use the amplified audio from the EZ-B, then the two solder points marked SPKR on the EZ-B are to be used.

  2. If you are using your own amplifier, then one solder point for the unamplified audio and another for GND is used.

There are 2 points ever used.

There will be a significant improvement for dave's setup. In dave's current setup with poor audio quality, it is because of 2 reasons.

  1. The audio from the SPKR connectors is already pre-amplified and therefore his amplifier is receiving distorted input

  2. The audio from the SPKR connectors has a bypass filter for small speakers. The bypass filter removes some of the low frequency (Bass) to improve audio on small speakers. Small speakers do not have bass.

If dave were to have the raw unfiltered audio, he would need to use the unamplified DAC output pin on the EZ-B v4. One wire would connect to the DAC Output pin, and the other would connect to GND.

#11  

Thank you for the detailed response DJ. I was thinking 3 because he was using the 2 SPKR and an additional GND for his amp and break out board. Your info cleared everything up for me. Thanks :)

#14  

Ah HA! Success! I followed Jeremie's wiring suggestion and now I have super clear and deep sound streaming from my laptop, to EZB and into the amplified system of my robot! I'm THRILLED to say the least. The sound is now balanced and leveled to the other sound system it's tied to. What's even better (if possible) it that now the neon of my robot flashes perfectly with the voice file.

So very sorry for any confusion and I'm so grateful for the help and insight on your part to add this solder point that makes this possible. :D

I've edited my first post with the proper steps I did to show this change with new pics and a new video. If you dont want to go all the way back there here it is also:

Hi all,

EDIT: the below post has been changed to reflect changes to correct wrong information and show the successes I had with the proper wiring information I received from the fabulous EZ Robot Support:

I spent some time over the past couple days seeing what I could do with the sound that can be streamed from my computer and played through the EZB V4. First I gotta say I'm no sound engineer or even a weekend garage installer. Just a simple guy trying to stitch this all together and learning along the way. Sound systems are one of my weak points (among a lot of other stuff :) )

Anyway, I first have to say that the little speaker on the V4 EZB does an amazing job for it's size and what is asked from it. It sounds pretty good but if I relied on it for the voice if my 400 pound B9 robot he'd sound like the Mayor of munchkin town. :P

My B9 has 4 sound systems. One is stand alone and plays background mechanical sounds through it's own amp and speaker. Two more (EZB V4's streaming sound and a Bluetooth receiver) play through the same amp and speaker and are sorted out by an auto AB switch. They play through the CF Sound system's auto switching input jack and it that can also play it's own sound files. The robot's chest neon is triggered by one of the CF3's speaker outputs.

So, what do I do if I want to Stream my sound files through my B9's main sound system with EZB? The V4 EZB has two little holes on the bottom board marked "Speaker". There you can solder in a couple wires and add another somewhat larger speaker. I first tried to wire in my sound system to these two holes and quickly found I had to also add a ground wire to one of several spots on EZB's grounding grid. I chose the square solder pad marked GND that's right next to the power plug on the bottom board.

However, when I wired my speaker and amp to these speaker through holes I quickly found that the sound was flat and tinny. EZ Robot support quickly explained that that is because these two breakout holes are "after" the onboard amp. So, If you are using a setup where you wish to use the amplified audio from the EZ-B, then the two solder points marked SPKR on the EZ-B are to be used. To get high quality sound output to my own amp I need to use the provided solder pad that is located before the onboard amp. Jeremie from EZ Robot told me: "We made a small solder point called a via available at the input stage of the amplifier and true high quality audio to be used for inputting into an external amplifier. The via is located to the top right of the amplifier chip when looking at the main board from the top, you should see it no problem from the bottom too as it's the only other through-hole pad that isn't soldered in that area of the board.The connection will be as follows:Via to right (or left) audio channel. GND to GND audio connection"

So I rewired like Jeremie suggested and was amazed at the difference. The sound was crisp, clear and deep. Here's a few pics of the process and a video where I hope you can hear how well this sounds.

I damaged my MP3 Trigger the other day beyond repair so I de-soldered the 3.5mm Mini Plug and built a breakout board to easily plug into. Here I have everything laid out and ready for assembly:

User-inserted image

If you just want to add a small un amplified external speaker this is where you solder the wires, Important: adding the black shrink tubing helps to keep the solder joints from digging through the insulation of the wires and a causing short. In this shot you can also see I've removed the little power pin that sticks out the bottom of the board and installed my own Piggy Tail power connector using wire and a Molex connector :

User-inserted image

Here's a shot of the solder job under the project board that I bought from Radio Shack and cut to size:

User-inserted image

Here are a few pics of the locations I soldered the the wires to "before" the onboard amp:

User-inserted image

User-inserted image

User-inserted image

User-inserted image

User-inserted image

Here it is all put together and mounted in the neck of B9:

User-inserted image

User-inserted image

Here's a video I made showing it in action and attached to my sound system through the 3.5mm Mini Plug that attached to the amp. I try to compare the fidelity of the already installed CF3 sound system and the streaming V4 EZB. Both play through the same amp and speaker.

I conclusion; EZB V4 does an amazing job making it easy for you to stream sound right from your computer to the board itself. Adding an amp and large speaker can be easily done and the sound is very nice. I'm thrilled how clear and deep it sounds. However I think your true results will depend on the quality of your sound files. I both .wav and .mp3 files and and heard a range of fidelity. Again, the better the sampling the better your file will sound. Also you can adjust sound quality with the controls on the amp and a good speaker will make all the difference in the world.

Before I got the V4 and tried to stream my sound files over the WiFI connection from my laptop to the EZB v4 I was using a SparkFun MP3 Trigger and the V3 EZB. The current setup is much easier to use and the sound when sep up like this is comparable. Again in the end it will all depend on your sound file's quality and how nice of a amp and speakers you use.

I hope this helps and you enjoyed.

Dave Schulpius
#16  

@All, thank you for detailed info and thank you Dave for detailed photos.

PRO
Canada
#17  

I just want to second that thanks to Dave!

Dave, thank you so much for taking the time to document your process and revise it. I was very surprised that you reshot your entire YouTube video, that was awesome of you!

#18  

That was fun to watch! It was interesting seeing what you were able to do, and the sound quality is great! Our Jeremy knows what he's doing :)

#20  

No problem everyone. It was an enjoyable process. The help I got made all the difference.

I had to re-shoot the pics and vid. My first draft was way to misleading and I didn't want to put out the wrong info. It also made me look like a dope. :D

Streaming sound right from the laptop to EZB was one of the features I was really excited about with the new EZB v4 and one of the first things I wanted to explore. I'm thrilled that I was able to have such amazing results.

Canada
#21  

You are such an awesome EZ-Robot advocate with your B9! Keep it up :)

PRO
Belgium
#23  

can this red cirkel also being use to let a led lid up when playing sound?same ritme. really a dreamrobot your b9. User-inserted image

#24  

Hi @Nomad;

I saw your other post asking about blinking LED's in time with the sound. I think Rich gave you some good advice in that you need to find something like a breakout board that will help process the sound into pulses for the LED. I've never done any LED work like this so I dont have any answers for you. I do know the hole you are asking about on the EZB v4 is where you attach to to get "Unamplified" sound. You run one wire from here to a sound amp and also will need an additional ground wire comming from the point I show above. Any board you end up buying to process the LED blinking would either be connected here or at the speaker through holes after EZB's built in amp (You can see them in the lower left corner of the board in the above picture). Which attachment point you end up useing would depend on if the new board uses pre amped or post amped sound.

Good luck and I'm sorry I could not give a good answer.

PRO
Belgium
#25  

thank you dave sorry one question.are these comming from the speaker?

User-inserted image

#26  

Yes, thouse are connected. I buzzed them out when I was working on this a can confrm this. You can test it also by uesing a inexpencive continuity tester. Any decient digital muti tester will have this function.

EDIT: Also, I'll restate; the holes you point to are located "After" EZB's built in amp.

PRO
Belgium
#27  

you mean these holes are not there ?sorry my englich is not good.

United Kingdom
#28  

You can follow the traces on the board from the speaker points down to the SPKR holes.

User-inserted image

These are amplified

PRO
Canada
#29  

Hi @Nomad18.08,

I can confirm that @Dave is correct that both those sets of those pads are indeed connected together and they usually connect to an external speaker (inside the EZ-Bv4 enclosure) that has a spring contacts that press against the board.

If you want to blink an LED with the audio I would recommend using a 330 ohm resistor connected to one of the speaker outputs them to the LED anode and the LED cathode would then be connected to GND. This resistor will help limit the current going to the LED so it doesn't get damaged.

The voltage coming out of the amplifier is not going to be huge, so I would recommend an LED with a small forward voltage, like a Red LED. Blue or White have the highest forward voltage so stay away from those colors (but feel free to experiment if you'd like)

PRO
Belgium
#30  

yes thats what i want to do,when i play a sound file that the led will flach same time. using original speaker. awesome guys. i will put a led behind the mouth,not thru a hole just glu on the inside.

rich is the purple color positif?

dave my appolegies for changing your topic.

blush

#31  

Just to make sure I (the most novicial of novices) understand the process correctly...

I open up the EZB. There are two little holes in the board to which I can wire an external speaker.

Follow-up questions: Can this be done with ANY speaker? I really don't want to get one that's going to demand an extra power supply. How do I determine which hole is + and which is -? Do I need to SOLDER the wires into place? Can I just use hot glue instead?

PRO
Canada
#32  

You'll need a 8ohm speaker 0.3W or above. Soldering or spring contact is strongly recommended. Plus and minus don't really matter, that's why they are unlabeled, sound will come out either way.

#33  

@Jeremie, Using spring contacts is an interesting and intriguing idea. How could you use them in this instance?

PRO
Canada
#34  

Well funny enough, the EZ-Bv4 (with enclosure) is a prime example. You could just take that concept and tweak it. Use a speaker with spring contacts and an enclosure to force the springs against the PCB.

#36   — Edited

And with an extra speaker installed into the EZB, what happens to the ORIGINAL speaker? Does the new one simply bypass the old, or would both be operating at the same time? I want my robot to be louder, but I'm terrified of f***ing up the hardware.

Again, I'm so green that the color green itself is looking at me and saying "seriously?" I've never heard of spring contacts before, and doing a quick google search isn't making it more clear as to how they would help in connecting a speaker to the board. Can you provide an example of what this might hypothetically look like? All I'm seeing are little bits of hardware that I've got no idea what to do with.

PRO
Belgium
#37  

bobsheaux

stop with putting yourself down.you are not alone .many dont get it the 1.2.3.4.5. time and that included myself.

#38  

User-inserted image @bobsheaux

if you look at these pictures I show the spring attached to the internal speaker, hope this helps you out. User-inserted image

PRO
Canada
#39  

@Bobsheaux, as long as you're here we'll help you as best as we know how :D. I think everyone here has made plenty of mistakes along our paths. Just keep trying, things might not work out how you imagined the first few times but it will come. Press onward! I'm supposed to be the knowledgeable one here and I have learned a ton just through conversations with this community. This community has a lot of patience and a willingness to help, I'm proud of what we have here.

Yes, you can remove the original speaker and replace it with a larger size of the same impedance (8ohm). The larger cone size will help with raising the volume, an external amplifier could work as well. Funny though, I find the EZ-B speaker to be pretty loud, and the software can overdrive the volume if needed, it just gets a bit distorted the higher you go.

#40   — Edited

After I did this mod I found if I left the little original little speaker I could hear a bit of latency between the two speakers. I could hear double talk. I removed the little speaker.

The signal you get from this mod is unamplified. I ran the signal through a small Lepy LP-2024A-HA LP-2024A+ Hi-Fi Audio Stereo Power Amplifier Car Amplifier. You can see it here: https://www.amazon.com/gp/product/B00ULRFQ1A/ref=ppx_yo_dt_b_search_asin_title?ie=UTF8&psc=1  You then run your speakers from the amp. You have all the advantages an amp in your sound system will provide.

The small original speaker gets an amplified signal. If you don't have a lot of room in your robot you will need to stick with the small original speaker or solder in some wires for a better smaller external speaker. If you solder in speaker wire and replace the small speaker with an external (non amplified) speaker use the holes marked "Speaker" on the board This will take advantage of the onboard amp to drive them. See posts #25 & 28 for a nice pictures of this location.

#41  

I don't understand how I'm supposed to connect a speaker to the EZB via spring contacts by looking at those pics.

After examining the innards of the EZB myself, I feel like there's no way to remove the speaker without completely destroying it. I hope you can tell me I'm mistaken here.

Are there any videos available demonstrating the difference between an amplified and an unamplified speaker? I REALLY don't want to do anything that's going to demand I get another power source (like having to buy an external amp).

PRO
USA
#42  

This topic is new to me too ... bear with me:

If i need to replace the speaker I would first disable the internal speaker:

before: User-inserted image

after: User-inserted image

the internal speaker is gone.

Next I would soldering 2 wires to speaker pads: User-inserted image

PRO
Canada
#43  

User-inserted image

Hey guys the speaker can simply be removed with a small flat-blade screwdriver (carefully prying against the enclosure) if you need to take it out. Be gentle!

PRO
USA
#44  

Quote:

I don't understand how I'm supposed to connect a speaker to the EZB via spring contacts by looking at those pics.
To connect to the board pads you ll need springs or pogo pins like this: https://www.aliexpress.com/item/32910364279.html

bear in mind both options require you to solder the springs / pogo pins to something else... e.g. board see how pogo pins are used: https://www.youtube.com/watch?v=0Ol3_ME8Ssc

Quote:

After examining the innards of the EZB myself, I feel like there's no way to remove the speaker without completely destroying it. I hope you can tell me I'm mistaken here.
Correct if you want to add your springs or pogo pins you need to replace lid with another lid or try to fit something between the existent speaker, eventually remove the internal speaker to fit whatever you have with springs/pogo pins.

Quote:

Are there any videos available demonstrating the difference between an amplified and an unamplified speaker?
The unamplified output is used to feed an external amplifier.

Quote:

I REALLY don't want to do anything that's going to demand I get another power source (like having to buy an external amp).
So if you don't want to use an external amp, you only have two options:

  1. use the existent speaker.
  2. disable the existent speaker, solder 2 wires to grab the speaker output, and connect to 8 ohm speaker.

the real question is: Can an external speaker be louder than the internal speaker ?

If your EZB is buried inside the robot with an external speaker will you have the freedom to relocate the speaker to a better location and/or drill some holes in your enclosure to get the sound out.

PRO
USA
#45  

@Jeremie: It was my next step:) User-inserted image

btw everyone, if it stops working is Jeremie's fault:) ha ha ha

PRO
Belgium
#46  

jeremie

i turn the cover over and tap ones on your desk.speaker comes right out.

PRO
USA
#47  

i found a spare speaker...

User-inserted image

User-inserted image So I'm ready to blast the neighborhood ... rave party !!! EZB is in D house !

PRO
USA
#48  

EZB with external speaker: https://drive.google.com/file/d/1MXspeASk2A2YfZIeLwByS4v5IVK1jVqv/view?usp=sharing

EZB with internal speaker: https://drive.google.com/file/d/15cNphSINe8BY2XDfEveLnAbU5UwSA2_Q/view?usp=sharing

recordings done with professional audio equipament: iPhone 17 Voice Memos app.

PRO
USA
#49  

Jeremie:

Quote:

I find the EZ-B speaker to be pretty loud
I agree.

Speakers are not all equal this is the one i used: https://www.velleman.eu/products/view/?id=350696

#50  

So the speaker CAN be safely removed. Good to know.

But whatever direction I'm going with this project, I'm stuck soldering?

#51  

Soldering is a good skill to learn. get a good soldering iron, good solder and a pile of paper clips. Just sit down and solder the paper clips together in various designs until you get the hang of it. You will never regret learning how how to do it if you stay in this hobby,

PRO
USA
#52  

@Bobsheaux: I noticed in another thread, you are struggling with the led and sound. If you want I can create a video to demo connecting the led to the speaker and discuss other led details, please let me know.

@Dave: I hope you don't mind using this thread to discuss the speaker / led connection, the issue is related to breaking out speaker sound versus a specific ARC's control.

#53   — Edited

No Worries @ptp. It's all good. ;)

Anyway, this is the community thread. Not mine. Whatever helps.

#54  

SO... soldering an extension cable to the EZB proved tricky (damn, those are some small holes) but per everyone else's assertion, NOT impossible. The external speaker has been attached to the vent in his omnibot gut, and now he's significantly louder. Thanks for the tips and (more importantly) the encouragement. :)

PRO
Belgium
#55  

hi bob

you can always use an iotiny for speaker.

#56  

@Bob, did you solder to the amplified "Speaker" holes or the unamplified ones pointed to in this tutorial?

Also, I don't know if you know this but there is a volume slider on the side of the sound board you are using in ARC.

Also, I may be wrong (because I'm not really an audio guy) but now that you have external speakers hooked up you may be able to get a powered speaker that has it's own volume control. Check this out to see if it's OK to do this first. They are usually used for unamplified signals like coming from a computer or cell phone. If you attached to the "Speaker Holes" you have a Amplified signal coming out. If you use a powered speaker that would turn the amp on the EZB into a Pre-Amp. I think that's OK. Check first.

PRO
Canada
#57   — Edited

I believe @Bobsheaux was looking to breakout the speaker from the EZ-B's speaker pins so that it could be moved physically to near the outside of his Robbie senior robot (i think?) so that it could be heard better. Let me know if I'm mistaken Bob.

#58  

@Jeremie That's correct. I'm tinkering with a Robie SR. and have it set up so my EZB is settled nicely atop the tape deck inside. It makes for a nice set-up, but the internal speaker was so deep in the body and surrounded by various bits of wires and hardware, the sound was very insulated. I've hooked up a 3rd party speaker into the EZB via the speaker holes, attached it to where the Robie's original speaker used to be just under the skin, and now it's much more audible.