
steve.neal
Australia
Asked
— Edited
I seem to be having trouble with one of my Sabertooth/kangaroo motor controllers. The red error light is on and the the motor will not work. Up until now it has been working fine. I suspect what may have happened, (not sure if this is a thing or not), I had the motor/encoder unplugged from the sabertooth and had run the initiation script while testing other things on the robot. I have tried re-auto tuning but this does not help. How do I reset the red error light? Everything seems to be connected. I cant see an obvious reason for it not to work.
Steve

I never said I did't believe you RR. Don't be so sensitive. I actually said in my post that I'm not 100% sure if only 1 volt would be a battery killer. I'm not a battery guy. I did google before I answered the first time just to be sure and there is some question here. I've seen some real heated discussions on this subject. Seems in the end that 1 volt is the drop off point and anything below there and the battery will die quickly. Multiple trips below this level will shorten life faster.
OK, let's say at 11v we can assume the battery is empty. If it's just empty the red LED should't be on because Steve's still feeding the circuit with a 12v power supply. I guess it's possible if the battery is hosed and shorted on the inside or if the bad battery is sucking all the available power from the Sabertooth and creating a brown out.
This is why I suggested first removing the battery from the circuit to see if the red led goes out. If this is the cause I still think the Sabertooth will be OK and not damaged. If the Sabertooth is bad I don't think a low voltage on the battery is what caused it.
I still cant get past the fact that I've been running this setup for years with three Sabertooth's and with their own dump batteries and have never had this issue. Maybe it's because I have better quality batteries then Steve. Maybe it's something else. I don't know, that's why troubleshoot methods need to be preformed. I've also measured my dump battery voltage levels many times that are in parallel with the power supplies after the robot has been powered up and after the Sabertooth was doing it's thing. After power down my battery level is always 12v. I'm not saying this is the right way to charge a battery. I'm just stating what I personally found in real life.
I still feel Steve has something else going on here. It could be something as simple as a bad battery that just puked on it's own. It could be something more sinister. He should check out the other parts of the circuit just to be sure. In the end I still feel (if people can afford it) that it's best to use the 2X32 Sabertooth set up with a voltage choke when you want to supply power with a AC to DC power supply and be done with all this.
Hi Dave & Richard,
Thanks Guys for all you're input with this problem. Dave, I have tried some of the things you suggested already, but not transferring known working parts to see if the problem follows or disappears, I guess for fear of damaging other working components. With the Roo, I don't have any connection to the 5V terminal, only Ground, S1 & S2 to the EZB. I didn't think however of the home made battery switch possibly being the cause. I have tried disconnecting everything including the Roo from the Tooth leaving only the 12 volt supply and the red error light remained. In saying that though, I didn't think, as you suggested, as it is still fed via the home made switch there could be a bad component on that. I have tried with the battery disconnected from the switch with no success but not with the switch disconnected as well.
I must head out now, but I will look into this further tonight. I am probably going to replace all the Teeth with 2x32s anyway, but I would like to know what caused this in the first place.
Thanks again and I will keep you posted
Ok, so I'm sure the Sabertooth is no longer with us. I have completely pulled it out and applied 12 volts to the input terminals only and the red error light is still on.
I have tried to figure out if the home built switch is to blame but my results are inconclusive... mainly because I am not very knowledgeable with trouble shooting electronics. I think I will just buy the 2x32 Teeth, remove the dump batteries, remove the home made MOSFET switches, rewire everything and be done with it. This robot owes me well over 10K to date, and he's not finished yet, so whats another $600,.....right? No sense taking short cuts..... right? I just need to order them when my wife is not lookingSteve
Granted I haven't read all the posts in this thread, so I am not sure what you have tested and what you haven't... Just out of curiosity did you check the output of the power supply? Did you check the sabertooth with another power source like a known good battery?... Maybe your power supply is duff and not the sabertooth?
The power supply in the pictures is not the one from my robot. The one in my robot is a 30 Amp 12 volt unit still fitted in the robot which is powering everything in the torso section just fine, including another Sabertooth. I have another power supply in the leg section feeding the waist rotation motor via another Sabtooth. The power supply in the pictures above and below is one I use for testing and It puts out a nice clean 12.03 Volts.
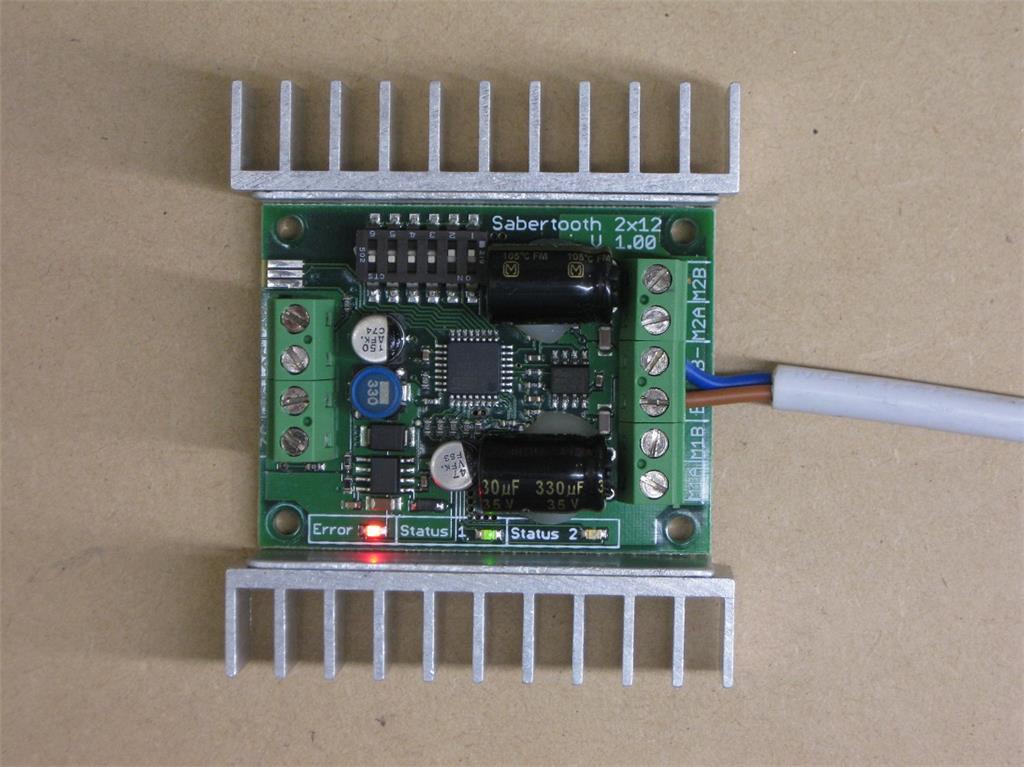
What I'm seeing here is that Status 1 LED is green but there is a red error LED. The status 2 LED is dark. According to the manual In most cases Status 1 acts as a power indicator. In R/C mode, it glows dimly if there is no RC link present and brightly if there is an RC link. The red Error LED illuminates if the Sabertooth has detected a problem. It will light if the driver has shut down due to overheating or overcurrent.
It looks like your dip settings are 1-4 Off (down), and 5 & 6 On (up). According to the manual If switch 6 is in the UP position, then the Sabertooth is in standard R/C mode. It enables a Timeout Failsafe, which will shut down the motors if the Sabertooth stops receiving correct signals from the receiver.
It looks like you have this set in RC mode right now. If dip is up and you don't have a signal from a RC receiver the failsafe is shutting down the Sabertooth. This could be why your getting the Red LED as it sits now. I'm not saying this is your problem but your not getting reliable information from the Tooth's LED. I'd suggest switching dip 6 to Up and seeing what happens. If you still get the red LED then add the Roo and set the dips on the Sabertooth to 1 & 2 Down (off) and 3-6 Up (on). If you still get the red LED i'd say your Tooth has failed.
Why did it fail? We may never know. It may just have given up the ghost. However, maybe there's a short in the battery or somewhere along the power train.
*Remove the battery, the sabertooth and the power supply and do a continuity check between the power supply and the ground side of the circuit for a short. *Make sure your battery is good. Use a battery charger to see if it will bring it up to full power and hold a charge (or take it out and have it checked). Some chargers know if the battery is bad when you hook it up. *If all this checks out you may have accidentally shorted out the circuit somehow. Most likely it's a manufacture defect and the Tooth just failed.
When things like this happen we normally ask yourself "What did I do?". Sometimes the answer is "Nothing, it was something else".
Hi Dave,
The dip switches are set 1 & 2 Down (off) and 3-6 Up (on). Its a bit hard to see in the last photo. Its easier to see in the closeup on the previous page. The dip switches are mounted upside down in relation to the text printed on the PCB. Looks like it is in fact dead. I have ordered the new 2x32 Teeth to replace the three 2x12s I have now. I may have to pick your brain if that's OK, when it comes time to work out what size resistors I need for them
Steve
You are going to be voltage clamping so you need to figure resistance and not power. So look at your Ohm values and not the Watts. So go ahead and get a few each10 ohm and 20 ohm - 10w Wirewound Ceramic Cement Resistor. You start with the 10 ohm and if the PS supply doesn't kick out and the resistor doesn't heat up too much you will be good. If not move up to the 20 ohm. For example for the little motor that runs my crown motor and the car power window motor I'm using to move the B9's arm in and out of the torso, I'm clamping voltage with a 10 ohm, 10w power resistor. For the Windshield Wiper motor that moves my arm elbow and lifts all the weight of my arm I'm voltage clamping with a 20 ohm, 10w power resistor. I may have been able to get away with a 10 ohm for the elbow motor also because the PS was not kicking out but the 10 ohm resistor was heating up more then I liked. I also have the resistors mounted right onto the heat sinks of the Sabertooth to help with any heat dissipation if needed.
Let me know how that works for you.