
steve.neal
Australia
Asked
— Edited
Sabertooth Autotune
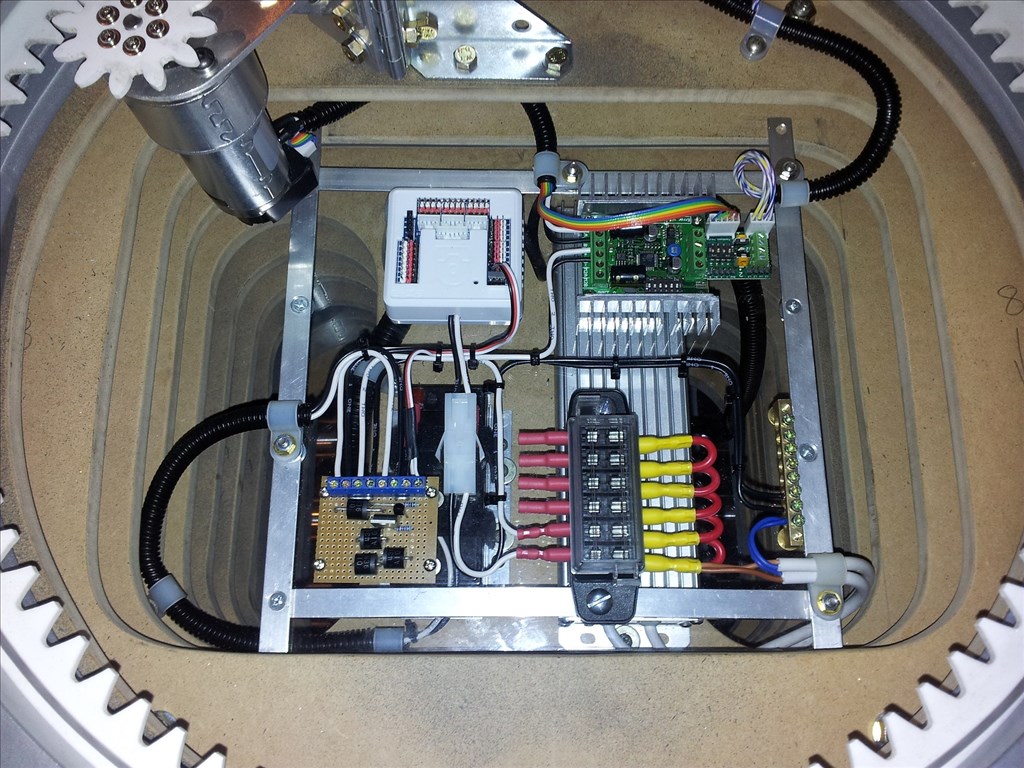
I cant seem to get my sabertooth/kangaroo to do an autotune. The moment I apply power to the sabertooth the motor starts running at about half speed and wont stop till I disconnect power. I am using a REX motor with encoder, limit switches, a 12 volt power supply and a battery to dump the regen power into. I have the sabertooth dip switches set to 1 on, 2 off, 3 on, 4 off, 5 on, 6 on. I have the kangaroo dip switches set all four on I just cant seem to work out what I'm doing wrong. Here is a pic of my set up.

I'm all out of Ideas tired Still cant get this to work. Help me Obi Wan... You're my only hope
Steve
Steve, First, very neat and clean wiring. Looks very professional.
I'm a little unclear. Does the motor start running like you say when you turn on our your home made electronic switch with the EZB? Are you saying you never get to push the little button on the Kangaroo the proper amount of times to start a tune? The Sabertooth starts by it's self and runs the motor before you get a chance to push the Kangaroo Self test button?
What LED lights are lit on both the Kangaroo and the Sabertooth?
EDIT: After rereading your first post I think you have the dip switches set incorrectly on the Sabertooth. You need to have 1 and 2 set to OFF and 3,4,5,6 set to ON. Give that a try and see if it makes a difference.
Hi Dave,
Thanks for the praise I like neat wiring. I am inspired by your mind blowing B9.
Yes the motor starts running as soon as I apply power via the home made switch and continues running disregarding limit switches altogether. Interestingly, the motor continues to run after I switch the sabertooth off with the home made switch for about 20 seconds and then fizzles out and stops.
I did try pressing the auto tune button on the kangaroo while the motor was running, knowing all the while in the back of my mind that it was probably not going to work. I could get the orange LED to start flashing on the kangaroo according to the number of presses for each tune but the motor just keeps on turning as it was before. The motor also seems to not running at full speed, about half.
One other thing I tried was to connect to the kangaroo via the TTL cable to my laptop, but the DEScribe software couldn't find the kangaroo. The TTL cable has red, black white and green cores. I connected the green core (I think is TX) to S1 on the Roo and the white core (I think is RX) to S2 on the Roo. I think that colour code of the cable is correct? Not sure what going wrong with this either. tired not having a lot of luck.
Unfortunately I cant remember which LEDs were lit and I cant check at the moment cos I'm away for the weekend (wedding anniversary ) When I get back tomorrow night I will try changing the dip switches as you suggested and let you know how that goes.
Thanks for your advise Dave, I couldn't do this without you.
Steve
Auto tune is for pwm mode only, I believe? Isn't it for detecting pwm signal?
The dip switches need to be set for receiving serial commands - not pwm. Unless you choose to switch the saber tooth over from serial (d0) to pwm.
I'm 100% sure you have your dip switches set incorrectly on the Sabertoooth. The Sabertooth is not seeing the Kangaroo (or responding to it) because you have it's dips on the wrong setting. Set them according to what I stated above and we can start from there.
If you read through the entire Kangaroo manual you will find a section towards the end walking you through installing it onto the Sabertooth. I don't know why they put it at the end. That seems kinda backwards to me. In that section they even have a picture at the beginning of it showing the dips set in the proper configuration with a caption saying "Sabertooth DIP switch setting - all modes". The instructions says that this dip setting sets the Sabertooth to packet serial mode at address 128.
When attaching your TTL cable hook TX to Control input S1 and RX to S2. Attach Ground to 0v. I dont know what TTL cable you have so I cant halp with it's color coding. You need to ash the manufacture about that. I had intermittent connection issues with the USB attachment point on my laptop with the TTL-USB cable I was using. I thought it was the cheap cable I was using. I bought a better one but still had the problem. when it lost connection or gave me the not connected (cant remember the exact message) I had to wiggle the USB connection and push the connect button in the DeScribe Software. Some times I had to do this several times to connect and also everyonce in a while while I was working with settings in the software when I wanted to upload the settings to the Kangaroo.
That brings me to the software. Remember to upload any changes you make in DeScribe to the Kangaroo. You don't have to restart the Kangaroo each time but you do need to upload any changes. There is a real neat feature in DeScribe where you can test any changes you make in real time before you Upload. It's in the "Custom Test" tab. Make sure DeScribe shows it's connected to Kangaroo in the center box at the top of the program before you try to test any settings live (DeScribe should auto scene you have the Kangaroo attached and set up the software to adjust the Kangaroo). After you done testing your setting live then you must upload them and restart the Kangaroo when you disconnect the TTL and hand control over to the EZB through the Uart. You can use a serial pin on one of EZB's Digital ports but you wont be able to receive any feedback information from the Kangaroo that way. You need the Uart port for feedback.
Good luck and keep us posted.
Hi Dave,
You Da man!
I changed the dip switches as you suggested and everything worked as expected. I have done the auto tune. I did however need to remove the index wire from the encoder because when I started the auto tune the motor moved to the first limit switch and stopped and went no further. Once removed I was able to do a complete successful tune. One other thing I will have to fix is during the tune there were a few sudden movements which caused the motor gear to jump a tooth at one point. I will need to increase the spring pressure holding the motor to the large gear and do another tune, but that's no big deal.
Now I need to work out how to send data via the EZB. Do I use the script manager? Do I need to connect to the roo with the DEScribe software before I try anything?
Not really sure where to start
Anyhow.. Thanks for all your help Dave. I hope I'm not too much of a pain in the butt blush
Steve
That's fantastic Steve! The biggest hurdle with using a Roo with a Sabertooth is getting that first tune done. It's all down hill from here!
I also found that the index pin should not be attached with this setup. Heck, that was another hurdle you jumped with ease. Your going to be just fine working with these controllers.
No, if your happy with the way your motor is preforming with the settings that the autotune set for you then you never need to use the DeScribe software to make your own adjustments. However it's helpful to be able to get in there and see what the Autotune has set the positions and speeds at. More on that later.
Sounds like your now ready to attach the EZB. I'd suggest using the Uart port of the EZB to attach to the control ports of the Kangaroo. Just match the TX, RX and Ground (S0 is the ground on the Roo) of each. The pinout of EZB's Uart (starting at the hole closest to the ADC Ports) is TX, RX, GR, 3.3vdc. Do NOT attach anything between the 5v port on the control side of the Kangaroo and the EZB. This port on the Roo is 5vdc out. The Roo gets it's controll power from the regulator on the Sabertooth. You can use this 5v power port to power other sensors like a pot or something. I'm not sure how many amps it;s rated for off the top of my head. So you'll just end up with three wires going from EZB's Uart to the control ports of the Roo.
Scripting your movement speeds and position stops is very easy. You just need to know what the values are for your min / max rotation points are that the autotune set between your limit switches. The easy way to find out would be to plug in your TTL cable and start up the Describe software. You can try to guess at these values but I had little luck doing that. The Positioning tab will give you all that info. In that tab you can see (and adjust) your hard and soft limits. Hard limits are where you actually hit the limit switches and Soft limits are anywhere you want the controller to stop before it hits the switches. It's a good idea to never let the trigger to hit your limit switches. They are there for panic situations (I'm sure your going to have a few as you set your system and code your scripts ).
).
As long as we'er talking about panic events; If you ever go into the Describe software make sure you have "Runaway Detection" enabled. It's enabled by default and is a real good thing to have working for you. It will stop the motor if the Roo thinks you have lost control if the motor. If that ever happens you need to power cycle the Roo to get it to move the motor again. If this keeps happening and you actually have control you may need to disable the Runaway Detection till you get things worked out.
Back to Scripting; You can use the Script manager or just open a EZ Script and use that. I like to start with a stand alone EZ Script and then copy it into the script manager when I get it right. However that's just me and some people may find that extra step unnecessary or annoying.
There are two commands you need to send before you can get the Roo to have the Sabertooth move the motor. (Three actually in your case but more on that later) 1: You need to Initialize the EZB Uart port (you only have to do this one time after you power up the EZB). 2: You need to start the proper motor channel of the Kangaroo's two motor channels your using (you only have to do this one time after you power up the Roo or if you turn off the channel for any reason). I always place the Uart command in ARCs Initialization script. that way it's ready when you want to send data through the UART. You always have to have the Uart port Initialized before you can send any data through it. You can also place the Roo's motor channel start command in the ARC Initialization script but only after the Uart is Initialized with a short sleep command between them. This will give the Uart port time to start. Here is an example of what that would look like:
Breakdown of the above code: uartinit(1,0,9600) Initialize UART port 0 on EZB board 1 at 9600 baud sleep(0250) pause script 1/4 of a second uartwrite(1,0,"1,start",0x0d) Send a Uart command on EZB Board 1 through Uart port 0. This will Start drive channel 1 on the Roo/Sabertooth. 0x0d very important. This is the return command (just like hitting the return on your keyboard) that the Roo needs to process the data you are sending. Every command you send to the Roo needs this at the end.
Now that you have your Uart port initialized and your Roo/Sabertooth motor channel your using started your ready to send movement commands.
However since you're using an encoder your Roo has no idea where your motor is sitting on your turning radius. If you were using a pot you could have it attached to a ADC port and use the GetADC command to get a voltage reading, have it do a little math and that would tell you where it sits. With an encoder you have to let the Roo/Sabertooth do a Homing procedure so it can ordinate it's self to where it's sitting. Thr Roo has a built in homing routine that will do this when you send the proper command. It will move to one limit switch and stop. You can control it's speed and bring your motor back to center with additional commands. Again, I have all this in ARCs Initialization script so it's part of the robot's start up routine. Actually it looks and sounds very cool. This command will look like this:
In addition to commands I've explained you'll notice a p##### and a s#### in two of the commands. These are p for the position you want to stop at and s for the speed you want to moved at. Like I said above these values are set into the Roo by the autotune procedure. You can find them with the DeScribe software as I mentioned. I tried to guess but had little luck doing that.
Now, your finally ready to send a command to where you want your torso to move to. The above procedures seem like a lot to do but really only needed to be done at startup and is completed in a matter of seconds (once you have it all scripted).
Here's an example of a single command in a script that will start moving your rotation motor and move it to a point (lets just call it 45 degrees to the right of your center point) on the radius:
Here's the above command broken down: uartWrite(1, 0, Start of command to send your data through the uart port. 1 the EZB Board your useing. 0 the Uart port your useing on that EZB board. It can be 0, 1 or 2. p##### and a s#### are the position to stop at and the speed you want to move. 0x0d very important. This is the return command (just like hitting the return on your keyboard) that the Roo needs to process the data you are sending. Every command you send to the Roo needs this at the end."
Let me know how you end up fixing the jumping gears. I have this problem also. I think it's a cause of no speed ramping support in the Roo. The motor starts up to speed right away and the result is jumping gears. I added a stronger spring but still have this problem when the speed is set too high. DE sent me a Bata version of the DeScribe software with acceleration settings. I've yet to try it on my waist motor as I've been concentrating on my arm design. Hope it ill work. It would be nice to have speed ramping on this waist motor. At the least it will look more natural.
Hope this hasn't been too long or confusing and helps a little. Let me know if you need any more info or help.
Hi Dave,
Words cant express how grateful I am. The effort you go to to help people like me, passing on all your hard earned knowledge is truly heart warming.
I cant wait to try out everything you have suggested. Thank you very much Dave
I will keep you posted
Steve