Asked — Edited
Resolved Resolved by Steve G!

Revolution Roli Green Flashing

Hi, I have bought the Revolution Roli. I have followed the instruction to calibrate the servo. And I have continue the instruction https://synthiam.com/Tutorials/Lesson/38?courseId=3 But now the connecting box is green flashing... normally it must be blue flashing.

What happened ? And how I can connect back to the robot (the robot does not appear in the wifi list) ?

Does I have to reboot somehow the box ?

Thanks, Regards, Pierre


ARC Pro

Upgrade to ARC Pro

Your robot can be more than a simple automated machine with the power of ARC Pro!

#1  

Green (Client mode) is good... means your ezb is now part of your network... With green you can connect to your ezb and the internet at the same time.... Blue means WP mode where you can only connect directly to your ezb... that means no internet...

Go to ARC and use the scan tool (the antenna looking icon in the connection control panel) to locate your ezb on your network ...It will chime when it finds it... then select the ip (which will automatically be copied to the connection control panel) and then press connect.... done...

United Kingdom
#2  

If all else fails, resetting the EZ-B V4 is covered by this lesson

#3  

Thanks @Rich, @Richard, the resetting allow me to connect back in WiFi mode to the EZ-B VA module.

BTW, I cannot make the Roli roll... I have follow this tutorial and connect the H bridge (https://synthiam.com/Tutorials/Lesson/44?courseId=3). But when I try to make the roli move by pressing the direction nothing happens.

I have not connected yet the other elements (camera, arms).

Do you have any idea of the problem?

#4  

I think Rich can help you with that (He's the H-Bridge guru).... More than likely a mis-wiring of the H-Bridge...

United Kingdom
#5  

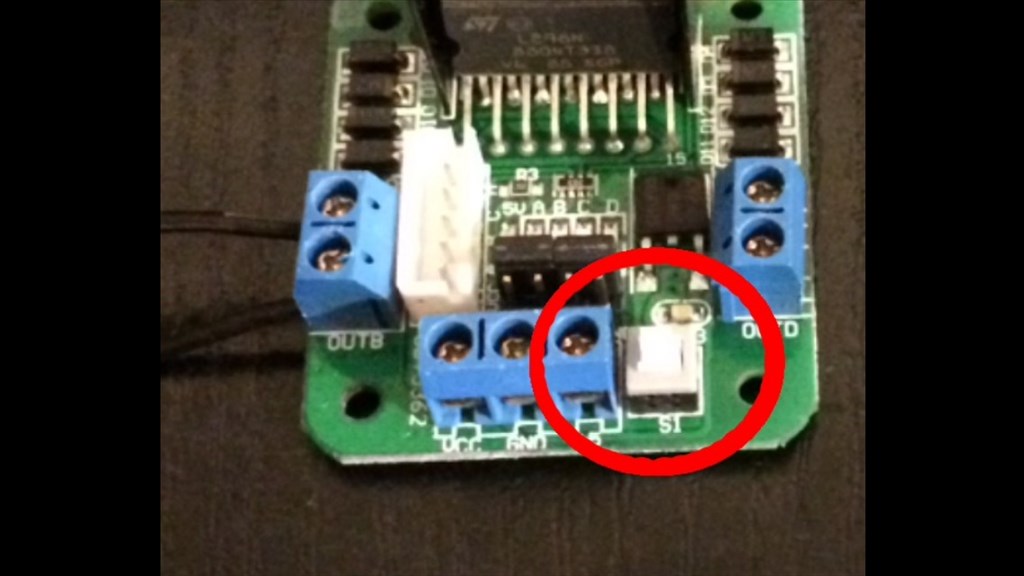
First check the wiring is OK, there have been reports of the wiring being incorrect from the manufacturing facility. Find the H-Bridge and check that the battery is connected to Ground and Vcc not Ground and +5v (not at home so can't search for the photos but I'll look later if that doesn't make sense).

If it's wired OK then it's a case of setting the correct ports to the correct pins which can be done in ARC. The robot should move in some way even if incorrectly configured in ARC however not knowing how it's moving means I can't tell you what needs changing.

This is a bit rushed but I'll revisit it when I get home in about an hour and throw in some more details :)

#6  

One thing that you have to do to make the arrows keys on your keyboard work work, which stumped me for a minute or two, is to click on the box right below the arrows that allow the buttons to work.

I'm not sure if that is what you were asking about but I thought I would throw it out there.

#7  

Hi, Thanks @Rich, I have open the robot and saw that the cable where connected on GND and +5, so I moved the red wire to the VCC as explained in the tutorial.

But the robot does'nt move, even with the modification. I have checked many time the connection and I think I have well connected all the wire.

I know that the wifi connection is working since in the diagnostic web panel I can make the robot say different thing.

Do you have some ideas?

I try to make the robot by clicking on the arrow, they become green but nothing happens.

Regards.

#8  

Can you make any of the servos move in Roli's arms?

United Kingdom
#9  

Try clicking the arrows which you have access to the H-Bridge. There are LEDs on it which should light up when the arrows are clicked. If they do but the motors do not move then it's either the motors not connected or the h-bridge incorrectly configured in ARC.

If they don't illuminate then the connections to the h-bridge are not connected.

United Kingdom
#10  

Have you tried pressing the little White button on the H-Bridge and tried moving your Roli?

User-inserted image

Also, are the ports you have the H-Bridge connected to configured correctly in the Movement Panel configuration menu? Also double check the H-Bridge wiring as well.

#11  

Hi @Rich, @SteveG, My robot is alive !

In fact I got two problems:

  • a bad wiring on the H bridge,
  • the S1 white button was not pressed !

I think it could be good to say that the S1 button must be pressed in the following tutorial. https://synthiam.com/Tutorials/Lesson/44?courseId=3

I will connect now the other elements (arms camera) and have fun ;-) Regards.

#12  

At least two people who had the mis-wired H-bridge like yours was the h_bridge burned out. If after following Rich's instructions for checking the H-bridge lights and Steve's instructions for checking the button it still doesn't work you may beed a warranty claim (use the Contact Us form).

Alan

#13  

I forgot to mention. My roli is rolling but it do not roll at constant speed.

I think the caterpillar are not really well adjusted, or the motor does not go at the same speed. I see the caterpillar is not taut.

Does there is a guide somewhere to adjust the caterpillar?

Regards

#14  

I did two modifications to make Roli roll better.

You can tighten the tread. First remove the treads. It will makke this easier. Flip Roli on his back, and you will see a screw right between the legs that hold the wheels. Loosen that screw and lift up the little plastic plate it holds down.

Gently pull one of the legs to the side until the gear teeth are free, rotate one notch towards the front (if working on the front wheels, towards the rear for the rear wheels) and push back in. Repeat on the other side, then do the same on the other set of wheels. Be careful with the back wheels since they have the motors, there are wires you don't want to pull too far.

Tighten the screw on the plastic plates. Roli will sit a little lower, but the tread will be tighter.

I found that wrapping the rear wheel with friction tape (available in the electric section of hardware store) or athletic tape (available in sports supply stores fir wrapping hockey stick and bat handles) before putting the tread back on also helped prevent slipping, particularly when turning on carpet or other high friction conditions.

Alan

United Kingdom
#15  

Pleased you got Roli rolling ;). The little switch activates and deactivated the on-board +5v regulator on the H-Bridge. Easily overlooked. Also you can pad the wheels out with friction tape like this. and replace the track over it. That will give it better grip. I'm using something similar on my current project on a modified servo and wheel. :)

PRO
Synthiam
#17  

Excellent to hear @TheFrenchLeaf

Remember, the Roli, JD and Six are robot kits:) There's nothing "wrong" with the robots - they're kits for you to build, which is why there are instructions and tutorials. These steps help you learn how to build a robot, step by step.

I will update the suggested tutorial for the button press, thanks for the pointer :D

Enjoy Roli!

United Kingdom
#18  

@TheFrenchLeaf.

Glad you got everything sorted and I'm pleased that I could help. DJ beat me to it, but I'll echo what he said about the tutorial lessons. They are a valuable source of information for not only building EZ Robot kits, but elements of the tutorials also help with building your own robots with EZ Robot products which is what I do. I always re-read them in my spare time, and if you notice something that could be made clearer it's always worth mentioning, as you have done.

Anyway, happy robot'ing (not a word, I know). :)