
dmzimbelman
Kinda Lost Here
I was very excited to get my robot and have been spending time try to get it do things, but I am kind of lost with all of this. I spent the last couple of hours following the multicolor activity tutorial and can't get that to work right. Mostly because I don't understand what is going on. I can create and save the color then go to the scripts find the "point"one, type what I am supposed to type etc but it does work right. I guess what I am looking for a very basic introduction, like what is a script is and what does it do etc etc. Or how the frames and action work together, yes I am talking really basic stuff but I don't even have a grasp on the basic vocabulary if that makes any sense
It seems to me that all the tutorials are written for engineers by engineers or at least someone that already has a grasp on some basic concepts. I would like to learn this stuff, which is why I started down this road in the first place.
Any thoughts on a more basic place to start would be awesome.
Thanks!

Hi! Welcome to the forum. I would start by pressing the LEARN menu option on this website. That is where our grade school education begins for classroom kids. There are steps which walk you through from the beginning to get your robot up and running.
Once you have your robot up and running with the default project, then start with the Activities section of the Learn section. The activities section starts by explaining basic features of ARC and what different things mean.
The questions that you are asking about movements and color are separate, as they are different things. Asking about how to walk and how to recognize colors are completely different functions. Think of yourself, as a human. When you read, you're not also doing pushups, right? When you sleep, you're not also mowing the lawn. So different tasks must be separated, just like we separate tasks in real life.
To begin, your question is with Multi Color tutorial? If that's the case - then please visit the multi color tutorial here: https://synthiam.com/Community/Tutorials/64?courseId=6
Watch the video and follow along. Pause the video as you perform each step. Not a step is missed in the video. It will be impossible for you to not complete the task I assure you. Simply press PLAY and begin watching the video. I recommend watching it through it's entirety at least once to get an idea of what to expect. Following that, watch it and pause at each step to perform the actions.
You can pause the video by pressing the PAUSE button on the YouTube player. Simply press the PAUSE button again to resume playing the video.
Here's a separate response regarding your Movement question - which uses the Auto Position. First, let me introduce this feature of ARC...
This is a very powerful message when you load ARC and should not be dismissed. The QUESTION MARK buttons are incredibly important to learn how things work. The control that you will be using for making the robot move is the Auto Position. To learn how to use the Auto Position, start by pressing the ? (Question mark) button and viewing the tutorial.
Here's a direct link to the Auto Position tutorials. Now, I'm cheating by giving you this link, so remember to use the ? (QUESTION MARK) button in the future: https://synthiam.com/Support?id=180
Okay then let's just focus on the multi color thing!
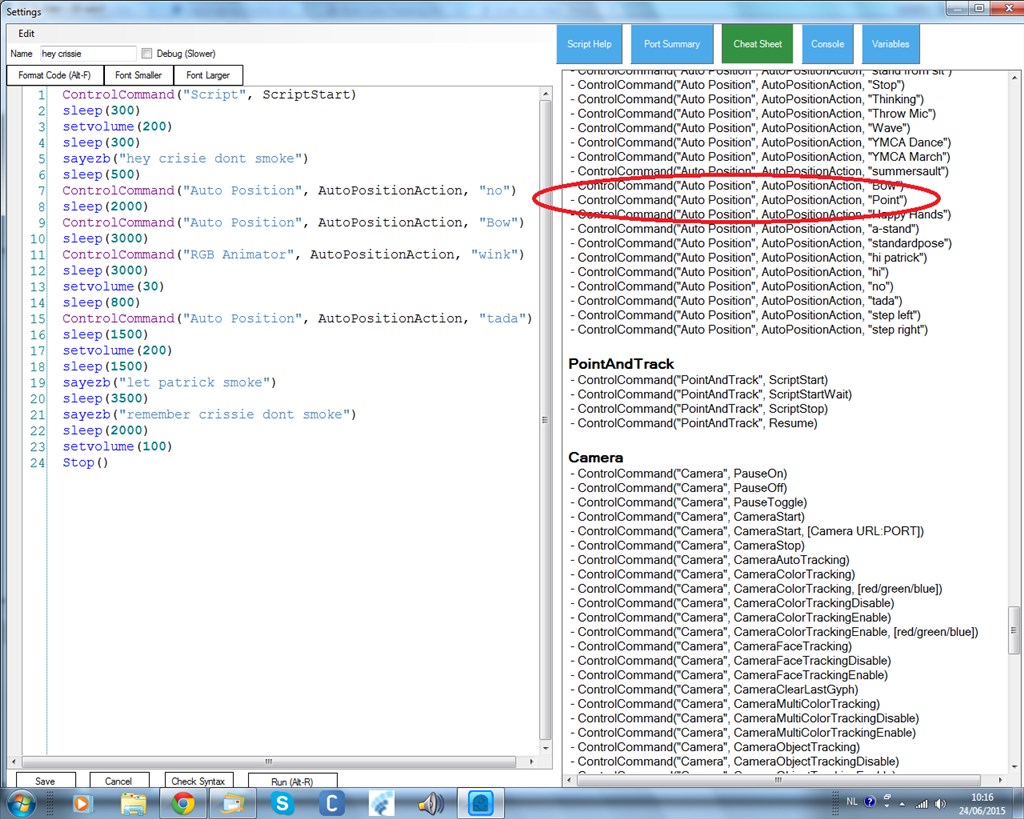
Here is my script edit from using the tutorial:
ControlCommand("Auto Position", AutoPositionAction, "Point")
sayezbWait ("I see a " + $CameraObjectColor)
Stop()
I have 3 custom colors "yellow truck" "gray elephant" and "red cap"
under the variables tab from the scripting screen the value for $CameraObjectColor is "yellow truck" I do not see the "grey elephant" or "red cap" there
So the behavior is -
sometimes it sees the yellow truck and appears to be trying to track it, other times it says it sees the yellow truck when the yellow truck is not there. I have been being very careful to make sure there are not colors close to that in the background etc.
If I check and uncheck the multicolor box under camera control it will reset and see the correct object, it has seen the "gray elephant" but never the "red cap"
and it is doing this annoying head bobbing thing, which I think is it trying to track the object, when I uncheck the multicolor box it resets and stops that.
So what have I done wrong, have I missed a step somewhere? I watched the video tutorial very closely and read the written tutorial several times over.
I created the colors, edited the script, and yes saved all that so what am I missing? Mine is definitely not working like the one in the video!
[feature] In elementary mathematics, a variable is an alphabetic character representing a number, called the value of the variable, which is either arbitrary or not fully specified or unknown. [/feature]
As stated, the variable $CameraObjectColor will store the name of the color that is detected. Variables store information. For example if i said $X = 1 + 2, what is the value of $X? Well, $X is the variable and your answer would be 3.
To introduce you further of what a variable is, perhaps it would be beneficial to read the tutorials on EZ-Script, which can be found here: https://synthiam.com/Tutorials/Lesson/23?courseId=6
All of the information that you will need is available in the LEARN section - All i can do is reproduce what is already there in these posts, hopefully it helps! )
The tutorial is very clear by stating that you need to isolate only the color that you wish to detect for that entry. If you name an object YELLOW DUCK, then the color range needs to be filtered on only the YELLOW DUCK.
Here is the definition for the word RANGE that is used in this context:
[feature] 1.the area of variation between upper and lower limits on a particular scale: [/feature]
That is the definition that defines the color range which you are creating when identifying a color, such as a YELLOW DUCK. The range is the upper and lower limits of the particular color.
In art class, you will have used a color wheel. A similar color wheel (actually it's identical) is displayed in the color range editor. You will notice many colors in the color wheel. Well, if your "range" encompasses many colors, then you will detect many colors as YELLOW DUCK.
For more information on color wheel, here's a great link with explanation using fruit to make it easy to understand: https://www.colormatters.com/color-and-design/basic-color-theory
Okay, so now that you have an understanding of variables, ranges, and colors - let's move on to the next bit of advice.
I would highly recommend reproducing the tutorial Detecting Multi Colors and not creating your own custom colors. In school, universities, educational classes, instructions, etc., information is displayed in instructions with step by step to teach someone how to accomplish a task. We have created literally hundreds of tutorials with step by step instructions. If the steps are not followed, then it's very difficult for us and yourself to identify the issue of why you're not receiving the same results. It is highly recommended that you follow the tutorial exact, without adding additional variables - such as grey colors into the mix. Start with a YELLOW and GREEN object, as the tutorial defines. Watch how the color wheel range is created for each color and duplicate the results.
Duplicating results is also how we learn to perform many other tasks - such as driving vehicles, making sandwiches and swimming. I love creating random examples . If i were to show you how to swim in swim shorts, it's probably best that you don't attempt to reproduce my example wearing a fire fighter suit.
Hope this helps! If not, within the next year, we are putting a program together to have children teach adults how to use robotics. We're starting by creating a new section of the website to allow people to create step-by-step tutorials (you will also be required to reproduce with the exact procedure to produce the expected results, however). The phase after the step-by-step tutorial section is to gather tutorials created by children in elementary schools. Part of their robot curriculum will be to create a tutorial that demonstrates something they learned.
You will greatly benefit from this up-coming feature.
The idea behind having children creating tutorials from what they learned is to produce a domino effect of knowledge. The next class which learns from the previous tutorials will produce even more advanced activities. Make sense?
In the meantime, read tutorials, follow activities as they are presented, and soon there will be a new section of the website which will benefit you greatly from elementary school students.
PS, if you ever get frustrated - pour yourself a cup of tea and music helps me! I try to be specific as possible with my responses, hope they are helpful. You would be surprised at how often the little things are over looked. People generally over complicate new technologies.
I still remember when my grandparents got their first VCR! Holy, that thing flashed 12:00 for years... until it was replaced with a DVD player!
Well had a bit of success tonight! Made up a couple of robot "flash cards" a green rectangle and a yellow circle on a white background, (and yes I realise shape has nothing to do with anything right now!) created the custom colors per the tutorial and actually got it to recognise the first color it would see, but it would not recognise the second color when shown......if I unchecked multicolor and let it reset then it would see the new color.
So hmmmmm how do I get that to do it on it's own, on the scripts tab before you enter the script there is a slider to adjust the number of frames before execution, mine was set at 10.. I lowered it to 3 and that seemed to do the trick, although I only got through one series and my battery low came on.
So now I am charging up and thinking I might have this one figured out.
Perhaps a mention about the frame rate thing in the tutorial might be in order.
DJ - the paragraph out of all that you wrote that was most helpful was
"I would highly recommend reproducing the tutorial Detecting Multi Colors and not creating your own custom colors. In school, universities, educational classes, instructions, etc., information is displayed in instructions with step by step to teach someone how to accomplish a task. We have created literally hundreds of tutorials with step by step instructions. If the steps are not followed, then it's very difficult for us and yourself to identify the issue of why you're not receiving the same results. It is highly recommended that you follow the tutorial exact, without adding additional variables - such as grey colors into the mix. Start with a YELLOW and GREEN object, as the tutorial defines. Watch how the color wheel range is created for each color and duplicate the results."
I agree, and also you might want to mention that in the tutorial as well.
In this instance, had the tutorial been more specific as to using something bright yellow and something light green so as to match the colors you were creating, the chances of success might be higher and if not then like you stated, then you and others that try to help people would have a better understanding of what might have went wrong.
And as aside, I'm not saying all this as an admonishment at all, I think you have created a very cool and educational product, that is why I choose it out of the myriad of options out there as my first real robot....Having zero knowledge about any thing to do with robotics, I choose your product because I thought and still think this is what will teach me the most.
As your products gain in popularity, which I believe they are, you are going to find more folks like me with little to no knowledge about any of this, so some things that you and others in the community that have had exposure to and take for granted are lost on a guy like me.
I do really like the thing you mentioned about having kids create tutorials for the things they learn and believe that is probably going to be a real step in simplifying certain aspects!
So again, thanks! I do feel as if I made some progress and I will keep plugging along and bother you when I need to!
Don Z
Okay, I have moved to this thread as asked to by DJ.
What is calling your script? I could easily give you a working solution but I really want to help you learn for future scripting endeavors.
The video you posted shows that the second color is being recognized. This is evident by the square showing up around the object that it recognized.
Please post the entire script you are using and we can work through it.
He script that he is entering is correct.
However, there is an existing script in the editor which he will need to remove.
Remove the existing script before adding a new script. Think of this as your sock drawer... If you decide to begin storing underwear in the sock drawer, you will need to remove the socks.
Or another example is a passenger in your car. When your wife is in the front seat, you don't keep piling new people on top of each other in the front seat. You need to remove the existing person to make room for the new person.
Another example would be your shoes. You cannot have someone else insert their foot into your shoe unless you remove yours.
So, remove the existing script and replace it with your new script.
Yep, just wanted to walk through what is happening logically with him first. I am through just posting answers for people. I have decided to take the route that you and Rich have here that has helped me the most to understand EZ-Robot. If this is done, and people will use it, it will make the community even more helpful as each question becomes a mini tutorial. If it is a question about another product or from someone who has been on quite a while, I will shoot an answer to them but I will also understand that they already have a good foundation to understand the answer.