
PRO
Herr Ball
USA
Asked
— Edited
Kangaroo / Sabertooth Help
0I have been working on this for 4 days in this cave.
This question is for anyone that uses:
EZBv4 Kangaroo & Sabertooth (2x25) combo Uart0 2 DC motors w/Encoders Sabertooth Kangaroo plugin (selected Uart0 & 9600 baud - same as in Describe)
If you could share your S & K dip switches with me?
I can get a good tune from what I can see in the DeScribe software. BUT When using the plugin and clicking on the arrows, they highlight but nothing happens? Writing a small script to move the motors forward nothing happens either?
Please, I need to see the light of day!
Related Hardware (view all EZB hardware)

EZ-B V4
by EZ-Robot
EZ-B v4/2 robot controller: dual Cortex ARM, Wi-Fi, audio/video, 24 servo/digital ports, I2C/UART, camera and Synthiam ARC control for custom robots
Wi-Fi / USB
Servos
24
Camera
Audio
UART
3
I2C
ADC
8
Digital
24

Maybe you didn't select the correct EZB UART port in the robot skill settings?
I recommend getting it to work without the kangaroo so you can familiarize yourself with the setup. Start small and move up.
Funny, just getting ready to call it a night and remembered I didn't mention I selected Uart0 & 9600 baud, same selected in Describe. Edited it in post.
I did have the Sabertooth working on a older robot, bought a Kangaroo to work with new motors with encoders.
Hi Herr Ball! Good to see ya.
I'm currently upgrading my robot and have been working with several ST/Roo's in the process. These things can be quite temperamental. It's good that you have gotten a successful tune. Once that is done you're almost there.
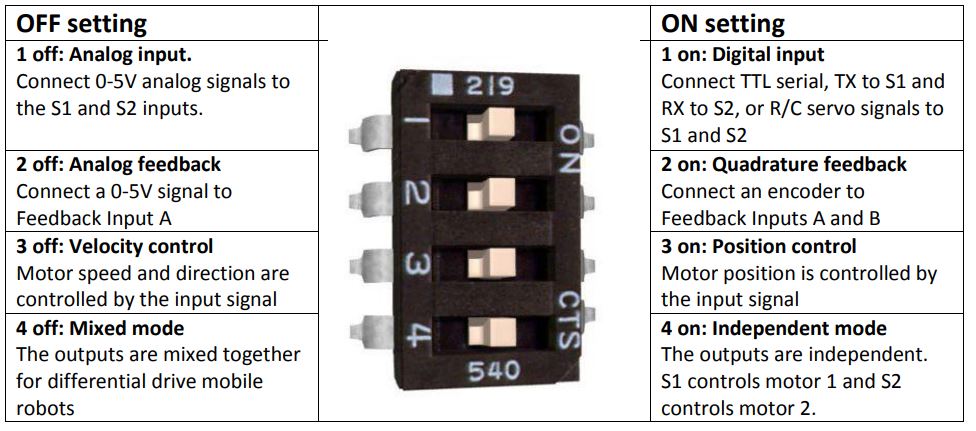
If you got a successful tune then you have your dip switches set on the Sabertooth properly. However it's a good idea to double check. When adding a Kangaroo your Sabertooth dips should be set to: Dips 1&2: OFF Dips 3-6: ON
The dips on the Roo would be set to how you are going to use it.
I have several with some using pots for feedback and other using encoders. They all are used in independent mode to control two different motors and used for position and speed.
With that said, the the 4 dips on the Roo's I use with an encoder are set to ON.
Here's a snip from the Kangaroo manual showing the dip settings:
I have not used the Sabertooth Kangaroo plugin so I do not know how it works to set up the system to be ready to accept commands. I have always written EZ Scripts to make my independent motors move to certain positions at different speeds. When not using the Sabertooth Kangaroo plugin here are a few things I have to do to start a successful move with a script (Please forgive if you already know this stuff): *Make sure the proper EZB is being called in the script (I use several in one robot) *Make sure the Proper Uart port is being called in the script (The EZB had 3 of them numbered 0, & 2) *Make sure the Uart port on the EZB you are connected to and using has been initialized with the proper port and Baud rate using the proper Command. In EZ Script is looks like this: UARTInit(0, 0, 9600 ). This is very important because if the port is not initialized the EZB will lock up. You only have to do this once. From then on the UART port will be ready. I do this in my INT script when I first start up ARC.
*Make sure the proper Channel(s) on the Roo that your motor is attached to is started. The roo will not accept any commands until the channel(s) you want to use is started. You only have to do this once. From then on every properly formatted command will be accepted. I do this in my INT script when I first start up ARC. *Make sure the command line going through the UART port is properly written and has a "Return" at the end. I think the EZB may lock up and need to be rebooted if you send a bad command through the UART. *At start up, make sure you have the your system home to the type of stop you had during your successful tune (limit switch, physical stop or a taught stopping point) or it will not accept commands. This only needs to be done once at system start up.
If you have everything in your system connected and set up like it was when you did your successful tune, then when you first start up the ST/Roo the led will not be lit on the ROO. After you start up the UART and then send the command to start your Roo Channel(s) you will see one quick flash of the LED on the Roo and then the LED will stay on and with a low and slow pulsing light. Each time you successfully send a command to the Roo, it's LED will flash once.
Watch the Roo's LED during and after you start the system and send commands. If there is an error at any stage it will start repeatedly blinking an error code.These codes are kind of cryptic but they will give you an idea of what is or isn't happening.
I hope this helps. I'll post a couple examples of my script asap.
OH, I forgot one very important step. Your system needs to home to some type of stop (limit switch, physical stop or a taught stopping point) at start up or it will not accept commands. This only needs to be done once at system start up.
I'll edit my above post with this info.
Here are the commands needed to get the system ready to accept a position and speed command. Change numbers to reflect your system, These only have to be sent once per session. I've listed different EZB's, UART Ports and Roo Channels for this example: UARTInit(0, 0, 9600 ) #Turn on EZB 0, Uart #0 port uartWrite(0, 0, "1, start", 0x0d) #EZB 0, Uart #0 port, Start Kangaroo channel 1. Notice the Return key at end of command, 0x0d uartWrite(2, 2, "1, Home", 0x0d) #EZB 2, Uart #2 port, Home motor attached to Roo channel 1
Now you can send the position and speed command: uartWrite(2, 2, "2, p0 s400", 0x0d) #EZB 2, Uart #2 port, Motor on Roo Channel 2 move to Position 0 at a speed of 400
Notice the Return key at end of the Kangaroo command, 0x0d. All commands sent to the Kangaroo through the EZB UART port needs a Return.
As a last recommendation, Make sure your Describe software and the Kangaroo's firmware are up to date.
Ah, one more suggestion. You mentioned you used the Describe software to set up your roo. The program has a very nice Live Test feature. You can use this feature to test your roo and how your setting interact with your motors. I'd highly recommend trying this just to make sure your system motors are responding properly. Once you confirm this (and make any needed adjustments) you have ruled out the roo/ST rig. All that is left to check is your ARC commands and wiring.
I didn't mention checking your wiring and connections before. This simple thing has really messed me up in the past. A broken wire, bad connection or something plugged in wrong really makes things look broken.
Sorry for all the long posts. I hope this helps somehow.
Wow Dave, you certainly gave me a lot to work with. I'm grateful for your input and will give it a close going over. I will report back soon.
Thanks Again!
Dave is the kangaroo sabertooth man! That does sound like a superhero name. Or, maybe the villain