Asked — Edited

Is There A Safe Way To Clean Corrosion From My Ezb?

Hi guys just checking the saltwater controller for maintenance. Its been a few months and apparently the cooling fan has been pulling in evaporating water which has a small amount of salt. The EZB is still functioning I just need to power it down to clean the pins for preventative maintenance and then remove the cooling fan. User-inserted image

User-inserted image


ARC Pro

Upgrade to ARC Pro

Stay on the cutting edge of robotics with ARC Pro, guaranteeing that your robot is always ahead of the game.

#1  

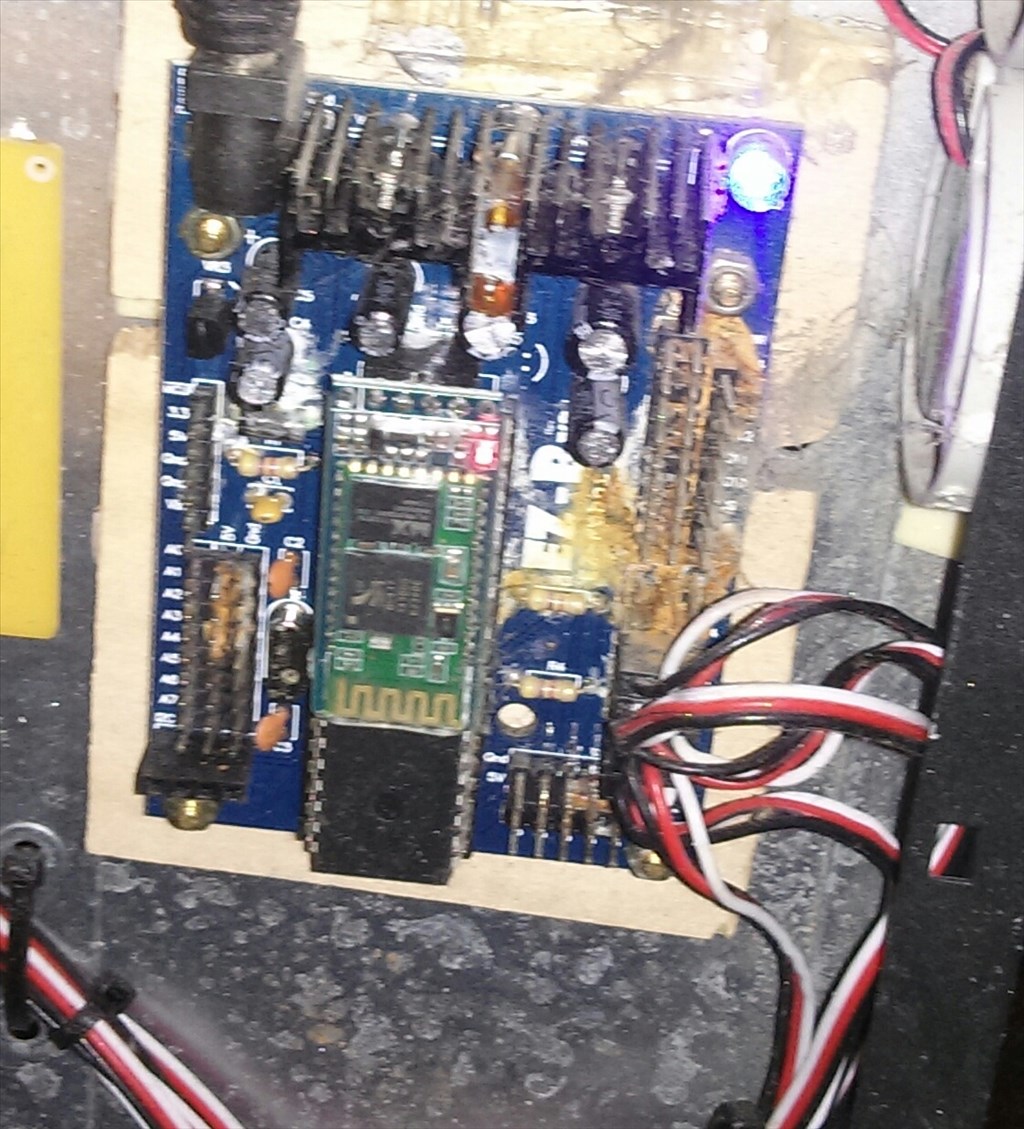
Anyone gave Ideas for this, for a "electronic safe " cleaning method.

#2  

Remove all power then use a soft tooth brush and rubbing alcohol. Use compressed air to dry.

#3  

Eeeeew nasty! Lol. I think I would take a toothbrush and scrub away.

#4  

OK I will take some 90 percent rubbing alchohol and clean it well. If they doesn't do the trick I will look into electrical connection cleaning solvent. I want to try the least invasive approach before a solvent. I will pick some up tommorow and record the progress and results for others who may need to clean up a ezb for one reason or another.

#5  

Yes, clean it up with the alcohol but you also need to neutralize the salt. Once it gets onto the board like that you will never get it off and all you can do is chance the chemistry to keep it from continuing to eat away and do damage. So,after the alcohol scrub, rinse off in tap water and and follow with scrubbing with clear vinegar. Rinse with clean water and repeat the process a few more times. Blow dry with compressed air.

If you do it like this all should be good. If you just wash it off without the vinegar it will just keep eating away even though you can't see it.

Edit: last liquid on the board should be alcohol. This will help remove most of the water.

#6  

OK so alcohol - vinegar- alcohol - air...

#7  

I'm going to video this. If something explodes at least it will amuse someone

#10  

Hope all goes well @jstarne1 and thanks so much for the practicle info @dshulpius :) there's an old saying about cleanliness is next to.......robotlyness! :)

#11  

robotlyness........ HA, HA! That's great!

Josh, One more thing; Be aware of static electricity when blowing off and drying the board with compressed air.

United Kingdom
#14  

Wow, that's some good results!

Although I would have removed the bt module and chip when cleaning it but I guess it was OK not to.

#15  

@Rich yes I probably could have removed those as an additional precaution but I believe its fine. The alcohol dries out quickly and I won't power it on till I repair that resistor anyways so there is minimal risk of damage. Speaking of think I can just resolder that resistor or should I drill out the lead and install a completely new one? I'm leaning towards just soldering the broken lead back to the solder pad and crossing my fingers :)

United Kingdom
#16  

Provided you make good connection you could solder it back on. Me being me would remove it and do the whole thing though. It's a through hole resistor isn't it? the legs should just drop out if you desolder it.

#17  

Yea , I may swing by RadioShack and see if they have a resistor of that value. I have not checked the resistor chart to check its value yet. I have a app on my phone. I just never used banded 1/4 watt resistors enough to remember , I would just check them with a meter... Bad habits are hard to break.

#19  

While at Radio Shack pick up a small can of solder flux paste if they have it. The flux will help with de-soldering as well as re-soldering. You might look for a spring loaded solder sucker while you're there, that will help the effort.

United Kingdom
#20  

I always remember the colour code from this, slightly racist but funny mnemonic... Black Ba***rds Rape Our Young Girls But Virgins Go Without Black Brown Red Orange Yellow Green Blue Violet Grey White 0 to 9 :D

#21  

Wow that's gotta be a record for the most offensive way to remember a resistor color code. They guy who thought that up must have been a sailor back in the 70s.

#22  

Here's the way i learned it ..Bad Boys R*pe Our Young Girls But Violet Gives Willingly(old school)......Here's another regarding navigation for new flight pilots ......TVMDC.....True Virgins Make Dull Company

#23  

I guess this is why I just use a resistor value decoder app lol. I've never heard of those.

United Kingdom
#24  

We didn't have the app when I needed to know the colour code for exams... 20 years on I just associate the colours and numbers together

#25  

Hi Josh, I really think your making a mistake by not neutralizing the salt. I know you live down south and don't see what kind of damage salt can do to car metal. It's insidious. However maybe you have seen what sea salt can do. When I was down on the Gulf Cost after Katrina helping my daughters salvage as much as possible after their homes were flooded by surged Gulf waters I found many examples of salt water completely corroding metal even as soon as a few days after exposure. I found silverware that was completely covered and half eaten. Once the corrosion gets into the metal there is no way to stop it unless you change the cemetery of it. A good example is salt damage done to lawns and trees along roads up in the north states here in the USA. Once this happens there isn't much that can be done to bring them back except lay down gypsum. The calcium in the gypsum will displace salt residues and prevent further damage.

Without going into a chemistry lesson and really pissing you off, you need to completely remove the salt or chemically change it or you board will fail in a few years. If your lucky the alcohol removed all the salt. If not the salt in still hiding in a few spots (probably under the header pins) and corrosion will start up again. Or the salt has already started eating into the traces and alcohol will not wash that out. It will keep eating away till the board fails. Here's a picture of what that looks like:

User-inserted image

There are several ways to stop even this advanced corrosion. In addition to the alcohol bath you need to use either vinegar, baking soda or ammonia. I've neutralized more then a few boards that looked as bad as the above and they are still working after many years.

Also do not be afraid to use water on your EZB board. Water will not harm it (I'm not so sure about the sealed Bluetooth unit though). I've been placing old dirty electronic boards in the dishwasher and using dish washing detergent as a soap for over 10 years now with no ill effect. The important thing is to make sure the board is dry before you turn the power on. I always blow it off completely with my air compressor and let it sit overnight in a dry area before I reinstall them. Also it's important to not let the static from the compressed air harm any sensitive IC chips. Keep yourself grounded when handling it. I know the IC chip on EZB is static sensitive.

The only thing I would not apply water to is boards with relays that are in a plastic dome or other sealed daughter boards. There is no way to dry these unless you drill holes or take off the domes.

Hope all turns out well for you Josh. I'm just trying to help and keep any problems from occurring down the line. With any luck what you have done already will be OK. I'm just really anal and don't like problems to pop up down the road. ;)

#26  

OK so its soaking in vinager right now and I will rinse in a few minutes with alcohol. User-inserted image One resistor needs to be replaced as it was too corroded to make a good solder joint.

#27  

Awesome advice Dave on corrosion control thanks so much!...Josh your vinegar bath needs a few baby cukes thrown in ..OR ...start making french fries :)..Weird how places in some states dont provide vinegar as a condiment?!...I guess its an English thing. Not even counting a french canadian add on of gravy and cheese curds (poutine) I am sure Dave knows all about cheese ,coming from Wisconsin! :)

#28  

Yes, everywhere I go in the world they seem to know about the "Cheese Head" nick name. :) I love cheese but never had vinegar on it. Ick. Now, I do love vinegar on spinach. Yum.

Back on subject; I've found it difficult to desolder parts that have been corroded. To keep from destroying the solder pads I usually make sure to use liquid flux and melt a little new solder into the joint before doing the desolder. However I've always done this on old corroded boards that are 20 - 30 years old that has seen a lot of miles on them. A new board like the EZB that has this corrosion may be a lot easier to desolder.

#29  

Gotta luv recycling!..I am always looking for cast out electronic equipment for gears and components and desoldering is a necessary skill :)

#30  

you forgot the tolerance code: BBROYG But Violets give willingly.

that's the way I learned it.

#31  

OK so its a 4.7kohm resistor and I stopped by RadioShack to pick some up. I tried to solder it on with the new lead free solder and that stuff was constantly attracted to my iron and didn't flow well. It just wanted to bead up. So I went back to get some 60/40 solder and tried again. Does anyone know when this resistor goes directly to son I can be sure I tested it correctly? It does power on and blink like normal. User-inserted image

User-inserted image

#32  

You may already know this but: If you put your digital tester on Resistance setting and the proper range, then measure across the resistor you should get the proper reading........ most always. However I have gotten different readings on resistors (rarely) both in and out of circuit. I've found most of my false readings on resistors in circuit will happen when another resistor is in parallel with it. Your readings will not always be spot on. Usually they very + or- 5% as noted on the specs of the resistor. Check the specs of the resistor. If outside of the stated range then the resistor is bad.

I also like to do a continuity test from the component I installed to where the traces go and also to traces and parts around it to see if there are any problems.

Just another tip on soldering; If possible don't cut your lead to far into the solder pile. I see you've cut it way down on the backside of the board. This could cause micro fractures and cold joints. I know, sometimes the pile is just to big however if possible leave a little of the component lead outside of the solder pile. Also it's a good practice to clean the left over flux from your board with flux remover when done soldering. This may sound a little anal but It both looks better and keeps shorts & bleed over to other circuits from contaminants down to a minimum.

Other then that it looks great! Nice job! ;)

Dave Schulpius