United Kingdom
Asked — Edited

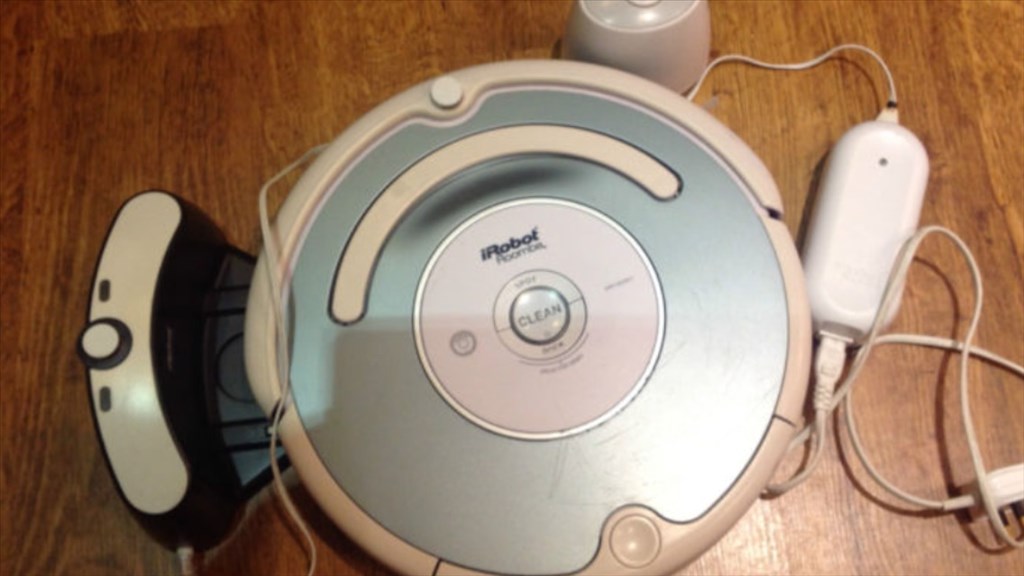
Irobot 530 Quick Advice

Hi guys.

I am currently looking at a Roomba IRobot 530 on a popular auction site I want to get. I don't wish to appear rude but I need some quick advice before I place a bid, as the clock is ticking. eek

Does the 530 have a comms port to connect the EZ-B4?

Is the 530 compatible with the EZ-B4?

I've never had a robot vac so it's all new to me. I know DJ does reference the iRobot but there's no mention on models.

Cheers.:)

User-inserted image


ARC Pro

Upgrade to ARC Pro

ARC Pro is your passport to a world of endless possibilities in robot programming, waiting for you to explore.

#1  

The 500 model Roombas all have the 7-pin mini din connector and the Open Interface for receiving commands from the EZB(4). You may have issues with sending commands using D0 since the 500 MCU seems to me less able to respond to the 3.3 volt levels from the EZB(4).

#2  

It has a 7pin plug under the front face disk cover... You will have to make a connector (I and Robot Doc too have made a few)... I think they are similar to a PS2 mini din connector... Anyway, if you have some basic soldering skills you can make a serial connector to work with the ezb 4....

edit I actually have a Roomba 530 and although Doc says he has had issues controlling the 500 series, I so far have not... However, I use the UART port... Not sure how much difference it makes because the serial voltage is still 3.3v... Still I have no trouble driving the 530 around....

United Kingdom
#3  

Brilliant, thanks guys, and thanks for the rapid response. Minutes to go. Placing bid now. Let you know how I get on.

United Kingdom
#4  

Well, what can I say. It was meant to be. You guys replied in excellent time with what I was hoping to hear, and I won the auction:D. I got it (used but nearly new) for £105 with docking charge station and one invisible wall sensor.

All I need now is to save up some more beer tokens and get myself another EZ-B v4. I just found DJ's tutorial using a PS2 joystick connector. I already have an idea for another robot project and have an old car vacuum shell which will make a great body that I started tinkering with about a year ago.

Thanks again Doc and Richard. No doubt I will be tapping in your shoulder's soon for some advice :P.

User-inserted image

#7  

Richard R, when using the UART(0) port I also have no issues with sending commands but there is no support for using the Roomba pre-built EZB overlays that all use D0 by default. I'm not sure when DJ will get the time to change the Do port to using any or all of the UART ports.

#8  

@Doc so true.... I usually don't use the prebuild Roomba control... I usually write my own custom Movement Panel using UART send commands... DJ had mentioned a few months back new examples are in the works for the Roomba (I imagine it has something to do with using the UART port)....

#9  

@Rickard R, that would be nice. Like you I could then consider taking advantage of the two way conversation possibility.

United Kingdom
#10  

@Robot-Doc.

Quote:

but there is no support for using the Roomba pre-built EZB overlays that all use D0 by default.

If you wouldn't mind, I just wondered what you meant by this. Could you elaborate?

#11  

The built in Roomba control panel doesn't work that well with the 500 series... I was just telling Doc that I use scripts and the custom movement control to control both the 400 and 500 series roombas, anyway.... I have a script that you can use to drive around your 530... However, saying that I haven't tried to control the 500 series roomba's vacuum and brushes yet... I am sure it will work via scripts, though... Also, reading the roomba's sensors via the UART is another story... So far (and this is on a 400 series iRobot Create) I have only been able to read just the bump and wheel drop sensors (no battery voltage or any other 2 byte receive)... So in other words, don't worry you'll be able to control your Roomba...:)

United Kingdom
#12  

Okay thanks Richard, and having your script would be a great start for me. I was looking through the posts yourself and Doc posted and I must admit I was a little lost at what you were talking about in regards to using the D0 pin and pre built EZ-B overlays.

Is there a Roomba example in ARC? I'm away from my laptop at the moment so can't look.

#13  

Look in the cloud here under sharing in the drop down box for my 500 series Roomba example...

#14  

The pre-built overlays and other Roomba controls were built by DJ and use the D0 port of the EZB(4) to send commands to the Roomba. The D0 port is wired to a 7-pin min din connector using the Gnd lead and the signal lead of D0 is the Xmit lead that is connected to the Rec pin in the 7-pin mini din connector. I believe DJs example shows using a PS2 connector which is an 8 pin mini din plug.

United Kingdom
#15  

Great, thanks for clearing that up Doc. Using my mobile/cell at the moment, so I'll have a look at your example Richard, when I get home.:)

United Kingdom
#16  

:D:D Look what the very nice delivery driver left for me today :D:D

User-inserted image

Charged and tested, and all working okay. And this is the overall robot design I'm playing with. (It's the one on the right. :P)

User-inserted image

#17  

@Steve G, great design concept. You may have to consider another way to operate the Clean Button on your Roomba. I have one that I added a relay to electrically simulate the button push.

United Kingdom
#18  

Yep. I have an idea for that too:). But thanks for mentioning it though. Could have been an easy oversight.

#19  

Steve G, Looking very cool. It will be a great robot. If you plan to utilize Roombas cleaning abilities, be careful of the arms extending out past Roombas diameter. Steve S

United Kingdom
#21  

Cheers. It should look pretty cool when I'm done (I hope). Yeah I still will keep the cleaning function. Well, he has got to pay his way in his new home. The arms won't stick out as far as what the picture shows, and should just fit inside of the diameter. They will also be servo controlled arms too, so plenty of movement. Just got to make a shopping list now. eek

United Kingdom
#22  

@Robot-Doc.

Quick question. You said in your previous post about finding a way to operate the "Clean" button and said you use a relay. I was thinking of using a servo to do the same, but the question I have is once connected to the EZ-B, can I not operate the cleaning function from there through it's hard wire connection?

#23  

@Steve, before you tear apart your Roomba.... I haven't tried, but the ezb should be able control that stuff sending serial commands... I mean to turn on and off the vacuum and brushes using the UART port or send serial commands...

United Kingdom
#24  

Cool. I was hoping, and kinda figured it would.

Thanks.

#25  

This will turn the brushes on and off via software...


#uses pin 5 (UART port 1)

uartWrite(0,1,138,13) #on

uartWrite(0,1,138,0) #off

#26  

I uploaded a sample project to control your Roomba 530... Look in the cloud under sharing in the drop down list for Roomba 500 custom movement panel2

Don't forget to run the init script before first...

United Kingdom
#27  

Thanks for that Richard. I did have a quick glance at your sample project the other day. Ordering new EZ-B tomorrow so I will have a good play around with this set up when it arrives.:)

#28  

I have updated it just now.... have another look if you want....

United Kingdom
#29  

Thanks. I'll take a look now.

United Kingdom
#30  

Hey guys.

I need a little advice. I've just ordered a little 5v inferred remote relay to power On/Off the EZ-B but I'm wondering about powering the relay itself. Could I use the 5v regulator from the shop and use the Ground and Possitive pins from the Roomba 530's comm port to connect to the relays input?

Of would something like a Buck Converter like this be a better option?

Thanks.

#31  

The power pins available via the Roomba 7 pin mini din will only support a power drain of 250 ma. If that is exceeded then the internal poly-fuse will trip. The fuse will auto reset once the overload is removed. You might want to use another voltage source and a 5 volt regulator.

United Kingdom
#32  

@RobotDoc.

Damn, that's a shame. I suppose I can hook it up to the EZ-B's battery but I figured as the 530 is always on when charging, this would be ideal for the R/C relay and could be continually on as well. Oh well. Thanks for the heads up Doc.;)

#33  

I have some more advice for you. If you plan to use a factory cable, unscrew the two little screws and take it apart and check the wiring. I had a brand new factory cable and it came in very Shotty. It blew up my 530 and I had to get another motherboard because of it. If you inspect first, then you will be happier later on.

my 2 cents.

:-)

#34  

@ Steve G, for what it's worth I just ran jumper cables from roomba's power pin (actually I gave up on the PS2 connector and ran jumpers to all the pins) to a stepdown converter @ 8.5V. I run the old EZ 3 and wireless cam all through the Roomba's power to the stepdown. Works great. But do this at your own risk

United Kingdom
#35  

@MovieMaker.

Thanks for the heads up. I'm actually using a mini Din plug I had laying around and soldering my own wires. Thanks for the advice though.

@pacowang.

Thanks for sharing what you have done and the advice. Cool idea powering the EZ-B3 from the Roomba's power supply. I think I'll stick to an external LiPo to power my v4 though. I just liked the idea of convieniance to power a small remote off the 530 so I wouldn't have to add a manual power switch.

United Kingdom
#36  

@Richard and Doc.

I thought I would dive in and hook up my 530 to the EZ-B. I downloaded your project first (Richard), but after I hit "init", nothing worked. So I tried DJ's Roomba project and I got some temperamental movement. I got nothing at first then it burst in to life moving forwards, but wouldn't stop, turn, anything. After I picked it up it stopped and I tried again. This time I hit turn left which it did, but pressuring stop or anything else had no effect.

Any ideas what's up?

#38  

I am using UART port 1 which sends data (to the Roomba) on the EZB digital pin 5... I just tried it... it works no problem on my 530 and 650 Roombas...

United Kingdom
#39  

@Richard.

DOH, I had a Homer Simpson moment, sorry. I looked at the UART scripts to check what port you were using and saw it was port 1. So I connected it to D1, not UART 1 (D5/D6), took a time out and realised my mistake blush. It's all working now. Now what I need to do is figure out how to turn on the sensors, auto cleaning mode, and seek and dock.

#40  

@Steve... That's pretty easy... I don't have time today, but remind me tomorrow and I will shoot you those commands....

United Kingdom
#41  

Brilliant. Thanks Richard.:)

#42  

Oooops... had a bit of time... but you do realise you're interrupting beer time...:P

uartWrite(0,1,143) #seek dock uartWrite(0,1,135) #Clean uartWrite(0,1,136) #Max Clean uartWrite(0,1,134) #Spot uartWrite(0,1,133) #Power down the Roomba uartWrite(0,1,128,7) #reset roomba

United Kingdom
#43  

@Richard.

Your a beautiful man. Thanks very much for that. This is my first time playing with UART and, except for the first two values (board and port numbers), I'm really not sure what the other values mean or do. I'll figure it out one day I guess.

Now get back to that beer, and have one or two for me.;)

United Kingdom
#45  

Thanks for the codes link Richard. A couple of questions though (you knew they were coming)... Is there a command to turn the power on when the Roomba is off the dock for a while and auto shuts down? I'm havering to press the "Clean" button to wake it up at the mo.

Second, I have seen the command codes for the sensors but not sure what to use. I want to be able to turn of all the sensors (cliff, bump ect) when I'm manually controlling the Roomba, and later on adding it to an autonomous script. What I've tried so far hasn't had any effect (although I'm still tumbling around I'm the dark at the moment). From what I gather it needs to be in "Safe" of "Passive" mode to do this, as the manual controls are in "Full" mode.

#46  

Try this, but otherwise I am not sure.... make sure you init the uart port first.... uartWrite(0,1,128) #this is the initial command needed before sending any other

Safe mode will allow the Roomba to control it's own sensors I believe...

#47  

Below is code to manually check the Roomba's bump and ir sensors...


  REPEATUNTIL(1=2)
    uartWrite(0,1,142,45) # Read Roomba IR sensors single byte
    sleep(10)
    
    uartWrite(0,1,142,7) # Roomba Bump and wheel drop sensor single byte
    sleep(10)
    
    uartWrite(0,1,142,58) # Stasis (Rommba moving forward) single byte
    sleep(10)
    
    $x = UartAvailable(0, 1)
    IF ($x>2)
      
      # print("Bytes in buffer: " + $x) checks how many bytes are in the buffer
      
      $RX_DATA = UARTRead(0, 1, $x) #places all the bytes RX into $RX_DATA
      # read 3 data bytes
      $RX_0=GetByteAt($RX_DATA,0)
      $RX_1=GetByteAt($RX_DATA,1)
      $RX_2=GetByteAt($RX_DATA,2)
    ENDIF 
    IF ($RX_0!=0 or $RX_1!=0)
      uartWrite(0,1,137,0,0,0,0) #stop roomba
    ENDIF 
      
      
    print($RX_0+" IR light object detected") various values depending on which IR was triggered
    print($RX_1+" bump detected") 0, 1, 2, 3 depending on where the Roomba bumped
    print($RX_2+" whether or not Roomba Is moving forward") 0 - 1
    
    sleep(250)
  ENDREPEATUNTIL 

United Kingdom
#48  

@Richard.

Thanks bud. I'll give that a try in a bit when I've charged the battery.

#49  

For two byte data this works for Roomba's voltage check


REPEATUNTIL(IsConnected(0)=0)

  uartinit(0, 1, 115200) #have to have this to clear the buffer
  sleep(1000)
  $RX_DATA=0
  uartWrite(0,1,142,22) # Volatge check
  sleep(50)
  $rx = UartAvailable(0, 1)
  
  
  IF ($rx=2)
    $RX_DATA = UARTRead(0, 1, $rx)
    $MSB=GetByteAt($RX_DATA,0)
    $LSB=GetByteAt($RX_DATA,1)
    $voltage=($LSB+(256*$MSB))/1000
 
    
    print($voltage)
  ENDIF 

  IF ($voltage<13.9)
    uartWrite(0,1,143) #seek dock
    print("Low battery, attempting to dock")
    halt()
  ENDIF 
    sleep(9000)  #check every 9 seconds
ENDREPEATUNTIL


United Kingdom
#50  

@Richard.

That last script, is that to be used with the TX D5 pin or how I have it connected now with the RX D6 pin?

EDIT: Scrap that. I just re-read the code and see it's for RX.

United Kingdom
#51  

Hey Richard. I just tried the sensor script but said there was an error on line 22 with variable not defined...

User-inserted image

Also had an issue with the volt check saying syntax error unknown command volt_check=1...

User-inserted image

#53  

Make sure you have receive wire to pin 6 of the ezb.... Also make sure you use the init script first

You will need 3 wires... ground Rx from Roomba... Pin 6 on ezb Tx to Roomba ... Pin 5 on the ezb

United Kingdom
#54  

Sorry mate, still not happening. I've been using the init script and have the RX and TX connected now, but on both the volt check script and sensor script, I'm getting "variable not defined: $RX_0". The power on script didn't work, but thinking about it the Roomba would need to be on in the first place to receive a command (kinda like pressing the On button on your TV remote with the TV unplugged).

#55  

@Steve...that's weird because it works on my Create 2. However the Create 2 is a Roomba 650 not a 530. I do have a Roomba 530 and will check it out tomorrow...in the meantime check your receive wire and make sure it's soldered to the correct pin on the mini din connector... I don't think you're getting data back from the Roomba....msg you tomorrow when I check my 530...

#56  

You can strap pin 6(gnd) and pin 5(DD) of the 7 pin mini din together and that will wake up the Roomba.

United Kingdom
#58  

@Richard.

Thanks buddy. I'm actually using jumper cables instead of a mini din and the connection is good. Speak to you tomorrow.:)

@Doc.

Sorry my friend. I have to admit you lost me there a bit. Could you elaborate a little. Are you talking about a "Y" cable (pin5 and pin 6 to where?) or jumper cable from pin 6 in to pin 5, and what script would I need to use for an "On" button? confused

#59  

I'm discussing the electrical connection of your comm cable that you wire from the UART to the Roomba. There are two pins used for providing ground (6 and 7) pin 5 which is next to pin 6 can be strapped together and then the same ground lead is sent to the EZB controller via your com cable.

User-inserted image

United Kingdom
#60  

@Doc.

Right, just to confirm, it's a "Y" cable I need. Join pin 6 and pin 5 together, and than connect both to the UART ground pin on the EZ-B. Gotcha. Thanks:)

United Kingdom
#61  

Thanks for that Doc. Got it working now. When I hit the Off button on my mobile control, it will automatically turn back in again in a time frame anywhere from15 seconds to just over a minute. Just curious though, is there a way to script a button to do this to maybe speed up the process? Not to bothered if there isn't, just wondering.

#62  

I'm not aware of any way to accomplish that action unless you want to add a relay to short pins 5 and 6 together when the relay is operated.

United Kingdom
#63  

@Doc.

Cool, no worries on that front. I don't think I'll go the relay route as I'm happy with the auto switch on. Again many thanks for that. It's a useful little hack. Just want to sort out switching on the sensors while under manual control and I'm all set.

One final question you may be able to help with. I've looked through the manual but couldn't find anything that could help. Is there a low battery warning command that can be used? I'm thinking that if there was, while the Roomba's under manual control and the batteries voltage drops to a point where it needs charging, I could insert a script to where it would take over, say (using a sayEZB script) "I need to recharge my battery", seek the docking station, and recharge.

Is that possible?

#64  

@Steve... See post 50... this script does work (LOL) it monitors battery voltage and when it drops below a certain voltage (in this case 13.9v) it instructs the Roomba to seek the docking station...

United Kingdom
#65  

@Richard.

Oops, I missed that. To busy mucking about with the sensor script. I'll give it another try tomorrow. Cheers.

United Kingdom
#66  

@Richard.

Couldn't wait so just tested it again. Turns out it was a dodgy jumper wire causing the error (and my headache). I replaced it and it works great now, so thanks so much for that. On thing, the cliff sensor and wall sensor (slows down as it aproaches a wall and does a gentle bump) doesn't activate when the sensor script is running. Are they not part of the IR sensor array or do they come under something else?

#67  

Although they are classified as IR sensors, they are not cliff sensors but are called "Light touch" sensors and are not controlled by any of the Open Interface commands other than to ignore all sensor input. They are located behind the opaque plastic windows wrapped around the front bumper.

United Kingdom
#68  

@Doc.

Okay thanks for confirming about the light touch sensor. I was referring to both that and the cliff sensor located underneath the Roomba as well. Can the cliff sensor be controlled by the open interface commands?

#69  

Similar to the Light touch sensor array, the sensors are either allowed or ignored.

United Kingdom
#70  

Thanks doc. I gather from what you're saying is that no, they can't be used with IO? That's a real shame as the cliff sensors were one of the sensors I was hoping I could use. Funny, looking at the OI manual again I would have said it could be utilised with manual control, the same as the wall sensor can in the script Richard posted. But the couple of scripts I tried and failed with, and yourself saying they are the same as the light touch sensors and can't be used certianly say otherwise. Oh well, thanks for your help once again Doc. Much appreciated.

So what IR sensors is uartwrite(0,1,142,45) reading then if not the light touch and cliff sensors?

#71  

@Steve, packet 45 is the roomba's light touch sensor... it will return a single byte value indicating where the Roomba sees an object in front of it...

If you give me an hour (just woke up lol) I'll check out my scripts on my 530....

United Kingdom
#72  

Great. Thanks Richard. Go have your coffee.;)

#73  

@Steve... just tested my script below and it works fine on my Roomba 530


REPEATUNTIL(1=2)
    uartWrite(0,1,142,45) # Read Roomba IR sensors single byte
    sleep(10)
    
    uartWrite(0,1,142,7) # Roomba Bump and wheel drop sensor single byte
    sleep(10)
    
    uartWrite(0,1,142,58) # Stasis (Rommba moving forward) single byte
    sleep(10)
    
    $x = UartAvailable(0, 1)
    IF ($x>2)
      
      # print("Bytes in buffer: " + $x) checks how many bytes are in the buffer
      
      $RX_DATA = UARTRead(0, 1, $x) #places all the bytes RX into $RX_DATA
      # read 3 data bytes
      $RX_0=GetByteAt($RX_DATA,0)
      $RX_1=GetByteAt($RX_DATA,1)
      $RX_2=GetByteAt($RX_DATA,2)
    ENDIF 
    IF ($RX_0!=0 or $RX_1!=0)
      uartWrite(0,1,137,0,0,0,0) #stop Roomba
     # or whatever you want the Roomba to do when seeing or bumping an object
    ENDIF 
      
      
    print($RX_0+" IR light object detected")
    print($RX_1+" bump detected")
    print($RX_2+" Is moving forward")
    
    sleep(250)
  ENDREPEATUNTIL

and this works as well


REPEATUNTIL(IsConnected(0)=0)

  uartinit(0, 1, 115200) #have to have this to clear the buffer
  sleep(1000)
  $RX_DATA=0
  uartWrite(0,1,142,22) # Volatge check
  sleep(50)
  $rx = UartAvailable(0, 1)
  
  
  IF ($rx=2)
    $RX_DATA = UARTRead(0, 1, $rx)
    $MSB=GetByteAt($RX_DATA,0)
    $LSB=GetByteAt($RX_DATA,1)
    $voltage=($LSB+(256*$MSB))/1000
    # $voltage=$LSB+(256*$MSB)
    
    print($voltage)
  ENDIF 

  IF ($voltage<13.9)
    uartWrite(0,1,143)
    print("Low battery, attempting to dock")
    halt()
  ENDIF 
    sleep(9000)  
ENDREPEATUNTIL

#74  

@Steve Are you in passive, safe or full mode? I am using full mode with the above code, maybe that makes a difference...

uartWrite(0, 1,128,132) # Places Roomba in full mode

United Kingdom
#75  

@Richard.

When I tried it yesterday it was in full mode. When it hit the wall the motors stopped fine but it did hit the wall with a bit of a thud, where as on a normal cleaning cycle it would detect the same wall and slow down bumping it softly.

Same thing with the cliff sensors. It was in full mode and ran the sensor script, put it on a work bench but didn't detect when it fell off (I was waiting to catch it) and the motors were still running so had to hit the stop button on the movement control. That's why I thought the running IR sensor script included the cliff sensor too. The battery check script is golden and works well.

I'll give the revised script a try and report back.

Cheers.

#76  

You could try it in safe mode if you want, but I think the Roomba will take over control of the sensors as opposed to my scripts....... So my script basically only reads the bump, stasis and light IR bump sensors. That's kind of it... It would be up to the user to do whatever with the data received back.... For instance if bump sensor returns a 3 it means the Roomba hit something in the middle of the physical bumper.... In full mode you would have complete control. It would be up to your programming to read the sensors and keep it from getting stuck, banging into things hard and or falling down the stairs...

Place your Roomba on the table (it shouldn't move because my script doesn't have a drive command in it) or somewhere you can read your pc and press the roombas physical bumpers and or hold objects in front of the light bumpers at the same time. Run the script in post #75... Now use your hand and press the roomba's bumpers... you should see numbers from 0 - 3 in the print window depending on where you press on the bumper...

United Kingdom
#77  

@Richard.

Thanks again buddy. I'll give that a try later on today. Just went to try it but the thing wouldn't move and the red light came on. Turned out that even though it was on the dock all night, it didn't charge. Got a quick pulsing orange now so it's going to be a few hours before I can try it.

Thanks again for your help (and your patience). It's really appreciated.:)

#78  

No worries Steve, keep us posted... We'll get this working for you... Quick pulsing charge light indicates your Roomba is attempting to recondition your battery... Could take up to 16 hours to complete...

United Kingdom
#79  

Quote:

Safe Mode When you send a Safe command to the OI, Roomba enters into Safe mode. Safe mode gives you full control of Roomba, with the exception of the following safety-related conditions: Detection of a cliff while moving forward (or moving backward with a small turning radius, less than one robot radius). Detection of a wheel drop (on any wheel). Charger plugged in and powered. Should one of the above safety-related conditions occur while the OI is in Safe mode, Roomba stops all motors and reverts to the Passive mode. If no commands are sent to the OI when in Safe mode, Roomba waits with all motors and LEDs off and does not respond to button presses or other sensor input. Note that charging terminates when you enter Safe Mode.

So please correct me if I'm wrong, but if I have the Roomba in "Safe mode" I have full manual control of the motors, but cannot manually control the sensors which I take to mean that all the sensors, bump, light touch, cliff ect will all be on, and when it detects when it's going to hit a wall or fall down the stairs the sensors take over and over rides manual control. So what I need to do is write a "Safe mode" init script to run the Roomba via a Movement Panel ect with all the sensors automatically set to "On". Is that right?

#80  

In safe mode, the Roomba won't hurt itself and will navigate around safely like it usually does... I think you can still read the sensors via scripts in safe mode... However, say you want the Roomba to back up if it hits something in the centre bumper, but the Roomba's safe mode programming wants it to turn left... There would be a conflict and whoever issues the last command (you or the Roombas OI) would win control and override the previous "do this" command....

In full mode (which I usually use)... You have to do all the thinking for the Roomba... If it senses a cliff and you don't tell it to stop, backup or turn, well the poor little guy is going to commit suicide by attempting to drive down the stairs...:D

#81  

Maybe the best way to approach this is to switch modes on the fly... when you want full control issue a full ControlCommand() to take over... When want the Roomba to wander around by itself, just switch back to safe mode....

United Kingdom
#82  

Thats what I was thinking. Having separate "Full" and "Safe" init scripts to change when needed (don't think I will need a "Passive" init). I don't have a problem using full mode when myself or a script is controlling it, but later down the line I want to make it as autonomous as possible, so thinking safe mode would be the better option for this. I'll have to do some trial and error before attaching body parts to it.

Yeah, when it docked last night I think I did it manually so it was still in full mode, hence why it didn't charge. eyeroll Lesson learned.

#83  

@Steve... Yeah, that may be why the Roomba is reconditioning charging as possibly the battery got too depleted over night while failing to charge...

If you keep reading the IO PDF I uploaded it will do two things... 1) Put you to sleep really fast LOL and 2) Get you the most out of programming and controlling the Roomba...

United Kingdom
#84  

@Richard.

Yes, between the Zzzzz's sleep, I keep going back to it and having a good read. A lot to take in for a novice like myself lol, but I'm starting to make some sense of it and it is a good read. So if I have this right, taking this for example...

uartwrite(0,1,142,45)

Which is...

uartwrite(Board, Port, data, data)

So writing something like this...

Serial sequence: [145] [Right velocity high byte] [Right velocity low byte] [Left velocity high byte] [Left velocity low byte]

Would be written in script something like this...

uartwrite(Board, Port, data, data, data, data, data)

Is that correct?

#85  

Yep you got it right... uartwrite(0,1,142,45) ...so uartwrite(board, port, request for a data packet, data packet requested)

If you open my custom Movement Panel for roomba driving you can just use all those commands in a script for forward, reverse, left, right and stop... That way you don't have to mess with the velocity high and low byte stuff...

#86  

With the forward command you can adjust speed via a variable if you want..

uartWrite(0,1,137,0,$speed,0,0) #forward movement where $speed is (I think) any number between 1 to 255... 100 seems to be a nice slow speed for most situations....

United Kingdom
#87  

That's cool thanks for confirming Richard. What I wrote above was just an example to help get my head around it, which its starting to. I already used your Movement Panel scripts in a mobile interface control, so it's all good. Still can't play with my poor lil Roomba. Orange LED is still pulsing so deffo going to need that 16 hour charge, but it gave me a chance to get my hands dirty and almost finish of the build part of my new bot.:)

United Kingdom
#89  

@Richard.

All being well, Vic (yes he has a name now, explanation to follow) should be ready to showcase in a week or two. Just waiting for some regulators to turn up (not the magnificent seven kind) so I can get this puppy wired up. This should be right up your alley as it a fabricated bot using odds and ends I had laying around... Oh, and a Roomba of course lol.:D

United Kingdom
#90  

Okay, so a bit of an update.

I wrote a init script for "Safe Mode" and took the Roomba for a little drive to see if the sensors took over when it hit, or was going to hit a wall. It didn't. In my eyes, it was no different to "Full mode". I had control of it, but driving it off a work bench or bumping it in to walls didn't activate any of the safety features which according to the PDF doc, it was supposed to.

Next I tried to script the "Cliff sensors" with pretty good results. here's the code...

REPEATUNTIL(1=2)
uartWrite(0,1,142,9) # cliff left
sleep(5)
    
uartWrite(0,1,142,10) # cliff front left
sleep(5)
    
uartWrite(0,1,142,11) # cliff front right
sleep(5)

uartWrite(0,1,142,12) # cliff front right
sleep(5)

uartWrite(0,1,142,58) # Motor Stasis
sleep(5)
    
$x = UartAvailable(0, 1)
IF ($x>5)
      
# print("Bytes in buffer: " + $x) checks how many bytes are in the buffer
      
$RX_DATA = UARTRead(0, 1, $x) #places all the bytes RX into $RX_DATA

$RX_0=GetByteAt($RX_DATA,0)
$RX_1=GetByteAt($RX_DATA,1)
$RX_2=GetByteAt($RX_DATA,2)
$RX_3=GetByteAt($RX_DATA,3)
$RX_4=GetByteAt($RX_DATA,4)
ENDIF 
IF ($RX_0!=0 or $RX_1!=0)
uartWrite(0,1,137,255,100,128,0)
sleep(2000)
uartWrite(0,1,137,0,0,0,0) #stop Roomba
     
ENDIF 
      
      
print($RX_0+" cliff left")
print($RX_1+" cliff f left")
print($RX_2+" cliff f right")
print($RX_3+" cliff right")
print($RX_4+" stasis")
    
sleep(100)
ENDREPEATUNTIL

It works fairly well, but I'm not sure I 100% trust it though. Most of the time it will stop and reverse back before it reaches the edge, but a few occasions the caster went over the edge but rescued itself before I intervened. I do have a slight issue with it though... When it stops and reverses back for 2 seconds, it wants to reverse again. Have I missed something in the script?

After that, I had a play around getting the "Light touch" sensors working. I managed to put a script together that when it detects a wall, the speed reduces to a very slow crawl which works, but I have a few issues with it...

  1. It detects walls and objects that are not even close to the Roomba which triggers the crawl speed). Is there a way to reduce the detection distance the Roomba receives, much like you can with a ping sensor?

  2. When I start the script, 50% of the time the Roomba will take off on it's own without me pressing a forwards control. I guess its because of what I mentioned above in point 1, but don't know how to write a script to get around it.

  3. Now this is probably due to my scripting skills (lol, or lack of), but I wrote it so when it detects a wall it will slow down, then when it hits the wall, the "Bump and wheel drop" sensors trigger the bumper sensors and stops the Roomba in it's tracks... but it doesn't and the motors continue to turn until I kill the script and press a STOP control. here's the script...

REPEATUNTIL(1=2)
uartWrite(0,1,142,45,46,47,48,49,50,51,) # soft bump sensors
sleep(10)

uartWrite(0,1,142,7) # Bump detection
sleep(10)
    
uartWrite(0,1,142,58) # Motor Stasis when going forwards
sleep(10)


$x = UartAvailable(0, 1)
IF ($x>3)
      
# print("Bytes in buffer: " + $x) checks how many bytes are in the buffer
      
$RX_DATA = UARTRead(0, 1, $x) #places all the bytes RX into $RX_DATA
      
$RX_0=GetByteAt($RX_DATA,0)
$RX_1=GetByteAt($RX_DATA,1)
$RX_2=GetByteAt($RX_DATA,2)

     
ENDIF 
IF ($RX_0!=0 or $RX_1!=0)
uartWrite(0,1,137,0,100,128,0) #forward very slow

ELSEIF ($RX_0!=0 or $RX_1!=0)
Uartwrite(0,1,137,0,0,0,0) # Stops forward movement

ENDIF 
      
      
print($RX_0+" Wall detected") various values depending on which IR was triggered
print($RX_1+" wheels stopped") 0, 1, 2, 3 depending on where the Roomba bumped
    
sleep(250)
ENDREPEATUNTIL

I'm a lot closer to where I want to be with this, but obviously still got some bugs to iron out, so I'd appreciate if you could tell me where I went wrong with my scripts.

Thanks. :)

#91  

@Steve... This won't work... uartWrite(0,1,142,45,46,47,48,49,50,51,) # soft bump sensors You can only make only one call at a time for a sensor... Single byte returns like bump sensors are pretty simple but you can only ask for the data one packet at a time... uartWrite(0,1,142,45) #one sensor packet call at a time (single byte)

Some are 2 byte returns so see my voltage script to see how to read 2 byte returns....

To be honest, what I have given you is all I have looked into with the Roomba.... I would have to spend more time to see what else I can do... But this is it for now

United Kingdom
#92  

@Richard.

Okay buddy. No problem, thanks good to know. Thanks anyway. What if I broke it down to separate uartWrite commands like I did with the cliff sensors script. Would that make a difference, or would that still read as multiple bytes?

#93  

You can break them down into multiple writes... each write has to have a corresponding read from the buffer... If you have 3 writes to various sensors you would get 3 bytes in the buffer so 3 reads... 4 writes and then 4 reads from the buffer etc... This is only if you are reading sensors that return only 1 byte... As mentioned 2 byte reads are more complicated... So far the only 2 byte read that I have working is the voltage check...

United Kingdom
#94  

Right gotcha. I'll have a look and your voltage check script and see if I can adapt it to the light touch sensors. Thanks again.:)