
Asked
— Edited
Hi! This is my first post here!
I have built a robot before using the arduino, but now really want to make something useful. As you can see in the video, my last robot didn't really do much, it was just REALLY big!
So I am going to try an make a DSLR 360 robotic panorama head, controlled by a smartphone.
The robotics part, I am pretty sure is more than possible with ezrobots hardware / software. But would it be possible to trigger a Nikon d750 with the EZ-B v4/2?
EDIT: The final thing is pretty much done! See the videos of it working below.
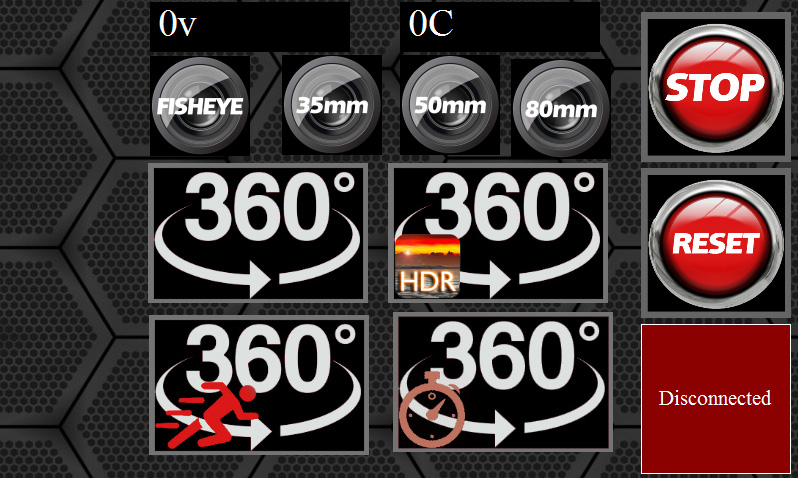
And here is the mobile phone app interface.

Thanks. I think it is a bit overengineered for what it actually does. The tripod head is crap though. You spotted it in one.. So wobbly. This tripod cost $20 haha! A quality tripod might be a good idea yes! For now, I have printed a much more solid mounting system to replace the cheap and flimsy device that came with the tripod (That is in contact with the entire surface of the mounting plate on the robot) but didn't have time to attach it yet. Will give it a try later and post the results
 You're dead right about the software expecting the same degrees of movement. The servos are ok. It all depends on how they hold up under the weight of a dslr.
The next step, if they start juddering under the strain, will be to replace them with steppers.. Hope I don't need to go down that route though..
You're dead right about the software expecting the same degrees of movement. The servos are ok. It all depends on how they hold up under the weight of a dslr.
The next step, if they start juddering under the strain, will be to replace them with steppers.. Hope I don't need to go down that route though..
Hey, looks like I will be needing some technical advice.
I am going to need two relays to trigger the focus and shutter control.
Incoming newb questions!
What kind of relays would you recommend?
Where do I plug them into the main board?
What kind of code would I use to trigger them?
Many thanks in advance to anyone willing to help!
:D
We used some solidstate relays for the Bimbo The Clown hack. Maybe @Jeremie will chime in on the pcb we used for that.
Thanks. I hope someone knows! It Should be as simple as using a high and low command if it is the same as the arduino. Do d0 to d23 output the same voltage as the power supply?
I believe I just need to use a NO (Normally Open) relay.
To make the connections for focus and shutter I will use two relays.
So d0 to d23 have the ability to send a pulse right? Do they work with commands like "High" and "Low"?
If so, all I need to do is set it to High, with a sleep for timing, and then back to low. Not sure what the code would be exactly, but along the lines of
#focus for 3 seconds Set(D0,on) Sleep(3000) Set(D0,off)
#Shutter 1 second Set(D1,on) Sleep(1000) Set(D1,off)
Here is what I need to control with the relay..
So I was thinking of using an optoiso. After trawling the web, I found a few people favoured them with things like the arduino, because they are very simple to use, and small.
No emf feedback either. I was thinking a 4N35 or similar..
Anyone have any experience with these?
Got my cable to go to my DSLR through the post for the camera focus / trigger.
I saw some people are using a opto isolator in conjunction with a relay - to make sure that there is no EM feedback from the relay. Does anyone know if a solid state relay can damage the pin / board if used directly? Or is that a mechanical relay only?
Used a couple of 4n35's last night. Made the circuit on the breadboard and successfully have the Nikon focusing and taking a picture.
Luck wasn't my friend yesterday. The cable I ordered for the Nikon shutter release didn't work. So drove to the centre of Seoul the get a new one.
Anyway, the road was hell because of the millions of protesters outside the bluehouse! Loooong journey for a cable!
Will solder this morning. Love the smell of flux in the morning!
One observation. The 4n35 works with the ez @ 7.2v. But 6 isn't enough. Using the signal wire with the set(d1,on) commands.
Camera trigger PCB all soldered and working.
I added an extra cable and plug to the camera trigger I got for the Nikon in Seoul yesterday. Now if I want, I can unplug it and still use the trigger button on its own.. I hate waste!
Now to put it all together with the panorama robot. Just got a couple of minor things to print first. Should have it ready to test by the end of the day!