
JonPointer
USA
Asked
— Edited
Changing Battery On Jd
I bought an extra battery with my JD robot, but I can't find anywhere how I open up his body to switch the battery. I wanted to be able to run one down and then switch in the other one. Thanks! Jon

here is the tutorial of the batt.jd is not made to rapidly changing the batterie.
tutorial
Thanks, that link takes me to the battery care and charging lesson which I have read. However, all I find is a link to buy extra batteries, but I don't see anywhere where it tells me how to change the battery. And my missing something? Thanks!
indeed something for dj to ad to his list to do. i dont see any tutorial how to change the batt.
maybe this pic can help.
There is no easy way to changeout the battery. When Anthony posted he was going to make parts for the EZ Robots I suggested some modifications to the body that would help a lot if he could do them. Never got a response. Anyway, one of those suggestions was to lengthen the body a half inch or so to allow a way for easier battery replacement. A space at the bottom with perhaps a door on it so as to be able easily get at the battery. The extra room would allow for a plug to disconnect the power leads from the battery easily as well. I would love someone with a good printer to do this re-design and make some for sale. If it doesn't happen soon I may just cut up the extra body I have now and attach it to JD to make it happen in some way at least.
At one time I thought I would just join two bodies together and go from there. All sorts of possibilities from that. Another battery, another EZB4. Use the extra shoulder servos as joints for legs. But I found that was way too heavy and impractical. Still, a joining of just part of another body might work out.
Anthony has proposed a backpack for JD to neaten the wiring and allow additional space. Battery space may be included. I believe once his shop move is complete he may have time to develop it further. See one of his latest post.
Ron
@JonPointer.
Nomad has a point about there being no tutorial for this. So here's a quick step by step on removing JD's battery I've put together for you.
1.) Turn off the power switch, then remove the EZ-B from the body section.
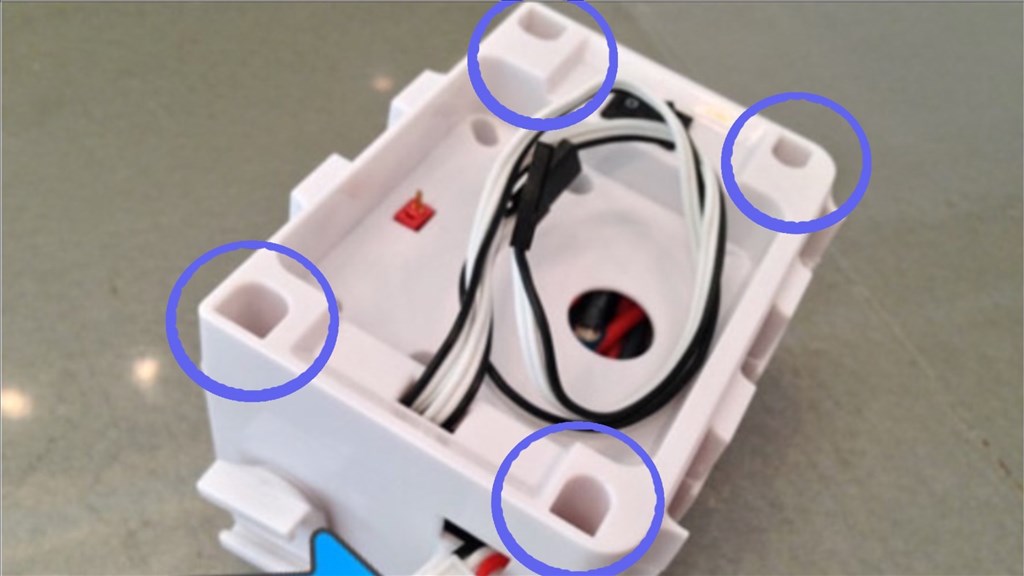
2.) With a Phillips screwdriver, remove the 4 screws located on the four corners of the body section (pictured below).
3.) Disconect the battery leads plug and remove the battery (seen below).
4.) Replace the spare battery putting the charging leads through the cut out on the side of the body section, reconnect the battery lead plug, and place this battery plug in between the servos and battery (as seen in photo below).
5.) Replace the body section cover and attach using the 4 screws.
6.) Connect the EZ-B back to the body section.
Hope that helps.
For anyone who wanted to redesign and 3D print a new body shell, maybe do it in such a way where you could have a separate compartment or tray within the shell, with a separate battery cover held on by a clip or single screw to make the battery removal process a little easier.
Just a thought.
Many thanks everyone - and thanks for the detailed instructions Steve G.! I should be set!
No problem. Good to hear.