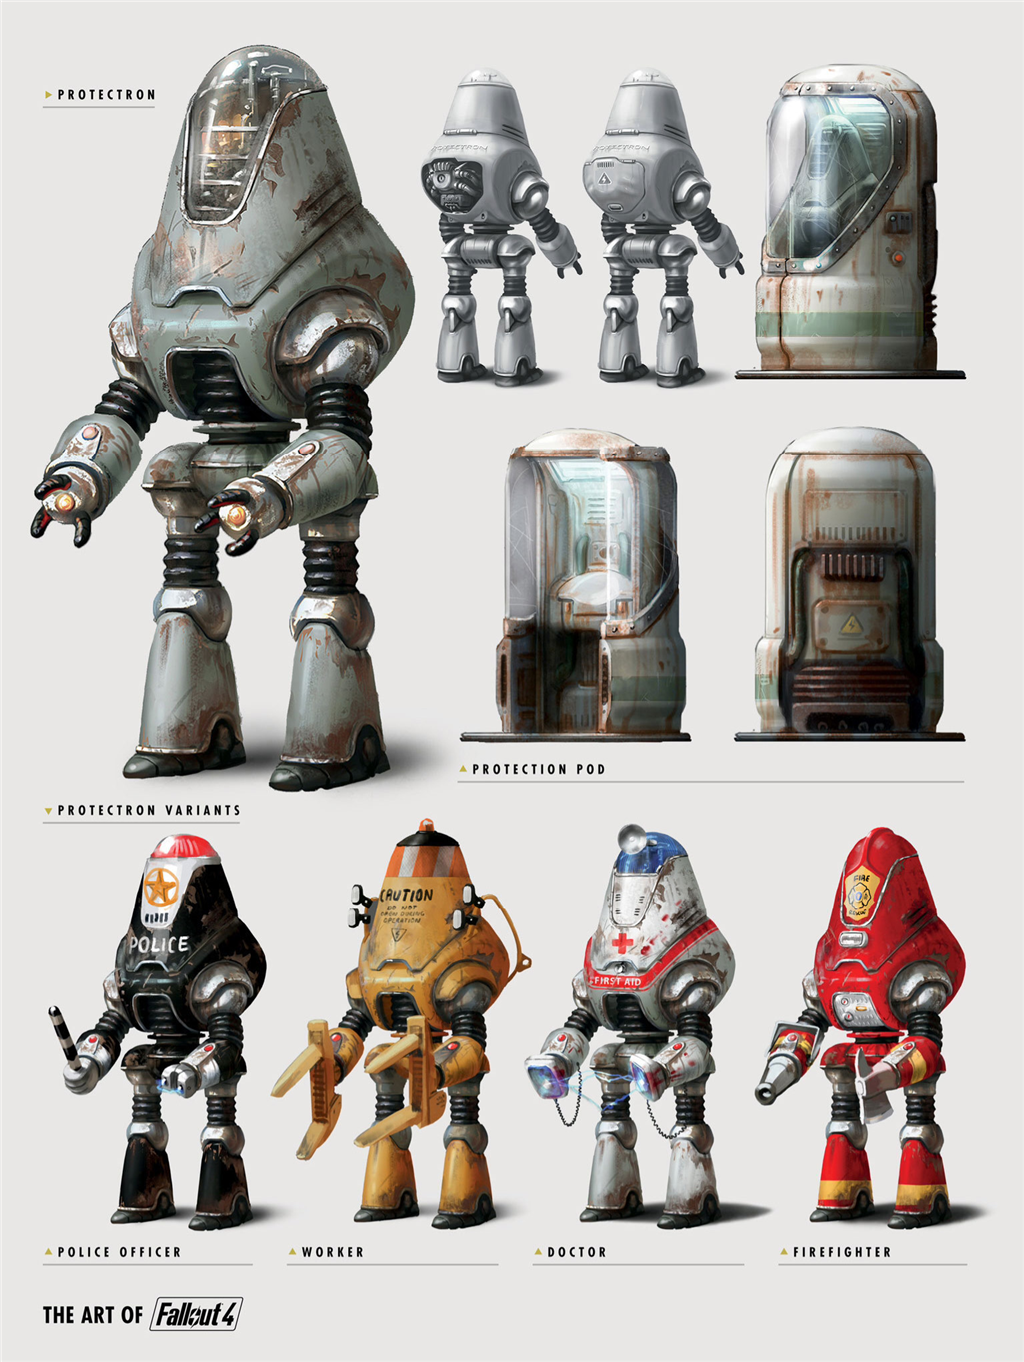
Asked — Edited

3D Print Request

So I am wanting to have someone 3d print a head cover for my Robosapian Blue. I am wanting the Protectotron head from Fallout 4 as a replacement head to fit on top of the robosapians current one. I will list images below of what the current head looks like and the goal is. I'd like it printed in black to match my bots color and possibly open slits near where the eye leds are so let the light effect show out the new head. a split would be acceptable so I can just click the two pieces together over the current head or just a large hood still to just put it over the head like a large hat works as well. just let me know if anyone is interested in helping me out and I can send dimensions or any other details needed, more than willing to Paypal for this request. thanks

link for robot toy model, could use this file and slightly modify to have slits and be larger. https://www.myminifactory.com/de/object/fallout-4-protectron-action-figure-15585

reference images below:

User-inserted image

User-inserted image

User-inserted image


ARC Pro

Upgrade to ARC Pro

Stay on the cutting edge of robotics with ARC Pro, guaranteeing that your robot is always ahead of the game.

#1  

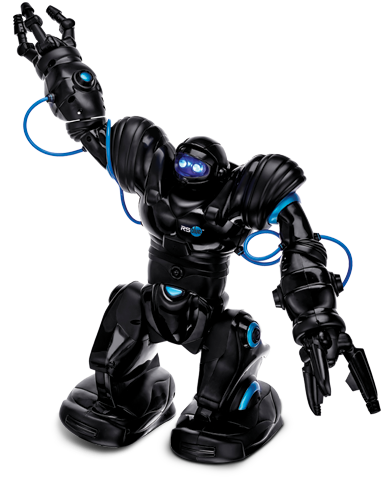
I have a RoboSapien and this looks interesting. I'll take a look.

#2  

That would be great, thanks let me know if its something you could do and cost. :)

#4  

I have a Robosapien as well; I'd be interested in a print (depending on cost).

Has anyone noticed the strong resemblance to Robby the Robot?

#5  

Those Robosapien's would be great for a body upgrade, can see the possibilities with it. :)

#6  

From what I can see it's going to take a lot of re-working. I have not had a lot of time to work on it either. But I haven't given up.

I did have a question, was the RoboSapien visor going to stay on or come off? I feel like it would need to come off.

#7  

Visor can come if it makes it easier. Thank you for working on this and it looks like others may want one too :)

  • also, Robby the robot is my favorite bot ever. My goal w EZB from day one was to recreate one and the robosapien looks close enough body wise and with this head and a few pieces on the back to incase the controller it will be perfect.
PRO
Synthiam
#8  

It might be easier if you made a template model first. Consider visiting the hobby store and picking up a small square piece of foam. You can get white dense foam that can be shaped with a sharp knife/blade. If you need to cut it into two pieces (front and back), they can be re-attached with white glue.

This is from walmart, and there are many others on there: https://www.walmart.com/ip/Make-It-Fun-Floracraft-Styrofoam-Block-3-x-3-x-3/36741929?wmlspartner=wlpa&adid=22222222227024545630&wl0=&wl1=s&wl2=c&wl3=40948516952&wl4=pla-78889953032&wl5=9032188&wl6=&wl7=&wl8=&wl9=pla&wl10=8175035&wl11=online&wl12=36741929&wl13=&veh=sem

User-inserted image

#9  

How goes the project, any luck?

#10  

Would look great if you made the visor open and close. ;)

#11  

Have you had any luck with this project? Let me know if it is still in the works :)

#12  

Time is my biggest issue in helping you with this. I really don't have much time to work on it currently. Another potential issue is the helmet does not lend itself to contour of the Robosapien shoulders and upper body. It can be trimmed up to fit some what but my concern is how good is it going to look?

What do you think about DJ's suggestion for making a helmet?

#13  

I understand, I'm in no rush. Even something lose to fit over like a hood works for me. I will be painting and detailing it as a whole after so doesn't need to be perfectly fitting. I don't plan on having it move so if it was flush with the slops in the sholders and where the chest begins to flatten out that would work for me. The image below is the space im thinking so doesn't need to be snug on the helmet just fit in the space the paper is covering. I plan on glueing it down if that makes it easier. Thanks for the update User-inserted image

#15  

User-inserted image

I got the model as close as I can for now. I'm going to try to print it next week scaled to fit the toy mini Robosapiens for test fitting and to save time.

.....it's like a box a chocolates....You never know what you're gonna get! ;)

#16  

Looks great can't wait to see the test print

#17  

As we can see, it not a good fit because the contours of the Fallout Robot head do not match up to the RoboSapien (keep in mind this is smaller scale, this is the Mini RoboSapien and the head scaled to match currently).
User-inserted image

I need to grind down center notches to see if it will fit down over the shoulders. I knew this would need to be accounted for in the end design, but I wanted to print the helmet as close to the way you found it so that others can see the process here, because it is not a straight line to take a 3d model or .stl file and turn it a robot part, there are a lot of steps and a lot of man hours and a lot of learning by trial and error.

Part of your question with this thread (which is a very good question) was how much would it cost to make this part. I think when you don't have the exposure to see what working with 3D editing software is like or how to make an .stl or how to edit one and when you don't have exposure of owning a 3D printer and the maintenance that goes along with it and the experience of seeing your 10hr print job on occasion go all haywire in the last 30 minutes or needing to print several test pieces in order to properly take your 3D design from the computer into the real world, etc.

Without that exposure to the total process it can seem pain free and likely inexpensive with the cost of a couple dollars for the plastic PLA or ABS, when that is not the case.

@atomsk not to worry, your actual end cost from me will only be a few dollars for the final print cost and shipping.

Here is a picture of the head sitting on top, I think it will look cool once it is notched out to fit correctly. User-inserted image

#18  

Looks amazing. I can always work out the roughness and I have thermoplastic to fill in the gaps so no need to be perfect but looks great. Let me know contact info and we can work out the PayPal stuff when its ready.

#19  

Thats going to look great, time to get the dremel out. ;)

#20  

@justinratliff - I'll buy a print as well. Let me know if you need my email so we can work out payment.

#21  

Here are pictures of the mini head after I dremeled it down to fit on the shoulders. I think you guys are right, I think it would be best to print it as is and let each person decide how they want to fit the head.

User-inserted image

User-inserted image

Next step is to print a full size head and make sure it sizes correctly.

Anyone interested can find my email in my profile here and contact me directly about getting one. I won't have a final price until I print the full size head though and let me know if you want the mini, the full size or both.

#23  

I finished the full scale head. I had took measurements and did a test print at 0% infill - this left my test print very weak but I suspected I would have an issue with scaling it up, which I did because the full size RoboSapian is much bigger which makes this head much bigger.

*The head is not dremeled to fit on the shoulders.
User-inserted image

-From the original .stl file to the final one it took me 27 edits through TinkerCad and Simplyfy3D.

-I printed a good quality mini head for the mini RoboSapien for myself as a proof of concept/test print.

-I printed a low quality test print of the full size head and found my scaling was off.

-I printed good quality head for Mike ready to ship for the cost of the material and shipping.

Man Hours I estimate about 12 hours Print Hours I estimate around 33 hours

I'm not seeking to charge for my time because I did this to help a community member and take on new 3D print challenge.

I mention it so we can point back to this thread when talking about custom print requests so that the time and effort that goes into modifying, editing, the trial and error, adjustments, measuring, cleaning, prepping, printing, etc can be illustrated when the topic comes up.

For me, having an .stl or file to start with was a good thing, without it I could not have designed it from scratch at this time. But this shows it is not an easy couple of minute process and it would not be for anyone.

To future custom part requestors my advice is: 1.) Ask and share your ideas, because you never know and you can't get help or advice unless you ask 2.) Be ready to take the plunge and help design or modify the part yourself in something free like TinkerCad (anyone can learn it, I believe that) 3.) Be prepared to pay a bit more than material and shipping 4.) Keep shopping for a 3D printer, you'll be glad you did!

#24  

Looks great, shaped and painted, just some thermoplastic to fill in the gaps. Great work! User-inserted image

User-inserted image

User-inserted image

#25  

WOW! The black and blue look fantastic! :) It's awesome to see it finished!