Since it was mentioned a few days ago it has been at the forefront of my mind bugging me to play with it, so let's play
First I will cover the wiring of the TellyMate Tiny to the EZ-B and then I will cover how to use it.
So, when you get one it'll turn up and you have a bunch of bits;
- Composite Video Cable
- TellyMate Tiny board
- Angled Pin Headers
- Straight Pin Headers
- 3x2 Pin Header for ISP

First things first, ignore the pin headers. The simplest way to connect this to the EZ-B is with a accessory extension cable (or servo extension as they are sometimes called).
All the TellyMate Tiny needs is a Vcc, Ground and Serial data. Vcc can be 5V so direct from the EZ-B is fine, ground as usual can connect to any common ground and serial data is sent from the EZ-B signal pin, this needs to be received by the TellyMate so connects on to the RX pin not the TX.
First cut off the one end of the extension cable and strip back the wires (similar to the camera mod, Ultra Sonic sensor etc).
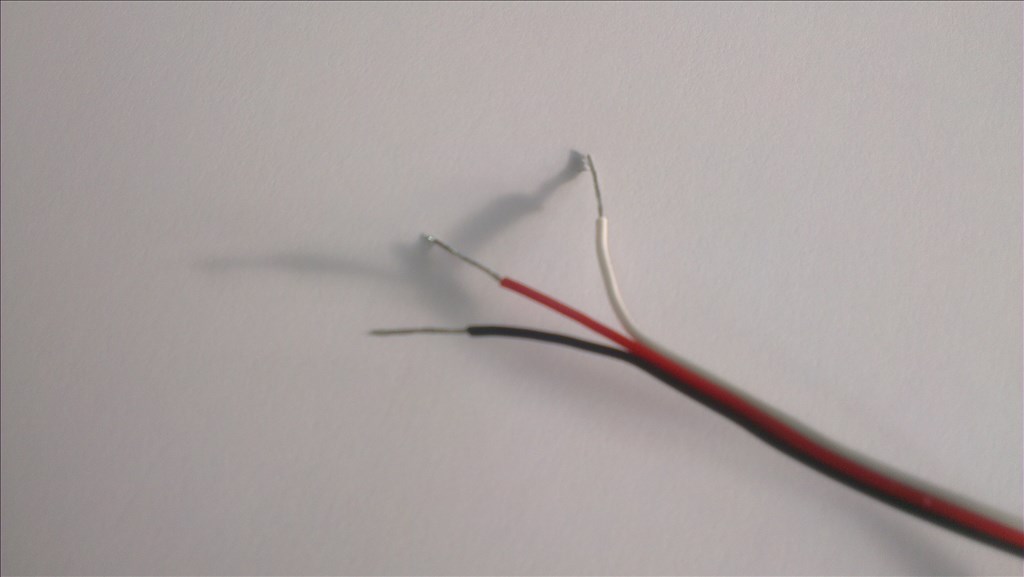
Next you need to solder the wires like so; Red to VCC Black to GROUND White to RX
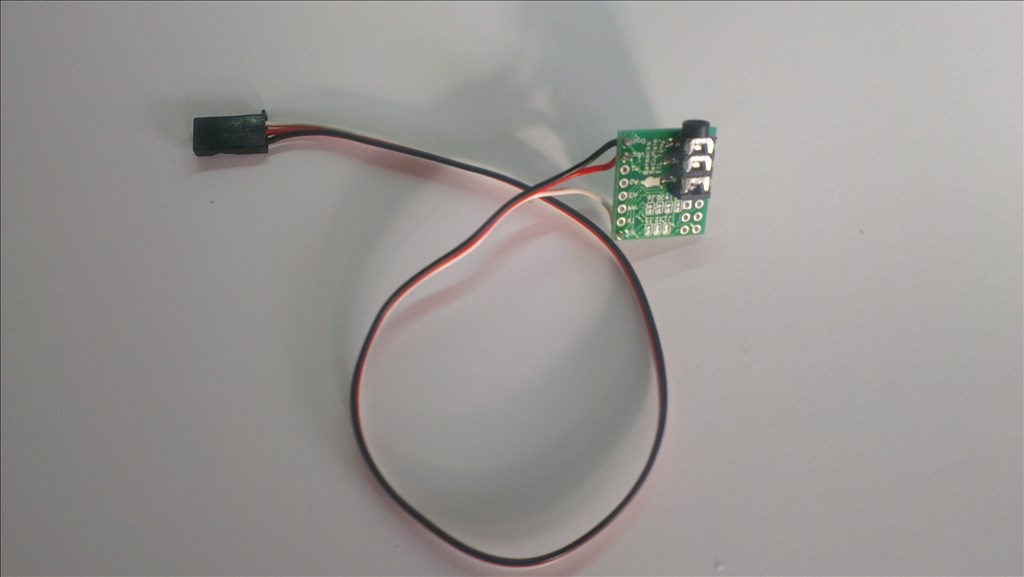
That's it, it's ready to plug into any of the digital ports on the EZ-B. It really is that simple
One slight oversight is there are no mounting holes on the TellyMate Tiny. A small piece of sticky foam tape would be ideal to mount the board. Provided you leave access to the jack for the AV cable this will cause no problems. Sticking it to the back of the LCD screen/TV/Display seems like an ideal location too.
Now, in order to use the TellyMate you simply need to connect the output to a TV via the composite video input, select the correct channel and send the serial data to the TellyMate using the SendSerial() command in EZ-Script.
Further details to follow on the scripting and operation plus a quick review of the product and it's capabilities to aid you in deciding if it's right for your project. Stay tuned for updates

OK,thanks will put my full finished code up too ,using your examples also in a few days on my robot design i am using it on
I see you made it 2 hours ago and i downloaded the file,but where is the video you said you made of it.
FORGET the last comment i found the video on it.
I last updated the cloud 2 hours ago (well actually a few minutes ago, I guess you have an old version if you downloaded it), I put it up the day I put the tutorial up.
The video is in post #2 just after the photos.
Just added in some more of the command sequences on post #2
Enable/Disable Auto Line Feed and Auto Carriage Return - With these enabled either the LF or CR code will move to the next line and return to the start of the line.
Moving the cursor - up, down, left & right commands added, this just moves the current cursor position up, down, left or right by one.
Removed cursor positioning due to complicated method and issues using ASCII character " for positioning. I have sent feedback to Batsocks and hoping to come up with a solution for absolute positioning.
Cursor positioning has been solved using hex. Details have been added to post #2 and to the project saved to the cloud.
There is also a strong possibility of connection tutorials for all TellyMate variants available at batsocks.co.uk being added to post #1 in the near future.
CAN you update the file you made in ez-cloud
It has been updated, it was updated prior to posting the latest update in this topic. As previously stated it will continue to be updated when the code is updated or when new examples are added. There is no need to ask for it.