Asked — Edited

Meet The Smart Saltwater Aquarium Powered By Ez Robot

Ez Robot community I wanted to introduce my latest application of this system. Some members hear already know I keep two salt water aquariums one coral which unfortunately died off and my predator tank. Sea life needs delicate balance maintained in their little ecosystem. Things like light spectrum , temperature, ph balance , current of water , nitrate and ammonia levels and calcium levels. These things take a practiced hand to maintain. I am building a new system and using ez b to monitor salinity, nitrates and ammonia, temp , water current flow and the ph. The ADC ports are useful for these and EZ board can control the current and switching to a backup power supply ( a apc for computers inside the cabinet to keep ezb and pumps powered). Also the ezb can turn on and off night , morning , day , and evening lighting settings. With a custom injection device im designing ezb can provide nutrients , calcium and even medicine if levels are out of wack. I started the build today and I am very excited! User-inserted image


ARC Pro

Upgrade to ARC Pro

Unleash your creativity with the power of easy robot programming using Synthiam ARC Pro

#1  

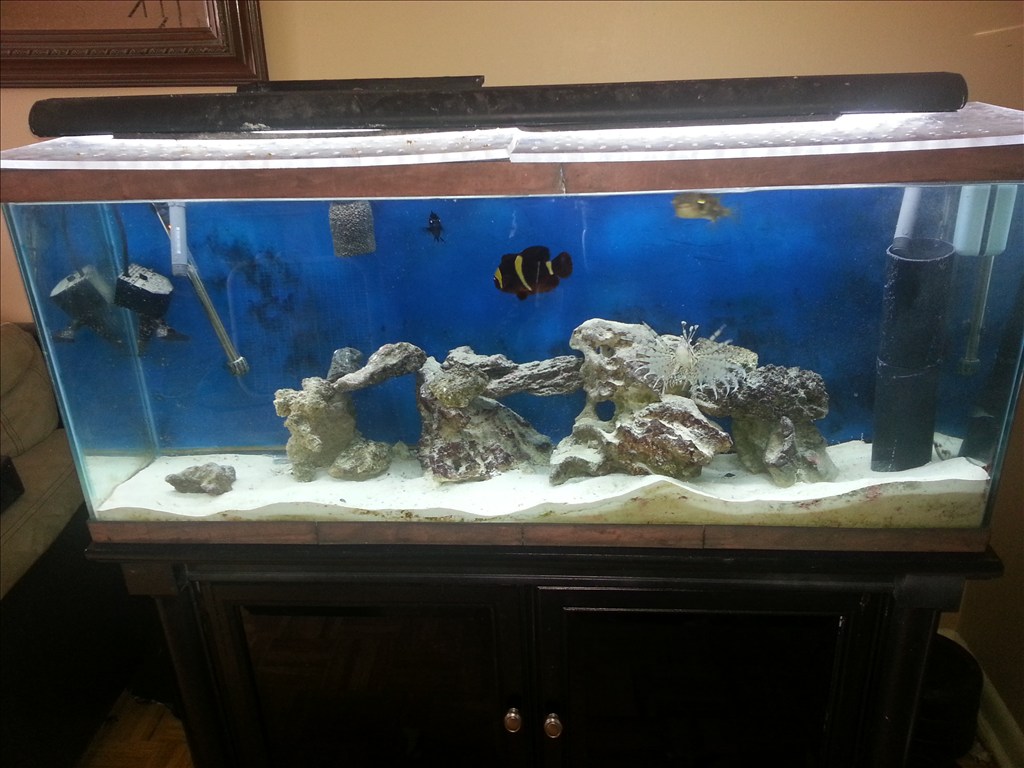
I already ordered the filtration canisters and pumps from bulk reef supply today. I wanted a very classy looking cabinet that is suitable as furniture if there was not a tank on top. Unfortunately they tank stands made these days are either poor quality or they are made of good quality but look horrible. I solved this problem by finding a tv stand cabinet that looked great and then let the modding begin....

#2  

User-inserted image 
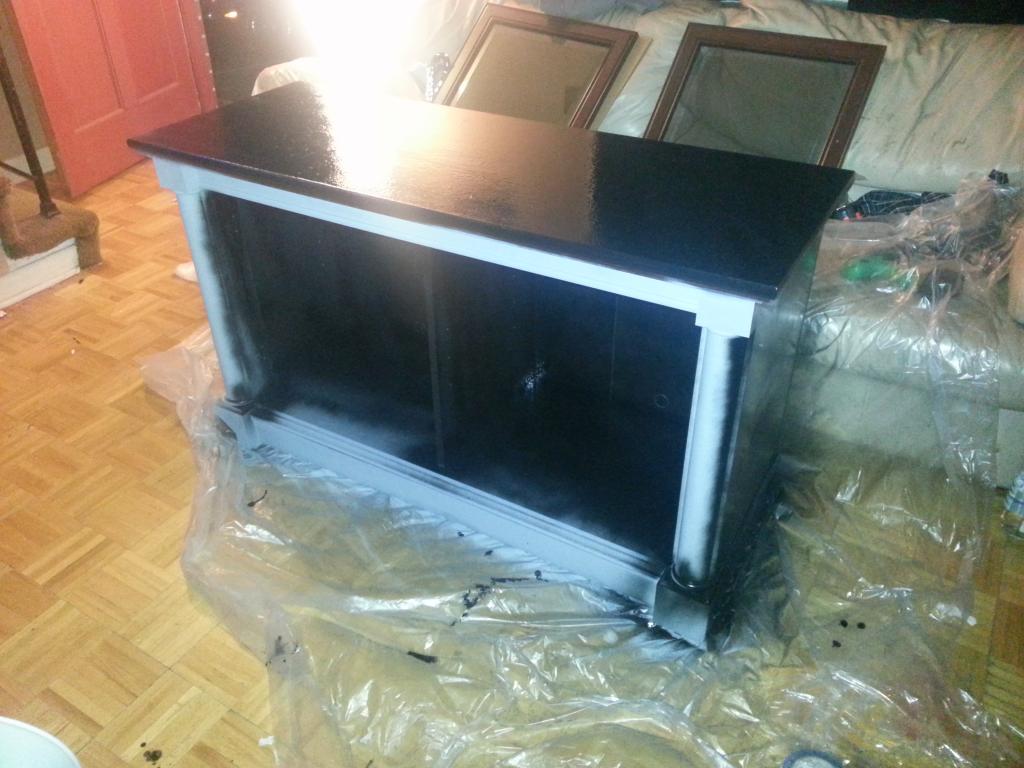
This is the walmart cabinet assembled and had a fake woodgrain. I tried painting the top but latex paint did not like the laminate. I had to spray primer down to get the black latex paint to stick.

#3  

User-inserted image

User-inserted image

User-inserted image

User-inserted image 
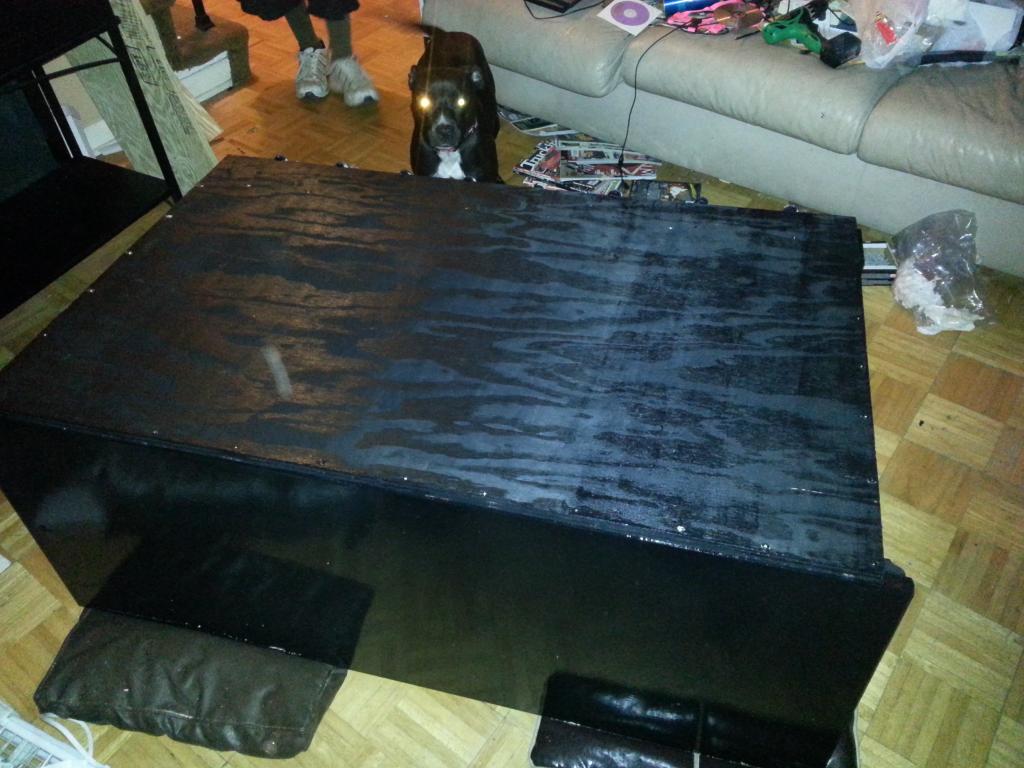
This was only made to hold a 75 pound tv. I went to home depot and had 3/4" plywood cut. The bottom of the cabinet only had 3 sides touching the floor. Front and sides. The plywood was installed and the back and extended all the way down to the floor and is now a 4 side supporting the load of the tank. Also we cut a bottom to support all four sides with 2 inch screws. On the back I predrilled and screwed the 2 inch screws in 5 inches apart.

#4  

At this point we beefed it up with 60 2 inch screws and 4 pieces of plywood. We can all stand on it now. Thats over 500 pounds.

#5  

Man Josh, you are quickly becoming the EZ-B King!

#6  

That's awesome! Like you said, saltwater tanks are very hard to maintain. I ran a mini reef tank for a few years And had great success after I learned the best way to maintain it. Saltwater tanks are not for the faint of heart. When I first started out I killed a whole tank of very expensive fish and learned some hard lessons.

I too couldn't find a stand I liked so I built an enclosed, hooded one out of oak. The frist problem I had was ventilation. With all the lighting needed in a reef tank the water temperature really shot up. Remember to put lots of fans with lots of ways for the heat and humidity to escape. I'm sure you know heat is a killer. E-B can help you with that also!

One more suggestion, seal the inside with a good marine clear coat.

I'll be watching your progress. What fun!

Dave Schulpius

Canada
#7  

I apparently kill goldfish and neon tetras by watching them... my stress flows away... into them and they die by the dozens:P The only fish I managed to keep alive for a long time was a Siamese fighting fish... after i dropped it from the bag into a cement sink full of soap suds then scooping back out with my bare hands and into his new bowl... after that ordeal I think it found my stress vibes quite soothing :D

I will now be content to observe Josh's fish instead... want to set up a fish cam Josh?... Muuhhaahahah :P

Canada
#9  

You could set up a P&T cam and track various fish/colours/movment as well as remote monitoring... interesting to see if face tracking picks up anything :P

#10  

I wonder if I could waterproof a ezrobot cam? Ha ha have a view from inside the tank:)

Canada
#11  

When the EZ-B mini comes out you can make a self contained ROV that could swim and "interact" with the fish :)

#12  

Oh, sorry, I seen now. Your going to place the tank on top of the cabinet. There should not be much problems with heat if it's not going to be contained in a hood. Cant wait to see how you work the EZB into the maintenance and monitoring of your tank.

Have fun, Dave

#13  

Yup 55 gallon standard rectangle tank ontop of the cabinet. At this time I use two heaters to keep temps up. Im waiting for the mag 7 pump and 5 reverse osmosis canisters to arrive this week. I will also get large syringes to load nutrients , salination fluid , purple up and calcium.

#14  

I wonder if I could seal up a ez robot cam with silicon and ofcourse remove the battery and have it hard wired for power. Maybe I could ajust the focus and then silicon all the way around the lenses and casing and antenna hookups. It would be sooooo cool to have a underwater view of a Coral reef tank with predators.

#15  

House it in a clear plastic box and seal it with silicone. Much like an ROV

Canada
#17  

You could remove the casing and lens hood, run extension cables for both antenna and USB, remove or keep battery, adjust the focus for the range you want and then encase the whole board in resin right up to the lens. add in a few hard contact points that you could use to attach accessorys too (like motor & propellers, etc).

Or go all out and make it a tetherless ROV like was done in on this site: LEGO ROV without tether

#18  

I love the rov ideas lol. Whatever I do the materials must be marine safe......which means no fiberglass polyester resin as that can leach toxins into the water. But maybe use the same idea with marine safe silicon.

#19  

Haha I am starting to like this Rov Idea. That might me a job for the mini ez board :p.

Maybe I could grab one of these tiny little guys and put a ez cam inside... its 16 dollars on amazon if I took the cam out of the case maybe it would fit:) User-inserted image

#20  

Youtube video http://www.youtube.com/watch?v=6FBEShODiAA&feature=youtube_gdata_player

Youtube test video. Its very agile. Honesty I would prob put a resistor on the motor so that it slows down for smoother operation. If I cant put the cam in the sub and it still be operational I will put it inside anyways and use it as a place to hide the ez cam....

#21  

Heres a couple of pics. I would use a unibit to drill the perfect size hole where the center led is on the front. User-inserted image

User-inserted image

User-inserted image I think the cam would look good dead center and I could silicon all the way around the lenses

#22  

Tiny update for smart aquarium- I recieved the 5 canisters I am using to put filter media in. One is filled with carbon, bio pellets, gfo, chato algae User-inserted image

#24  

Ok I spent a couple days working on mechs and last night I was back on the aquarium. I poured epoxy on the top of the table to make a hard waterproof surface so that nothing bad happens if it gets wet. Usually press board swells if it gets water on it. Next step is covering the epoxy in black paint and mounting up the filter canisters and the mag 7 , 700 gph 1/2" inlet and outlet pump. I have 5 canisters but due to space I may eliminate one of the bio pellet canisters. User-inserted image

Canada
#26  

Wow, quite the chemistry set you will have going there... I can see how an EZ-B will help with the automation. Good going Josh!

#27  

Thanks, tommorow I will start the plans for the injection system to control chlorine ' calcium, ph, nutrients ect. I will need to get several large syringes that I can load the various liquids in and attach servos to them to actuate syringes whenever needed to force liquids into water return. I will try finding syringes now...

#28  

Ok I found a suitable syringe that is both large and has a variety of measurements which should make the process of calibrating the ezb even easier! User-inserted image

Ok these guys are just 6 dollars each. I will probably buy 6 or 7 so I have a couple to mess up during the mounting process.

#29  

Necessary Supplements in Nearly All Reef AquariaCalciumAlkalinityUseful Supplements in Many Reef AquariaMagnesium (if not maintained by calcium addition methods and water changes)Iron (for aquaria growing macroalgae)Silicate (for aquaria with sponges, snails, etc.)

#30  

This is a really impressive build Josh. Where do you find the time for it all? Honestly, you are a machine. Hmmmmmm - EZ-Brain?

Canada
#31  

Josh is a cyborg! that explains everything... except the fishnet stockings :P

#32  

I guess I sacrifice sleep and I dont have a girlfriend. That means more time for robots lol.

#33  

Ok i had to strip the epoxy off because it didnt gel smooth and look as good as I wanted. Bright side is i started installing the filters. I found that I need a male to male 1/2" pt plastic fitting to the canisters as close together as possible. User-inserted image

User-inserted image

A fitting this short should allow me to easily fit three canisters side by side. I already attached the mounting hardware to the top of the canisters and somehow I managed to loose one of tje brackets! Seriously? Thats soo frustrating. User-inserted image

#34  

Tommorow in my spare time at work I will start designing the servo actuated liquid injection system for the nutrients , buffer and other fluids. I did however find today a machine I can hack to automatically feed my fish pellets. All but two of my fish like pellets so thats a plus! User-inserted image

Since I really only need the mechanism and not the daily timer I can hack it. I will look on ebay for a used on or cheaper model since I am going to hack it anyways.

#35  

Ok here is my idea using 4 of ez robots high torque servos connected to 150cc syringes. User-inserted image

#36  

If I use live injectables like photo plankton for example the syringe needs to be refrigerated

#37  

Maybe you could use a peltier cooler to keep it cool.

#38  

Thats a possible idea. I will research them and see if it is a practical option.

#39  

Ok I had to custom make fittings called a 1/2" male to male pvc pt (insert name here later) I took two straight to thread adapters and put a 3/4" section of pipe between them. I used weld on 750 hotweld pvc glue. User-inserted image

User-inserted image

The goal here is to make connections close together so I could get three canisters in the left half of the stand. Heres a pic showing about 5 inches of play plenty enough to get a 90 degree elbow on the left end:) User-inserted image

#40  

Next step is getting 2 90 degree 1/2 pt ends and 2 ball valves also one at each end.

#41  

Here is my roommates tank system that he rigged relays and timers to do what he wants. Fortunately I have EZB:) User-inserted image

User-inserted image

#42  

User-inserted image

User-inserted image Ok 17 dollars shipped. For this mini explorer submarine. Where the center led is im thinking is great for a camera!

#44  

User-inserted image

Three color light on the way

User-inserted image Also current generators

#45  

Usually a tank of my size would have two current generators. I only bought one now but I will probably get a second. I will update everyone if I do..

#46  

Ok tiny update. Total of 4 current generator pumps are on their way. Two will be on each end of the tank. I will simulate wave alternating currents by each set of pumps running 20 to 30 seconds then switching to the opposite side of the tanks pumps and pushing back agian for another 20 to 30 seconds. This is an uncommon marine tank setup because of complexity and all the equipment you would need to buy. Thanks to a handful of relays and switching transistors ezb can control all these effortlessly! User-inserted image

#49  

Ok 4 hours into this project today I have the 5 canisters mounted with 4 steel brackets. Using fiber reinforced hose I made the input connection to the pump. The pump must be lower than the water source it is pulling from so gravity pulls the water down into the impeller.

#50  

User-inserted image Preparing to move the tank onto the new cabinet I remove about 30 gallons of the 55. Even then it still weights 200 pounds or better so it was some serious grunting to get it moved. Then when I sat my end down dan had not moved his fingers and got them seriously squished.

#52  

It took hours to get this working! We had problems getting all the air bubble out of the lines and canisters because they are reverse osmosis. That kind of canister forces the water through an outer wall and then an inner tube holding filter media. Anyways its been a long night and im just so happy the filter system I designed is running and being tested. We only found one leak that was so small it only dripped every couple of minutes. I put a dot of super glue on it and sealed it right up! User-inserted image

User-inserted image

#53  

I have not measured the flow on gallons per hour yet but just taking a guess I would say between 250 to 300 gallons per hour. Most specialists in marine industry claim water should be circulated through filtration 4 times per hour and a couple experts we talked to said 6 times per hour is best which would be the 300 gph range. So as long as the filter media doesn't cause too much resistance to flow I will be dead on where I need to be.

#54  

The light on top is a temporary solution. Im getting custom acrylic covers made and the dual bulb light is on its way. Also I will have 4 wave generators to install and thats where we start to test EZB. Ezb first tasks are turning light on and off at a designated time and turn on night lighting and chato lighting at night. Also I plan on a 30 second on 30 second off alternating cycle between the four wave generators to simulate ocean currents in the wild. My roomate even came up with an awesome idea to get a few white , blue and yellow leds and get ezb to flash them quickly like lighting from a storm. How cool would that be? Oh this is a cool project.

#56  

We tinted the glass with 2 percent to help hide plumbing and when algea lights are on it will not be very bright at night. I hate the latex paint. Its garbage so I eventually will repaint it.

#57  

Its only noticable with flash but looks like I have a tiny bit of overspray of primer. No problem i must repaint this thing with a good indoor paint because this stuff was horrible. So I will get a oil or water based paint instead of latex . Also inside the cabinet I am getting a couple baking pans to use a drip pans when I replace filter media and the inside of the cabinet will be sprayed with liquid rubber.

#58  

User-inserted image

User-inserted image

User-inserted image

User-inserted image In this system I have a chato algae canister , gfo canister , carbon canister. One is empty at the moment. Once I added the material I got lots of air in the system and now its pushing lots of bubbles.

#59  

Ok fixed the bubbles till all the air is out if the system... User-inserted image

The chato needs light to live and grow and it will be a few days till equipment gets here so im using a house hold energy saving bulb at the moment. Because the cabinet is tinted even with lights on inside the cabinet it blocks most the light.:) User-inserted image

This is a pic showing the regular lamp lighting the chato algae

User-inserted image This is the door closed , there are a couple tiny cracks I will cover but mostly it looks good..

#60  

More updates will come tommorow with plans for mounting ezb in a dry safe place as well as the relays that will be used to allow ezb to control everything.

#61  

After just one night with new filter media . Wow this will be crystal clear. User-inserted image

#62  

Ok equipment is on the way so progress will stand still till then.

Blue submarine (to encase ez cam) arrival usps Nov 9

T5 Marine parts light UPS Nov 8

4 powerhead 350 gph pumps (to make waves) Nov 9

125 snails (aid the automatic system as natural cleaners)

Tip220 switching transistors to control ac power relays as interface between ezb and relays) nov 7

#63  

Good news switching transistors are here and the submarine... sub seems smaller than pictured. User-inserted image

#64  

Its big enough for a cam inside but I would need to gut the electronics to make room. Go figure lol.

#65  

Ok im thinking I will use a unibit (drills holes) to get the perfect size for the lense. User-inserted image

User-inserted image

#66  

First time I have seen puffer mad . He got sucked up agianst the pump inlet User-inserted image

User-inserted image

#67  

First time I have seen puffer mad . He got sucked up agianst the pump inlet User-inserted image

The ez cam inside the sub is a no go. Even outside the case its too small.

#68  

User-inserted image This is a uv/purple looking bulb 18,000k A 10, 000k white bulb and actinic blue bulb

Here is an example pic with these bulbs lit. User-inserted image

#69  

I had some problems with the pump system generating micro bubbles and I had to design a baffle. I used a 3 inch black tube and drilled rows of holes 3 inches from the bottom and shortened the output hose so bubbles would need to go down 17 inches to make it into the tank. Heres pics... User-inserted image

User-inserted image

Once I got the baffle in bubbles were reduced significantly and I slowed down flow so it can clear up. Trail and error is part of making a automated system so im taking it step by step.

#70  

Here is my early morning or later evening bulb. Its really cool almost uv. User-inserted image

User-inserted image

#71  

User-inserted image I have this used server case im thinking I can use to house the relays and other electronics. I could put ezb in but I am mildly concerned about getting the wireless connection to Jarvis. I may do a external antenna mod in this case.... well see.

Canada
#72  

You could just remove and extend the EZ-B's Bluetooth module outside of the metal case and place it in a plastic box if you still need it protected from "elements"... it is just 4 wires.

Your tank pictures are really nice... makes me want to get into salt water fish now... heh, when I am rich maybe :P

You going to do a fish cam broadcast?

#73  

Im certainly not rich but if you buy little by little 6 months later you have a nice tank. I spent 150 to buy 4 cool and also large fish. I will consider the external Bluetooth idea.

#74  

Ok ive been testing the canisters for s few days. Because they are inline there is a lot of resistance. I figured some math based on flow rates of 1/2" tubing and I need to have only 2 inline to get the flow I want. So that being said the system is getting a refugium so I can seperate two sets of canisters and two pumps. The 350 gph pumps I picked up are strong for what they are so I may just use these to pump water through the two sets of canisters. I will remove one canister from the system. Honestly a refugium makes the automation process easier I was just trying to do somthing as simple as possible.

#75  

Thats a beautiful color light in there.

#76  

Thanks troy. You cant see well with this color but the color itself looks good.

#77  

Ok tiny update. Previously I ordered a marinland light fixture and a bulb came in broken.... they sent a replacement. That was the blue one. So now the white 10000k bulb blew. They are sending a new one. Im considering buying a second fixture from them for 50 bucks . That would total give me 5 bulbs , one purple two blue two white and I woukd have both white , yellow and blue leds.... ikl explain the leds later.

#78  

User-inserted image

Short diagram

Individual control for purple , blue and white bulbs by relays because they are 110 volts

4 blue leds are night lighting

4 white leds simulate lighting during a storm

1 ultrasonic pointed down to measure level to trigger top off pumps.

Canada
#79  

Even at the low power of the sensor, wouldn't introducing ultrasonic frequencies into your tank possibly effect your fish? Unless you only pulse it for a few seconds every few hours or so.

#80  

@gunner no water slows down sounds. Any sounds that penetrate the waters surface are no longer ultrasonic and volume very low. Also I would only have the ultrasonic measure once a day I believe.

Canada
#81  

Oh...? If I recall correctly, sound actually travels faster in denser materials like water and metal then in air. Fish finders and sonar all use ultrasonic, as do some algae treatment cases, but at very specific frequencies. But if it is pulsed once in awhile, then it will most likely not be an issue :)

#82  

Ok here is just the two blue bulbs. My white burned out. It was a second hand one anyways. User-inserted image

#83  

I picked up a couple new anenome today and wow! One is huge and I bought him for only 16.99.... User-inserted image

User-inserted image

Ok back to ezb business.... I really want this setup to be isolated from other projects for reliability and consistancy reasons. I looked on craigslist and bought a computer and also a spare that the guys says needs a hard drive and os... so only one is good at the moment. It was 30 dollars so I certainly wont complain. It is a older system but should be enough for a dedicated ezb brain. User-inserted image

User-inserted image

#84  

Josh, I think this is one of the most creative uses of EZ-B I have seen. It really shows the versatility. And the tank looks great!

#85  

Thankyou brett! This project is really coming along! This morning I noticed a very rare event. My giant maroon clown has hosted the anenomes. This is not common anymore because so many clowns are tank raised where they never learned this behavior. User-inserted image

More and more successes !

https://www.youtube.com/watch?v=qkRQg-46aDY&feature=youtube_gdata_player

#86  

Tomorrow i receive the second light fixture. This will give me up to 5 bulbs to control lighting in the tank. I will try different combinations of bulb arrangements to see what is practical.

Canada
#87  

That video was cool... I am liking salt water tanks with their interesting types of fish:) One of our clients has a large tank with Nemo and Dory in it :D

I know this is all about the EZ-B integration, but more videos please :P

#88  

Sure gunner , soon as i get my new phone in a couple weeks pics and videos will continue. I have been a little mia lately because my computer is in pieces and i sold my old phone so in using a basic one right now. Soon as i get the new phone i will get back on the posting wagon!

#89  

This is all beautiful. Makes me miss my old Aquarium. I used to sit in my study and watch that aquarium for hours at a time in order to relax. It was only a 29 long. Yours is probably double that size like 60 long. Also, I saw you dog's eyes glowing in a previous shot. Do you have him hooked up to the EZB?

that would be cool. The Bionic Dog~!

;)

#90  

@Mel yes its very relaxing and when in thinking i often sit down and watch the fish play. The tank is a 55 gallon, 48" long ,16" deep , about 20" tall.

#91  

Tiny update , i pulled apart the canister system for filtration and racked my brain. I found gfo media barely allowed water to flow through. Honestly i pulled the cartridge out and water was barely dripping from the bottom. I removed it in a hurry. I also tested the canister tops and found they were very restrictive so i removed them. The canisters came with a top and bottom filter that seems like it is getting clogged as well.... out they went. I split the chato algea into half and put each piece in a separate canister so the algea has room to grow. I cut down a desk lamp to position the light bulb right between the two chato canisters for direct lighting. I have a ten watt bulb in but soon i will switch to a 49 watt. The biopellets i moved to be the first canister and carbon is the last. I powered the system back up and everything is flowing 3 times as fast. I measured the output flow going back into the tank and we are at 120 gallons per hour. User-inserted image

User-inserted image

#92  

In trying to get the water crystal clear. Soon as i get that done i will move next to automate the lighting to turn on and off based on time of day from ez-board.

#93  

Fyi aquarium experts say 4 to 5 times volume of your tank is what you should shoot for but this is also based on a traditional refugium that is less efficient with less filter material. 120 gallon is 4 times the volume.of.my tank so based on experts the flow seems to be spot on.

#94  

Small update , had a giant hair algae spike and came up with a solution for air and bubbles in the filter canisters. How about web controlling a vacuum pump? Short video after cleanup

https://www.youtube.com/watch?v=4KfwVmdVblU&feature=youtube_gdata_player

#95  

looks like a good idea josh,so far my saltwater tank with living coral doing good,one of my sisters told how to take care of it since she has one for many years my next tank getting is 100 gallons for saltwater fish

but my most excited item getting is my new pet RING TAIL LEMUR they go for $1500 plus a special 8 foot by 8 foot cage THAT NEEDS TO BE BOUGHT FIRST cage i got for $500 ,comming in jan 12 and in feb getting in the lemur i put a deposit on him of $700 ,gthey are hard to own in some states since exotic animal,cant wait to get my little lady added to my family,monkey may be next on my list

#96  

Sad news puffer got too close to pump intake and got stuck. I pulled him off this morning and he was puffed up with pins sticking out . Hopefully he survives. Note to self -build on protection for the fish from the pump intakes....

#97  

dam,hope he gets well one i am getting for my big tank is a stingray without the stingers,and others too

#98  

JOSH with this project of yours gave me a idea going to use my EZB i am getting a LONG TAIL LEMUR in a few months after i build a very large outside cage so the EZB wiill be good for temperature monitor,alarm system, maybe a rain gauge and food monitor plus have the camera keep a eye on him

EZB not for just robots but everything else too, also thought about X10 system ,but would be very very costly,for every outlet,lights control.A/C control and SPA controller and more in my house,would need well over 1000 of EZB

#99  

Its my Birthday! Woop woop! The tank appears to have recovered from the hair algea. Yay! User-inserted image

User-inserted image

#100  

Tiny update. I descided to up the bulb wattage feeding light to the plant life filtration. I went from a 10 watt bulb to a 42 watt 2700k light that closest resembles sunlight in a bulb. The bulb itself is huge incomparison but im thinking the chato needs more light than the 10 watt. My roomate runs two 20 watt bulbs I believe so now I should have just as much light on the biological filtration as him. This should raise oxygen levels a bit. I will be buying a vacuum pump to pull the oxygen the chato is producing and pump it through as airstone. Because I have a sealed system the oxygen produced has no where to go so I must pump it out and put it where I want it. User-inserted image Original 10 watt by replacement 40 watt 2700k bulb User-inserted image I picked up this sea urchin to start cleaning proactively the corners and hard to reach areas. You can see he literally sticks he mouth in the corner to grab algae growth. I may get a couple more of these guys. While at my fish supplier Justins Frags , hes sold me on the idea of using a kessel led light. Using two servos I could gradually raise light as if the sun was coming up and even change the amount of blue and simulate sun going down. I cannot dim a flouresent light. So ezb will be connected straigh to the kessel.

#101  

mostly everyone its using LED for saltwater aquariums best way to go,another great idea i get for each of my aquariums since i go on my trips,but also great to have without going on trips is a automatic feeder I thought ofr making one with servo's ,but since so cheap i bought them

#102  

Alright great news , building the new refugium and revamped filtration system. Pictures coming soon!

#103  

First I removed the experimental canister system and started measuring for the ten gallon refugium. Theres enough room on the inside of the right half however the opening is a few inches too narrow to slide in the refugium tank. So I made a brace from 1 inch thick plywood and about 30 screws spaced 4 inches apart to insure it could hold the 200 - 300 pounds that it resting on it. User-inserted image

User-inserted image

#104  

this is the cansister filter system i got its rated at 500 gallons and rated as one of the best to buy it is very costly $500 at rated pump is 900 GPH http://www.petsmart.com/product/index.jsp?productId=13185456&lmdn=Fish+Filtration+%26amp%3B+Circulation&f=PAD%2FpsNotAvailInUS%2FNo my sister help me find the best one made

#105  

also looking at you ROV design i am working on one with camera and special drive motor design and to motors to raise and lower the ROV,also belong to a yahoo ROV GROUP ,might look at posting the photos of it,was looking for a good microcontroller board and i think EZB is perfect,wouldnt fit inside any tank ,will post a new thread on the design

#106  

@robotmaker thats a sediment filter ir removes solids. It doesn't add oxygen though or process nitrates. Does look like it can keep water clear of junk and poo floating around though.

Ok I picked up plexiglass from lowes and began measuring and cutting. In the entry way the tank has a three section bubble trap. The center section is where algae , live rock and the spaghetti (chato algae) the idea is to completly infest this area with bacteria and plant life to pull the nutritional solids like fish poop , decaying food an proteins. User-inserted image

User-inserted image

User-inserted image

User-inserted image

#107  

my sister has one like it for over 4 years and no problems at all,thats the reason i am getting it can add another type to add oxygen also adding a lot of air stones release oxygen and adding plants but there is a machine if needed to turn salt into oxygen,my dad has one for his pool but airstones also the best i have the whole back wall line of stones ,like a wall of bubbles

#108  

for nitrate removal you need a nitratereductor they are about $100 for 100 gallons another item i am getting is CO2 REACTOR ,ONE FOR MY FRESHWATER PLANTS and one for my saltwater tank ,petco has all theses types and more

#109  

User-inserted image https://www.youtube.com/watch?v=8LQRD5mHN0g&feature=youtube_gdata_player

#110  

saw you video JOSH it does look good only its a very big setup on mine i am looking at professional setup it cost more but worth it and its a lot better it moves 900 gallons per hour compare to 360 gph on the electronics i might use the EZB, it is little over rated for this type of project ,but might use it because of the camera idea on adding a camera the EZ camera not ready the best camera the LUX is not great for darkness even with IR lights ,whats needed is .001 lux or so b&w camera to see darkness,i did see a very good ,color and switches to low lux B&W camera that may be better

#111  

I tested the small pumps that will individually be pushing water through each canister. Still going very strong. Looks great.

#112  

your design look good ,but with all the work on this project i guess you wont be able to finish you omnibot project

#113  

No rush Josh. You're working on multiple projects at once AND posting pictures and video showing how busy you are. All the while working a regular job. We enjoy seeing any of the progress your making no matter what it is. :D As always, do it for your enjoyment. No deadlines or pressure from us. :)

#114  

@troy. Thank you @robotmaker soon as this refugium has water flowing and filtering which will be tommorow I can get back to Jarvis. I must do the body work and send dude to paint. User-inserted image 10 gallon refugium with 3 bubble traps and large pump section User-inserted image Custom overflow style drain to refugium good for 580 gallons per hour. The mag 7 pump we are estimating will exchange 390 gallons per hour which is nearly 8 times the volume of my tank. This is 4 times what I had before so im excited. All the plumbing and hoses and pumps are in the right side of the stand and left side will have electronics and will be the "dry" side.

#115  

not much a rush from me too,just waiting on it to finish and see if some of your designs will work for my omnibot design i am lot like you ,i have about 4 robot projects going on,plus working for my job at home i dont watch TV much or go out,plus have house repairs,but soon i will be retiring in a few months,1 trip left to go to china,and then next month done ,need more time for my ROBOT building i have well over 20 robots to build,i just got in 5 more EZB and my machine shop almost done,lathe machine next month and christmas my scroll saw comming it great tool to but called BLADE RUNNER,NEED TO MAKE MY ROBOT FINGERS

so far plumbing looks good,i am looking to use EZB for my large fish tank,just not having anything on the outside of the cabinet or almost inside except for special filter cansister and special filter buying new from petshop,i ordered my canister filter for $425 and rest after christmas i spoke to some experts and the told i got the right equipment i might use your injector system since i have many large syringes i got from work and i have over 200 different types of relays i,need any can have some

the safterwater tank is not really my main project,first need to see up the camera's and lighting and incubator setup for my GECKO,getting ready to mate on FEB14 and have incubator made alreay,except for controlling the temperature.looking at all females (can select male or females or both by temperature)

#116  

User-inserted image

User-inserted image

User-inserted image

User-inserted image This is the overflow drain down to the refugium and filters.

#117  

i got a very low cost super nice cabinet very well made for $140 on sale ,no cheap wood i hate compressed board,i love only real wood in my house i make some of my own furniture using only real wood my bed furniture so so very well made had offers from other to make one for them,,next making my cabinet to match,its a very old style renniassance type to go with my large sword collection,my whole bedroom has so much in dragons swords and rennaissance stuff including very special dragon stain glass lamps

this aquarium table supports 900 lbs aquarium table

User-inserted image

your idea getting good so far JOSH ,gave a couple ideas for mine wont use the pvc pipes idea,dont care to have it on the side of my table,wont look great in my house,but other ideas you going to use with EZB going to use to talk to other robots using EZB to let me know if my tank has any problem,i dont know if DJ added this feature

#118  

The pictures look good. I came to petsmart here and took a look at it. Its particle boars with a laminate. Its good for a fresh water tank but doesn't have room for the pumps and filters for salt water. My stand is high density fiberboard butit looked good when I bought it.

#119  

UPDATE going monday to a saltwater fish store where mostly they sell only saltwater fish stuff besides other fish and pets (very big store ),i was in there before,but the guy who made the 20 to 30 100 gallon tanks going to let me see his setup

#120  

i didnt look at it too good,but still it rated at 900 lbs.kinda thought it might be particle board with laminate,real wood need to spend about $1000 can very easy make one out of birch or walnut,but dont have the time,just want well made to hold more then 500 lbs and has to be look very nice in my house also thats why i have very good stuff in my house,cost more but worth it,one side will fit my 3 canisters setup and other side my fish supplies,its going in my kitchen near my dining table facing a mirror do have my geck's there i know they wont be happy about the moving ,female gecko loves to look at her self on it ,or maybe he thinks it a male on the full wall glass mirror ,40 gallon tank i have for her and soon her mate jake,2 months to go cant wait for mating dance he does for her (feb 14) hope to get a video camera to tape it

also shipping 2 day air is free for me

#121  

Ok more pics. Water is flowing now... User-inserted image

User-inserted image

User-inserted image

#122  

https://www.youtube.com/watch?v=Uz6AEOi8IsY&feature=youtube_gdata_player

Filling the refugium for the first time

https://www.youtube.com/watch?v=Htylx0O3DtQ&feature=youtube_gdata_player

Water in the refugium with pump running , first try. The bubble traps in the refugium seem to be working properly.

#123  

saw the video very short ,very big setup,needs a lot of water,i guess it wont fall over 2 tanks of waters i see

#124  

User-inserted image Looks really nice not to have a hang on the back filter.

User-inserted image You can see the refugium working right through the 2 percent tinted glass.

#125  

@robotmaker. No it falls over once it tops the wall. This is the refugium topped off at max level. I used a power head to pump water to the canisters which seems like just enough flow to work properly. I mounted the light directly over the chato algae. I will probably use a coffee can to make a big reflector to aim the light down on the tank and not have direct view of the bulb.

#126  

i meen the saltwater tank on top,it not like robot that can easy fall over with all the weight it cant must weigh a couple hundred pounds of weight with both tanks full of water

#127  

I stopped by walmart and picked up 3 inch thick poly fill. I cut it into a 9.5 in by 10 in square and inserted it in the inlet of the refugium..... PRESTO! Now even at max flow no bubbles! Also this large slab of polyfill is a mechanical filter as well that will rarely need a change. I will run this overnight and ive considered adding an extra section from 1/2" polyfill as well but im testing this first. User-inserted image

User-inserted image

User-inserted image

#128  

polyfill is good stuff,i have use it before in a custom speaker box i made

#129  

User-inserted image

User-inserted image

User-inserted image Now with 4 times the flow the sand and debris was being blown up from the bottom and making a mess. To remedy this I used silicon to attach plexi to the bottom and used a larger drill bit to waffle it up and now there's no bubbles and no sand being kicked up.

#130  

i just back from the pet store where they sell a lot of sa ltware tanks and fish for the saltwater tank i only need a power head and canister type filer is the best,and dont need any other type of filter system aslong asi have living coral rocks and plants it save much money,he is in charge of the saltwater fish tanks for all the stores and show the big setup in the back with many many tanks of saltwater fish living for years using only that system,so he told those other 2 filters is a overkill,onlly is to check the levels once a month for a ny problems with a very good water tester,for oxygen only need some air stones hook to a air pump as the bubbles rises it releases oxygen

#131  

Fyi if your growing coral bubbles are your enemy , bubbles injure and kill mushroom polyps and young delicate corals. So be careful with air stones.

#132  

they are used alot and fish love it my back wall of the fish tank has it the full length and the fish go crazy at it ,the love to swim into it alot and play with it bubbles cant really kill ,it depends on the pressure of it if very tiny they dont hurt the fish or coral you may have the wrong ones or too strong of a pump you need a regulator and there is other ways to place a piece of pexiglass in front if too strong with tiny holes they even sell dividers that has it done already

#133  

Not fish. Fish love them. Im talking about mushrooms and live coral. Check reefcleaners or aquarium advice websites. But thats my 2 cents.

#134  

when place on the back wall not near any coral or anything else already got that info from my saltwater expert ,he says too many people buy extra filters that are not needed,his tanks going for many years without any problems with same setup when you see it with your own eyes like i did ,its better then any internet advice

go to a pet shop ask if you can see thier setup.but not all saltwater pet shops are the same also

#135  

JOSH did you get acrylic tank ,thats what i am getting and looking one i saw at a very good price it holds 150 gallons 5 feet long free shipping on ebay $900 acrylic tanks is 17 times stronger then glass aquarium tanks and alot lighter. and there is others like 8 foot high i think 1000 gallons for $5000,wish i had the room for that,well someday soon also will order next month a nice 3 ft wall tank from amazon it holds 6 gallons for my living room i do have another port hole size wall tank 2.6 gallons in my bathroom for my gold fish

#136  

JOSH have a blessed safe christmas and a happy new year.

#137  

JOSH here is a few ideas for your project and mine First i made and designed a dirty oil detector for a pump,so i think the design might work for a dirty water filter. Second i saw a low cost fish feeder and looks easy to make it run from EZB and can easy add a circuit for when the feeder is empty too.

#138  

So I had a second round of attacks from the algae monster User-inserted image The tank looked like one big jello shot. All it was missing was the vodka! One of the gizmos at the EZ B disposal is a UV light. Fortunately once activated and two days later i is on the road do clearing up thanks to some electronic stimulation. User-inserted image @24 hours with uv saturation User-inserted image 48 hours after UV saturation. This is running the max 9 watts I can energize the compressed gas tube to. (Similar to a halogen or xenon) User-inserted image Because of the obvious dangers of direct UV Radon I had to shield this in a light tight canister. The tube is inside and water passes through a tube right in front of the uv bulb and back into the tank.

#139  

WOW i never seen that on my sister big saltwater tank ever,thats weird

looks like you are making a bomb

#140  

Honestly without googling lots of pictures I never had either. Never had this problem but luckily some electronic technology exists to knock this stuff out quick! All without spending hundreds of dollars on some marine sterilization setups.

#141  

my sister has a super simple setup,no problems for about 3 years, i guess your is a strange setup to have water not clear i think she paid only about $90 to $100 ,and had the right balance of fish with plants and coral the expert at the saltwater fish store told me the same thing all that hundereds of dollars is a waste of money others buy for marine sterilization setups

i am getting a PH sensor in soon to build my circuit,first making one for my fresh water tank using EZB

#142  

Great Fred! We will be looking forward to updates on your project thread.

#143  

I am like JOSH lot of projects to do But there is good news retiring very early from my work,in march so much more time for robots also hope to win the bid on a house too

PH not just for me ,but JOSH may need it ,plus a few other special sensors for freshwater and saltwater tank,one item well needed is when a filter goes bad,another is water level and many more

#144  

It keeps me creative to have a few different projects ;)

#145  

72 hours after I added the uv sterilization it looks like the algae spore outbreak never happened. Tommorow I repair the refugium where the massive buildup of spores broke some of the walls loose.

#146  

Going into the 4th day by about 8 hours... User-inserted image

#147  

Wow that's a rapid and dramatic improvement!

#150  

looks very clear,that first one you had up i never seen atank like that,may be the wrong fish or setup that cause that You need a right balance of fish,coral and plants and not too much of each

#151  

I took water samples and pictures of fish and setup to three different salt water dealers and they all said the setup was ideal and I would just need to give it a few days to do its work..... so here we are now :)

#152  

That is incredible Josh. Good work. Now I see where you got the bright idea for Dusty (lol)

#153  

I would how it got like a jello shot like you called it, It look super super bad,never seen water look that bad

DOES look nice and clear like it should look

#154  

Both me and my room mate rebuilt our refugiums. I adjusted the placement of the bubble trap and added several pieces of plexiglass to hold up poly filter media closer to the top. My previous problem was the poly matt pushed agianst the first wall breaking it loose. Now that its higher up it cannot do that but will still give cheap mechanical filtration. User-inserted image

User-inserted image

User-inserted image

User-inserted image

User-inserted image

#155  

Refugium back in place and pumps back running this morning User-inserted image

Canada
#156  

I love watching this thread. Always wanted a SW tank.

Can't wait to see the EZ-B integration into the mix.

#157  

SALTWATER tanks are great and fairly easy to take care of,but they are harder then freshwater tanks looking at a idea,might be hard to use EZB to control all my tanks .mostly becacaue i have a lot of them and some are seperate in each room And use a lot of EZB'S might be to hard because its hard to watch and control them since the max is 5 EZB

#158  

JOSH my big wall mounted aquarium just came in today ,it is heavy almost 60 lbs and no water added tet,most likely need to findsome to help me install it will post photos of it

#159  

Your going to want to do some serious reinforment to your wall. The weight of a 60 gallon will pull a tank clean out of a wall with only 2x4 supporting it. They make special galvanized steel supports that go from the bottom to the floor and top to the ceiling. IM SURE youll figure it out :)

Woops after reading that agian I saw you mean 60 pounds not gallons. Lol mistakes make me laugh somtimes :)

#160  

i might go saltwater or freshwater with that tank,bayshore aquaruim that makes and sells them ,has it for both and in video of mine, he using saltwater they make the best wall mounted aquariums,they look like a flat screen tv,some bubble types i am mounting it on 2x4 studs in the wall,it has strong brackets it comes with everything needed pump ,,filters,lights ,syphon tube and more

and when i got it,found out they made a bamboo type one (dam) my living is all in bamboo,black frame will still look good User-inserted image they make black,silver or $100 more bamboo

#161  

JOSH i ordered a few float switches to tell if i need water,.and may use a pump to add the water

FLOAT switches for great for water level,i get tired of adding water to my tank

one i found is about $5 from china,can easy make one using a magnet and a reedswitch and ball going up and down on a pole,but for $5 ,you cant match the cost to make and seal it

float switch User-inserted image

#162  

Ok EZ Board integration starts today. Im using a 1U rackmount server case for a slimline mount either horizontal or vertical on its side. All the relays and ez board are short enough for the 2 inch thick steel encloser.

First step is ezb needs a powerful and reliable 12v and 5v power supply. A 1u 200w server psu is perfect! User-inserted image

User-inserted image The green wire in the atx and ground must be connected to trigger a psu on. I will use a rocker switch for this. User-inserted image

#163  

User-inserted image Round switch is psu power. This reboots ezb and powers down relays and leds. Main power to control. Two blue switches are main actinic lights and secondary lights. Green is the lower chaeto and refugium light. Red is uv sanitation switch. User-inserted image

User-inserted image

#164  

Wow, very colorful. Do they light up? Looks like Christmas!

#165  

Yes they will all light up behind the 5 percent window tint on the cabinet. -low profile blue rocker- main ezb and system power , only used to reboot Position 1 blue toggle- actinic blue 55 watt bulbs Position 2 blue toggle- purple dawn and twilight bulb -green toggle- Refugium and Chaeto light source Red toggle- Ultraviolet Sanitation light source

Its nice to be able to turn off the uv to administer medicine. The uv light and carbon reactor pull most everything out of the water including medicine. A perfect example is the Gold and Maroon clown had developed an infection during the algae outbreak. . The antibiotic will be destroyed by uv and then absorbed by the carbon reactor. User-inserted image You can see where scales are distressed and shedding. This is being treated now and the data is being used to build a injection system. User-inserted image

#166  

Beautiful jstarne! of course we're all waiting to see robotic fish swimming around making medicine moot!........not that Ive gone completely to the silicon side:) ......carbon based life forms are still my favorite :)

#167  

@irobot thankyou! This should be a challenging project but maybe once I get everything working maybe I will offer a kit for DIY aquarium enthusiasts. ;) My family are begging me to "patent" the setup lol.

There are high dollar systems out there that do these things on very large industrial sized systems.

Places like this piece together other products to get things to work but are way pricey and over complicated to perform their tasks. Draquarium.com

This is one of the cheapest and well know units but it must be manually programmed. Its basically a fancy alarm clock that also turns one main light on and off. Anything else is additional and this alone is 350 dollars. http://www.marinedepot.com/Digital_Aquatics_ReefKeeper_Elite_(Plus)_Controller_Multi_Item_Monitors_Controllers_for_Saltwater_Aquariums-Digital_Aquatics-DA1115-FITEMOMI-vi.html

With ezb ,a few switching transistors, handful of leds , and relays for 110v equipment we can do everything they do and much much more.

#168  

This is a really interesting build. I'd like to see more people doing out of the norm stuff with EZ-B. Have you gotten any coworkers interested in the EZ-Robot robolution?

#169  

Oh yea I got lots of attention in the call center when I brought squeegee in.. The idea of doing these kinds of projects are scary. The hobbyist may not have confidence in what they can do given the right tools. As the progress goes on the aquarium coworkers ask how its going and love to see pictures and videos.

#170  

You can get them to start on the boxbot and whet their appetite for more. Squeegee has a lot of mods (cutting, sanding, lots of fitting). All it takes is getting the first hurdle done then the creative juices will come and take over the tougher ones. This is a fun project to follow.

#171  

Ok a little more progress. My roomate helped by wiring the switches while I was away at my moms for dinner.. User-inserted image

Im thinking I will mount ezb close to the front where the open vents are to get a tad bit better reception. Also cooling will be installed. I will probably do one 120mm and a couple 40mm near ezb heatsinks. User-inserted image

#172  

User-inserted image Heres the blue lights lit and the one green switch. The blue is incredibly bright.

User-inserted image

Im thinking I will line the relays up over on the right side. I csn easily get 5 mounted and maybe 7 relays if they are side by side with no space. Ofcourse if I really needed theres no harm in having another row. I believe 7 is plenty because the leds and other devices can be controlled by one of the switching trsnsistors.

#173  

That rackmount idea looks good. I might do the same for my rackmount i have,it looks same as yours. cases like make great place to place EZB and more i used some PH probes and underwater temperature probes for my tanks and for my GECKO cage LOOKING at networking all the cages and tanks together I found A WIFI board that can take a network connector with just a few parts

#174  

Update! I was sent home early today so I stopped by the hardware store to pickup parts to start mounting up the relays. The area under the servos has a sheet of plastic to prevent shorting to ground and there is a reasonable amount of space between each. I will need to pick up lots of heat shrink tube and crimp connects tommorow from harbor frieght. I will cover the wires and crimp on connectors all the way to the tip to reduce the amount of exposed wire. Im using dc relays to switch on and off 110v household ac to the various lights and pumps. User-inserted image I drilled out holes for machine screws in a straight line for relay mounts. User-inserted image I put machine screws in the holes and superglue them in place. This way as I am working to wire each relay the machine screws will stay in place. User-inserted image #10 washers and wingnuts tighten into place to secure the relays. User-inserted image Now that we have a nice row of relays the next step is mounting EZ Board in the location best for reception and cooling. Ezb will not be powering anything directly only enough to operate switching transistors to trip relays. The only equipment it will power are the night time leds, twinkle leds and storm leds.

#175  

I would use mosfets to turn on the relays,first i see you are using high current coils on the relays Second on using mosfets you dont need a kickback doide on the relay,few other item about using mosfets instead of transisors less heat ,easy to use then transistors,and lower current drive MOSTLY nobody uses transistors any more best way instead of relays if switching AC lines is SSR or reed switch,relays are bad because of RFI across the contacts, Switching DC no RFI problems but higher current SIMPLE SSR is a traic,cap and optocoupler with a led control ,also its well isolated

here is a simple SSR using a very common MOC3011 optocoupler and can drive straight from digital output moc3011 circuits I guess its too late for this project,so best idea is use a mosfet

#176  

Yup I already said im using switching transistors to trip the relays. I believe each one is rated for 3 amps . Thats probably 5 times what the relay would draw.

#177  

i made a new post for others about the bad problems of using transistors Make shore you add a diode across the coil contacts or the transistor will be fried from inductive kickbacks IN4002 0R IN4007 TYPE

#178  

Idea on rackmount frame looks good,may use one of mine for that,depends if it fits inside my cabinet with my saltwater stuff,plus filters and cleaning stuff. i look at making my setup real nice looking ,notthing on the outside ,like a piece of furniture

#179  

Tiny update- ok the EZ Board is now mounted and insulated from the steel case. I put it right in front of the vent and hopefully Bluetooth will still make it directly above on the second floor where the host pc is. I installed 4 fans but im still kicking around the idea of a single 120mm fan pulling air from the center. I will see if I can tolerate the 40mm fan noise when its inside the case. User-inserted image

User-inserted image

User-inserted image

#180  

I see you love using a lot of fans in your robots and designs.so far i never found a need for them IF you work out the power dispatching ,where is very little or no heat is produce

#181  

Fans add to the longevity of electronics. Heat even in smaller amounts reduces the working life. Considering this is going inside a cabinet which is probably about 82 -86 degrees I feel that its needed. The cabinet is about the same temp as the water flowing through the refugium.

#182  

not really,but if going in cabinet you may need it look at TV'S they dont need it and other electronics pulling high current and wattage way i work it out is get a good temperature probe and measure the temperature,most transistors will take high heat without thermal breakdown and mosfets are even more,most can easy handle 85 deg OR MORE ,,check the data sheet on them ,plus with a heatsink even more ,like almost 100deg without going bad (thermal runaway)

#183  

Another tiny update for today... User-inserted image I have been trimming back wires and tommorow this will be even cleaner.. User-inserted image This is the switching transistor board. Tommorow I will pick up 1k resistors and diodes to complete the circuits. These are for triggering the relays. User-inserted image

User-inserted image Here is the circuit for triggering the coil on the relays

User-inserted image To divide up the 12v pos and ground and the 5v pos and ground im using a barrier strip. This makes changing and adding additional 12v or 5v connections easy.

After 5 days without the uv light you can see the red algae on the rocks. Im glad that the maroon clows treatment is over so I could turn things back on. :)

#184  

User-inserted image I cant wait for my first thunderstorm....

#185  

The diode goes across the coil,if you look on the internet you will see it on the coil reason is that its a inductive type ,and when you apply power and then remove power the energy builds up and cause a spike called INDUCTIVE KICKBACK ,and then transistor get fried What the diod does it clamps the voltage so no KICKBACK

CATHODE IS V+ on the coil and anode is the transistor emitter

Inductive is not a lamp,its resistance load

Inductive is motors,coils and solenoids and transfomers

couple of other points on using power transistors you should have a 100k to gound just incase for false triggering,what is does it keeps it low till you get a high signal to turn it on microprocessor like used on EZB can false triggered can set it up in a script code to stay low until it needed,but can still false trigger also lower the base turn resistor to 470 ohms can help too (2 1 k in parallel) will work

FISH LOOKS REAL GOOD ALSO

I love to have a stingray like my friend thats a actor has in his 6 foot tank

#186  

User-inserted image

User-inserted image

User-inserted image

User-inserted image I picked up colored set of tape to mark and identify each type of connection. I will probably use white for 110v AC , yellow for 12v , and red for 5v. It would have cost me 40 dollars or more to get multicolor crimp connects.

#187  

looks good so far,on the multicolor crimps i get them from digikey very cheap and fast shipping

#188  

Damn. All you need now is a magnet based cleaner with x/y track that cleans the front glass every hour. It could run back and forth then lower its self and do-it again. I know those magnet glass cleaners cant be that much.

#189  

IROBOT sells a window cleaning robot

#190  

@robotmaker on a different thread, Your told me your name was FRED as is my robot..Friendly Robotic Entertainment Droid! Imitation is the sincerist form of flattery :)

#191  

Giant update! My roommate Dan wheaton helped me with rewiring the switches and relays for negative pulse to trip relays. This is because the tip120 Darlington opens to ground not positive. User-inserted image

User-inserted image

User-inserted image

User-inserted image

User-inserted image

#192  

This ezb powered on the first time. Blinking status light and no Bluetooth light but I have not updated the firmware yet. Next step is to start running the 110v power wires to the relays:) taking a break for dinner. I used plenty of zipties to clean up the wiring and drilled holes in the case where I used zipties to hold them down directly to the bottom of the case.

#193  

I have regulated 5 volts going to ezb. That should be fine right?.

United Kingdom
#194  

5v to 17v so yes, although ideal voltage is 7.2v according to the manual

#195  

Awesome Josh! an amazing build pictorial with an EZ-B at the heart. I belive this tread holds the record for the longest on the Forum! professional build too I might add :)

#196  

Thankyou irobot! , about the thread length.. The Jarvis omnibot 2000 build has 200 pages in the first thread and more in the second getting ready for paint.:) Thats a big project I started in January. Thankyou for your support! I TRY to make my builds detailed enough a novice builder could copy my results.

#197  

Thanks for the clarification on the TIP120! Where did you find the diagram?

#198  

here is a link on how to wire a TP120 correctly and in the article is shows using arduino like JOSH HAS

it shows for motors and induction loard like relays that the diode is across the motor or relay coil also shows that is controlling light it doest need the diode

how to use a TIP120

DIODE IS FOR COIL SURGE KICKBACKS or way to call is is BACK EMF can place accross he transistor but does do as good as across the coil the diode works like a voltage clamp little info about a darlington is is 2 npn transistors connected together to get double the power PNP darlington is a little better but needs a inverter circuit using another transistors

#199  

here is some info on what the diode is for You can see that in 2 of the 3 illustrations, there is a diode parallel to the device we are powering. Any time you are powering a device with a coil, such as a relay, solenoid, or motor, you need this guy, and don't leave home without it. What happens is when you stop powering the coil, a reverse voltage, up to several hundred volts, spikes back. This only lasts a few microseconds, but it is enough to kill our transistor. So this diode (only allows current to pass one way) is normally facing the wrong direction and does nothing. But when that voltage spikes comes flowing the opposite direction, the diode allows it to flow back to the coil and not the transistor. We will need a diode fast enough to react to the kickback, and strong enough to take the load. A rectifier diode like the 1N4001 or SB560 should do the job. If you are looking for extra protection you could use an optoisolator between the Arduino and the transistor. An optoisolator optically isolates both sides (high and low power) of the circuit so the high-voltage can not possibly can not come back to the microcontroller

also says about on using optoisolator witch is much better

#200  

I just took a video testing the system with two lights. Im uploading to YouTube now.

User-inserted image

User-inserted image

User-inserted image

User-inserted image

User-inserted image

User-inserted image

User-inserted image This is the Smart Aquarium controller with 5 relays setup for all the lights right now. Next will be the wave generator which is already wired.

#201  

YouTube video https://www.youtube.com/watch?v=RreB8RKv3Oc&feature=youtube_gdata_player

#202  

looks nice and neat wiring,thats what i do alot at work wiring thats neat thats care of many problems ,makes it easyto fix,also high voltage wire (ac 120) should not be near low voltage ,ac produces some noise or hum idea you should use is on the base wire going to each TIP120 you should place it away from the AC lines.like under the board or between the TIP120

#203  

https://www.youtube.com/watch?v=DUZ_dF9DDag&feature=youtube_gdata_player

Ok here is a short manual demonstration of the control unit using the manual override switches. Three sets of lights are controlled here. We will add an 18000k purple light for dawn and dusk and two wave generators next. Now I get to see if I can manage a good connection directly above on the second floor to the computer.

#204  

Despite safety precautions I still shocked myself twice lol. It was not equipment that caused it just accidentally brushed a connection. At that point I descided to tape up each connector with color coded tape. Green -ground , red 5v pos , Yellow-12v pos, white-110v AC live , Black 110v AC Neutral. I also covered the barrier strip with tape but I think I will cover it with a piece of plexiglass and 4 standoffs in the near future. Safety first kids! Don't do this project alone just in case you make a mistake and always triple check connections with a meter before applying live power.;) -Josh Starnes

#205  

safety iswhat i have to do to all my work projects ,because of ISO9001 INSPECTION ,using interlocks plus special circuits when board is tested there is no pwer and then switched on

JOSH you are near water you should have GFI built in to your box,,another item having that computer cabinet is next to water,if there is a leak or something else you will have a big big problem

On the wiring of AC YOU HAVE THE COLORS WRONG green is ground,dark is HOT (BLACK) and neutral is always WHITE i got shock a few times ,mostly fixing TV'S LONG TIME AGO ,800 volts boost voltage,gives you a burn mark and build circuits up to 4000 volts to check a special sensor at work,that was a hard tester to make is safety for production and pass the ISO 9001 standards

United Kingdom
#206  

That's backwards to over here, brown is live, blue is neutral, green/yellow is earth/ground, it used to be red live and black neutral, so certainly not dark is hot.

Is it a good idea to twist cables? I was always taught it was bad practice and not to twist, not only because you can break the wires but either eddy currents or harmonics (or something along those lines, I forget what exactly)

#207  

Ive always twisted them. Pc manufacturers twist them. Networking companies twist the connectivity wires, rc equipment manufacturers twist them as well. Its just something to do to keep them neat. The labeling inside the case is meant to make it easier to repair and expand in the future. I am not at all worried about official color codes because im mixing industry types both household electronics , pc electronics and ezb microcontroller/ rc standards. Im putting a guide on the inside of the case to be sure the color coding is not mistaken in the future. Here in America mcep and ase technitions are taught to twist wires as well.

#208  

in every project ,for work or my robots i twist the wire,its very common practice ,it blocks eddy currents for noise,if you look at network cable all wires are twisted for same reason AT work i made a machine to twist wires,and programable for production

United Kingdom
#209  

That's fair enough, maybe I'm thinking of AC? I know I was taught not to do it when I did my C&G2390/2391.

#210  

AC you dont really need to twist the wires.but you should always keep low voltage wire from AC high voltage wires to reduce any noise that can reset the microcontroller or use shielded cable another reason why network cable uses shield cable to block AC sinewave hum AC is a pulsating sinewave voltage and thats where you get noise or (hum)

#211  

JOSH i dont know if you get a low cost idea for reading temperature of the tank but ebay has them low cost $1.50 to $3 it what i paid for mine for a set of 2,i bought 5 sets from different bids only need a 10k resistor and analog port ,they are waterproof,and will need more,since i have 6 tanks so far and 3 gecko cages that needs 2 of them ,plus incubator setup

arduino thermistor probe

10k resistor should have a pot ,makes it easy to calibrate it,like 9.1 k and 2 k pot ,this way you have a range of 9.1 k at the lowest and 11.1 k at the highest adjustment

IF you want it super stable,i have ideas for it,but for EZB its not needed

#212  

In my background of telephony twisting wire is really important for all the reasons FRED(robotmaker) :) indentified. and all his other suggestions are valid!

#213  

Ok i updated software , one of my ezb had a problem so I swapped it out. https://www.youtube.com/watch?v=d-ld3Ukcz5k&feature=youtube_gdata_player

https://www.youtube.com/watch?v=hgyu7k97C4M&feature=youtube_gdata_player User-inserted image

After I did the firmware update I had a issue with my pc. After reboot it said "chassis intruded fatal error". The best I can understand is its a jumper that a switch can be attached to to indicate the case is open. I can pull the cmos battery and it starts fine with default cmos settings but once I power it down and back up it says chassis intruded fatal error and u get pretty upset. Any help , my board is M4A88T-I Deluxe Asus , its been working perfect for a while till I i put the motherboard in a case and now it did this. [

#214  

check your battery,then update the bios from website

United Kingdom
#215  

If you don't have it, download the Mobo manual from the manufacturer here, in it will show the jumpers. Failing that, the bios should have an option to disable the alert.

It looks to be in the bottom right of the mobo, next to the clear RTC. User-inserted image

United Kingdom
#216  

And use the clear CMOS jumper rather than pulling the battery, it's easier :)

#217  

he said it was working before,so i suspect is the bios problem I had a problem with my dad's computer i set the time latter it changes ,battery was good,so i update the CMOS (BIOS) by flashing it and worked ok after that

#218  

I jumpered the pins and reset bios , still does it. The only way I can get the pc started is to remove the battery and clear bios memory then power on... I have two videos to demonstrate the basics.

https://www.youtube.com/watch?v=NN8rDjpq7Ts&feature=youtube_gdata_player

Here im explaining what has been setup and tested so far.

https://www.youtube.com/watch?v=4l_cP2WTxyk&feature=youtube_gdata_player Demonstration with ezb running the three lights so far.. ;)

#219  

did you try to flash the BIOS with a new update,it could be that the bios info is messed up

United Kingdom
#220  

If having the jumper across the chassis intrusion pins (check continuity of jumper, it could be something as simple as the jumper not shorting the pins out) doesn't solve it (after clearing the RTC RAM) there is something screwed up in the BIOS and it needs re-flashing, which is easy with Asus mobos.

I trust you are clearing the RTC RAM correctly?

  1. Turn off and unplug
  2. Move jumper from 1 & 2 to 2 & 3
  3. Wait 5 to 10 seconds
  4. Move jumper back to 1 & 2
  5. Plug in and turn on

I just read that they advise removal of the battery to clear the CMOS RTC RAM, which surprised me that they didn't fit a jumper for that but they must have their reasons I guess.

#221  

Yup I checked continuity , if I move the clear cmos pin and then put it back the error remains but it I do it and also pull the battery then it will boot up and ask if I want to use default settings , I choose that and computer turns on. However once it is turned off or restarted it does it agian. Ive never flashed bios before. Do I just download it to a thumbdrive and use the ezflash option at boot?

United Kingdom
#222  

There are 2 ways on Asus boards.

EZ Flash 2, which is put the bios on USB and boot (see Asus' guide, it's more comprehensive than mine)

or

Windows, ASUS Update (start, programs, asus, asus update, asus update) Select from drop down list whichever you want (I had problems with some options with not being able to connect so try them all if you have problems). Click next Follow the on screen instructions

#223  

Thats what i said i think it needs flashing ,hope that fixes it

havent yet done it on ASUS board, But i always check all my motherboards to see if my CMOS needs a new update

Update adds a lot of extra features to the motherboard

#224  

I have not flashed the bios but the computer is working fine as long as i dont completely shut it down, im running a 24 hour test for the 3 light schedule, I tested it just a few minutes apart and everything worked flawlessly! YAY I could not get Ez cloud to connect so im pasting the example code here.

waituntiltime(08,00)
set(D1,on)
waituntiltime(10,00)
set(D2,on)
waituntiltime(18,00)
set(D2,off)
waituntiltime(20,00)
set(D1,off)
waituntiltime(20,00)
set(D3,on)
waituntiltime(08,00)
set(D3,off)
#226  

For reference D1 is actinic , D2 is Daylight 10000k and D3 is Cheato night light.

Note : Also as an update to the 1st ezb not connecting that I swapped in the video, I used a small screw driver to peel off the tape. , removed tape and pressed Bluetooth module down into the socket and this fixed both ezb with Bluetooth red light not activating. The two affected units were solarbotics pcb early models so maybe they just used double sided tape that was too thick and it was not connecting well to the main board.

United Kingdom
#227  

The only problem I can see with the script is, what happens if you start it at 09:00? It'll wait until 08:00 to move to line 2, so 23 hours.

There is a global variable $time, I would look at using that and some IFs and ELSEIFs

I'd also use :labels for say :0800 SET(D1, On) SET(D3, On) Return()

:1000 SET (D2, On) Return()

etc.. and call those up with GOTOs, but it's not necessary.

United Kingdom
#228  

Thanks to the bunch of newly added snippets in the scripts section there may be a lot of hints there for that script, if waiting until 0800 causes problems (it may not).


:begin
# Actinic
IF ($hour >= 8 and $hour < 20)
  SET(D1, On)
ELSEIF ($hour < 8 or $hour >= 20)
  SET(D1, Off)
ENDIF

# Daylight
IF ($hour >= 10 and $hour < 18)
  SET(D2, On)
ELSEIF ($hour < 10 or $hour >= 18)
  SET(D2, Off)
ENDIF

# Cheato
IF ($hour >= 20 or $hour < 8)
  SET(D3, On)
ELSEIF ($hour < 20 and $hour >= 8)
  SET(D3, Off)
ENDIF

GOTO(begin)

Note that where Cheato is on overnight and passes over from 24 to 0 the AND and OR are around the other way to Daylight and Antinic which don't.

This will just loop over and over again, you could add a SLEEP() in there if it uses too much resources on a constant loop, there is no need to check constantly, waiting for a minute or two, or even more wouldn't be the end of the world.

I've not tested it, I didn't even write it with ARC in front of me so check it. You can easily test it by replacing $hour with $test, running the script and then open the script console, enter

$test = 1

See what happens, do the same again and change $test to 2, 3, 4 etc.

United Kingdom
#229  

Slightly altered script which allows easier alteration of the times.

I've assumed Antinic is the daytime light (8am until 8pm) and Cheato is the night time light (8pm until 8am).


# Set up Daytime, Night time and Daylight hours
$DaytimeHour = 8
$NighttimeHour = 20
$DaylightOnHour = 10
$DaylightOffHour = 18

#Start the loop
:begin
# Actinic and Cheato
IF ($hour >= $DaytimeHour and $hour < $NighttimeHour)
  # Turn on the Antinic and turn off the Cheato
  SET(D1, On)
  SET(D3, Off)
ELSEIF ($hour < $DaytimeHour or $hour >= $NighttimeHour)
  # Turn off the Antinic and turn on the Cheato
  SET(D1, Off)
  SET(D3, On)
ENDIF

# Daylight
IF ($hour >= $DaylightOnHour and $hour < $DaylightOffHour)
  # Turn on the Daylight
  SET(D2, On)
ELSEIF ($hour < $DaylightOnHour or $hour >= $DaylightOffHour)
  # Turn off the Daylight
  SET(D2, Off)
ENDIF

#Wait 1 minute to reduce load on CPU
SLEEP(60000)

#Return to the start of the loop
GOTO(begin)

#230  

Might need to make a script for daylight saving times right now it gets dark about 5pm to 6pm

United Kingdom
#231  

Fetch the sunrise sunset times from the internet and have it totally automatic...

#232  

Lol I arrange the tanks "day" around my work schedule. I have a third light im adding in maybe tonight , it has a purple/uv color to it and I believe it would be ideal for dusk and dawn.

#233  

Example pic , this is that bulb on by itself , I already have the output ready to go just needs to be plugged in and added to script assuming todays test went well. We will see when I get home:) User-inserted image

Im thinking I will add this project to radioshackdiy.com , the great create

United Kingdom
#234  

I was just looking at the waituntiltime script function again and your script.

The second WaitUntilTime(20,00) (for turning D3 on) is a pointless line as it will already be 20:00 before it gets there (after turning off D2). You can remove it so that the Set(D3,On) is directly below Set(D2,Off) and the last WaitUntilTime(08,00) too, with Set(D3, Off) moved up to the top with the Set(D1,On). The script still works with both WaitForTimes though.

The major concern is if you don't start the script between 20:00 and 08:00 it will wait until 08:00 to pass line 1, so for the rest of the day it wont function.

My script will avoid that but will check the time every minute (or however often you decide by changing the Sleep(60000) at the end.

Or, you could use an IF statement at the start of the script, add labels in down the script and read the time when you start the script and goto the correct point...


IF ($hour < 8)
  GOTO(0800)
ELSEIF ($hour >= 8 and $hour < 10)
  GOTO(1000)
ELSEIF ($hour >= 10 and $hour < 18)
  GOTO(1800)
ELSEIF ($hour >=18 and $hour < 20)
  GOTO(2000)
ELSE
  GOTO(0800)
ENDIF

:0800
waituntiltime(08,00)
set(D3,off)
set(D1,on)
:1000
waituntiltime(10,00)
set(D2,on)
:1800
waituntiltime(18,00)
set(D2,off)
:2000
waituntiltime(20,00)
set(D1,off)
set(D3,on)
goto(0800)

#235  

I see DAVE has his project there B9 ROBOT

Me i use to like radio shack from long time ago,but the prices are so very high

So now i use digikey or mouser or newark to buy parts and some discounted surlpus store like electronic goldmine and others,prices so cheap with shipping and get my parts in fast about 3-4 days

#236  

I can't figure out how that last post relates to the last 3+ pages of posts.

#237  

TROY i was replying to his post about JOSH adding his project to radioshackdiy post #4

#238  

Sorry, that little bit got lost in all the posts on coding, scheduling and timing. My bad, FRED :)

#239  

THAT cool no problem,like always never ever mad my post i might added to much also,but just wanted others to know including JOSH how you can save money,radio shack is close by most ,but with tax and high prices its a lot ,plus driving i do like the radio shack small breadboard or protoboards

#240  

FIRST 24 HOUR test complete. The tank cycled through all the desired light settings with the script I posted , I will update in the morning to ensure it looped like I wanted, good so far ;)

#242  

Thats great dont forget to post the code it ,so others might need it that was the setup i had plan for my lights for my tank IF asked my sister who has a saltwater tank for years if you want me to make one for her,she said no wants just like they have in fish stores :( :(

#243  

Josh, congrats on the 24 hour test! ...though that made me think "what if" something failed in the system god for bid, so do you have a back up system? In my former job as a mainframe technician for my local telephony company (Which DJ now subscribes to, Telus Corp) our system had two identical copys running at the same time. Copy 0 and Copy 1 with one copy being online. This accomplished two things, should one copy fail the other would automatically go "online" providing Dial tone etc without any lost calls. The second reason was to perform maintenance on the "off line copy". It was 1984 when we shifted from an electromagentic stepper system to a processor capable of 12 megahertz WOW! Our reel to reel mag tapes which recorded the billing never failed! LOL ,it was a brave new world. During the first few months a full "global" ie reboot happened many times knocking down phone calls.....anyways :)

#244  

Now that my EZB saltwater tank controller has survived the first 24 hours of testing I submitted it to radioshacks Great Create

User-inserted image

User-inserted image

#246  

JOSH it says 6 lights where are the other 3 lights used for

#247  

Two actinic , two daylight , purple dawn dusk light and the chaeto night lights

#248  

OK ,i thought is was controlling 6 dirrent light setups,so you have few lights in parallel

#249  

Ok so I have new additions to the tank. I was out shopping at fish stores for the wave makers. While shopping I ran accross a crazy Lion fish Villan , he looks so sick! I also picked up a sally light foot crap , sea urchin, horseshoe crab , spiny box puffer , and a pink anemone... User-inserted image

User-inserted image

User-inserted image

User-inserted image

User-inserted image

Im looking at having two higher power wave makers , maybe 700 gpg and a smaller 400 gph on continously. I set up one of the ports to alternate the larger pumps side to side. Ill post the options ive seen so far.

#250  

Awesome Josh! Great looking fish and lighting controlled by an EZ-B niiiice! ...But I am still waiting to see a robot Nautilus! :)

#251  

One of my small tanks i have got a leak,lucky my fish are ok,so far in 3 years none died on me.

So i bought a water tank sensor for 2 reasons one is that you do need to add water now and then,since water does evaporates over time ,and second if the water goes low too fast it meens there is a leak,it can be set up in EZB easy and on mine looking to add a water pump with a small container to fill it up by EZB

second i bought 6 auto fish feeders ,one for each of my tanks so far and using 6 EZB one for each tank ,using network RJ45 Since the tanks in different rooms and every room alread as a network setup and want a very stable connection,WIFI not really stable as bluetooth,only straight wire

#252  

Ok the two wave generators are on the way. Both are made by Aqueon , Aqueon Circulation Pump 950 GPH 

User-inserted image

I lucked out and a kind individual sold me two new ones for 20 dollars each which is less than half regular price even on ebay. They will be here mid next week. :)

#253  

WOW JOSH same ones i bought on sale just last week and free shipping WONT that hurt the coral and plants ,like you said awhile back on the bubble maker i suggested

#254  

Great question fred , as long as the unit is fully submerged it will not shoot out bubbles. Naturally rivers and the ocean have a great deal of flow but as long as the current is not so strong it physically hurts the plants or corals its sll good. Saltwater tanks need a lot of flow , some argue the amount of flow from pumps and wave makers should be at least 30 times the volume of your tank ;)

#255  

I hope the flow is not strong,when i check my bubble maker the bubble was so weak didnt move my plants and the fish love it so much,they love playing in the bubbles

#256  

Josh,

Are you worried the fish will be sucked into or up to it?

#257  

GOOD suggestion DAVE, i think it would too,and motors sometimes stop,with power problem and fish get caught it,when power comes on again ,it will kill the fish Fish wont get sucked into it ,because it pushers water out.

there is a way to protect it,screen in front of it may not work to well,but current sense on power wire or power monitor,but if the motor sticks and then starts again wont help much.

So best fix is fan blade monitor,using IR or magnetic switch ,like magnet on the blade with hall effect or reed switch,,like used in alarms ,like a magnetic encoder,both easy to make.

Also JOSH you said the natural rivers and oceans have water flowing and if not too strong it wont hurt the plants or coral,that not really correct.

Reason is the plants and coral are way at the bottom and the flowing stream is near the top of the water.

#258  

When I was running a reef tank I had pumps for current flow and was afraid of this. I kept the pump towards the top of the tank and built a cage around it to keep the little critters away from the suction action of the pump. Never had a problem.

#259  

that good idea too,DAVE and seems like it will work fairly well,current flowing will depend on the cage is made,what size screen is used,you dont want it too small, or too big of holes

If making it too small of screen holes it will cut down on water current flowing ,if too big of holes small fish will get in to it.

Also that type doesnt suck water it pushes water,and intake on it does have a plastic screen if you look at the design.

#260  

All they are is a fan pushing air,where in water it pushes water instead of air

on the model JOSH got amazon has it for $18.18 including shipping

#261  

Ok today I get to move my main computer back to my room snd start working on the wierd case intruded bios error. I traded a few video games for a Acer One Aspire Netbook in great condition with win 7. This will be the new host pc for ARC software and I already had purchased extra Bluetooth adapters in my last order so once I have it charged and ARC installed I should be ready to go! I will post pics later. On a second note im starting another thread for my Nano Tank , a ten gallon saltwater aquarium which is known to be very difficult. This will be a reef / coral frag tank. Here is the ten gallon on my table I painted black. User-inserted image

The EZ board for this one is on the way so im going to start its setup , im considering making a custom setup for this one too but with many surprises involved ;)

#262  

i heard they said that a 10 gallon not great for a reef or coral tank,should of got a 20 gallon would be better less crammed up and will look better,they dont cost tha t much more.

my brother about 6 months ago,went in to his horse stable room to clear it out for horses he was getting and found the last owner had 9 10 gallons in there some with lights ,he gave them all to me ,pretty cool HUH

#263  

OK me and my roomate wired the third light which is the uv/purple color that will be on early morning and late night before completely going dark, I have installed framework 4.5 and fresh install of win7 before downloading ARC to this netbook. I wrote the script like i did before but added in the additional light schedule however i noticed i recieved and error when trying to run it. Its weird it didnt do this before. Also i noticed the ezb is connecting throught Com port 4 but i can manually toggle the digital ports on and off through ARC. the error indicated "string was not in a corrrect format Done". Any ideas why im getting this. Sorry id this post was not written well as its 2am and a hour ago I took two Sleeping pills from Unisom so Im seriously Drowsy. Anyways see anything I missed? Syntax error check did not find any format issue.

:Start WaitUntilTime(06:00)Set(D4,on) WaitUntilTime(08:00)Set(D1,on) WaitUntilTime(08:01)Set(D4,off) WaitUntilTime(10:00)Set(D2,on) WaitUntilTime(18:00)Set(D2,off) WaitUntilTime(20:00)Set(D1,off) WaitUntilTime(20:00)Set(D4,on) WaitUntilTime(22:00)Set(D4,off) WaitUntilTime(22:01)Set(D3,on) WaitUntilTime(05:59)Set(D3,off) Goto(Start)

#264  

looks easy,might use it for mine,will work for my 4 fish tanks ,plus my 3 gecko cages

JOSH you going to make a temperature monitor and PH monitor for your tanks

And what about a auto fish feeder

#265  

I copied in and pasted my previous script but added :Begin at the top and goto(Begin) at the bottom so it resets the script once a days cycle is completed. At least this is what I understand it will do. :)


:begin
waituntiltime(08,00)
set(D1,on)
waituntiltime(10,00)
set(D2,on)
waituntiltime(18,00)
set(D2,off)
waituntiltime(20,00)
set(D1,off)
waituntiltime(20,00)
set(D3,on)
waituntiltime(08,00)
set(D3,off)
goto(begin)
United Kingdom
#266  

If you are dead set on using WaitUntilTime rather than and If ElseIf loop with the $hour variable I would make these small changes to simplify the code a little and group all of the Sets to the same WaitUntilTime;


:begin
waituntiltime(08,00)
set(D3,off)
set(D1,on)
waituntiltime(10,00)
set(D2,on)
waituntiltime(18,00)
set(D2,off)
waituntiltime(20,00)
set(D1,off)
set(D3,on)
goto(begin)

Although I would advise using the If ElseIf loop over WaitUntilTime or at the very least an If ElseIf before :begin to point ARC to the right place in the script to start just in case you need to reboot outside of the 20:00 to 08:00 window for any reason therefore avoiding having to wait until 8am of the following day for the script to move past line 2.

#267  

Hello rich , I tried listing two actions like you show in line 3 and 4 and ez script throws an error that it cannot be ran because it is entered in a incorrect format. So im just trying to do what ez script is allowing me at the moment and gradually work the bugs out.

#268  

Hey Josh, for what it's worth I tried a simple 3 line code with waituntiltime and 2 digital port sets and it ran ok. Are you sure all was typed in right?

#269  

Copy n paste how your script looks troy

#270  

update i tried it with out copy and paste and RICH's code works perfect no syntax errors

i just uploaded it to EZ-Cloud as lightscript under incomplete robots at the bottom of page ,try it, it works

#271  

Just this:

waituntiltime(08,00)
set(D1,off)
set(D2,on)

It was just before 8am here so I started it and watched it run then stop.

United Kingdom
#272  

I can't say I've ever used the WaitUntilTime command so am not 100% sure how it works but logically thinking it should go down the script, hit a WaitUntilTime command, hang until the specified time then continue on, which it seems like it does from the other replies.

If the script is working and you aren't too fussed by how it's working then leave it and iron out any bugs later on if you want to. I'm just all for nice neat optimised code labelled up, commented etc. (it really helps when future modifications are required).

#273  

Ok I will rewrite the script tonight and give it another go , this is a development so additional features will be addes in. One very important feature I must add is a reconnect script. I turned off Bluetooth power management and power management policy in windows and disabled usb power management but every few hours it may drop Bluetooth connection. Anyone have autoconnect ideas ;)?

United Kingdom
#274  

I'm looking to sort out an auto-reconnect solution for my bot, I haven't done anything about it yet but once I have I'll let you know.

#275  

JOSH are you adding temperature monitor to your saltwater tank design

#276  

Yes , temp , salinity , water level alerts , and nitrate measuring will be added in the next couple of months. Because living things depend on this system im adding in one feature at a time and testing as I go. Next features to be added are the alternating wave system when the aqueon pumps arrive this week and night lighting leds.

#277  

ok thats what i am using in mine PH monitor ,temp water levels and salinity i bought already most of my sensors i need ,plus HUMIDITY sensors for my gecko tanks Need to buy a PH monitor tester to calibrate my PH sensor about $20 on ebay

i do have part # and where i got each sensor including water level sensor if you need them to help you out in your project

#278  

Sure if you would post them with links and price that would be great , thankyou

#280  

about the PH sensor it does need a small circuit and sensor its about $19

all other sensors easy to interface

But second idea is to buy a digital PH monitor and may be tap in the circuit with 0-5 volts out for ADC on EZB i will need to buy t of them ,its about $30,since might need for for calibration

PH monitor for fish tanks

all ther sensors under $4 except for humidity sensor and board

United Kingdom
#281  

Can ARC read that Humidity/Temp sensor?

#282  

Yes it has a analog output for temperature,on the humidity is simple frequency to voltage circuit

But i think on the humidity output you may be able to use a digital port .like on sonar when is reads a frequency (pwm output) on the echo pin

I have made a few frequency circiuts .one using a 55 timer and others using a frequency to voltage chip

#283  

ALSO here is the board to go with the PH sensor

ph sensor board also with this board can measure oxidation or ORP levels it has a analog output

#284  

I will check those out robotmaker , thank you

I started to test out a zero water filter. The purpose is to remove chlorine , heavy metals and floride from water added to the tank. The eventual idea is to have a primo style water dispenser next to the fish tank. As ezb reads the water level has dropped it would simply pull prefiltered water from the dispenser into the tank by a small pump. It could take a couple months to evaporare enough water from the dispenser that I would need to fill it. At that point all I would need to do is swap out the water container for a full one. Super simple! User-inserted image 072 ppm tap water before filtration User-inserted image 000 ppm heavy metal and chlorine content after zero water filtration.

#285  

thats whay i am doing on mine,having a small container and when the water evaporate,i use the pump to re-filled along with the water level switch

#286  

The current generators arrived and I started playing with placement. I have two options , one on each end pointed to the center or where inpositioned them now which actually pushes against the glass and then dispurses. After the current generators are connected to ezb I will make a final descision where they will be mounted. User-inserted image

User-inserted image

User-inserted image

Ok so now you see the current placement , I understand that mounting them on the ends may make them more effective but I don't want the flow so strong it keeps sand kicked up.

#287  

Small update video , the marine environment is shaping up and I have the wave makers in the tank. Next step is to wire the wave makers and have them alternate about every minute. https://www.youtube.com/watch?v=wH49rjTS420&feature=youtube_gdata_player

#288  

I have been having a disconnect problem im trying to solve , maybe a quick reconnect script I can add in. I know its an option I just have not used it yet. Reconnect is somthing I would like to add to the next revision of the projects scripting.

#289  

JOSH what happen to this project is it DEAD

#290  

Nope I am moving this week to get out of my apartment before the 1st which means I will need to breakdown the fish tank. So I have put this on hold till after I move and get settled.

#291  

SO it meens you are moving to florida where i am at

I am looking to move to a bigger house,but so far house i want near a lake and large land they want about $450k and max i want to pay is $300k so need to keep looking

#293  

Yes I have seen lots of episodes of tanked. All of them I believe;)

#294  

MINE getting close to them ,looking to buy another tank this one 200 gallons

Trying to make it like chuck norris tank thats more then 6 feet long maybe 500 gallons or more.

He has a house in west palm beach near my brother and very good friends with him . SUPER NICE GUY CHUCK is.only he loves to drink a lot like my big brother.

#296  

good size I have that one only not glass ,ACYRLIC is the best to get,more clearer and stronger then glass ,plus lighter

#297  

Yes its also very pricy and non one pays crazy money for my designs lol , fred you need to take me under your wing , show me how you make the big bucks.

#299  

I was thinking of making a larger tank with acrylic but the tank is for turtles (4) and there nails will scratch acrylic

#300  

Yes I have sea urchins and they will chew up acrylic too.

#301  

Just a tiny update. This ezboard has been running 24 hours a day 7 days a week and was only turned off twice , once from a power outage and other from me moving. Other than that it has had continuous operation since Jan when the wait till script timing was introduced. I have not made upgrades because the intent is to integrate the salt water system as part of what Jarvis controls at some point.

#302  

Hi Josh, how are you going to measure PH. I want to measure PH and EC for a plant growing EZ robot based system. There are plenty of arduino shields for this. I'm thinking connecting to an EZ robot would require hacking a sensor from an off the shelf device. Any thoughts? BTW, thanks for posting your aquarium travels, it's been interesting!

#303  

Hey this project was dead since I moved because the next steps were to make a brand new case to hold ezb parts , a new stand and a autofeeding system. There are autofeeders out there but I need something custom to feed a few times over a few minutes. Also I want a larger capacity as well to hold 2 weeks to a month's worth of food at a time. It took three months since moving to train the fish to eat the flake without any sign of their natural food. They are all predators so this was a challenge. Non predator fish would eat flake of most types without training. I did a short video proving it can in fact be done. I showed the local fish guys and they were pretty impressed. Dry processed food is much cheaper too so there are many benefits. Now that I'm finally getting settled in my new place I will get to develop those project more. :)

#304  

https://www.youtube.com/watch?v=_VqIQsvq15E&feature=youtube_gdata_player

Video demonstration of predatory live feed fish trained to eat flake as a primary diet.

#305  

Good news on the lion fish eating flake.

#307  

I enjoyed your salt water adventure. I used to have a large aquarium also, but mine was fresh water. I used it for 15 years until I contaminated it where no fish could live in it. After trying so many times, I converted it to a terarium. Good to see you making good use out of the EZB.

Thanks for sharing.

Mel

#308  

I'm glad your enjoying it. The trips not over it's just certain projects or hobbies are seasonal. I didn't want to be inside as much during the summer buy fall is here and now the indoor projects will pickup.

PRO
New Zealand
#309  

Hey Josh check this out!

http://www.instructables.com/contest/ageofaquariums/

#310  

Sweet Tamieon ! Thats great , i would love to do a tutorial