Asked — Edited

First Build Questions

Greetings!

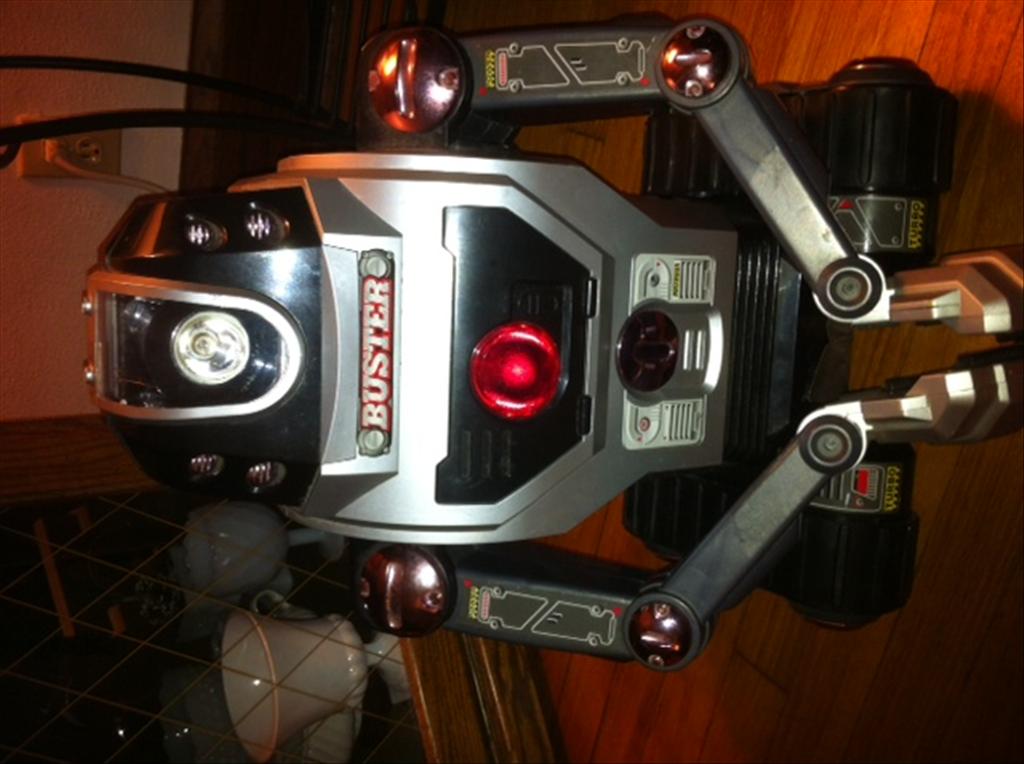
I picked up a BUSTER bot which I hope to turn into a real robot.

Since this is my first build, and I have no background in robotics, just a desire to create - I have a ton of questions.

  1. Buster operates on 6 "c" cells located in a compartment between his treads underneath. I would like to replace this and seal up the hole, creating, I hope, more usable interior space. Part of this is due to the fact the door is gone, so I'd have to fabricate one in order to keep using "c" cells, part of this is hoping that there is a more efficient method of battery power (hopefully rechargeable!) So the question is: what would be an equal or better replacement?

User-inserted image

  1. I haven't cracked him open yet, to see how he works, but he runs commands through a wired controller, which is quite thick. I have not been able to get him to power on, but I did read online that he likes high quality batteries, and he was shipped to me with Family Dollar batteries! So I don't know what works in terms of motors and what doesn't.

  2. With this in mind, here are the mods I'd like to make:

Camera to replace "spotlight" in head Separate head from body (it is now stationary) and add geared assembly and motor to enable head to turn. Add sensors front and back - I want to let Buster "feel" his surroundings, not sure if I need active or passive sensors or both EZB Board - so my scarecrow can have a brain! Possible replacement of servos to update those in arms Possible replacement of motors for treads Remote control with voice command capability (Buster has a speaker to allow speech through the remote now).

So, I am so new, I don't even know how to start. The EZB kit I think would provide me with a lot of the parts I would need. I know the motion sensors are available at Radio Shack (passive $9.99, active $29.99).

Can you all recommend parts dealers and ideas on how to proceed (if there are any Milwaukee, WI builders - let me know!). I'm especially eager to solve this "c" battery bank, hoping a pair of RC Nicad battery would be better? Possibly using a solar panel to charge?

If anyone has a manual, I'd love to see it, I'd like to know just what he did. He was sold in 2000, so he's a tween, and you know how they can be!

I use a Gen 1 MacBook Pro, so I'll need some ideas for programming the board with a Mac.

Thanks in advance for your help!
Kent

:)


ARC Pro

Upgrade to ARC Pro

Join the ARC Pro community and gain access to a wealth of resources and support, ensuring your robot's success.

#1  

I just started on my own project not too long ago. Here's what I would tell myself:

  1. Order the complete EZ-B kit. You're going to need everything it comes with and more but it'll keep you busy for a while.
  2. Don't worry about how the old robot worked. You're only interested in it for the shell anyhow. Crack it open and take out all the guts. You'll be replacing most of them with stuff that comes with the EZ-B kit.
  3. Don't worry about the existing battery pack. You're going to replace it with you're own battery. Most people seem to get a 7.2V NiMh battery RC car battery. I personally use 6 AA eneloops because I don't need more than 2000 mAhs between charges.
  4. Get the robot up and running on the EZ-B first. Worry about solar power, touch sensors, etc. later. The kit comes with enough stuff to get you started.
  5. Go through the forum and just read a bunch of old posts. Not everything is going to make sense at first but as you progress, you'll remember something you read and you'll know to search for the thread later.

I hope this helps and I hope you have as much fun as I've been having!

#2  

Welcome! I agree with what Choyster said. I also recommend staying away from Radio Shack if you can - you will pay twice as much as other sources. Ebay is always good, All Electronics and Sparkfun are also good. In fact, I got a 6 VDC rechargable battery for omnibot from All Electronics for $10 bucks, and they had a 12 VDC for like 15 bucks. I am using a 7.2 NiMh for the EZ-B and the 6 VDC for my motors and heavy duty servos. Enjoy!

#3  

If you are in the west or southwest, Frys Electronics is good if you don't have the patience for waiting on stuff to ship from Hong Kong when you buy from eBay (seems all the good cheap stuff is there). Less expensive and wider selection than Radio Shack. Unfortunately, there is nothing similar for us East coasters. Every time I travel to California though I take an extra suitcase so I can stock up on parts and toys....

Alan

#4  

Frys rocks! I hit the one in Phoenix whenever I'm there (the inlaws).

#5  

Hello Kent and welcome. I am also working on a Buster. Buster I have done alot of the things you have suggested you would like to do. Please let me know if you have any questions. Best regards, Roger the bookmaker and Buster.

#6  

Great Info! Thanks you guys!

I'm kind of excited to see another Buster! Seems to be a pretty cool bot, with tons of potential.

Roger, did you have plans to sever the head and put it on a track so it can turn at least to the side? Were you mounting the camera in the old spotlight area?

Does everyone use something like JB Plastic Weld to fabricate and re-attach parts?

I have to clear a space in the basement of my landlady's house to build on. I guess I'll do the de-construction until I can buy the kit.

How big is the camera? it looks huge! I was thinking of getting an old cell phone camera, is that too small?

Bret - do you have a B-9 that you've made work? I have to confess that that's the robot that got me thinking a hundred years ago!

Thanks again! Kent

#7  

@cv66seabear - the camera is really pretty small when you remove it from the housing, I have one in my omnibot. I do have a 2 foot tall B-9 I have been working on as well. Right now he just has some cool lights, his antenna rotate, bubble moves up and down, and he says "My sensors indicate an intruder is present" if you get too close. He doesn't move yet as his original drive system was pathetic. I have stripped a RAD robot and will be using the tracks for mobility. But he is on the back burner until I finish my omnibot. As soon as I get back to him I'll post. ;)

#8  

He Doesn't say "Danger, Danger, Will Robinson!" ? :)

#10  

Hi Kent, I mounted the camera in a ball that sits in the old spot light hole and moves up and down and the head moves horizontally so I have both axis. As Bret said the camera is really small and fits well. No plans just kind of went with the flow. I use a hot glue gun for most hacks but a little epoxy when it needs to be a little stronger. When I cut Buster's head off I simply put in a support for the servo and mounted his head on the servo. Good luck to you and let me know if you have any questions or need any help. Regards, Roger

#11  

"I mounted the camera in a ball that sits in the old spot light hole and moves up and down..."

@Bookmaker - Oh! So that's how you made that look so slick! cool I've watched that Buster video over and over because it's so cool and also to try and figure out how you made the camera mounted in the spot light hole look so professional.

If you have or could maybe post close up photos of how you did that with the camera mounted in a ball, I'd love to see how you did it. Thanks! :)

#13  

JT, Here is a picture of the back of Buster's head with the back cover removed. User-inserted image I just cut a few holes in one of my dog's play balls and placed the camera in with a little packing foam. I attached a mini servo on the left and a pivot on the right.

and here is the front with the shield removed. Note how perfectly the sonar sensor fit the duel ports on Buster's right side. Just dumb luck!!

User-inserted image Let me know if you have any questions.

#14  

That is slick! I find that most of my robotics is just dumb luck haha. :D

#15  

Hay Bret, What is inside the arms on the B-9? Do they move on the toy? Does he walk?

#16  

You can push the arms in and they lock with a spring like a dart gun. A button on the back releases them. The robot does have two drive wheels with two motors and moves okay. The original remote he moved forward and turned in reverse like a cheap radio control toy. But you talk through the remote and he does have some voice tracks. I plan on putting mine on the RAD drive section to have actual tracks and servos in the arms to make them move around and have the claws work (they are spring closed now).

#17  

Hey Roger,

DOH! I didn't realize you had included the link to your Buster!

He is totally awesome! I wish I knew how to fabricate arms like that! Did you buy aluminium stock and drill holes for servos, etc., or did you actually machine parts? Would you share drawings later?

I was considering buying some kind of alternative arm, or a hand that would grab, since, as you know buster only as the ability to "clap" and pick up things with both hands.

Really an amazing job - and your first build?!?!?! I absolutely love how cool he is, and he does everything i want mine to do! Do you have distance sensors? Are the lights on his left side LED's?.

My Buster didn't come with the stabilizing wheel on the back - do you think this is a necessary thing? I think it would be very easy to fabricate if it's a necesasry thing, perhaps a ball wheel (like a Dyson) to make turning easier?

I am a children's librarian, and hope to also earn how to use servos to make puppets that will talk to kids and change expressions, etc. It would be fun (and more like a soft-skinned robot, than a puppet!

I'm reading the Robot Builder's Bonanza, hoping I get some good tips there, but I have to say - you guys (and gals) building here, are amazing! Thanks for your help, now I have to try and read every post on the site!

Kent

#18  

You could also use PVC pipe for the arm structures.

#19  

Kent, I made the arms using aluminum tubing and solid. I machined everything myself and made allot fit into what came with Buster. Sorry, I didn't do any drawings. You can see the sensors mounted on the right side of his head in the picture above. I put LED's in the holes on the other side. I am working on a movie showing off his arm and hand. I am also working on the finishing touches for his left arm. As far as the back wheel goes I didn't use it until I increased the voltage and he would fall over backwards if I took off to fast. I would see how it works and only use one if you need it.

#20  

Yeah...I was looking at your "ball turret" mount, and then noticed the sensor post! The LED's are so bright! So the ball is a hollow plastic ball, or rubber? as long as your dog doesn't get jealous and smell his scent on it and go after Buster!

Did you add a base to the head? Can you send a pic of the rotating mechanism? Do you have the one sensor? Or are there more in the lower body?

I really love the way he works. I can't think of anything to add!

#21  

@Bookmaker - thank you very much! Truly inspiring work. cool I really appreciate the insight to your Buster build. Gets the brain juices flowing for my Robie Sr.

One of your dog's play balls, huh? I also hope your dog doesn't secretly have it in for Buster or at least his eye! ;)

#22  

Well, the ball is similar to a ping pong ball. And as far as my dog goes, I don't think he will miss it. User-inserted image

Kent, I did add a piece of wood to the upper torso for a base to attach the head servo. User-inserted image

#23  

LOL! Yeah, maybe he won't miss that one toy... ! (Can the deduction be made that you have no children - but a very happy dog?) :D

So the head servo is under the wood? the camera is small! looks like a piece of felt to help the head glide quietly as it turns, very smart!

What range of motion does it give his head? Got a closeup of an arm? Did you use wires to create "tendons"?

What kind of tools did you use in the arm fabrication - anything special? (like a metal lathe or something, or just regular tools, drill, hacksaw/dremel, etc)

Did you use a Dremel to sever the head, or is the speed to high, and it will melt the plastic?