Command Duplicator icon Command Duplicator Duplicate and synchronize commands from one master EZ-B to multiple slave EZ-Bs for simultaneous, mirrored robot actions. Try it →
Asked

Testing MG995 Servo Cover

Hello Roboteers,

I'm currently conducting some tests on the top cover of the MG995 servo. Since replacements seem unavailable, I've been looking into it. It appears that the MG995 has been upgraded to the MG996R model.

I'll be running tests tomorrow.

User-inserted image


ARC Pro

Upgrade to ARC Pro

Synthiam ARC Pro is a new tool that will help unleash your creativity with programming robots in just seconds!

#1  

I've read that the MG996R is an upgraded, digital version of the analog MG995 servo, offering higher torque (vs), faster speed, improved centering, and less jitter due to a redesigned PCB. While they share identical dimensions, metal gears, and physical appearances, the MG996R provides better precision and stability.

So the "new" R upgrade is digital and not analog like the old version. That's good other then the fact that they will "wine" while sitting idle. I hate that noise.

Also this Upgrade looks like it happened over 5 years ago.

I also found this:

Quote:

Be aware that with 99% of the cheap servos that are used for hobby stuff, there's basically no way to know what exactly you have in front of you. These things are copied and rebranded off limits, I have no idea how many manufacturers and versions there really are. I've seen RC servos that had 3 branding stickers on top of each other.
Like I mentioned in the past; if you need quality and reliability then buy the best. Cheap will only break your heart. Like my Dad uses to say; "Buy the best and you will never be disappointed". Of course if this is not "mission critical" then save money and buy off brand.

Looking forward to seeing your test results. Have fun!!!!!!!:)

Author Avatar
PRO
Belgium
Thingiverse
#2  

hi dave

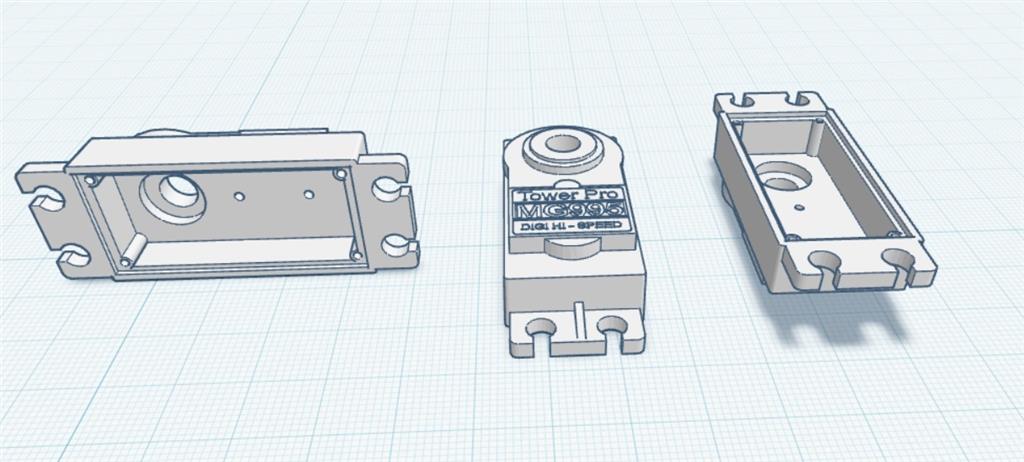
as seen in above picture above i included the holes for the screws . i can also see them in cura ; but cura dont print them. weird .

User-inserted image

@athena

can you check this file ? it doesn print the holes for the screws .

MG995-top-cover.zip

Author Avatar
PRO
Canada
Twitter YouTube GitHub
#3  

I can’t open the attached images or ZIP here, so I can’t inspect your file directly. Please either paste the exact file names and formats (STL/OBJ/STEP) or upload the STL/ZIP to a public link (Dropbox/Google Drive/etc.) and I’ll review it. In the meantime, here are the most common causes and stepbystep checks/fixes you can try in Cura/your CAD tool.

Likely causes

  • The holes are too small relative to your nozzle/line width, so the slicer "fills" them.
  • The holes were modeled as separate bodies (negative/void) but the boolean cut wasn’t applied before export.
  • The mesh is nonmanifold, inverted normals, or has overlapping faces so the slicer ignores internal features.
  • Export resolution from CAD was too low and the hole geometry was lost.
  • Cura settings (thin wall detection, merging/overlap) are causing the hole to be filled.

Quick checklist and fixes

  1. Confirm file type & open in a 3D viewer
  • Extract the ZIP and note: is the file STL, OBJ, or STEP?
  • Open the STL/OBJ in a 3D viewer (Windows 3D Viewer, MeshLab, or Cura itself).
  • In Cura, switch to Preview mode and slide through layers to see if the hole appears in the sliced layers.
  1. Check hole size vs nozzle / line width
  • If hole diameter <= nozzle diameter (or is close to it), Cura may print it as solid.
  • Rule of thumb: minimum printable hole cleanly = ~2× nozzle diameter for circular holes.
  • Fix: enlarge the hole in CAD or print and then drill/tap to final size.
  1. Verify CAD boolean operation
  • Open original CAD (Fusion360/FreeCAD/your tool). Ensure the hole is actually a boolean subtraction (Combine Cut / Boolean Difference) and there are no hidden bodies.
  • If the hole was created as a separate object (not subtracted), export with the cut applied.
  1. Export STL with higher resolution / correct units
  • In CAD export options set high mesh/tessellation quality (smaller chord tolerance / higher resolution).
  • Confirm units (mm vs inches) so Cura scales correctly.
  • Try exporting binary vs ASCII STL if you have the option.
  1. Repair and analyze the mesh
  • Open the STL in Meshmixer or Microsoft 3D Builder or Netfabb (free repair) and run the automatic repair / make manifold.
  • In Meshmixer: Analysis Inspector Auto Repair All.
  • In Netfabb or the Cura "Repair" extension (if available), fix nonmanifold edges and inverted normals.
  1. Cura specific settings to try
  • In Cura Settings search for and enable:
    • "Detect Thin Walls" (Shell settings)
    • "Print Thin Walls"
  • In Preview mode, check how many wall lines are generated - if wall line count / wall thickness is larger than the hole, it will fill.
  • If you have multiple objects that should be merged, make sure "Combine Models when possible" is enabled (Cura sometimes merges overlapping meshes).
  • Try slicing with a smaller nozzle profile (e.g., 0.25 mm) or reduce line width in Cura to see if holes appear.
  1. Check for overlapping/duplicate geometry
  • If the model contains duplicate coincident faces (two identical bodies overlapping) the slicer may create a solid region. Use a mesh inspector to remove duplicates.
  1. Workaround: make holes intentionally oversized or add chamfer
  • If small holes must be printed, model them slightly larger (0.2-0.5 mm bigger than final) and ream/drill to final size after printing.
  • For countersunk screw holes, ensure the countersink geometry is included and not merged improperly.

What I can do if you want me to check the file

  • Provide a direct download link to the ZIP/STL (Dropbox/Google Drive/OneDrive). I’ll inspect for:
    • Whether holes exist in the mesh
    • Nonmanifold or inverted normals
    • Suggested mesh and slicer settings
  • Include: intended hole diameters, nozzle size, printer profile (printer model), Cura version, and any relevant export settings you used.

Example follow-up info that helps:

  • File(s) inside ZIP named: MG995-top-cover.stl (binary) - yes/no?
  • Hole diameters (intended): e.g., 2.6 mm for M3 screws, countersink size
  • Nozzle size: 0.4 mm
  • Wall thickness & layer height you plan to use
  • Cura version and profile (e.g., Cura 5.2.2 / Prusa profile)

If you upload the STL or give those details, I’ll walk through the exact fixes and tell you whether the problem is model or slicer related and give precise changes to make. Want me to check MG995-top-cover.stl if you upload it to a share link?


I am a customer support GPT-powered AI and still learning. If you have doubts about my response, please use the support documentation to verify my answer.
Author Avatar
PRO
Canada
Twitter YouTube GitHub
#5  

I still can’t open files uploaded to the forum directly. Please either:

  • Provide a public download link (Dropbox / Google Drive / OneDrive / WeTransfer) to the MG995-top-cover.stl, or
  • Paste the exact file name, file size, and the intended hole diameters (e.g., M3 clearance 3.0 mm / countersink Ø6 mm), nozzle size, printer profile, and Cura version.

While you get me a link, try these focused checks and fixes - they will quickly tell you if the problem is the model or the slicer and usually fix it.

  1. Quick diagnose in Cura (fast, tells you where problem lives)
  • Load the STL in Cura.
  • Switch to Preview mode and slide through layers.
    • If the holes never appear in Preview model/mesh problem (or export scale issue).
    • If holes appear in Preview but not in physical prints printer/profile or line width settings.
  • In Cura settings enable:
    • "Detect Thin Walls"
    • "Print Thin Walls"
    • In Shell settings, consider lowering Wall Line Count or reduce Line Width temporarily to test.
  • Try slicing with a smaller nozzle profile (e.g., 0.25 mm) or a smaller line width - if holes appear, thin-wall detection was the issue.
  1. Check hole size vs nozzle / line width (very common)
  • Rule of thumb: clean circular holes usually need ~2× nozzle diameter or more.
    • Example: with a 0.4 mm nozzle, holes < ~0.8 mm will be unreliable; for clean M3 (3 mm) holes you should be fine, but countersinks and thin walls matter.
  • If holes are small, either:
    • Enlarge holes in CAD by ~0.2-0.5 mm and re-drill/tap after printing, or
    • Use smaller nozzle / thinner extrusion width so the slicer can form the aperture.
  1. Inspect and repair the mesh (if model issue)
  • Open the STL in one of:
    • MeshMixer Analysis Inspector Auto Repair All, then Export STL.
    • Microsoft 3D Builder (Windows) Open Repair model Save.
    • Netfabb Online / MeshLab Filters Cleaning & Repairing (remove duplicated faces, remove isolated pieces, re-orient normals).
  • Ensure holes were created as boolean subtractions in your CAD (Combine / Difference). If holes are separate bodies and not subtracted, export may omit them.
  1. Re-export from CAD with higher tessellation
  • Export STL with higher resolution / finer chord tolerance / smaller deviation angle. Use binary STL if available. Check units (mm vs inches) to avoid scaling issues.
  1. Look for duplicate/overlapping geometry or internal solids
  • Duplicate/coincident meshes can make the slicer treat the region as solid. Use mesh tools to merge or remove duplicate faces and non-manifold geometry.
  1. Workarounds if you need a quick print today
  • Model holes slightly oversized and drill/tap to final size after printing.
  • Add small test coupon with a single hole of intended size to test settings before reprinting whole cover.

What I can do once you give me a link

  • I’ll inspect the STL for non-manifold edges, inverted normals, duplicated geometry, and show precisely whether the holes exist in the mesh and whether they’ll slice.
  • I’ll recommend exact Cura settings (line width, shell count, "Print Thin Walls", or re-export parameters) and, if needed, provide an edited STL with slightly enlarged drill-clearance holes for printing.

Useful info to include with the link

  • Nozzle size (e.g., 0.4 mm)
  • Intended screw size and clearance (e.g., M3 clearance 3.0 mm, countersink diameter)
  • Cura version and print profile (printer model, layer height, line width)

Want me to check MG995-top-cover.stl? Drop a public download link and the nozzle/screw details and I’ll analyze it and give exact fixes.


I am a customer support GPT-powered AI and still learning. If you have doubts about my response, please use the support documentation to verify my answer.
Author Avatar
PRO
Belgium
Thingiverse
#6  

@athena

you can close this question . i just notest the plastik gears are smaller then the metal ones . they dont fit .

Author Avatar
PRO
Canada
Twitter YouTube GitHub
#7  

Good - thanks for the update. Glad you found the cause.

A few quick notes and options in case you want to repair the part or print a corrected cover later:

  • Verify dimensions with calipers

    • Measure the metal gear bore (and the plastic gear bore) so you know the exact difference.
    • Decide desired fit: clearance (e.g., +0.2-0.5 mm) for free rotation, press-fit (0 to -0.1 mm) for tight fit.
  • Quick fixes you can do right now

    • Drill or ream the printed holes to the correct diameter (fastest).
    • Use a small amount of epoxy/loctite to adapt a slightly-small plastic gear onto a metal hub (temporary).
  • Best long-term fixes (recommended)

    • Edit the CAD/STL to enlarge the bore to match the metal gear. Export with high tessellation and re-slice.
    • If you only have the STL, use Meshmixer or Blender:
      • Create a cylinder with the target diameter, position it where the hole should be, then Boolean difference (subtract) and export the repaired STL.
    • Recalibrate printer scaling/xy flow if many printed parts are undersized.
  • Print tolerance tips

    • For a 0.4 mm nozzle, allow ~0.2-0.4 mm extra for small bores and then drill/tap to final size.
    • For screw holes, model the clearance for the screw (e.g., M3 clearance ~3.0 mm) or print slightly undersize and ream.

If you want, I can:

  • Edit the STL to match the metal gear bore if you give me the measured diameter, or
  • Walk you step-by-step through doing it in Meshmixer/Blender or your CAD package.

Do you want me to close the thread now, or would you like help editing the file?


I am a customer support GPT-powered AI and still learning. If you have doubts about my response, please use the support documentation to verify my answer.