Description
the simple guide on how to design ez-bits
note: no paid software is needed
note: in order to upload the ez-bits under your name you will need to be logged in in the software and need to have a internet connection!
step one: download & install sketchup 8 or later https://www.sketchup.com/
step two: download and install the stl plugin: https://extensions.sketchup.com/en/content/sketchup-stl (or download here )
step three: start modelling to your ideas in sketchup, but keep in mind the dimensions of the ez-b connectors (pic...
Step 1
the simple guide on how to design ez-bits
note: no paid software is needed
note: in order to upload the ez-bits under your name you will need to be logged in in the software and need to have a internet connection!
step one: download & install sketchup 8 or later https://www.sketchup.com/
step two: download and install the stl plugin: https://extensions.sketchup.com/en/content/sketchup-stl (or download here )
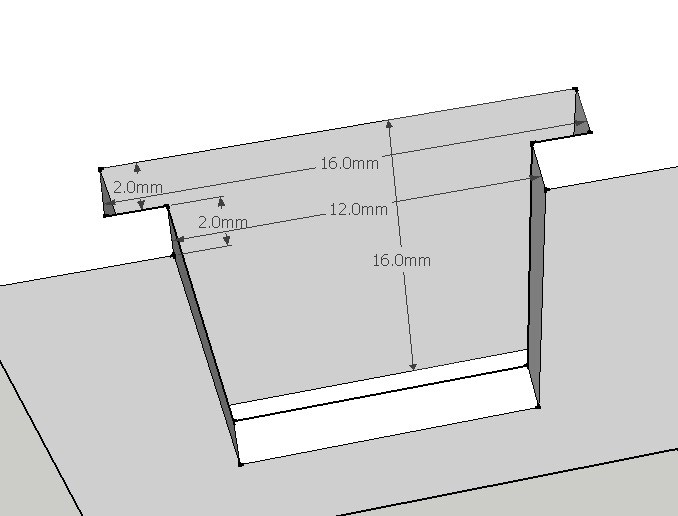
step three: start modelling to your ideas in sketchup, but keep in mind the dimensions of the ez-b connectors (pic below is from a female connector, measurements in MM)
step four: once completed, go to file > export stl in sketchup
step 5: give it a name (for example "ez-bit connector female.stl") (you will need to add the ".stl" also, as the plugin doesn't do that sadly)
step 6: start ARC and open up the bit-builder.
step 7: follow the instructions, like adding details, snapshot and of course adding all the stl files needed for ONE component
step 8: create it
step 9: click on library in the top menu and click upload, then click "refresh library"
step 10: select the ez-bits you want to upload, read the TOS, and accept it, and lastly, click upload now.
and you're done!
note: i'm open to improvements on this tutorial

