


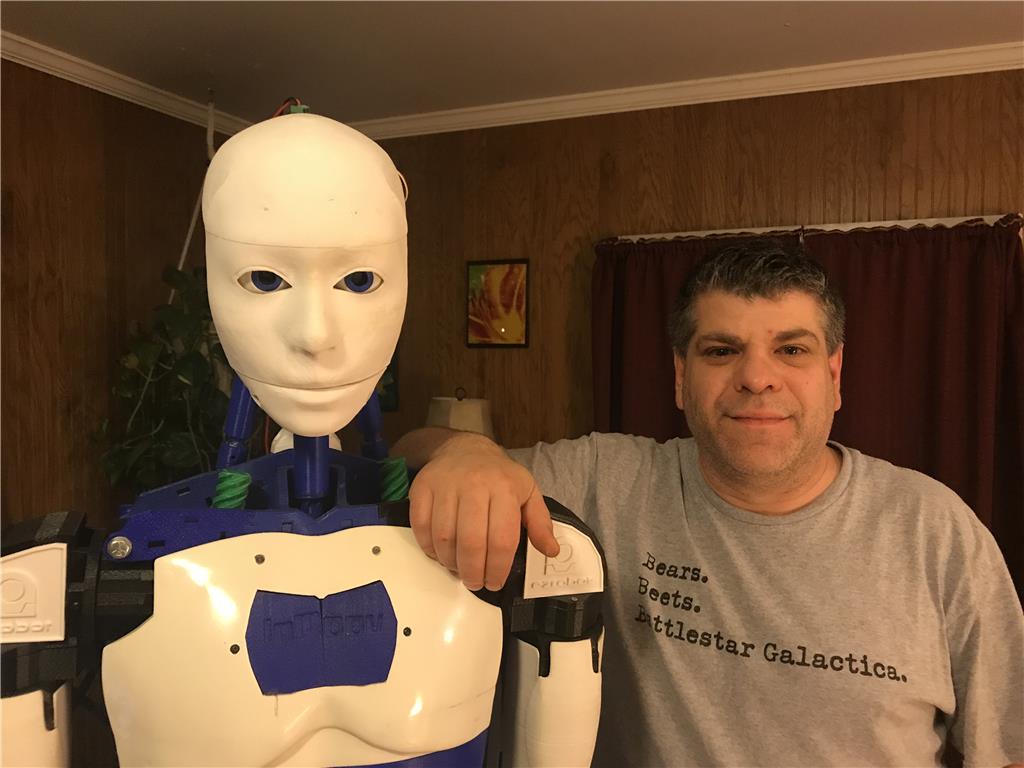
Hello all, I wanted to start my own thread to discuss my Inmoov and my conversion to EZ Robot. I appreciate all the work by the MRL guys but I struggle with it. I am indebted to the help they gave me but I needed something a little more along in development with some documentation.
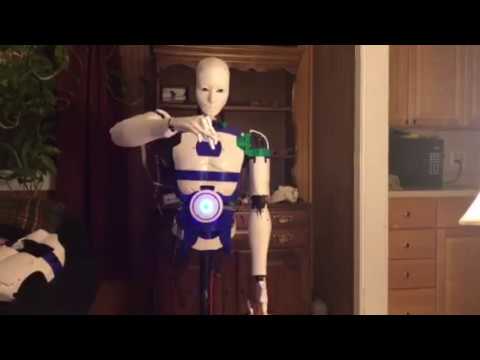
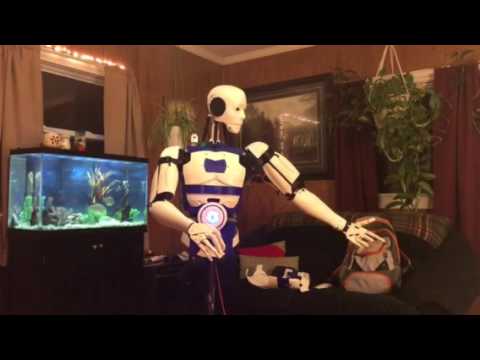
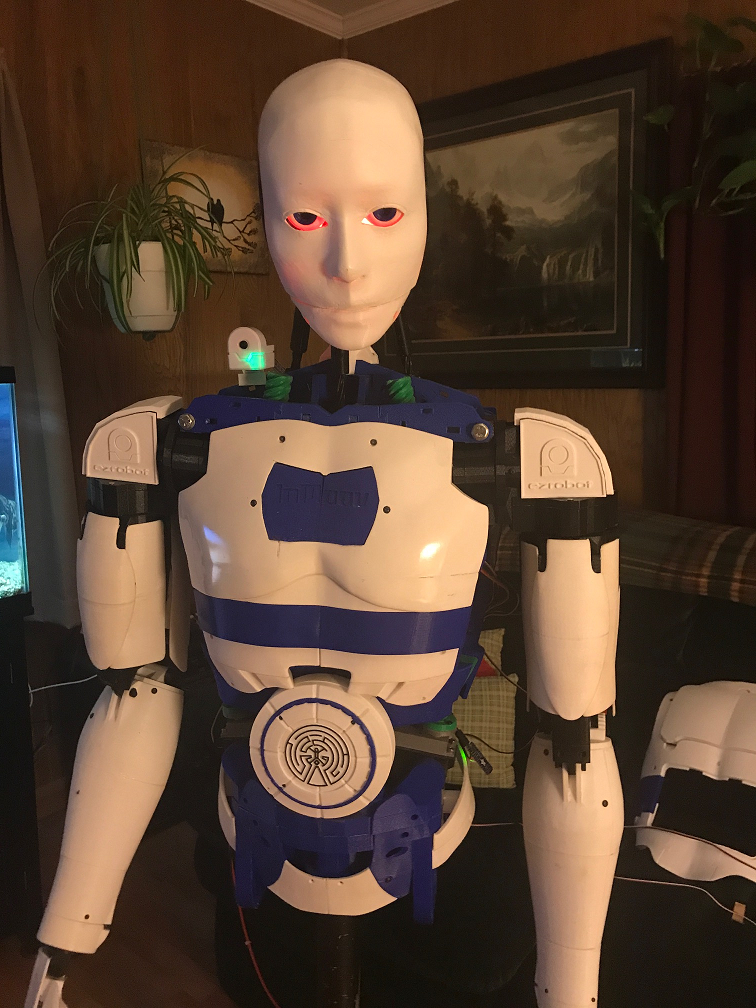
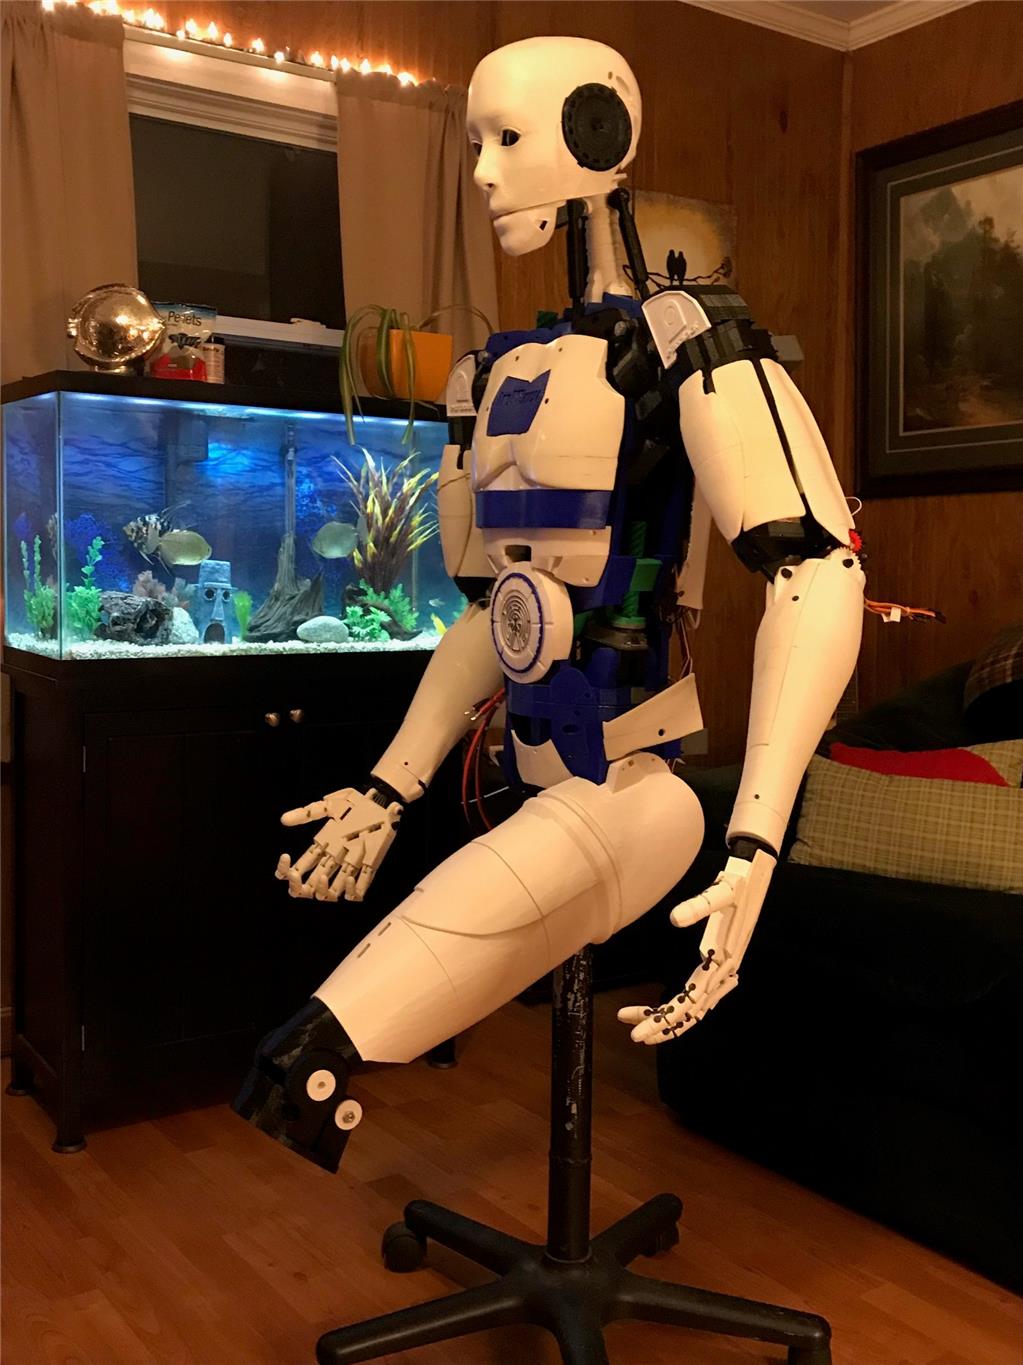
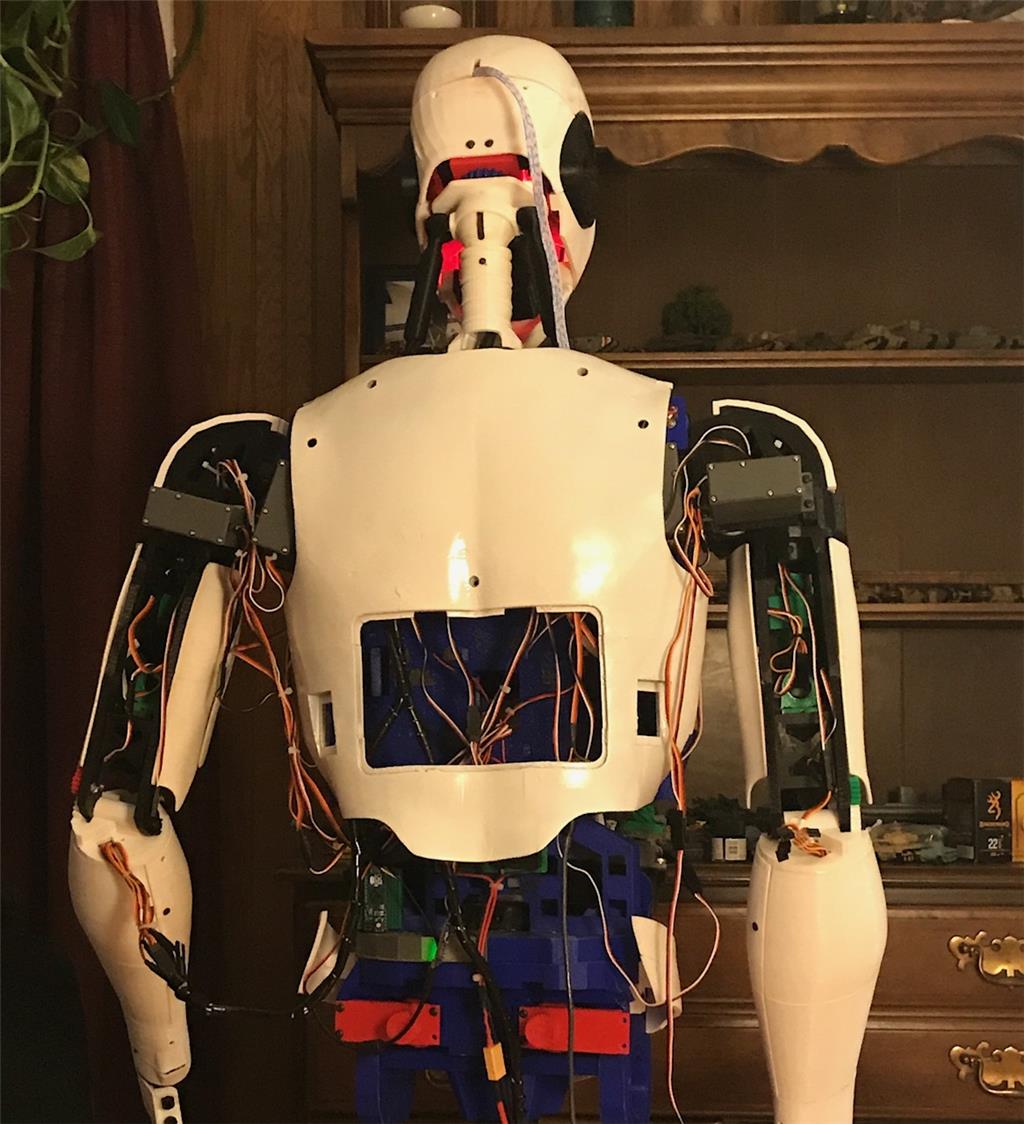
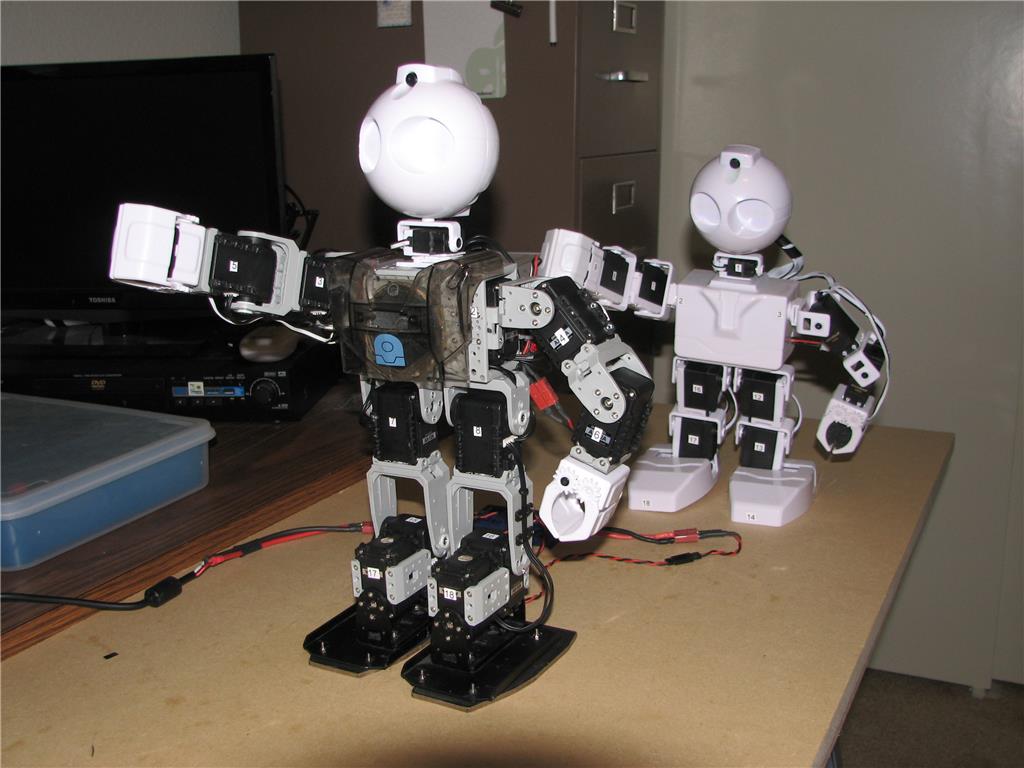
So here is my guy. Pretty standard build as far as inmoov's go.
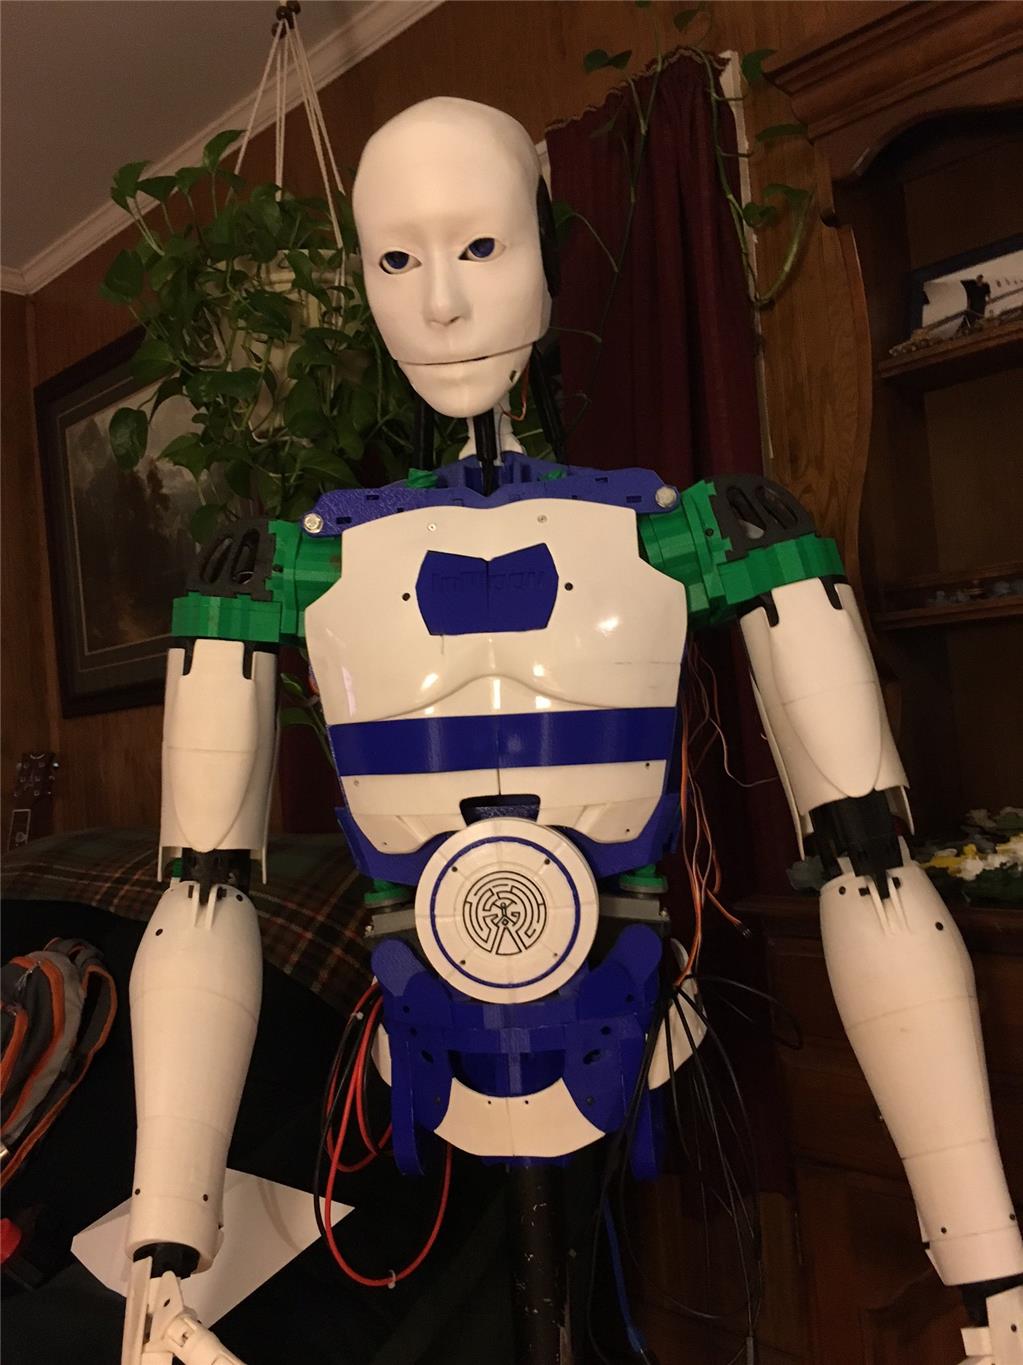
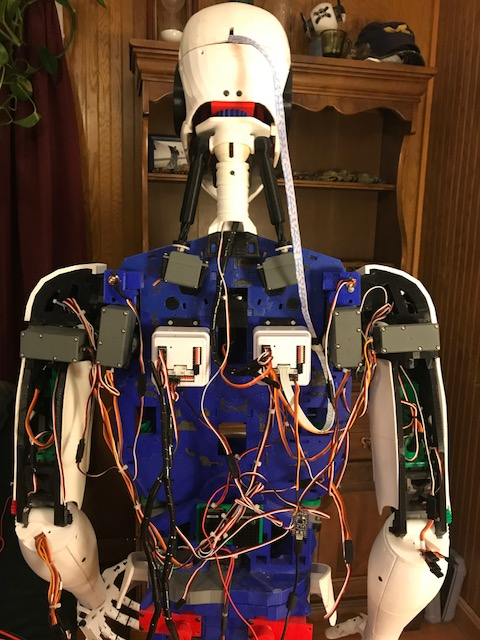
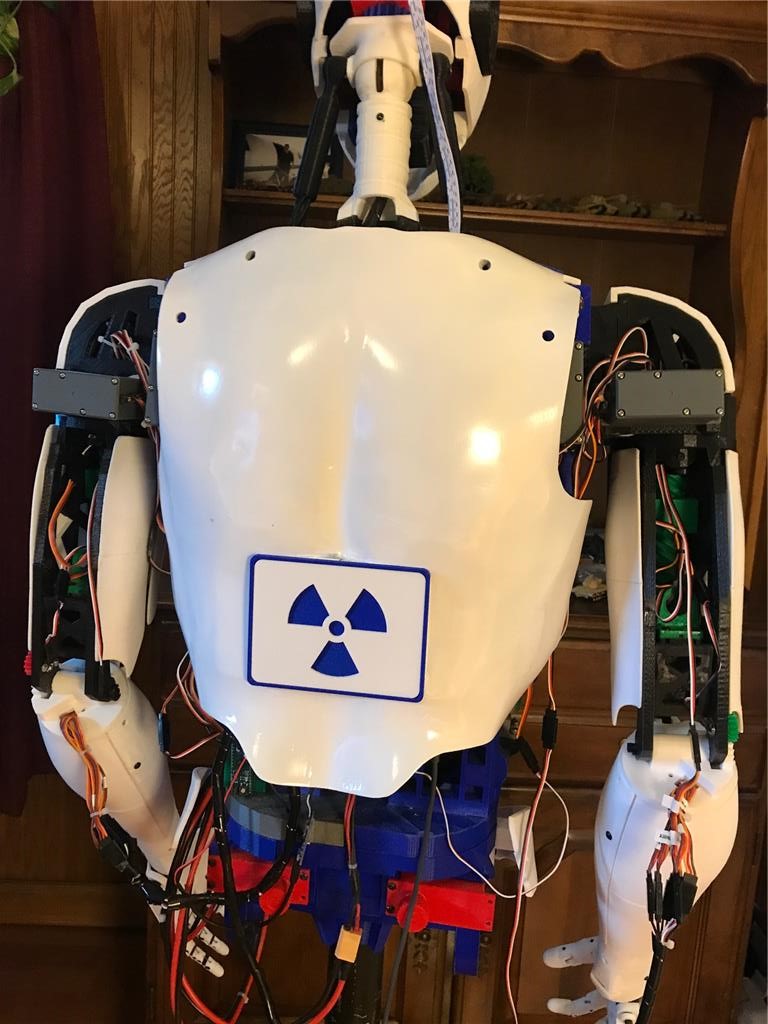
Here's the back. All the standard inmoov components. Dual 256 Megas, Nervo boards USB hub, Power supplys etc.
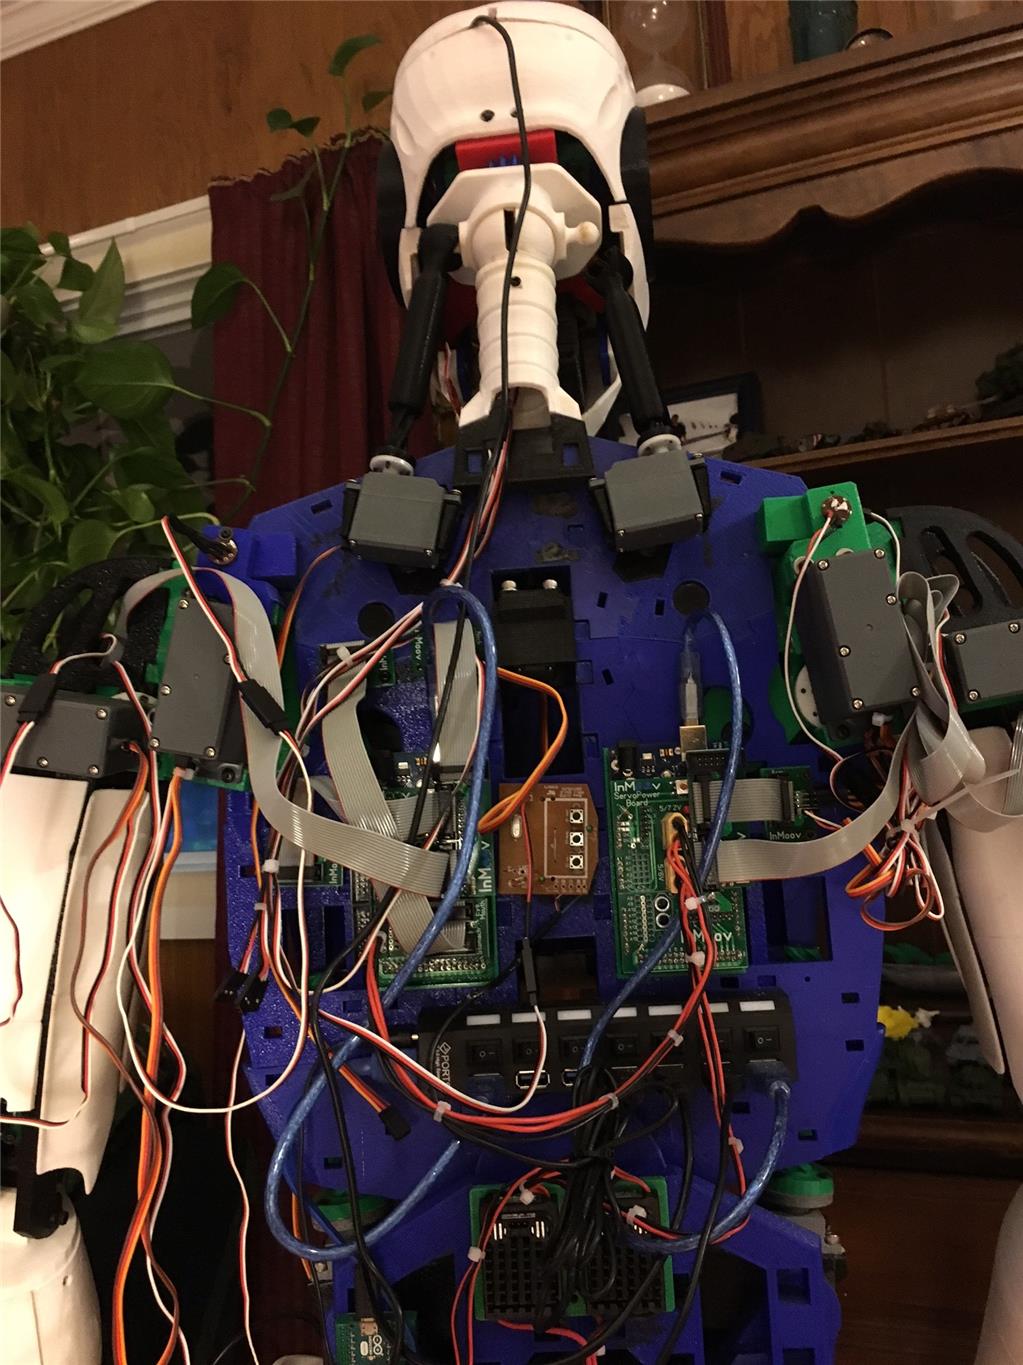
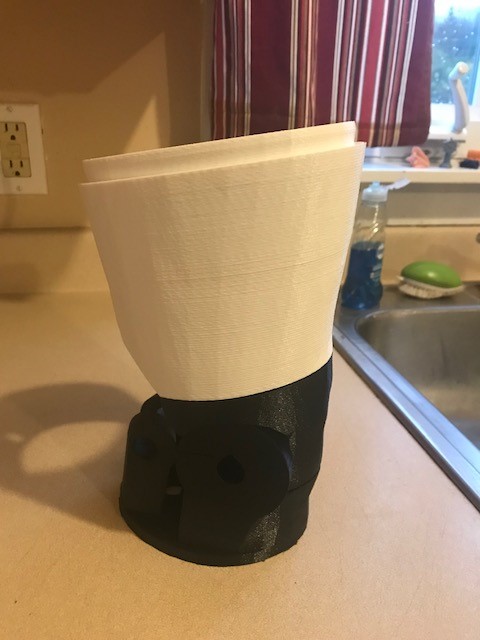
So the tear down begins. I need to clean up that wiring too. What a rats nest!
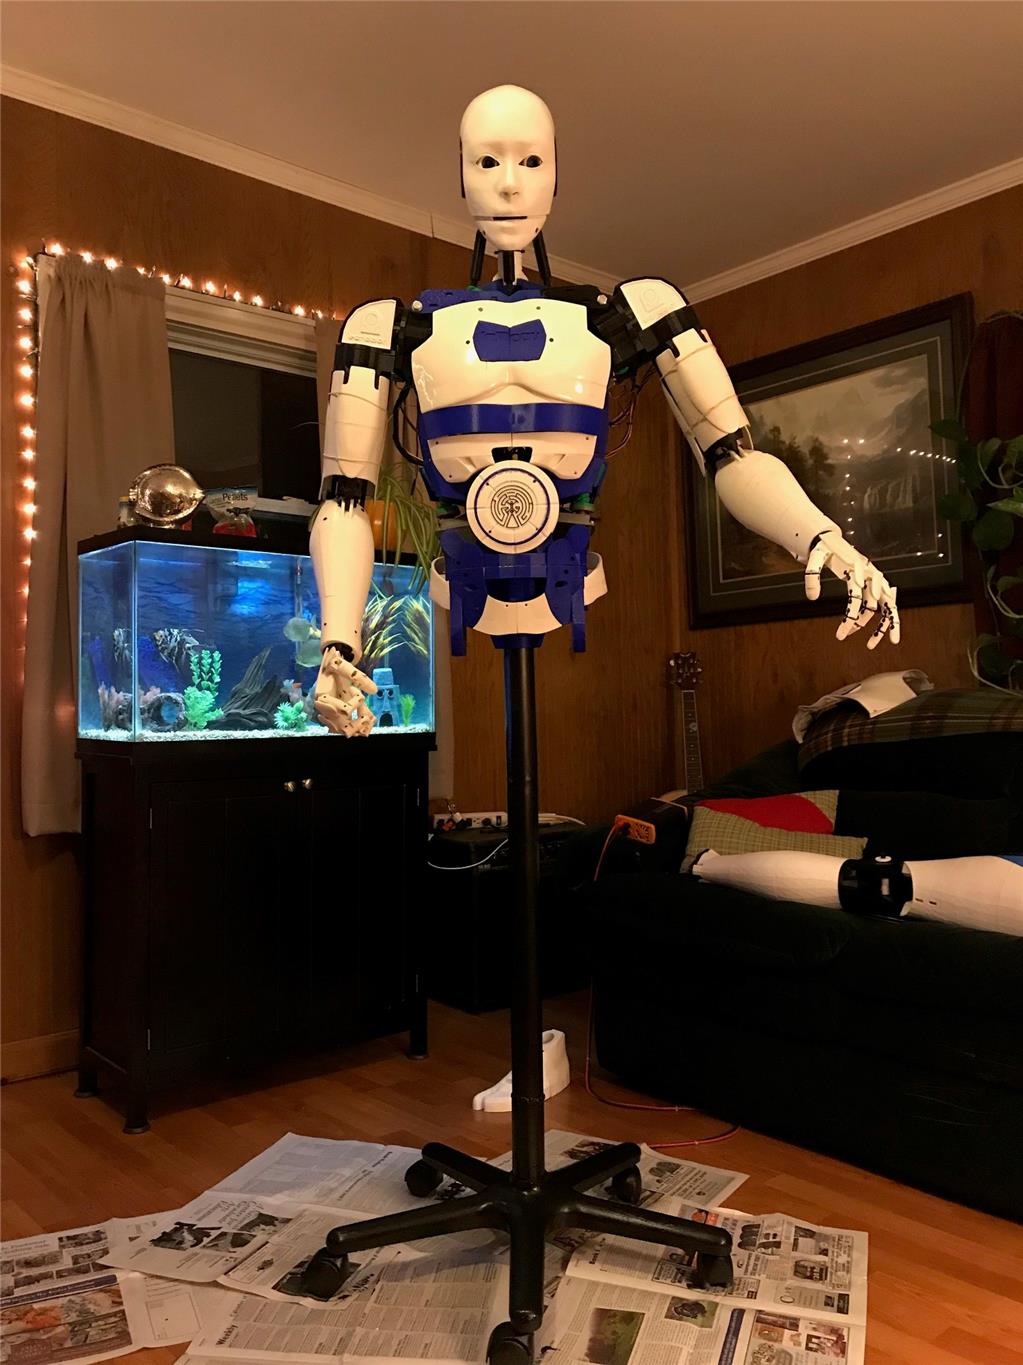
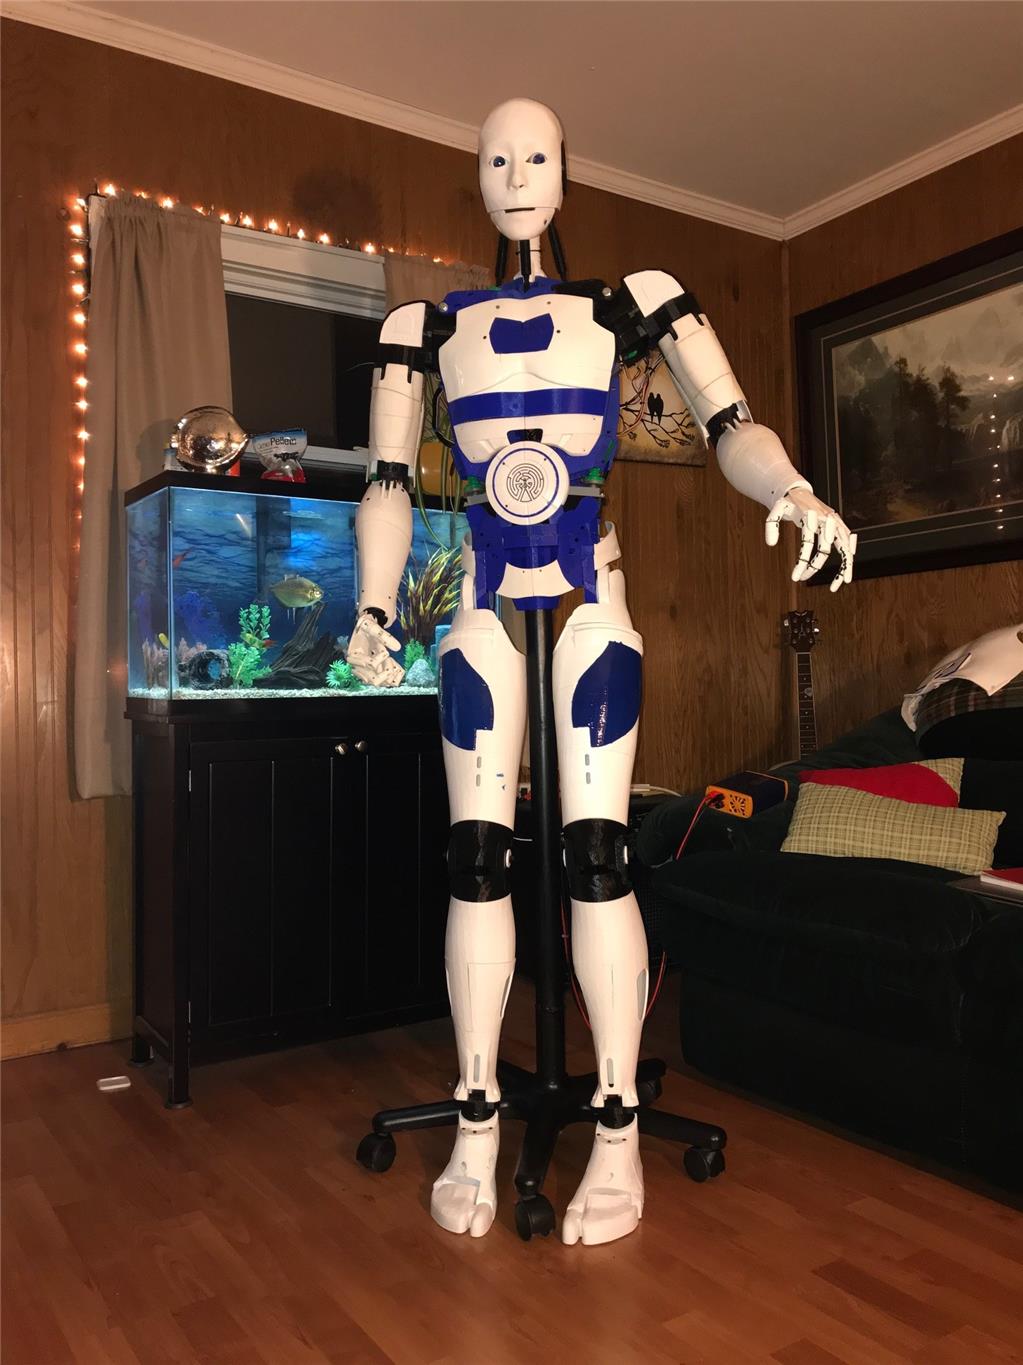
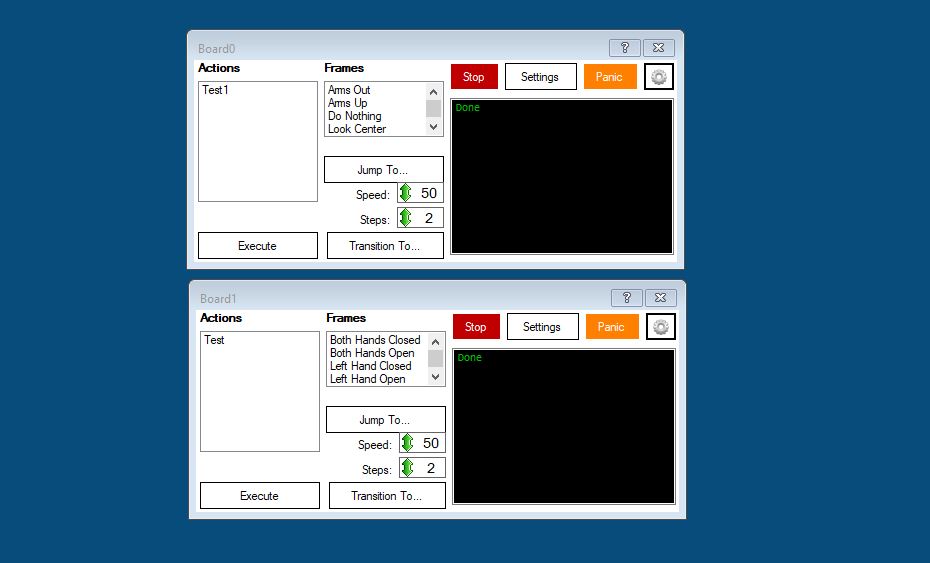
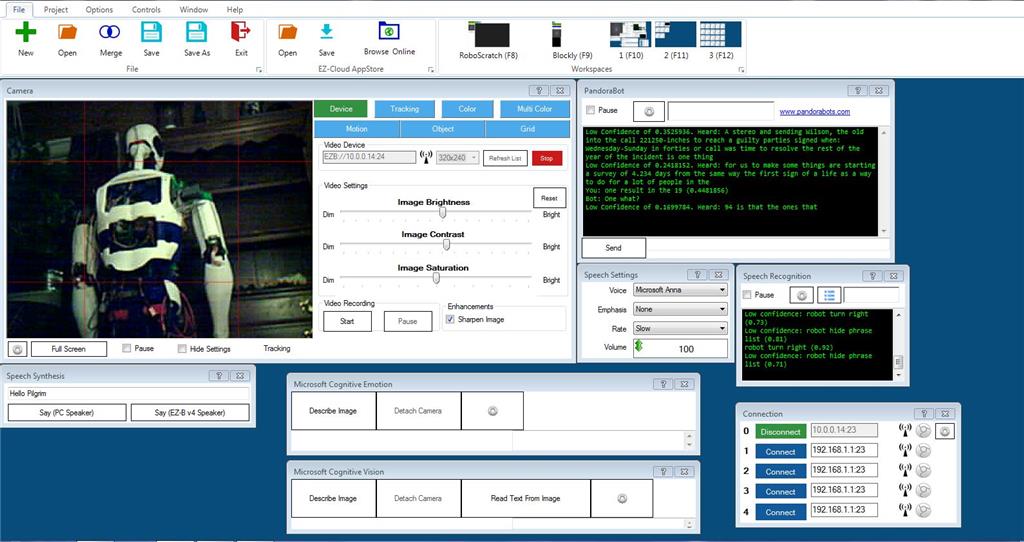
I just received my EZR controller and camera so I have no idea how to program it yet. I figured I would at least try to set up a GUI that allows me to manually move the servos like the MRL swing GUI. Five or six hours later and a few tutorials and I have this three screen model. I was easily able to add way more than basic servo control.
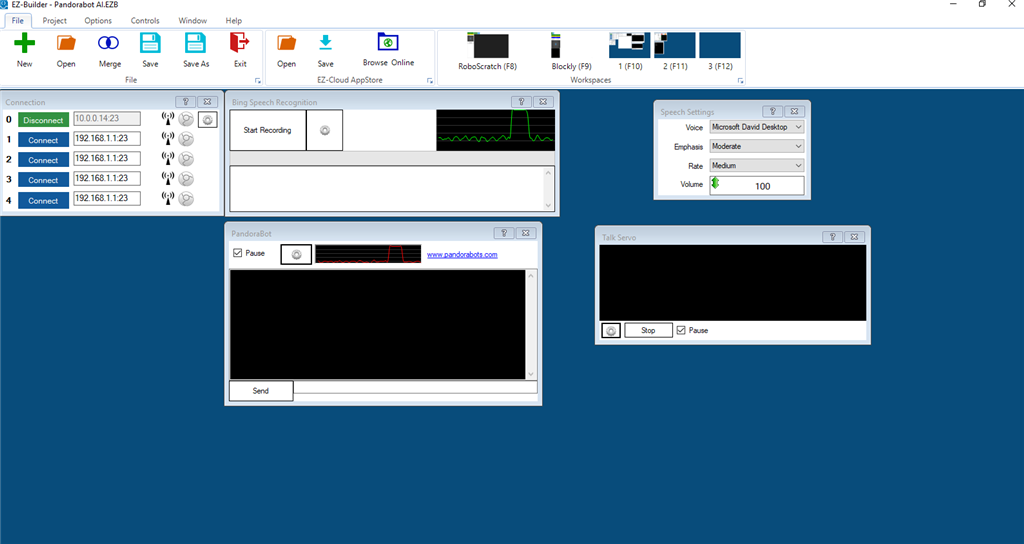
Here is the main control screen. Contains the face tracking speech functions and a custom Pandorabot for AI. Some MS cognitive stuff as well.
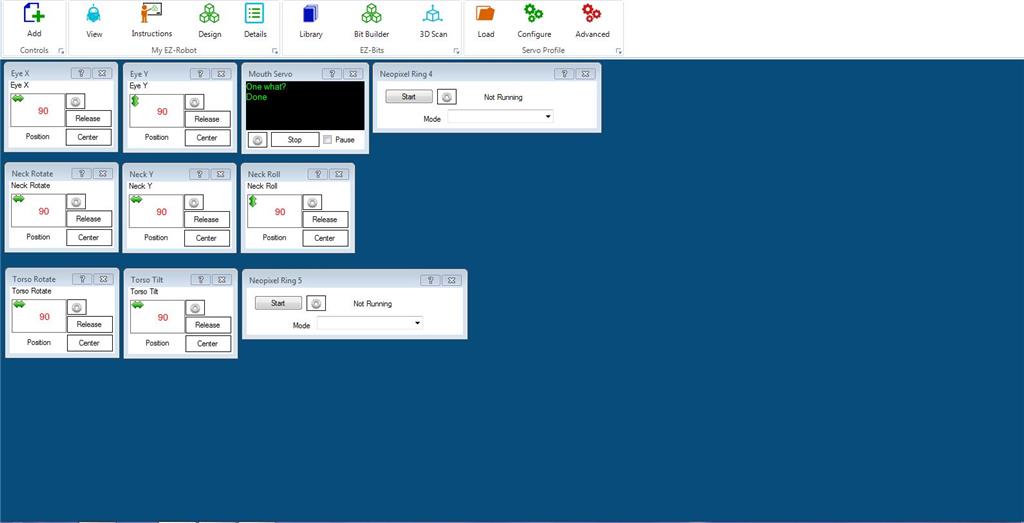
Here is the second screen. Head functions with a mouth control servo, neck, torso, and the 2 neopixel rings I have.
Third screen is for the arms and hands
So now I pretty much have all the same functionality I had in MRL give or take. I am pretty sure I am not doing this entirely correctly but it will come with time. Need to get into the scripting. I guess there are some tutorials to watch. So far my experience has been pretty good and in a day eclipsed my MRL progress of the last 6 months.
I'll update this thread with my progress and appreciate any feedback.
Other robots from Synthiam community

DJ's Ips (Indoor Positioning System)
Robotz012248's My Desktop Trio Of Robots

Awesome start.
Before getting into scripting, I would start looking at auto-position. It allows you to easily build animations of servos moving in concert rather than just triggering them individually. Then tackle scripting where you execute your autopositions based on various triggers. Much easier than trying to script servos one at a time.
Alan
Welcome to the club. Nice InMoov, I've seen it on InMoov's site. I too started out with MRL and then switched over EZ Robot. You are really going to like it here! As Alan said work with the Auto Position control - that's how I do all of my movements/animations - with some scripting as well you can operate everything very easily.
Alright, that's two people telling me to start looking at the Auto Position function. Sounds like my weekend homework has been assigned.
@Perry_S make it 3.. the autopositioner is a God send for creating inMoov movements and animations...
Just a bit of advise when using the Auto Position Control. Start out by creating a frame that has all of the servos in a position that would be the 'Rest' position. Then connect to the EZB. If you don't create this frame before connecting to the EZB all of the servos will go to 90 degrees when you connect to the EZB. Then to create other positions, start with the robot in this position, connected, then create a new frame and move the servos into the position you want. I learned this the hard way and broke some joints when everything went to 90 degrees.
My InMoov project is in the App store - Bob's InMoov
Thanks for that advice Bob. I have really bunged things up before with servo positions and scaling with MRL. Broke more than a few servos as they initialized waiting for the limits to be set. One of the main reasons I migrated.
Haven't had a chance to look... does Auto Position work with virtual servos i.e. Dynamixels? Thanks Chris
Yes! Auto Position Control works very well with Dynamixels.
Hi, I am just beginning my InMoov build and will be using the e-z robot system. Really looks like something that I can sink my teeth into. This will be my first robot build/experience so I am pumped. Good to see others that migrated from MRL as it looked very awkward to learn and use.
What type of power supply are you guys using for bench testing? I know they want you to use the battery power supply they sell but for working out problems on the bench a wall power supply would be advantageous. Any amazon.ca or ebay.ca links would help.
I bought one of these... more than enough juice for an entire inMoov... 6V Power supply
Perfect, Thanks Richard.
@RR, Thant's a great find and price. I spent well over $100 on a 60amp unit but it provided 12v. I see the one you linked to is a 6v, 50 amp unit. Do you Inmoov guys run any other devices that have higher voltage needs? Do you just boost the voltages with converters? If so what kind of boost converter do you use?
I know it's pretty common to buck voltages but to boost I've found a lot of heat is produced and you also have a lot of wasted energy if your using liner converters. Have you found a switching converter that would ease this issue? I do know switching converters are more efficient but do cause electrical noise. Maybe this isn't even a worry you guys have.
@Dave.... I use it with any project that requires 6V (I actually bought 2 from him)... This guy sells lots of models with higher voltage if you need that. I actually haven't done any projects that require various voltages so I have not used any kind of a buck converter yet... FYI I know these are the real deal as the fan rarely comes on even with inMoov fully flailing about....
Hints: I have separate power bus lines direct to modified InMoov breakout boards. I took the plastic sockets for the 14 wire plugs off, then unsoldered all but the signal pins. So the signal pins ONLY go to the EZBv4/2 and the servos get their power direct from a SLA 6VDC bat thru a switch bank I designed and mounted at the back of the neck: http://www.thingiverse.com/thing:2168436
The EZB which will only handle 5amps continuous and 20A spike.
First I added all the servos in the Project tab > Details menu > Port Summary tab.
From the Connection control (gear icon) I create a single Init Script on Board 0 (I use two boards for the my InMoov) Setting servo speeds must be prefaced with setting the servo's position (the first time round), and I set min max while I'm at it:
Next I created some scripts using the Script Manager control to test the InMoov - head, L arm, R arm, Torso with a bunch of SayEZB("testing this and that") followed by servo position commands to all the min maxes.
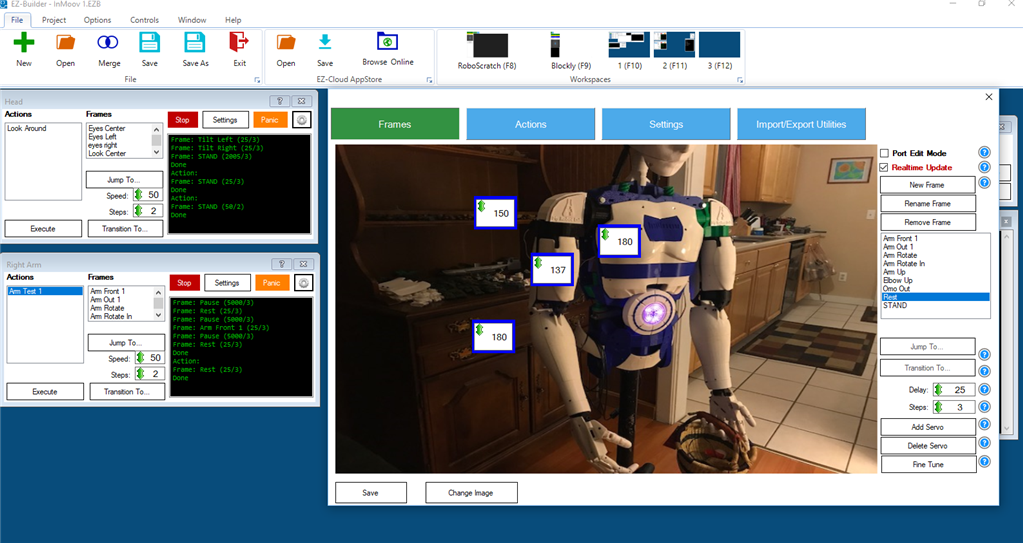
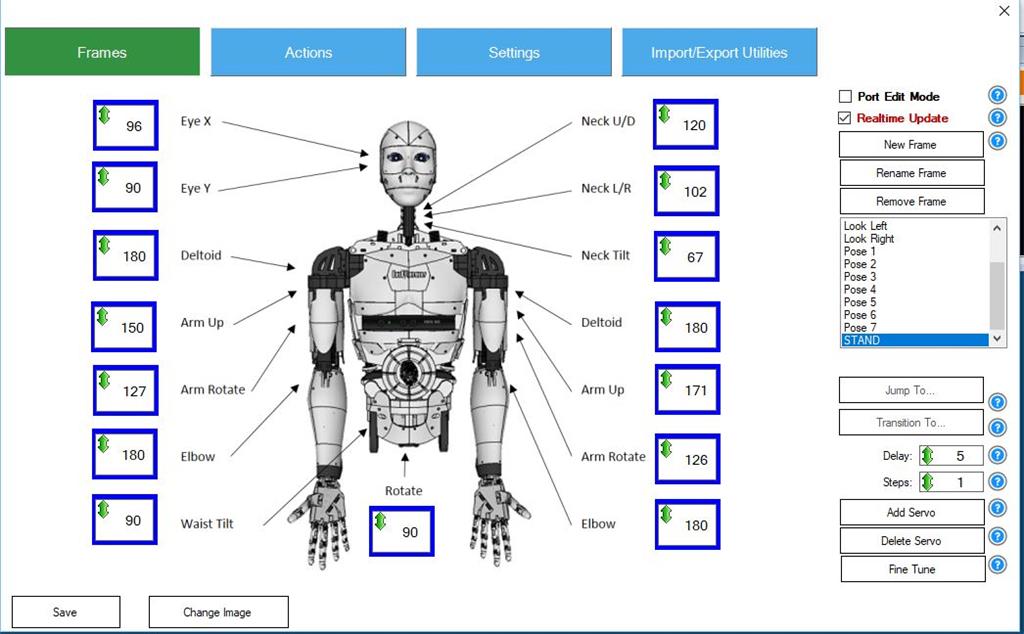
I'm using two Auto Position Controls - one for each board, and created a REST Frame in each. You can upload a snapshot of your InMoov then [Add Servo] after servo, dragging each into proximity of the joint it controls. The mouse drag to set is a nuisance, so I right click each to open a dropdown which is much easier to use to set the value you want. Hint: If [x] Realtime Update is checked the servos will move as you adjust. If [x] Port Edit Mode is checked the Port id's will show on each servo.
Now just to get the concept you can create another frame that for example has the head looking at the right hand as it closes. Now from a script you can use
Delay is when to start, steps is how many steps to break the movement into from where the robot is now, to where it is going to be in this frame. Is that cool or what? The software brackets the movement!
I'm also just a month into converting. My InMoov already shakes hands (and waits for you before closing and shaking...), looks all around, detects life forms in front and behind, has the old style [AIML 1.0] Pandora chatbot: https://www.pandorabots.com/botmaster/en/home and I added my own automation.aiml to reproduce what I had started in MRL to get voice control...
This after a YEAR of futzing around with MRL and the endless changes, breakdowns, and near complete lack of documentation - and a great bunch of guys working on multiple fronts in their spare time for fun and no profit - so no complaint for their free services and efforts.
And a huge thanks to the community here on EZ, esp the tech savy and InMoov users who have been the most help of all!
Good info but in the AutoPosition control I think the Delay is actually how many milliseconds between each step.
So....... if you have the Steps are set to 5 the servo will move between start and finish in 5 steps. If you have Delay set to 30 the servo will stop for 30 milliseconds between each step.
If your servo is jerky when it moves you can do a couple things to smooth it out. Put more or less steps between your start and finish points and/or place more or less delays between the steps.
Feel free to correct any info I've just stated. This stuff is sometimes hard to wrap the mind around.
@Dave Thanks! I sort of fig that out just this afternoon. About to have a Skype with @Bob to learn more...
FYI: Here is a 5V 40A 200W DC Power Supply for just $25 and free shipping if you have prime. I think the InMoov would run on this just fine since the servos will all run on 4.8V - 6.0V
They also have 60A and 80A each $$35 and $45 respectively.
https://www.amazon.com/JoyNano-Transformer-Surveillance-Industrial-Automation/dp/B01JLYWC3I/ref=pd_lutyp_simh_1_6?_encoding=UTF8&pd_rd_i=B01JLYWC3I&pd_rd_r=CQGT9PTSFT0C5XQFDS8E&pd_rd_w=2xd89&pd_rd_wg=wWmQt&psc=1&refRID=CQGT9PTSFT0C5XQFDS8E
Great contributions guys. I think I am up for a power supply upgrade. Mine is peaked at 10 amps.
Stephan getting about time for you to post a video!
Here's a couple of pics...
@mayaway Outstanding man!... He just needs legs and he can do your grocery shopping for you...
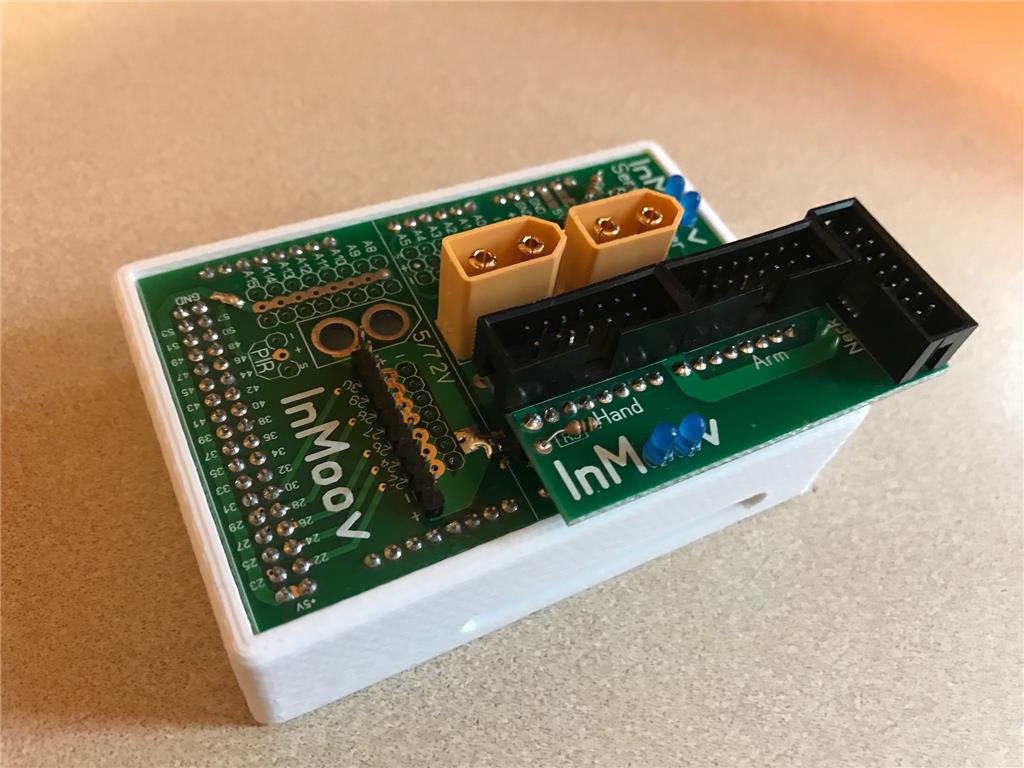
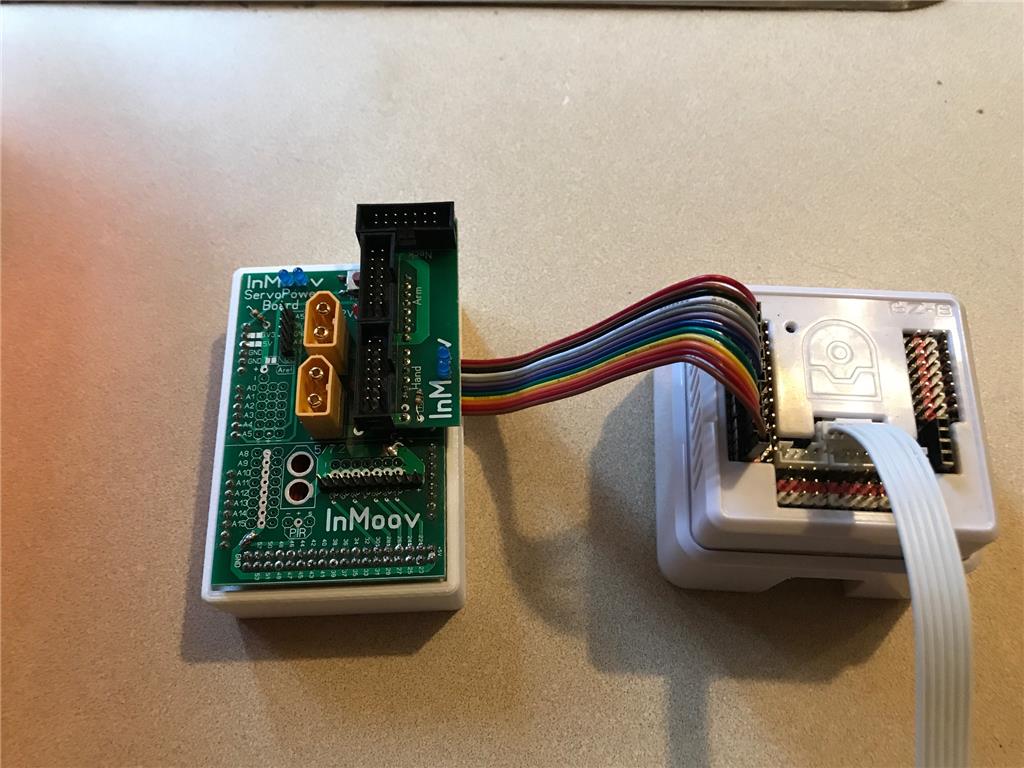
A little more progress on my inmoov. Since I already had all the original Nervo boards and wiring in place I decided to print a holder for the Nervo board and ditch the Arduinos.
Hi folks, really interesting build thread for me. I'm early stages of my build, just completed my 1st arm and am now building the head. I'm going with EZB for my Inmoov as I have no experience of any other kind of system. Toy maker Tony suggested I go down this route as well. As I'm starting from scratch do I actualy need the nervo boards as well as the EZB. I don't fully understand their function? Regards Steve (uk)
You don't need the nervo boards with EZ-B. Some of us have modified them since we had them, and had switched from MyRobotLab & Arduino MEGAs to EZBv4/2 The idea is to provide power buss to your servos separately, so you only have signal wires going to the EZB which can handle 5A continuous, 20A pulse, and is fused at 20A. Does this help? You'll be delighted at the power and ease of using ARC and the EZBv4!
Hi Steve, You do not need the Nervo boards to use the EZR. I wanted to use them because I had already spent the money on them and had the rest of the wiring configured. Plus I wanted to preserve the ability to use the Arduinos in case the MRL people get their stuff together.
Well I haven't had much robot time lately but I spent the last couple of hours reading through the tutorials and setting up my inmoov head as a chatbot. Since many suggested I look at AutoPosition I worked on that for head gestures as well.
In this version I used the Pandorabot control with the Bing plug-in.
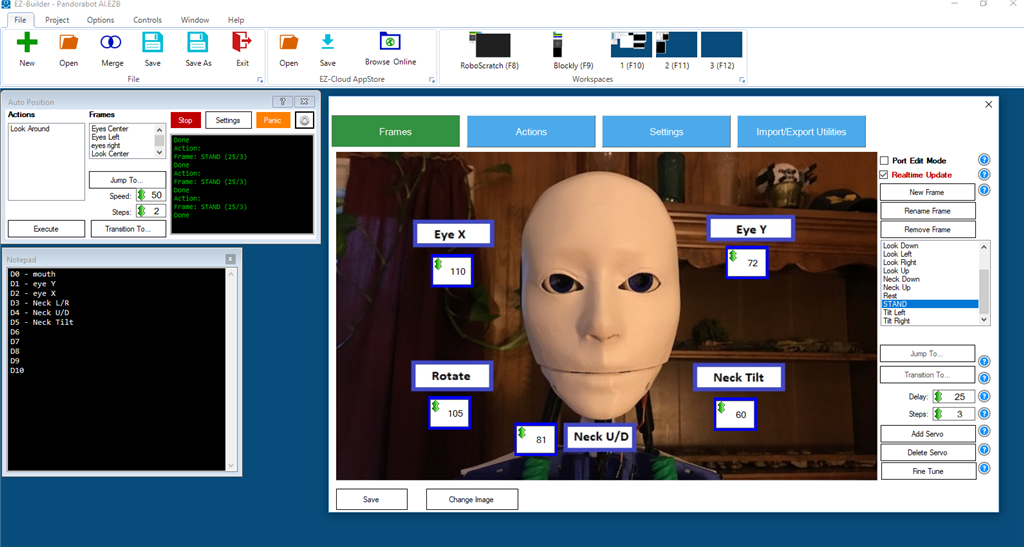
I think I get the AutoPosition system now. Here's the screen I ended up with
I'll upload a video as soon as I can.
How does the nerve board interface? Uart? Tell me more
The Nervo board has header pins that insert into the Arduino. I simply ran jumpers to the EZR and printed up an enclosure to protect them and mount everything. I can use the Nervo boards for heavy power distribution. That's all they really do. Kind of a $3 conversion module for us that started with and have a fully functional MRL/Arduino inmoov. I can switch between the two control methods easily.
Oooooh okay. Not a servo controller. Understood! Thanks for the info
Playing around a bit with the AutoPosition and the right arm. Do you guys use one AutoPosition for every servo of the robot or do you break it out into separate boxes for arms and heads and what have you?
Here's my very basic first test of the right arm.
I use one auto-position for each EZB, and so far have two.
Not an InMoov, but I use a separate auto-position for each arm of my Roli so that I can move them independently, and then I have another Auto-position with both arms and the camera pan/tilt for coordinated movement of all of them.
I could coordinate the separate ones through careful scripting, but just as easy to set up another Auto-position for the specific servos I want involved in a movement.
Alan
A little bit of bling for my guy
www.thingiverse.com/thing:2349495
Playing with a few poses
That pose where he points down reminds me of iron man. Has anyone thought of making an iron man head for their inmoov? that would get a lot of attention! probably go viral pretty quick
Hadn't considered that. I guess I would have to call him Plastic Man though and that doesn't make the bad guys quiver.
Very nice InMoov Perry! Lorn
Thanks Lorn. EZR has really brought it to life. It was basically a statue for a year.
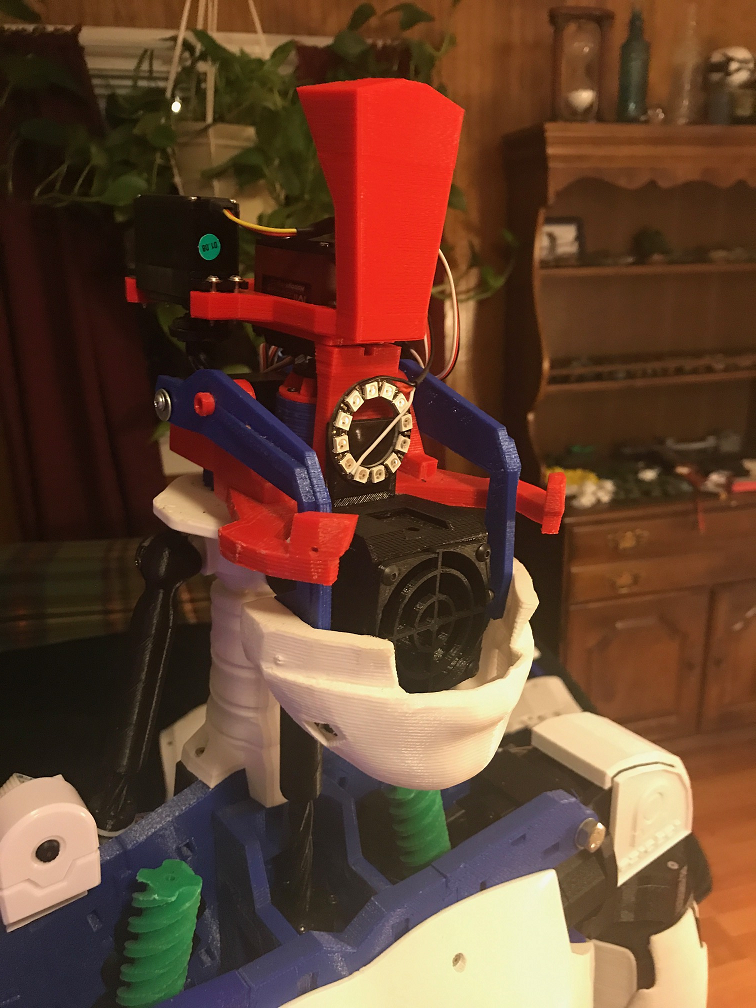
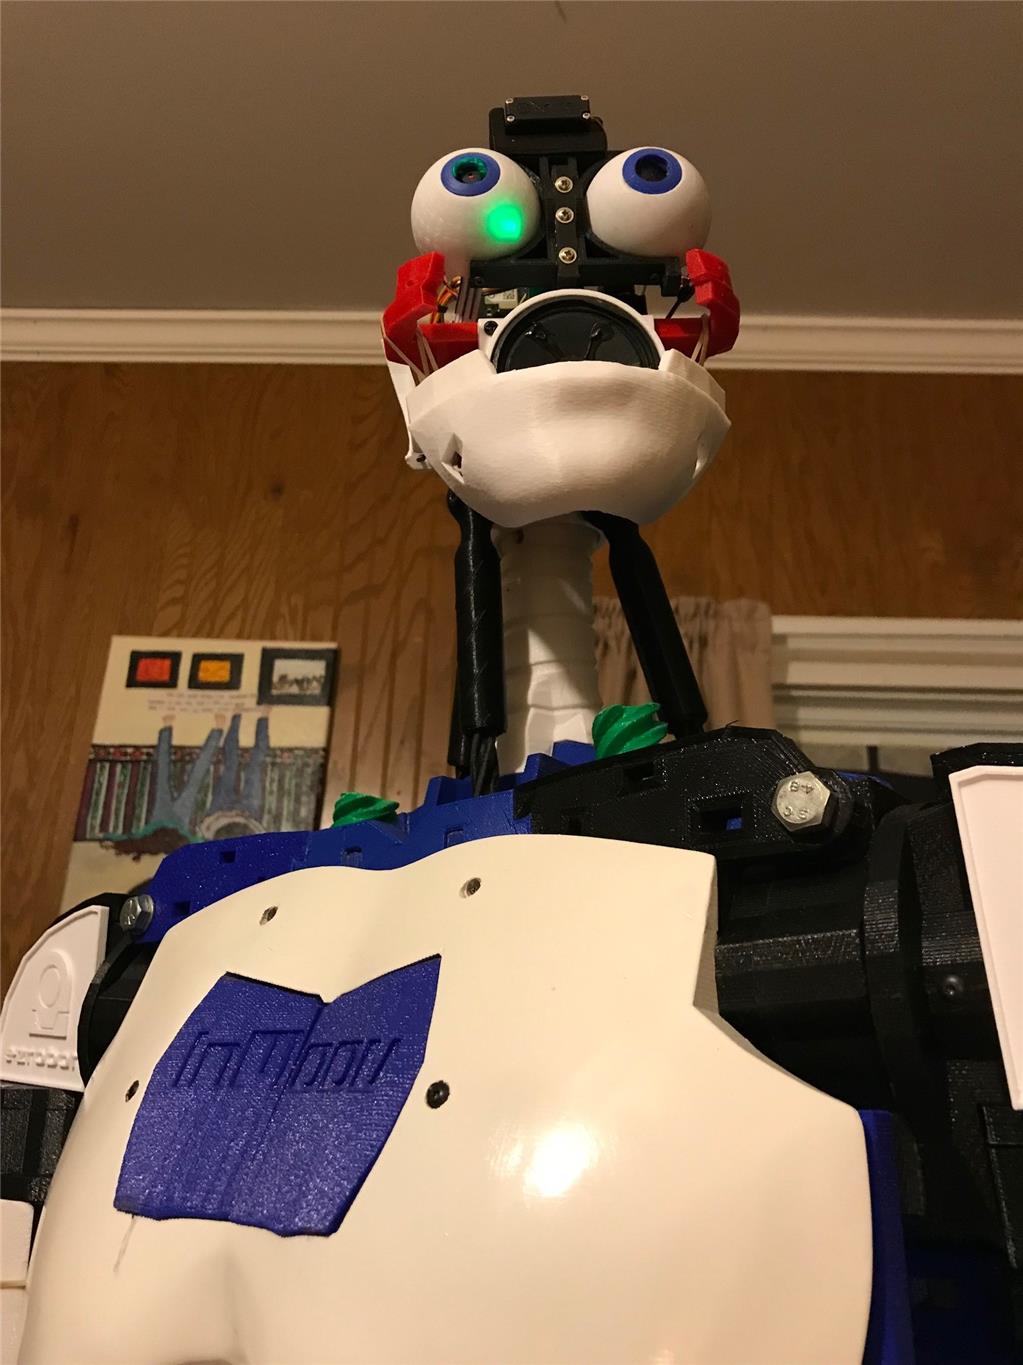
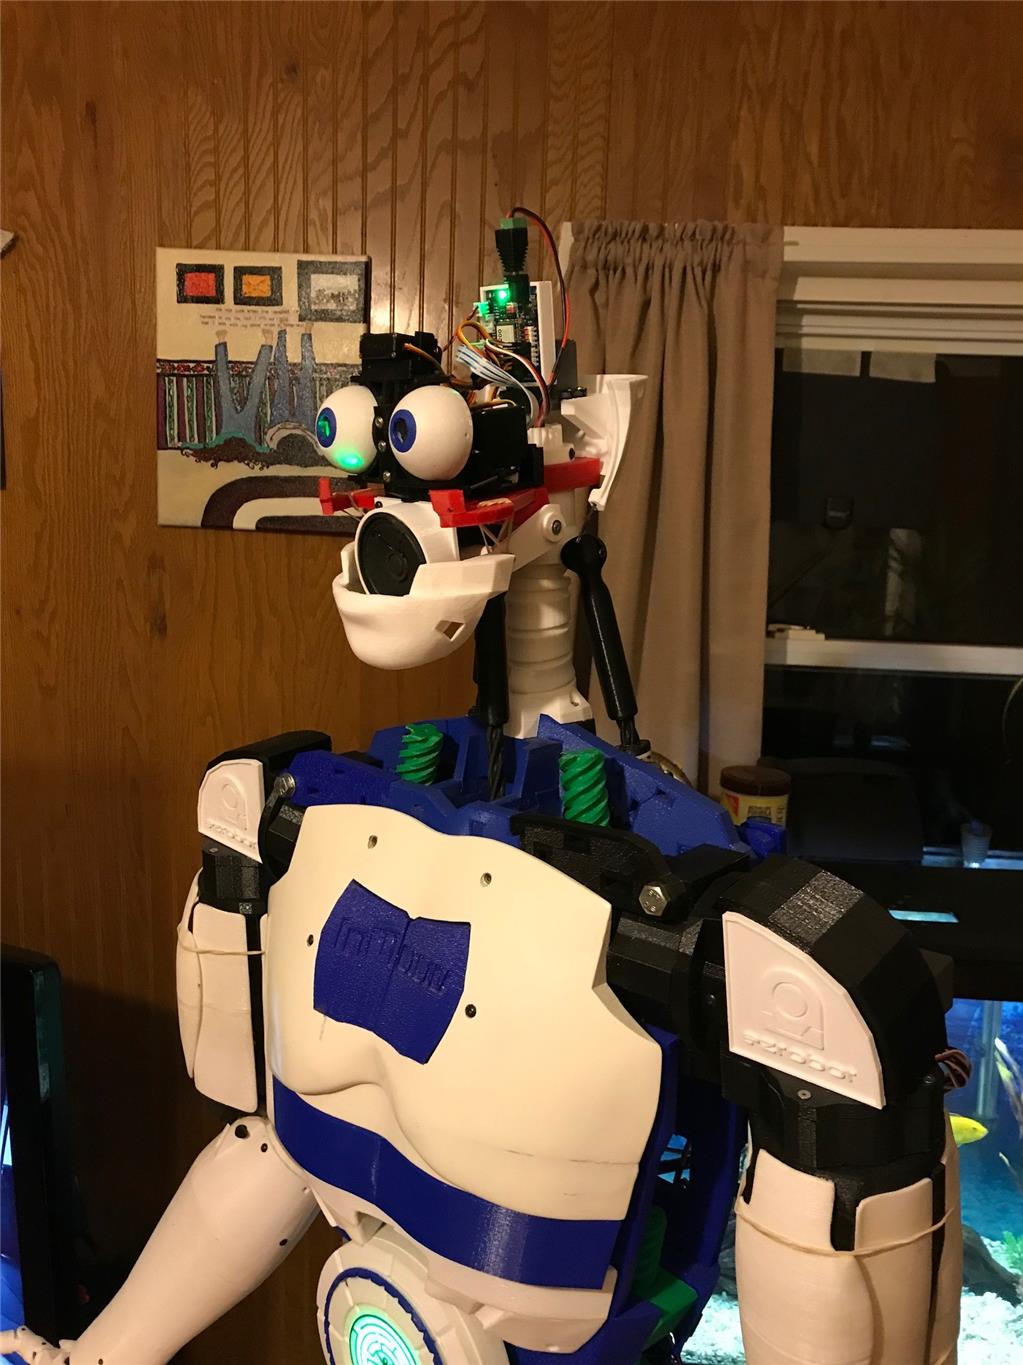
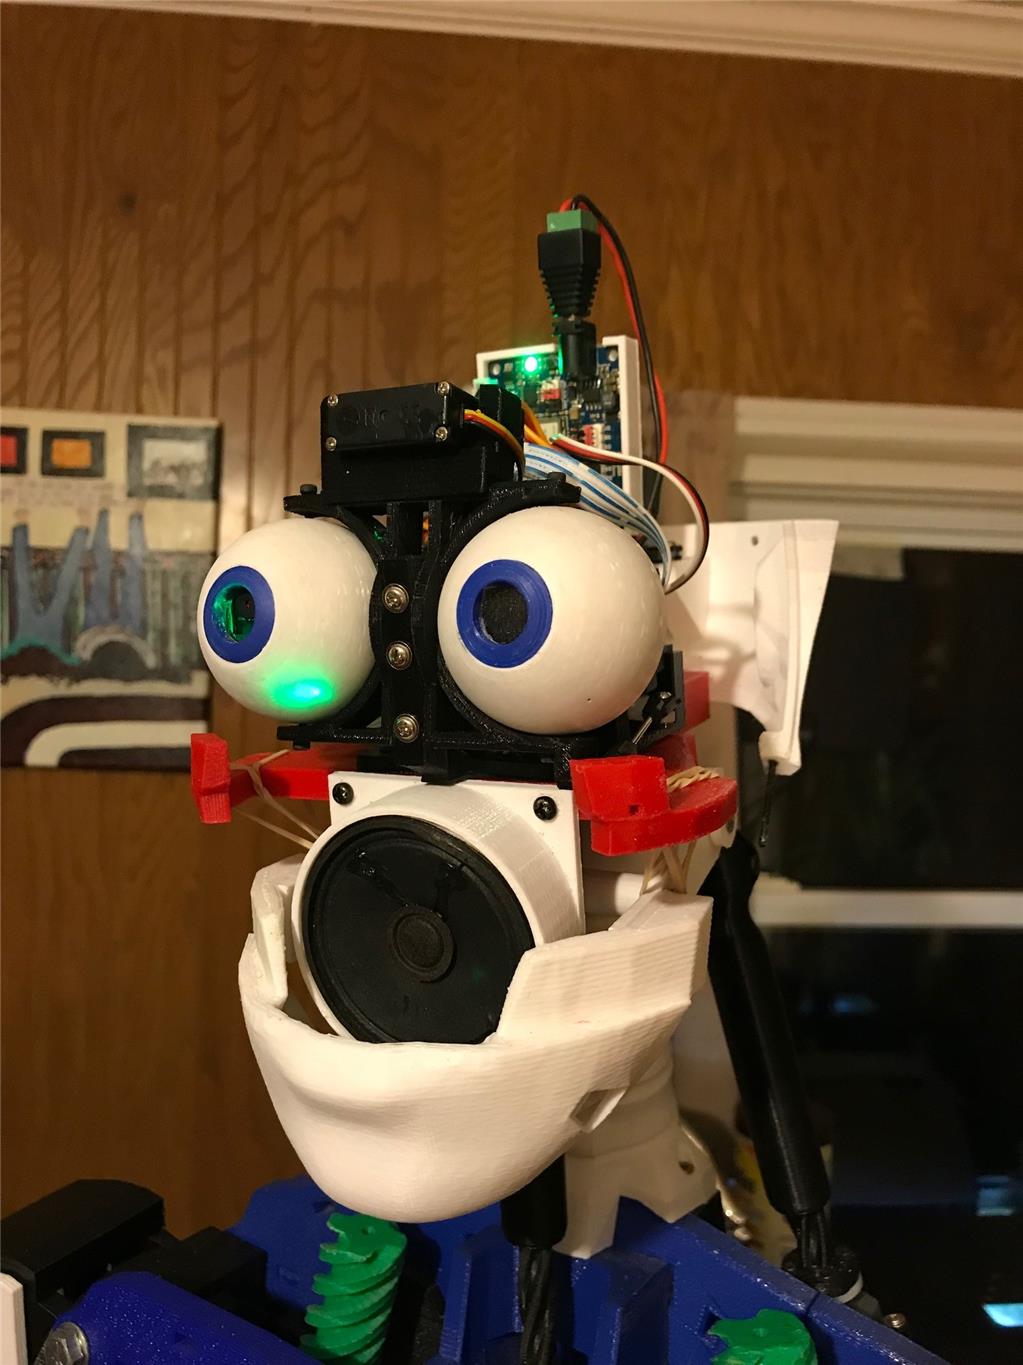
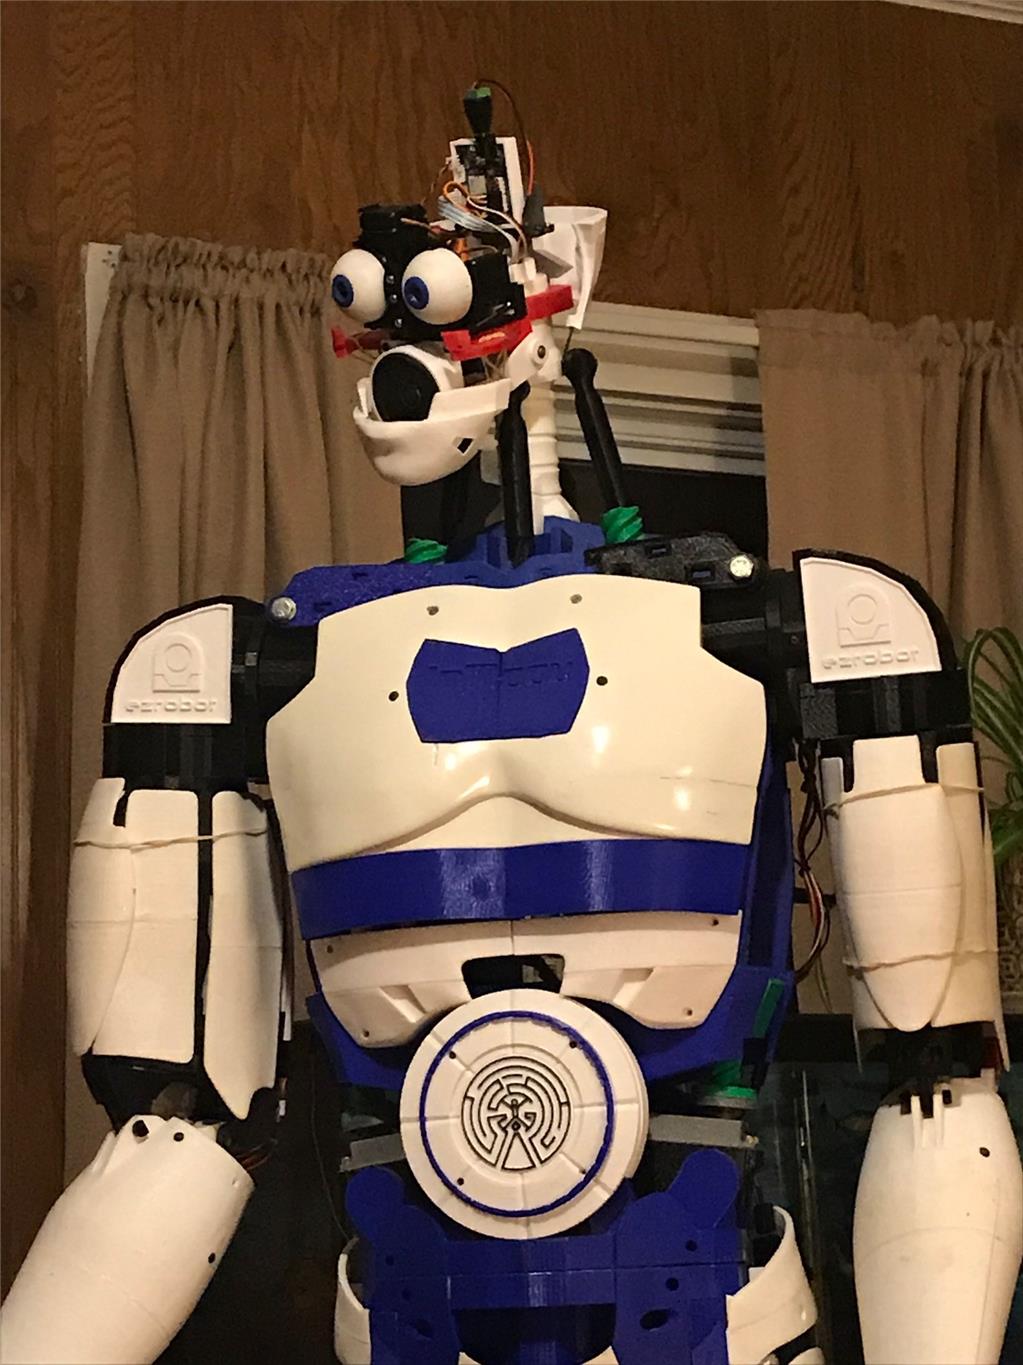
Making some improvements on the head. My mouth servo never really worked that great. Made a few adjustments. Added a neopixel ring as a robot aint worth salt without flashing lights. I want to try to use the lights in the head to indicate emotional state along with tone of the response in the voice. Hopefully with happy or sad responses from the chat bot.
Light blue head for happy. Trying to make him look angry here.
Great looking InMoov, Perry. Where did you get the Kinect fill in pieces?
I found them here Bob.
www.thingiverse.com/thing:1538320
I added a lip to them so they screw to the bottom of the chest piece. I lost the files in the great hard drive crash of 2017 unfortunately.
@Perry_S That really is a nice inMoov. Your build quality is excellent....
@Perry_S What printer did you use?
@Richard - Thanks a lot. I had a lot of time to work on cosmetics because I could not get the other software to work.
@Wayne - I bought a inexpensive Geeetech Pro i3 printer kit off ebay about 2 years ago. It has been running ever since - $400 printer kit.
@Perry Just goes to show you don't need an expensive printer to get good print quality. Your build quality on your Inmoov is good.
Chris.
Thanks to all that helped get the Neopixels working. I have a 16 segment in the torso and a 12 in the head. Using an adafruit pro trinket to drive them. I can access their functions thrugh scripts now.
Here's just a quick test
So very awesome, looks great well done!
Very nice. I like it!
Looks very good, and Inmoov's 'mouth to speech' synchronization is excellent, I wish I could get mine that in sync. Also my inmoov's mouth gear action is a little bit noisy, I don't hear yours at all on the video.
Fantastic work Perry. Chris.
I had issues at first with the mouth servo. I could get it to move the right way but it wanted to be open when it should be close and vice versa. I ended up printing the piston and cross piece in reverse (mirrored) which changed the orientation of the threads. It worked after that. Strange.
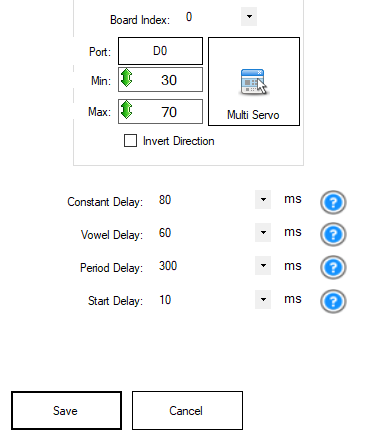
I messed with the controls to get the mouth to sync up. Start with a really long sentence then adjust the timing so that the mouth stops moving when the talking stops. That way it is better calibrated for shorter sentences. I think 'Constant delay' is a typo and really means Consonant delay. Here's the setting I ended up with.
It's too bad you had to reprint pieces to get the jaw to move correctly. Mine was reversed as well but by checking the Invent Direction box that was solved. I wonder why that wouldn't work for you?
That's a really nice looking InMoov!
Thanks Perry
Yes I played around with the settings and spent a lot of time going back and forwards changing them to try to improve the sync up, but usually end up making it worst, and would end up go back to my original settings. Mine also was reversed, but i check the 'Invent Direction' box and that fixed it.
Cheers Chris.
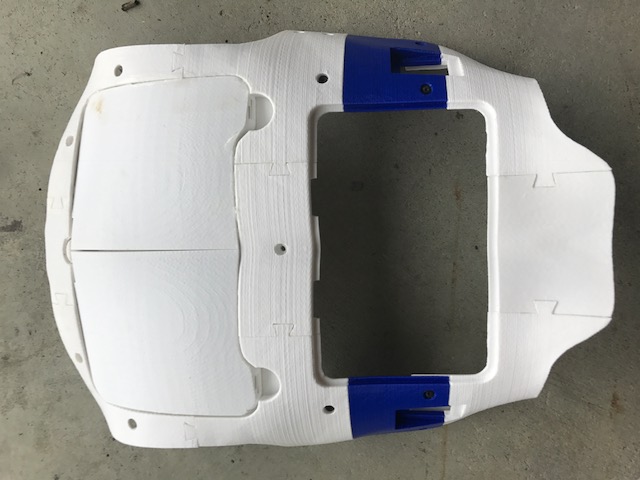
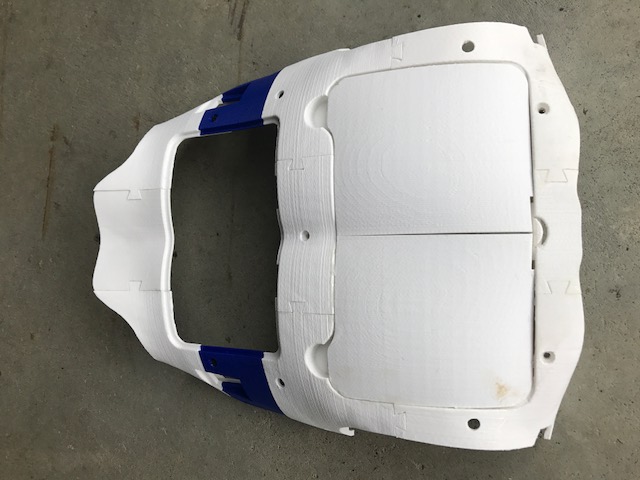
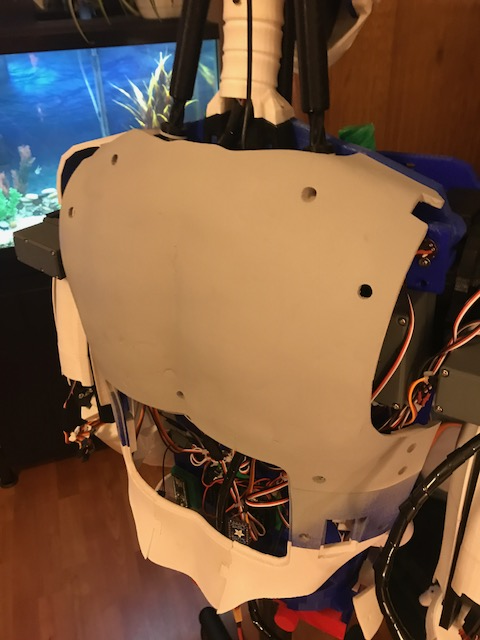
Time for me to finish the back. I redesigned the Lenovo covers for a better fit. All the contours line up better now. Glued it together here and getting ready to start the filling process.
Looking good Perry, the tablet cover is definitely a better fit, with the contour lines. I printed out a flat cover plate a while ago, but I rarely put it on ( especially at the moment as it's in bits ). I like folks to see all the electronic parts especially the EZBs and the wiring requirements etc etc.
Can you post your improved version of the cover plate on 'thingiverse' I'll add it to my 'to do list' after I finish off the HDD servo refit, and other mods I currently doing. I keep getting side tracked, I recently purchased some aluminum and red copper filiments and started to reprinted some parts of the 'Drupp's modified paroloma neck' to see if it makes it stronger.
Cheers Chris.
Looks great Perry. There's a lot of parts to print.
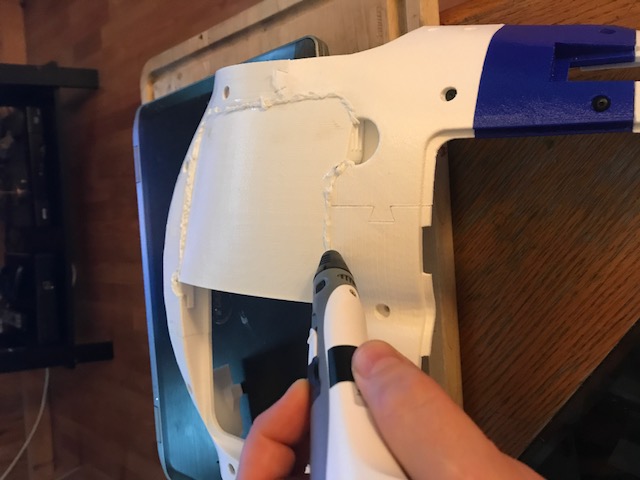
I am trying something a little different here. I used a 3D printing pen to extrude PLA into the gaps that I have. Here is an early picture. It turned out pretty good and is structural. There will be some sanding to do though. I hate sanding. I would rather be at the dentist getting a tooth pulled having a discussion with my wife about the diet she wants me to go on than sand. But I guess it goes with the territory.
I am looking forward to seeing how this turns out. I had though about sealing in the back pieces, but decided that I might want to remove them without removing the entire back. I opted to leave them as doors for now, but might do a similar thing if I am not ever opening them.
@perry_s C'mon, sanding isn't that bad . Look at it as a time of introspection/meditation. You go from coarse grit to ever finer, always a tactile process (even if you are using a grinder, Dremel or sander), and focus on the rhythm.
At least that's the way I approach it when working on my B9
WarPig, I hear you but I think I will hold my opinion. Man it sucks hard
Seriously though, my bot is all PLA and it is horrible to sand. ABS is much easier to post process from what I hear. PLA doesn't sand real well, It kinda just melts.
Buuuuut, I made it this far. All the contours are tight and flow with Gaels design intent in my opinion. Not sure what I will do with the battery door and switch panels. The battery cover is kinda ugly as is.
Here's the updated covers;
www.thingiverse.com/thing:1798673
Just basic primer for now
Looks sharp man. Now you can add Tatoo's. Lots of canvas to work with
Wow. Beautiful!
Looking Nice Perry, like David said, large area for an artist to paint.
So looking at the hand situation I have seen Bob has done some awesome work. Think I will give it a whirl. Since I don't like printing and cutting here are some modified files to print the hand.
www.thingiverse.com/thing:2445188
Been busy for a bit but now my second EZR has arrived and I am spending some more time on the bot. Separating the functions between the two and routing wires, rewriting code etc.
Since I had the head open it was time to mount my EZR camera in the eye. There seems to be some good tracking tutorials going around. I already had the extension cable.
Here's the modified part;
www.thingiverse.com/thing:2479390
I have the camera rotated 90 deg. This allows the cable to be in a vertical orientation for flex as the eyes move.
Nice work Perry, I was wondering about the cable obstructing the movement, but looks like you have overcome that. Next time I have Data's head apart I might try your mod.
Cheers Chris.
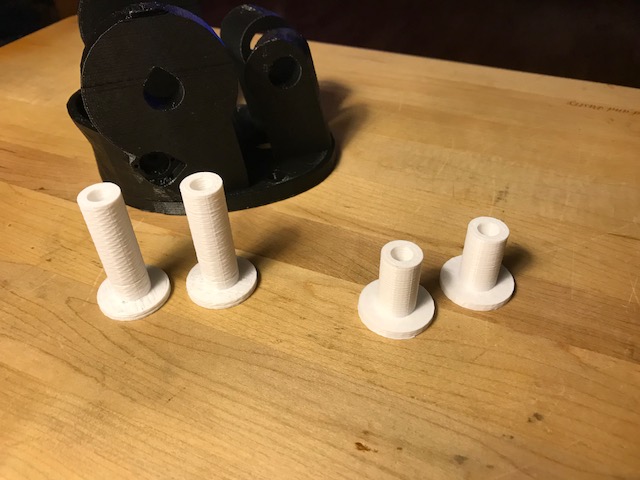
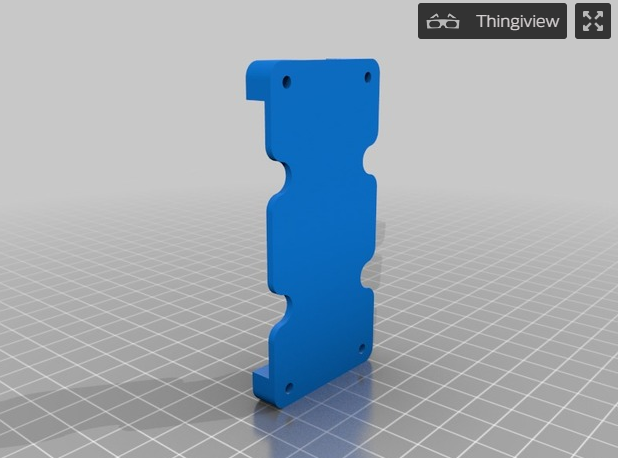
I was asked this in a different thread so I thought I would include it here. I designed these mounts. They glue to the back f the holder that shipped with my EZR controller. No real reason to take that apart and I put reliefs in so you could change the fuse if needed.
The file is here; www.thingiverse.com/thing:2501214
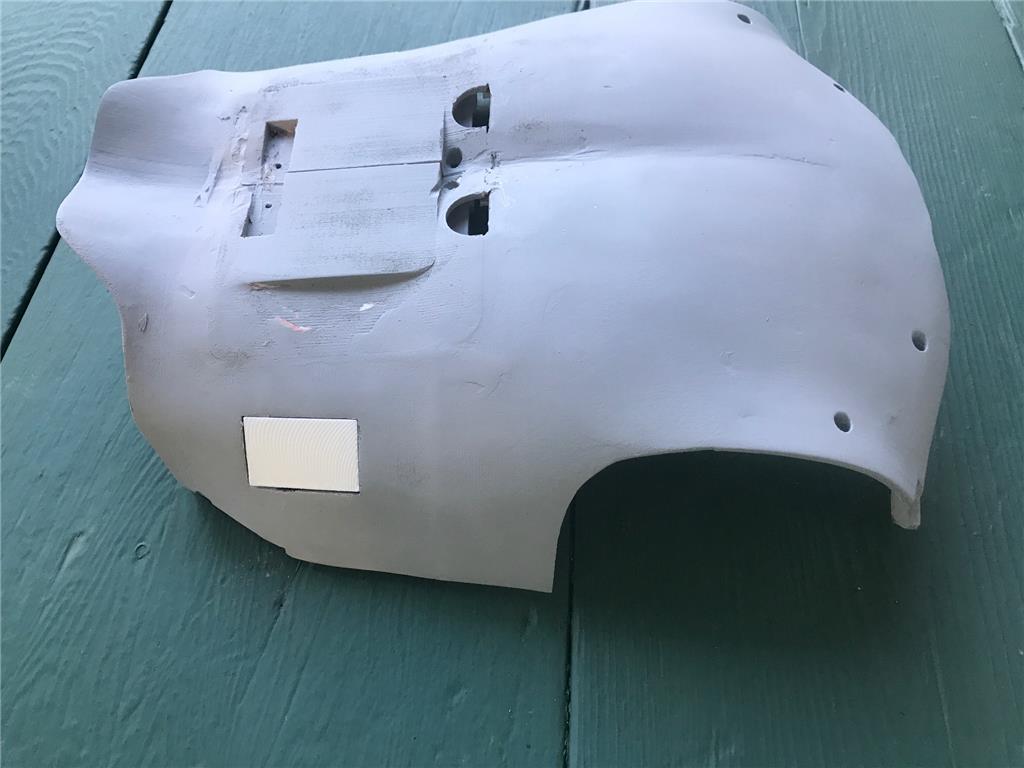
Got a little more done on the back. I am closing in the battery door. I just want a fully enclosed back. It is easier to take the whole thing off by two screws. I might design a latch of some sort. I have the battery cover and switch covers designed and am printing them now for a test fit.
Here's where I am at.
Great work! I printed an extra pair of upper arm front covers and used them for upper arm back covers.
That is so awesome. That back plate is huge, where does one get the printer to print that out? Would love to know what printer that was made from
Thanks for the comments @mayaway I redesigned that part to make something specifically designed for the back. Just have them off as I am working on the wiring rats nest
www.thingiverse.com/thing:2141535
@RoboHappy - check out the previous entries in this thread. My back is made up of mostly Gael's parts with a few of my own. They are all on my Thingiverse account. My printer is a $400 ebay clone from Geeetech.
Switch covers are completed. They are surfaced nicely so they match all the curves. Battery cover is printing up now.
www.thingiverse.com/thing:2510769
Great stuff Perry! Lorn
Little more work done. I made the battery cover out of blue which is the base color of my bot. It accepts an insert plate that can have various designs cut into it.
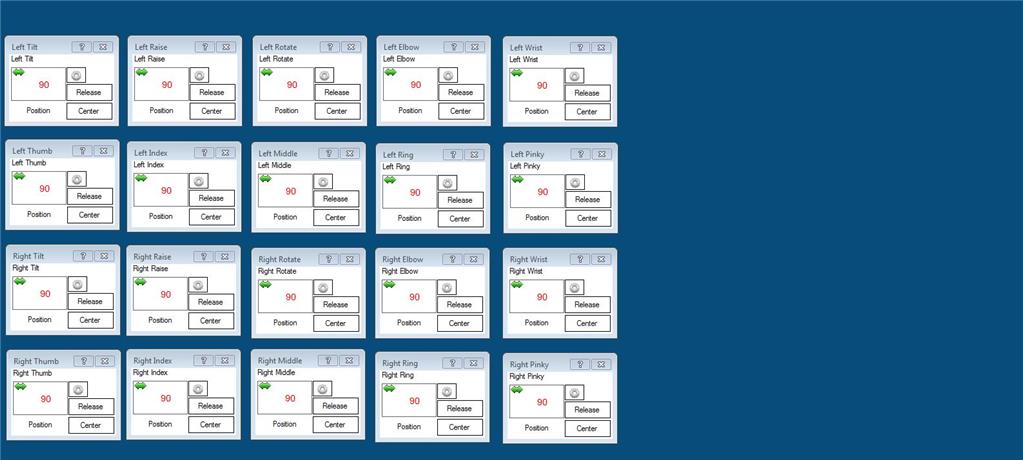
Time for a little programming. Not my strong suit but this seems pretty logical to lay out. Hopefully new inmoov people will find this helpful. Now that I have my second EZB I can control all the functions. I have set it up so one controls the 10 fingers and the neopixels and the other controls everything else. So to set up my bot I made two AutoPosition controls split up accordingly.
I created some graphics for the AutoPosition controls and associated all of the servos. This one is for the torso
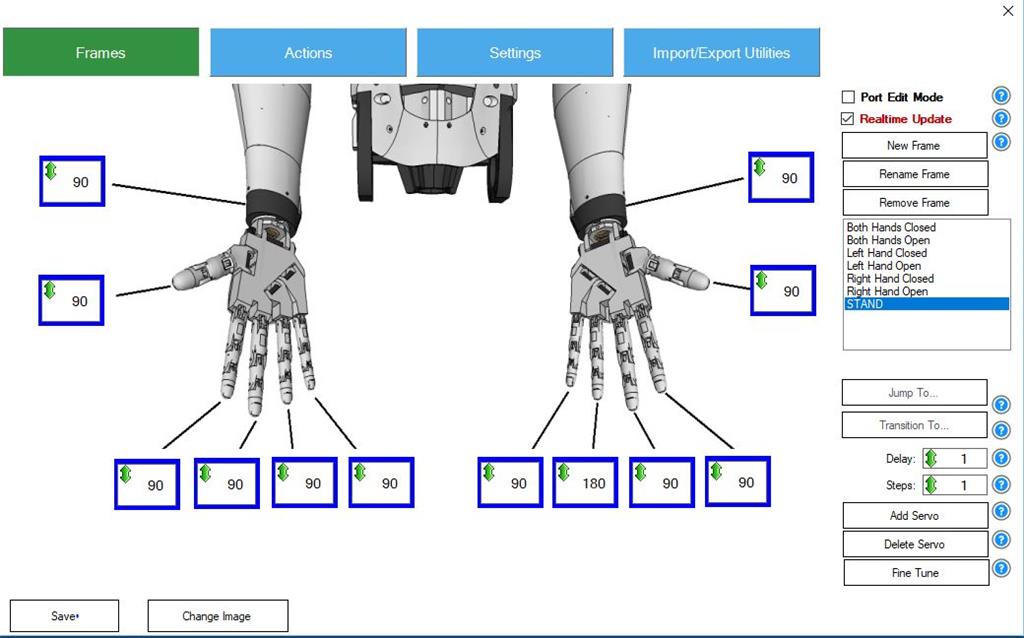
This one for the hands
It would be nice if we could provide some basic tools for inmoov builders. Curious how the rest of you do it. Feel free to post a screen cap or two.
Perry,
I love your graphics of the InMoov in the Auto Position controls. It looks so neat and tidy.
I started out using Auto Position controls which is an excellent learning tool, BUT moved over to scripting as time went on.
Cheers Chris.
Thanks Chris. I will get there with the scripting eventually. The think I like about EZR is that you don't have to be an expert to be proficient at it. I am just more of a gui guy. IT is helpful in setting up the overall project as well.
Perry
Yes Perry, ARC is so versatile, adaptable to any project, before I came across EZ-Robots, I was building Hexapods and programming them using 'python' and C++ etc.
It would take me ages to program just to do the simplistic actions, and a huge script, I then found ez-robot's and converted to EZB's and it took minutes to product scripts, and so quick to edit them in 'real time'
Chris.
Hey Perry. Looks great. I am just starting with AutoPosition so it's good see your progress. Did you want to share your ezb file for the torso and hands?
@Holy1 No prob. Should be up there and accessible now. Have at it.
Thanks Perry. It's nice to see how other people go about doing things.
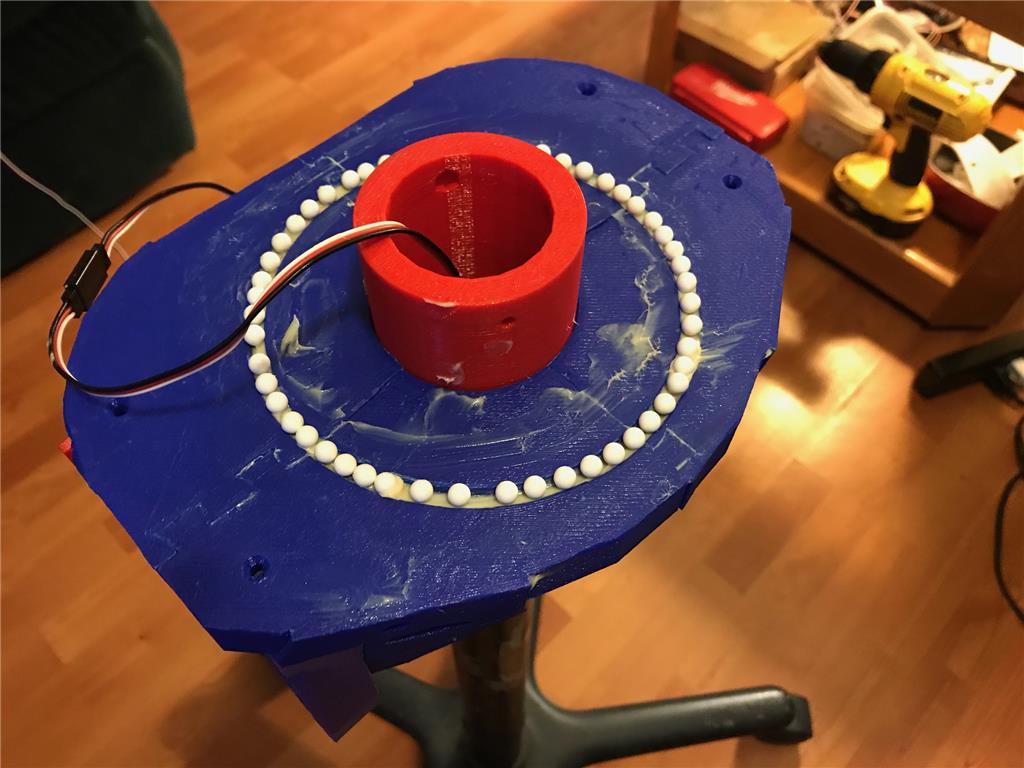
Making the rotating waist right now. IT was fun assembling the bearing. Works well with only one servo
@Perry_s I didn't have much luck with those ball bearings. I replaced them with this; https://www.amazon.ca/Reese-Towpower-83002-Fifth-Wheel/dp/B000778LCU
I had to make a spacer so it would fit nice around the gear and I cut it down in diameter. I greased it up really good, it works great and it's a lot easier to work with if you need to take the joint apart.
That's an interesting option. I imagine a BB lazy susan could be put in there easy enough.
I used steel bearings from Amazon: https://www.amazon.com/gp/product/B004YL32W4/ref=oh_aui_search_detailpage?ie=UTF8&psc=1 and both servos.
Hi Bob, great idea with the "fifth wheel lube plate" not seen those before. would make taking it all apart so much easier, Lorn
Well I am sure most of you heard Gael released his leg designs. The parts are big and are taking a long time to print. Nothing quite like a printer jam at hour 15 of 17.
So legs are coming.
Nice work! I haven't started to print them yet but I've looked at the parts. Have you broke up the ThighHighRight & Left parts so the pieces will fit in descent sized printer. They won't fit in my Rep 2.
Not yet Bob, I'm going to try it whole first. I think it just may barely fit. Otherwise it will have to be cut. I was playing around with a cut version that I added flanges to. If this gives me problems I will finish it off.
Ah , did not know about the legs. Sweet, had a look and I can print the parts at full size.
@Perry_s, I think a lot of people will be looking for a 2 or 3 part version of those parts.
I was thinking something like this. The tabs could be for gluing or bolting. I am not sure if this interferes with anything though.
Looks good, I can print that part. It's this one that is too big.
Yeah, we can split that easy. Any slick ideas on how you would want to attach them afterwards. I can put that in there. I guess in the spirit of inmoov I could put in the dovetails but those damn things I tell ya. Will 2 parts work? Are you constrained in X Y, or Z? hate to go to 4 as I need no reason to print parts that small. Preferably a clean spit with some means of attaching afterwards.
I haven't started to print them yet Perry, as you have said there going to be long prints, and I don't think the top thigh part will fit, I will need to split it into two parts.
Are you going to use the 10mm rods to support the legs or add a rolling poll?
I think I will go for the 10mm rods inside, for me the rolling poll seems to defect the objective of having legs, but I assume using the rolling poll you will be able to move the inmoov, and not have to fix the feet to a platform?
I don't think Gael has mentioned the length of the 10mm rod needed, but I suppose that can be figured out once a complete leg is printed.
Thanks for sharing your prints so far, keep us updated!
Cheers Chris.
I take it these legs don't have any drive system. They are just for looks. (InMoov statue...) Gael has breached his initial 12 cm3 Build Space for the InMoov. Rats. My idea was motion first, then covers to make them pretty...
Hi Mayaway, great legs - have you a video of him walking?
Cheers Lorn
That's my winter project. Mount & wire the motor controllers, MPUs, then code for slow controlled ambulation. Not sure if I'll interface directly to EZ controller or have Arduino in between. Will probably seek help from the community...
That will keep you busy! Have you seen James Brutons walking XRobot on utube?
Also only just spotted Gaels legs ready for printing as per this thread so have started printing Lorn
Yes - Jame's work is the foundation of mine!
@Perry_s, If it was split length-wise it would fit in my printer. Think it would work best if the pieces bolted together.
@mayaway - geez man you go away or a while and come back with what looks to be legs that can function. You need to post a pic every now and then. Neat stuff.
Gael's legs are for static display. Right now they are pretty much shells with few internal features. Making a walking inmoov is a huge task and I am not sure it can be done. I imagine you would have to start making a pure walker then add some sort of torso to it. All the balance issues with the arms moving. I so hope I am proven wrong
So it looks like I can print the biggest of the parts. I felt bad for my poor old rep rap it was printing hard for 24 hours on this one.
Wow! Wha't your build space? Yeah, I'm retired Physical Therapist and we spent many hours learning about gait. I had whole books about just that. So yes, our dynamic, continual falling forward and catching ourselves with the opposite leg is tough to replicate. I'm thinking of a slow motion, weight shift to single limb support, advance the free leg, weight shift back, keep everything close to the ground -- a Parkinsons shuffling gait... no acrobatics!
Well to say these parts are big is an understatement. Looks like what Gael published is missing many parts. They seem easy to replicate though. So far I had to make the bushings on the knee actuator.
I'll probably startup a Thingiverse page with all the mods like missing parts and things cut for smaller printers.
@perry_s wow nice inmoov build. I am still on my first arm (hence the reason I just got into ez-b) I have the same printer but no fancy color display (although mine always fails about 95% through a 24 hour job...)
@Nink The printer can be made to perform. The screen is just a raspberry PI and an Adafruit 7" display. Printed up a case for it.
@Nink - oh yeah man. You won't regret getting the EZB
@Perry, Great work and progress, your Inmoov is looking good!
What size is your printers build plate?
Chris.
Chris it is listed at 200 x 200 x 180 but can't quite hit that in real life.
Right foot... Just needs the servo linkages!
Rear and front of the foot
Ankle joints...
Wow. You're putting in the Servos too. Nice job. I am out of filament now so it will be a couple of days until I can make more.
Hi Perry I am thinking of making the foot the base of my Inmoov HeadBot. A table top chatbot, just need to sort out the ankle gearing to move the head, well thats the idea...
Well more legs are coming.
Perry, that looks great. What are you planning to do about the stand? I see in Gaels pictures he sort of cut of parts of the chair legs bits I think, leaving only 3x wheels and then extended the pole. My Inmoov is still fitted to an old camera stand though I have got an old chair ready to modify, just not done it yet.
Lorn, I asked Perry the same question, if he was going to use the 10mm rods to support the legs and add a platform or add a rolling poll?
I think what Gael is using is called a Rolling Poll I assume using the rolling poll you will be able to move the inmoov, and not have to fix the feet to a platform?
Chris.
Instead of modifying and old office chair can you guys us a rolling IV stand? These are the ones you see in hospitals with people walking the halls and their IV hanging off them. If they are not strong enough how about one of those standing computer stands with casters?
For my stand I will probably extend the one that I have. I just need to weld about a 1 foot segment of pipe to what I already had there. I like to weld. The chair base has worked out really well for me so far. I like being able to wheel it around. I am not sure those IV stands would work. They look pretty weak and I bet they are expensive.
Have all the IBT_2 Motor Drivers mounted, power and logic busses installed. Feedback Pots wired in. Awaiting delivery of third EZBv4
@mayaway
What type of drill motors are you using?
I bought six of these on Amazon: https://www.amazon.com/gp/product/B0057I2Y54/ref=oh_aui_search_detailpage?ie=UTF8&psc=1
Just for the record a 1 pound (2.2 kg) spool of 1.75 filament will get you one right thigh. A tad more than KFC. The black is still holding out for joints though.
Funny thing. I can no longer take pics in landscape mode.
Impressive ! Congratulations !
@Perry, I think you have that the wrong way around, it’s 1kg = 2.2 pounds!
Chris.
I'm from the US. We don't profess to be good at the metric system!
I thought the right thing but typed the wrong.
Easily done Perry.
Your Inmoov is look GREAT, that’s a lot of filament to make the legs. I’m must start to print them, but I got side tracked and have started to rebuild my old hexapod with HDD Servos. Well that’s my excuse, but truthfully I think I’m a little apprehensive with how long it’s going to take and the build size!
This guy is intimidating. Luckily right now he has a 10 Gallon beer brew kettle for a right leg so I am not afraid of him attacking me. I still need to weld a new section into the stand to remedy that. Plus I am low on beer. Another spool of hatchbox white shows up tomorrow so the old printer will be huffin and puffin through the weekend to make the right calf and foot.
Wow Perry, he does look big! eek
So I had the chance to get out into the garage and do some welding. I like metal working. So I added a pipe segment to my stand. It really is odd working on it now because it is so tall. I need to step on something to get into the head.
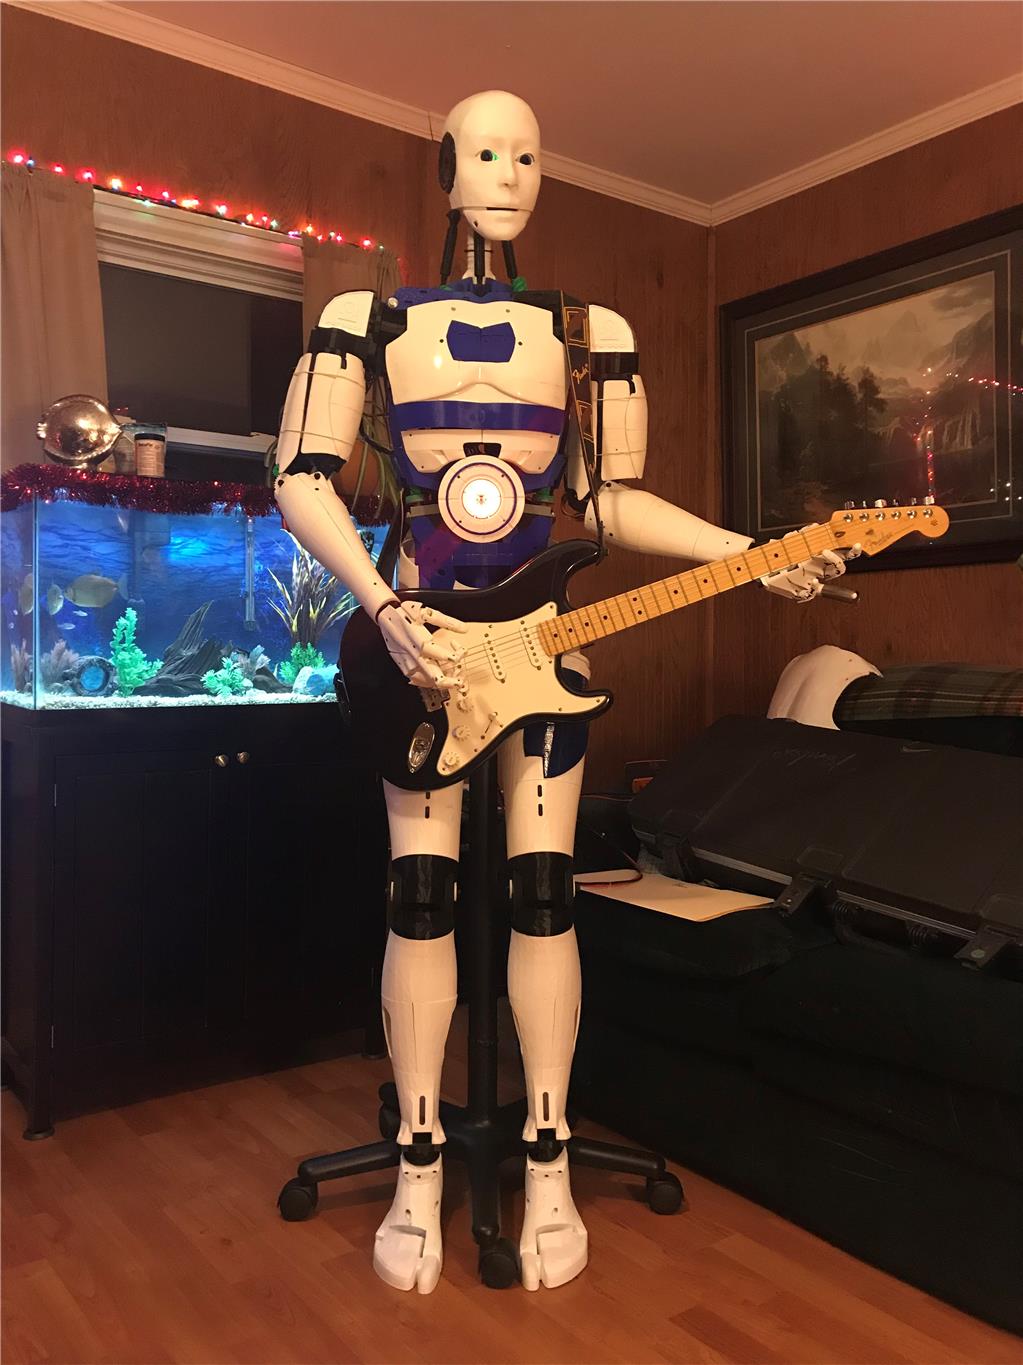
Legs are done now. He's about 5' 9" tall. Things all painted up.
Beautiful !
Yeah, It looks really tall! Nice Job.
Time to exercise those servos. Just setup a few autopositions and made them voice activated. Now that printing is done it is time to hit the programming.
Oh yeah, turn down the volume, my audio picks up awful servo noise for some reason.
What is life without Music? He likes Primus and Janes Addiction. Crazy I know. Shouldn't have used a random seed on the A.I. Just what I need, another rebellious teen.
Nice job, Perry, that’s a great looking InMoov! The legs are a lot of printing and work but worth it.
Just finished building and installing the Parloma Neck design for InMoov along with some new shoulder and clavicle covers: https://www.thingiverse.com/thing:2697490
See the test vid here: https://youtu.be/jS2gTYITwJM
I thought he'd be more into electronic music...
@mayaway I really like that neck. I have thought about trying it out. THe operation looks a bit ratchety though. Are you happy with it? Any progress on the walking?
#Perry_S -- I love the new neck! I think I need to adjust the timings. I'm using 5,1,1 right now. Installing the new front piece of the torso was fairly easy. For the back part which comes in four pieces, upper and lower, I only needed the upper two sections, and those, wound up sawing off the two bars that protrude to the middle. These Skateboard bearings on Amazon work like a charm: https://www.amazon.com/gp/product/B00ZI60WKY/ref=oh_aui_detailpage_o01_s00?ie=UTF8&psc=1
As for progress on walking: First I just got forward and reverse control of each joint: Hip Flexion/Extension, Hip Abduction/Abduction and Knee Flexion/Extension I wrote movement scripts for each joint/direction so I could position the joints as desired, firing each motor for 200ms per script run. This gave me a chance to test the 10K feedback pots which have turned out to not be sensitive enough as installed to give me the data I need to accurately register or predict a joint's position. So I'm thinking of an installation directly over the point of rotation, or perhaps higher precision pots. I also had one IBT_2 controller only firing on one channel so ordered a replacement. That's now installed.
Another potential solution to watching joint angle could involve multiple MPU's but I think I'd need to run them through an Arduino since it seems like you can only have 1 MPU-9150 control in EasyBuilder.
In my initial static joint position tests as I moved each joint the whole Torso of the InMoov would move OVER the legs. Next I've built a script to oscillate a series of movements, including weigh shifting of the torso, and some additional weight shifting can be achieved through Abducting one leg and Adducting the other. So I messed with that until my brain cramped, then TDAY happened whereupon I had too much of everything for three days, followed with a requisite bout of gastroenteritis.
Then I got excited about this neck, and just decided to go ahead with it. Now I'm getting back on track to explore walking some more. The InMoov needs to be able to completely shift it's weight to one leg long enough to move the other leg forward, if only a shuffle. When we walk we spend a full 60% of the time in single limb support in a continual process of falling forward then stopping our fall.
@mayaway, Nice work on that neck, it moves pretty good. I know a few Inmoov builders are using that design. I know you have a plan for tracking with 3 servos because ARC only can control 2 servos for tracking purposes, can you post your ideas? Also, You should start a separate thread with your ideas, designs and progress you are making on getting your InMoov to walk. I know a lot of people would be interested in it.
@bhouston Thanks Bob! I may not need to pursue my plan as Drupp's code (posted below) from the EZ app store 'New Neck for Inmoov' may do the trick. At a glance it looks like he uses the eyes to track, keeps track of the neck servo positions, and nudges (within tested limits) the head to follow the eyes. If the tracked object goes out of range everything is returned to center. Pretty clever! Drupp's code: (you can load his EZB file and look everything over.)
My idea was to read the XY Outputs from the tracking control, then write equations to convert that into positioning the three Parloma Neck servos to achieve the same X, Y result. I did see this code for the Penguin.cpp shoulder:
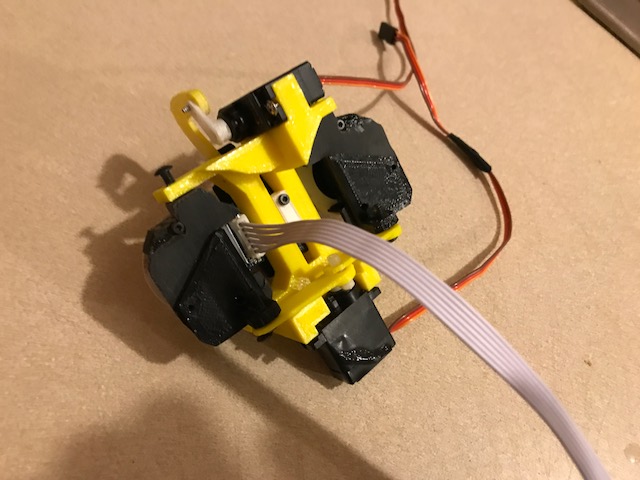
This image shows the position of Parloma Servos D0, D1, D2 in the mounting frame.
I've updated my project if you guys want to take a look. Might be helpful to see how I laid out my project. Emphasis on chatting using Pandorabot.
Hi @Perry_S, I have the Pandorabot in place too, and created and uploaded an automation.html that calls scripts and custom Movement Panel events based on recognized commands, in addition to just chatting... You must have something similar. Best, Stephen
@Perry, thanks for posting this. I gave it a try but the panderbot is very slow to respond. Like 1-2 minutes. I have very slow internet so I am thinking its that. Do you get slowed responses?
@Holy1 I have very fast internet (pay for more speed since I earn $ taking care of websites and programming...) and don't experience any delays using Pandorabot.
@Holy1. My Pandorabot is pretty much immediate. I will try to pull together a video and post it. I have a pretty decent wireless network.
@Perry_S WOW, your robot is impressive! So is your project file, it's very clean and organized!
Thanks Justin. I saw your call out in the other forum thread so I had to scramble to fix spelling and errors and repost the project before too many people saw it.
It would be nice if we could have a common inmoov platform. Since we have different bots and different goals this may not be possible but there can be some commonalities, Like the AutoPosition controls and graphics.
I am having some better luck with Pandorabots. I like the training function. I want to take the function where it can learn a name and extend that to populate a local database or something.
I think doing more with Pandorabots is very doable and I find myself wanting to do the same. I still want to use dialogflow also.
@justinRatliff Well get to it then. I need to ride your coat tails
@Perry_S HAHA I doubt that very much! But that's nice of you to say. Can you explain more about your idea to improve Pandorbots?
There is no real magic in what I am proposing. You have the ability to add capacity by training the robot. Typing in sentences and seeing how the robot responds. YOu can modify the responses or add them if there are none. I am thinking of having my wife chat with it for a day or two, just to give it perspective. She would ask way different questions than I do, Beyond that I think I need to understand AIML and use the Pandorabot editor to write custom AIML scripts for various interactions. I would like the Pandorabot to be able to learn things that I tell it. Like it can learn a name. I think it might be tied up in the update.html file. Not sure.
Another thing I would like to develop is to be able to take input via Bing Speech, then decide if that should be sent to the EZR speech recognition which handles some of my action scripts or to Pandorabot. For instance I can tell it to close his hands and he does. But that also goes to Pandorabot which causes a response I didn't really want.
Don't forget the Properties tab for your bot in Pandorbots, you can adjust settings and add new Properties and delete ones too. You'll need to "republish" your bot once you make any changes there for them to carry over. My changes also take a while before they show up in chat.
I've been pondering the same thing! This is an issue for pretty much any chat bot. My thought was reserve BING only for chatbot services or similar services.
My thought is to have a voice command for starting and stopping and engagement of the chatbot service (BING), like "hey robot, lets chat".....maybe even get fancy about it and say "hey robot it's me Justin, let's chat"...that turns on the chat bot service (and BING) and possibly some random life animation for the body....like a person standing still talking to you but not dead motionless standing still talking to you. And by setting your name you could preset some other things depending on your needs.
So in ARC you might have a phrase for yourself, one for your wife, one for your best friend and one for general chat...each of those "could" set conditions and of course start the chatting with Pandorbot and pause the traditional Speech Recognition of ARC.
Then you'd need a command to end the Pandorbot session, like "nice chatting with you" which would probably tell BING to stop listening because that would cut off Pandorbot and you'd want to turn back on the traditional Speech Recognition of ARC.
That's my best idea of a solution so far.
So I use a custom AIML file I named automation.html (a carry over from MRL) and have uploaded it to my Pandorabot's AIML section. As you can see from the file I can call my InMoov to all sorts of action in response to my voice prompts:
Does this help?
As Ben Javari from Short Circuit would say at times like this, "I am standing here beside myself"
So with the command control as the response, is that spoken though?
@Mayaway, What advantage is it doing it that way as compaired to doing that in the Voice Recognition control in ARC?
WOW, that works in training too! @mayaway your are a genius!
Putting that knowledge in simple terms (because I like simple), for training, you can put ARC code commands in [ ] brackets and ARC will execute it! And you can add words for Pandorbot to say outside the [ ] brackets! YEA!
@mayaway - I came from MRL too so I remember editing the ProgramAB aiml files. I like your implementation and didn't realize I could use the ControlCommands.
Right now I am using the voice recognition control as I like the way it is laid out and I don't enjoy long scripts. I guess this way allows you BingSpeech which is a really good recognition service.
Thanks for sharing.
@all Thanks! @bhouston I think the advantage is that you have all the resources of the Chatbot so you can have a conversation about anything. If you happen to issue a command that you have coded for in your custom aiml file, then your InMoov will respond verbally and execute the command or script you have pointed to, so you get the best of both worlds.
@Justin I am also interested in getting my InMoov to learn and remember things for later recall - from session to session. I'm aware there are ways to read/write to ARC files sequentially on a local drive (or networked drive). I've not yet investigated any automated learning with the Pandorabot, other than that page where you may type in questions and modify the responses.
Has anyone ever set up a local offline pandorabot/aiml server? That may solve the lag problems @holy_1 has.
There were some ancient (2006) articles about how to do it, but the info and resources have all but disappeared.
This is such a great thread, learning lots here. Thanks everyone for sharing all your coding, Lorn
@warpig - I just downloaded ProgramAB and installed it locally on my laptop. ProgramAB is based on ALICE and is written against the AIML 2.0 spec whereas Pandorabots is only AIML 1.0 AIML 2.0 has the features I need, the ability to learn from conversation but sadly it seems to not be maintained with much vigor. If a person wanted to they could use this to combat the latency but I think for Nink the problem is just a bad local wifi.
I have been messing around building a new head. Two heads are better than one I hear.
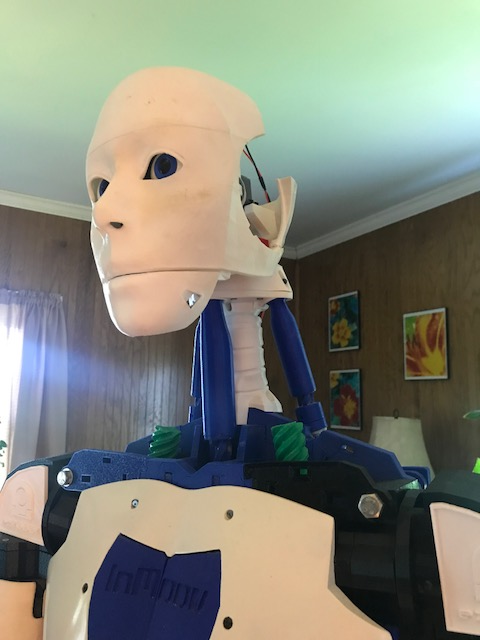
I want to decouple the eyes from the back of the face. Such a hassle to open up the head to work on it with the EZR camera in one eye and a USB in the other. All the cables that snake down the neck make it almost impossible. I also want to change the jaw as I want it actuated by a center servo. And I always want it to close. Not partially close but always. There is a lot of room to reclaim in the head. Moving the neck rotate servo to the rear and creating a stadoff to mount the eyes on. Using some parts from THingiverse so you will notice some bhouston eyes, matts head parts, and a one piece head from juerg. Everyone will get props when I am done and post it up.
Nice work! I added the Parloma Neck which affords fantastic range of motion and makes a bunch more space in the head with no big gear or servo to drive the rotation. I made my head cover in two hemispheres by fusing the parts together. So there is the whole face, and the two halves of the skull.
Deleted
Hey All
I have gotten my printer, played with it for several weeks and now ready to print my table top Inmoov head. Now where to start ... lol. I'm sure I can find the standard head but with all of the improvements you guys have done, what will match up with what? I'm interested in the Parloma Neck and also Perry_S new way of mounting the eyes to the back of the head. Can all this be done right now? Any info or links that you feel would make it a little easier would be greatly appreciated.
Originally I modified my eye mechanism (https://www.thingiverse.com/thing:1607869) to work with the camera's mentioned there. Later, I replaced the cameras with an EZ-B Camera in one eye, and a red led and lens in the other.
With the Parloma Neck it changes a few of the parts (you no longer need some for the head/neck and torso) https://www.thingiverse.com/thing:2059967
Hello Herr Ball, I am still designing in the vertical servo for the eyes. Got a little side tracked with real life unfortunately and haven't spent much time on it lately. I'll put it up on Thingiverse when I am done. At the core of the design I am using these from Mats and Bob H
www.thingiverse.com/thing:992918
www.thingiverse.com/thing:1047175
As far as printing the face/head I like to have as few parts as possible so I start with Juerg's model
www.thingiverse.com/thing:1636086
Hope this help
Thanks for the help guys
It won't be the last you hear from me ... lol.
I'm back ... lol. On the Drupp neck, I can't find the bearings that are mentioned? Bearing: R-1560 Zz / 15 mm x 10 mm x 6 mm
Is 15mm the outside dim.? 6mm the inside hole dim.? 10mm the width dim.?
I can only find ... 15mm x 6mm x 5mm
Thanks
Almost - for the neck I used these: https://www.amazon.com/gp/product/B00ZI60WKY/ref=oh_aui_search_detailpage?ie=UTF8&psc=1 And though they are listed as 5mm thick, they are in fact, 10mm thick...
Ordered
Thanks Again!
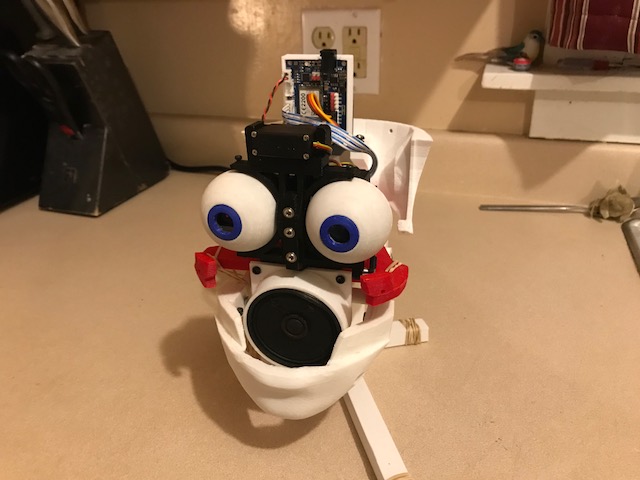
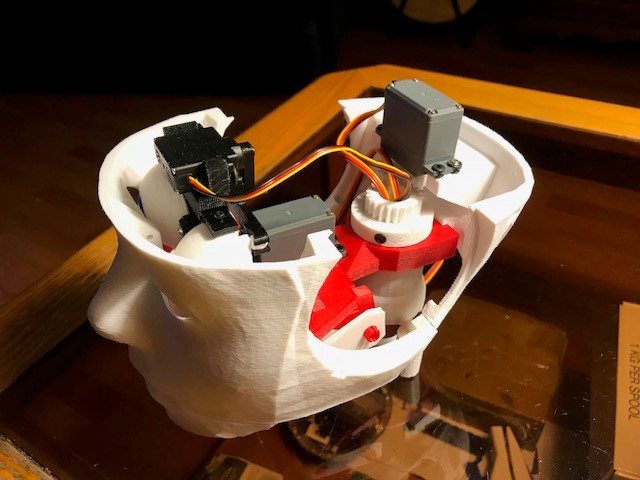
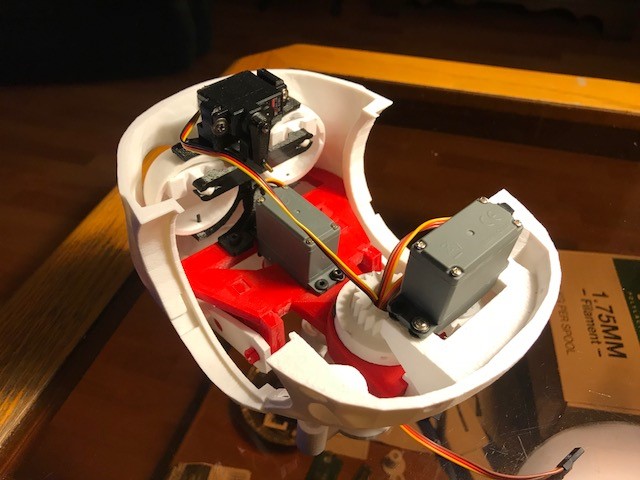
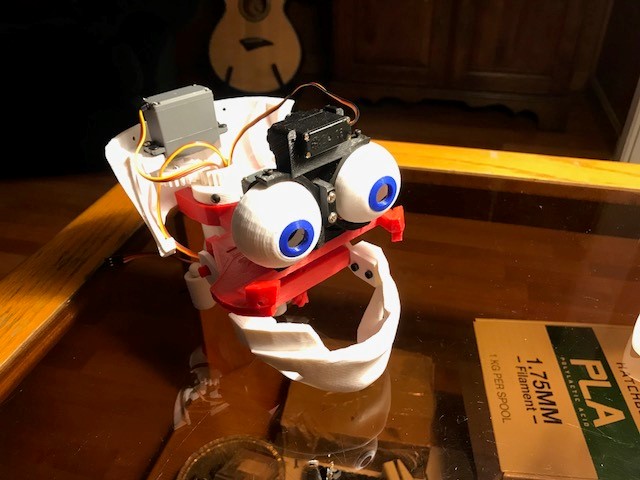
Got a little more done with my second head. Finally have it pretty function and I fixed the things I didn't like about the old design. So the head can exist without a shell and it can be removed without pulling a hundred connections.
Here is the Layout. I now have an IOTiny in the head. All the head functions are controlled by it so If I pull the head off and power it it will work.
Here is the Nck servo mount. It mounts to the main head frame. It is one piece printable.
The Jaw servo mounts in the center of the head pointing down. It has a cam on it that actuates a bar that connects the jaw supports.
Finally, I put a 8k speaker in place of the one supplied with the IoTiny. I had hoped for a little increase but the volume and quality var exceeded my expectations. It is great. Even better once I printed up a little enclosure for it.
That is amazing!
Can you share the STL for this. I really like it and my son is now thinking about doing an Inmov with my help as we might finally have access to a 3d printer soon.
Here are some pic's now that I have installed a few more things. Nice to have a standalone wifi enabled head. Kinda looks like Crowe from MST 3K
LOL - nice MST3k reference


Perry, that is so good, very clever and very funny at the same time
Now that the head is independent and working I started to write some routines to make the guy look like he was just hanging out, not doing much. The movements are random. Here is a short clip.
That's good movement Perry. Can you share you snipit of code? I'd like to make it part of T-One.
Perry how is the mouth working since your change. does it close after speaking and is it quiet compared to the original? confused
@3dprinterguy I'll post my code soon. It will just be a rev on my Inmoov project that is alread in the app store
@nallycat - Mouth works great. I use rubber bands to keep the mouth closed so the servo cam only has to overcome those to open it. That way it is always aligned and closed. It is very quiet. Only slight servo noise.
Hi Perry, You mentioned that you downloaded an installed program A B, did you get that working with ARC?
@danf Hi, I got it operating but never did get it integrated into EZR. Not that it cannot be done, more a testament to my lack of programming expertise.
Have you tried the synbot plugin https://synthiam.com/redirect/legacy?table=plugin&id=167
or aimlbot: https://synthiam.com/redirect/legacy?table=plugin&id=242
?
@Perry- Thanks, I had hoped someone had figured out a way. That's beyond my skills.
@DJ- I have the aimlbot working. It works well, it just doesn't have as many features as Program A B (amil2). I am slowly trying to figure out synbot.
Just finished up printing Gael's new neck design. It is a really great evolution of what Bob H has contributed. It seems much more solid. I had to make an adapter because my head design s so different now. Sill keeping the EZR controller in the head. Previously I was using only one servo to drive the tilt but I bit the bullet and stripped the electronics out of the second servo and made it into a drone servo to the driving one. Now with one piston pulling and one pushing it helps a ton.
Cool, I haven't seen the new neck yet. Going to check it out.
Very nice Perry
Today is a happy and a sad day. Robot Man (That is the best name I ever gave him) is retiring tomorrow. He has worked diligently his whole existence, helping to promote human-robot relations. It is time to let him get on with his life. He wishes to travel the world, maybe meet someone from the RealDoll factory.
This means I will be starting a new project. I have Some ideas that I am working on. I want something different. Something like a scratch built inmoov my way. But not an iinmoov clone but a tangential concept. I want it to look like a robot. Mechanical in most of its design features but organic in different ways. Hopefully I will post up something soon. Suggestions always welcome
So end of an era here. I hope my work has helped some in one way or another. For now, I am drinking the beers and I set his power supply on 50 Hz which gives him quite the buzz. Off to the clubs after that. Hope he makes his flight in the AM.
Perry and Robot Man Over and Out
Hey Perry, A fair good-bye. Hope his travels are good.
I have begun (last month) to scratch build a new robot too. Good luck! It's a great hobby. Hope the updates from EZ-Robot will make our builds more exciting.
Thanks a lot. It is funny because without the first concept I have already named my new bot Scratch. I wanted him to be weathered. It took me a few minutes to realize the scratch build aspect so I decided it would be a great name.
Good-bye Robot Man. me and my inmoov will miss you, I hope Robot Man's new owner keeps using ez-robot.
To bad you won't be working on InMoov anymore, I'll miss seeing your work on it. Your's was one of the best looking one's out there! Good luck on your new project, I look forward to your progress on it.
I wouldn't say I will no longer be working on inmoov stuff, I just want to take it a bit differently. I am thinking now that I do not want a bot that looks so much like a human. Been there and done that. The human body is biological perfection but at times translates poorly into the plastic robot world. I want something that looks more alien. For instance, a completely different head that could be interchangeable with the inmoov head.
There are so many inmoovs out there now but very few that are heavy on modifications like yours. It used to be unique to have an inmoov but many cookie cutter builds out there now. I want something that is unique.
I have a box from EZR waiting for me at home and some test prints already done. I'll start posting pretty soon.
Perry
When one moves on another one arrives. Farewell Robot Man. Hello ez-robot inmoov family! I am almost done printing Sam, my inmoov.
Just kidding I am almost done printing her right hand. I will be doing things a little more different.
Questions
Best wishes!
There's a bunch of threads that deal with various aspects of the InMoov
The MRL guys are dedicated, ambitious, intelligent and totally volunteer... they are pursuing the edge of bunches of possibilities AND trying to create a functional core at the same time. If you want to invest, you can get 'there' with them. Otherwise, EZRobot will give you an immense amount of functionality in a short amount of time. I use three controllers in mine...
PS: I use Hatchbox Beige filament so the need to cover the pink is not a problem. There is really no such thing as 'flesh tone' Take a look at color samples of any photograph of a face in Photoshop. Greens, Blues, Grays, Reds, you name it...
@overserved
Questions
Is there a formum here specific for inmoov builds?
Not a specific forum. Just search the forum and you will find stuff from many. Lot's of inspiration. Also, feel free to download my program and many others from the app store. Of course everything is free.
Am i wrong or is Myrobot lab not very user friendly?
Not user friendly enough for me. EZR does everything for me and is actually a documented stable software platform.
Start a thread and keep us informed on your build. Looks like you have high goals. Should be cool. Refer back to this one of needed. Lots of info in here.
Perry
@mayaway Thank you for taking the time to respond. I agree the MRL is amazing! I don’t have to time to dig that deep to be a constructive member over there.
There is fleshtone or skin. I run exclusively 3dsolutech filament. For this project I am using Skin ABS Filament 1.75MM 2.2 Lbs roles.
I have pushed about 30 rolls of 3dsolutech filament through my printer and I have only had 2 bad rolls. It was PLA and it would not stick or bind to itself. The company replaced it for free. Plus it is crazy cheap!
http://www.3dsolutech.com/store/abs/skin-abs-filament-175mm-1kg-22-lbs
@perry_S Thank you as well for taking the time to write. I honest appreciate it.
I will start a thread soon. I have something fun in store for you guys. I am going to install a neural network in my inmoov so she will feel all her body parts. Her entire body will be partitioned proximity sensors. This will be key for walking and stop the inmoov from blindly bumping into everything. It is a huge part of the puzzle that is missing.
I do have big plans but I am standing on the back of giants. The inmoov community has been at it for years and has excellent resources!
The only hat trick is the walking inmoov. I got into the project to have one walk. I have no use for a waving statue. There are plenty of walking robots out there. The question is how cheaply can we make the inmoov walk.
This is a good start the Inception drive: A Compact Infinity Variable transmission for Robotics. https://spectrum.ieee.org/automaton/robotics/robotics-hardware/inception-drive-a-compact-infinitely-variable-transmission-for-robotics
Best wishes for now! Rick
Honestly I think that starting with an inmoov and trying to make it walk is an impossible task. A walking machine needs to be designed as a walking machine from the start, which Inmoov was not.
Prove me wrong though, people often do !
I hope he succeeds. It would be great to see. I was told many times that I wouldn't be able to build working, articulating, retractable arms for my B9 robot. That just made me more resolved and more so with each failure. Two years later I had a working set.
Keep your dream alive! Have fun.
@Perry_S I completely understand your perspective. I believe a walking inmoov is a software issue more than a hardware one. Lets just take a step back and remember we are melting plastic in our homes in the shapes of things designed by a guy in France. I feel the hardest part has already been overcome! Each part of the inmoov acts independently and the legs are no different. I do beleive the center of gravity is wrong and there needs to be proximity sensors regisoring the inmoovs postion in real time. We shall see. Plus I have a picture of an inmoov finger for my avitar. So talk is cheap until I complete a few things I mentioned before.
@Dave Schulpius Congraduations on your B9 robot. I readly enjoyed your videos! I believe out of all the amazing advancements going on today a walking inmoov is pretty small time. I do think it will attract more people to the joys of robotics. It is time we integrate more AI into these projects. A walking inmoov is the perfect candidate.
Best wishes!
Rick
I'm a retired Physical Therapist. We spent quite a long while studying all of the ins and outs of "gait." I'm on my third generation of failed legs (not walking yet). I'm not sure our little servos and plastic parts are strong enough or fast enough to manage the intricacies of same. When we humans go into single limb support (SLS) hundreds of pounds of force are exerted on the femoral neck to hold us up. (It's a good design, around 500,000 years old...) We are in SLS a full 60% of the time when we are moving about!
I've also had VERY POOR RESULTS using any of the MPUs (6050/9250) - even the one EZ used to make and never got back on the shelf gyro/compass/accelerometer with the software. Any success there may have to built on Arduino sub-processing and sending signals to ARC
I may try servo driven robotic pistons - there are some that are strong enough. My main thrust has been to create a full weight shift to the left and right so the InMoov (with the upper body mounted and in place) is standing on one leg (so it can move the other leg forward). This is tricky because in humans, walking is a process of FALLING forward and catching ourselves at each step... (InMoov is NOT GOOD at falling...)
Thoughts?
Hips/Ankles: servo Driven 20:1 Planetary Gearset (a derivative of another design on Thingiverse) https://www.thingiverse.com/thing:2782154
I have an inmoov robot and early on when the waist was completed, I needed a new pole stand. while attaching the robot to the stand I lost grip and inmoov fell damaging the right shoulder, lots of work rebuilding. falling with a plastic robot, is not an option. using plastic for working legs will never work. check out Sophia the robot gets legs and that is how it will be done more metal used and a larger foot platform to prevent falling. check out james bruton walking robot. and that will be how we as DIY robot builders will achieve walking legs for inmoov. just because inmoov is a 3d printed robot does not mean the legs have to be all plastic.
This is all very exciting. Looks like you guys are very close to cracking this nut. Don't give up or get too discouraged. Maybe @nallycat is right. Perhaps a metal based 3D print filament will be required to straighten the legs (or maybe just the joints?).
The work @mayaway has done so far is amazing. My first thought was "faster MPU". Then later in mayaway's post he mentioned "Arduino sub-processing". Yes! Also an onboard super fast computer and not have to deal with the latency built into WIFI to the EZB.
Just spitballing here. Good luck guys. You all know more about these issues then me.
I think the legs should be all metal internally with a plastic covering just for looks. have a look at the biped project it uses a android device like a cell phone with it's sensors to achieve balance and stability. connected to an arduino mega, for programming. mayaway why not copy James Bruton's robot legs he seems to have achieved where others have failed.
@nallycat Yup - James is who got me inspired in the first place. Robot X #8 Shows the piston actuators I may move to for weight shifting. James doesn't provide enough information to replicate. Now he's abandoned Robot X and moved on to an open source dog (which may be replicable) Robot X only walked accidentally like a washing machine throwing itself back and forth to niggle across the room. Not what I'm after, if anything, I'd like the InMoov to weight shift, lift one leg, move it forward, set it down, then weight shift over that leg, and move the trailing one - even a Parkinsonian shuffling gait would be ok - slow and steady as she goes.
My plastic 3D Printed leg parts are strong enough to hold together - what I need is the strength to hold the top half of the InMoov up while one leg is lifted. Shifting InMoov's weight over one leg is not the problem. Once lifting the opposite leg starts, my InMoov sags - the planetary gear system doesn't have the torque to stop it. So linear actuators like this 4" Stroke 115 lb Thrust Heavy Duty Linear Actuator may do the job... Then if the plastic starts flying in every direction some additional parts may need to be metal...
@mayaway I think your Inmoov legs are exceptional! James definitely nailed it. If you are looking for a completely mechanical solution that is the ticket. I am personally looking for a half mechanical and half "self returning" system. Similar to our hand. The tendons close the hand naturally but we can apply force when needed. We also need to apply force to open it. This build elasticity into the movement. I don't see a lot of "bounce" in many biped robots. I do see them staggering around. I think James is your key. You can reach out to him and I am sure he will send you all the files you want. I tried to get his email address from this youtube contact section but it wasn't working.
I have posted a sketch of my finger sensor idea tittled Sam Inmoov Finger Sensor Made Easy
https://synthiam.com/Community/Questions/11653
Let me know what you think. It is extremly simple and requires very little work.
@overserved Thanks! I've been pecking away at them for a couple of winters now... (robot time - in the summer we sail and garden and...) There are leg systems that use springs to store and return energy to make ambulation more efficient - our muscles and connective tissue do this as well (try tearing apart a roasting chicken with just your hands.) Worth thinking about... You are referring to tenodesis: "Tenodesis grasp and release is an orthopedic observation of a passive hand grasp and release mechanism, effected by wrist extension or flexion, respectively. ... Moving the wrist into extension will cause the fingers to curl or grip when the wrist is extended, and to straighten or release when the wrist is flexed." (Because the tendons are not long enough to go the distance in extension so the fingers curl to make up the shortage.)
RE: Finger Sensors I've built a capacity operated relay system before which would trigger when your brought your finger or hand close to the sensing surface. This is a great idea for detecting close proximity to a surface by an organic form.
More recently for proof of concept, I simply took #2 Pencil and scrubbed a dime sized dot on two pieces of paper. Then overlaid a separate piece of stained glass copper foil facing each dot. Then stacked the two dots on top of each other with one copper foil strip above and one below. Put an ohm-meter across the foil 'leads' and see the change in resistance with even slight pressure on the graphite dot area! Here's the foil: https://www.amazon.com/Stained-Glass-Copper-Conductive-Adhesive/dp/B01C55MI98/ref=asc_df_B01C55MI98/?tag=hyprod-20&linkCode=df0&hvadid=198129370765&hvpos=1o1&hvnetw=g&hvrand=10058145657167053097&hvpone=&hvptwo=&hvqmt=&hvdev=c&hvdvcmdl=&hvlocint=&hvlocphy=9002578&hvtargid=pla-318026027027&psc=1
Awesome Ideas and application. That adhesive backed copper foil is awesome for many things. I use it to repair cut or damaged traces, through holes and solder pads on circuit boards. Easy to cut to any size, stays where you stick it and stands up the heat of the soldering iron (as long as you don't keep the iron on it overly long or the adhesive will melt away. Works perfect if you are soldering properly). Thanks for the tip!
I've got a question here as Inmoov is a big robot and as such I'm asking for recommendations of a 3D printer that basically works out of the box for printing such a large sized robot? Can I please get a couple from you guys?
I'm willing to even open a new forum question about this, but wanted to at least start here where Inmoov is actually being used.
We had a friend let us use his FLsun 3d but honestly its a piece of.... eyeroll eyeroll and he honestly chuckled when I told him the same thing.
@mtwannabe I bought this MakerFarm Pegasus 8" Kit: http://www.makerfarm.com/index.php/3d-printer-kits/pegasus-series-latest-printer-model/pegasus-8-kit.html
I've had the best luck with Hatchbox filament.
Gael designed the original InMoov so it can be printed on any printer with a 20cm cube build space. The smaller pieces glue/snap/screw together to make the bigger pieces...
@mayaway
very interesting to know as the information we knew about was taken from here http://inmoov.fr/build-yours/ and it suggested a size of at least 12x12x12 Thanks and I'll start by taking a look at the above printer
The decorative legs he's designed do take a larger platform. The upper body may still use the old format but I'm not sure...
ok so I've also started the conversation here synthiam.com/Community/Questions/11659
so as to NOT take away from this forum thread. Please add to it, if you have experience in the 3d printing arena. Thanks
Just so everyone is aware here is another open source robot that walks. In fact, they show in the video of them kicking it over and it getting back up.
Darwin-OP@mtwannabe So there are dozens of these little tiny robots that can hop about like nothing. Even EZ's robots do this... Now, as for life size humanoid ambulation - that's a whole 'nother ball game...
I use a new version of flsun delta large format to print my Inmoov and I have no negative issues with that printer, I use PetG filament that does not require high temp to print and it is as strong as ABS without the need of a printer enclosure and it sticks to bed without warping, I use a Glass disk on the printer bed and I use Aussie hairspray the parts release with no problems when the bed is cool. PetG filament bonds with Weldon 3 which is the same process as acetone with ABS it is a bond not an adhesive so it is a very strong. and no fumes and is food safe. This is how I build my inmoov and others may have other opinions on how it should be done, but that is how I have done it.
@mayaway
Wow that is 1.25 miles of copper tape! Ok I'll check it out.
You are going to flip over this. James Bruton has a much better version of his walking robot I have not seen. He spliced in a sneak peak using actuators at the end of this video. Fast forward to 10:45. Now this I like.
Here are some actuators: https://jet.com/product/Heavy-Duty-Linear-Actuator-12-Volt-6-Stroke-2-Steel-Brackets-Included/7d9f78552f0c42129c59ff71c77fe1ac?jcmp=pla:bng:nj_roc_gen_electronics_a1:electronics_car_vehicle_electronics_car_safety_security_a1:na:PLA_333246465_1213861007457062_pla-4579465930794947_c:na:na:na:2PLA15&pid=kenshoo_int&c=333246465&is_retargeting=true&clickid=54609dbc-143e-47ea-9f3c-1bbbeab882bb&kclid=54609dbc-143e-47ea-9f3c-1bbbeab882bb&msclkid=e95ae073272415b54b50bbc99bbbab30
Best wishes!
@overserved Which Bruton video at 10:45? Thx!
@mayaway My mistake here is the link
I also found this from Alexander Bersenev on youtube. I am 100% going to build this with added in coil spring shocks.
It is an interesting conversation for sure. I think that the problem that bipeds is in the actuators. Finding actuators that can offer the speed, power, weight profile we need limits all. The human muscle really is a great invention. The best walking robots I see are centered around highly engineered (expensive) actuators tied together with some good code. All the structure that hold them together is the easy part. We can do that.
That last video is pretty cool and shows promise like many others. Once again it is a tiny bot, tethered. I will follow him because it is interesting. Burton's stuff is pretty cool to. Watching his videos he laments a lot about needing better actuators.
I recommend you start a new walking robot thread. I'd like to keep this one about inmoov's.
Perry
@overserved Nice find...never saw this guys clips! I will dig in deeper, never thought about my little robot to start walking, but seeing this makes me think about it!
edit Did you see that ist is five years old, in the comments someone even mentioned that the guy might have died or something! It's a great build, sad it's never been updated or worked on!
Hi All, Iam trying to finish "Toby" my Inmoov. I have been working on him for about a year. I am using MRL but looking to switch over to EZ Robot. My main problem right now is setting the right shoulder pot and getting it calibrated to 90 degrees. I had it working and one day I powered Toby up and he spun his right arm completely around.
Question: Is EZ robot easier to calibrate the servos?
EZ-Robot - ARC makes all things servo related easier. You can download ARC software for free and mess around with it. Super easy to learn and lots of examples and videos.
See this EZ-Robot Tutorial about initializing servos: https://synthiam.com/Community/Tutorials/155/1
The short answer is YES! I converted from MRL a year or so ago, and after getting over the first few bumps of the learning curve with help from everyone on the blogs here, and help & other EZ resources I had my InMoov doing more in a couple of weeks than after a year of fiddling with MRL... who are great bunch of talented guys, volunteering their efforts to an on-going open source exploration of running things InMoov and etc...
Thanks 3dGuy and mayaway. Mr. mayaway I have used some of your improvements that are on thingiverse, in particular the square pot holder for inmoov's shoulder.
Toby looks great! I like the color scheme.
I would say it is a little easier to configure the servos. More importantly for me it is a stable platform that is backward compatible for the most part. When I used MRL there would be a code update and endpoints or scaling had errors and I would burn servos.
Thank you Perry_S, I admired your bot and all of the work you put into it.
Great work Perry, where are you in USA?
Wow...I am so envious. I started printing one of these years ago and then got sidetracked focusing on my little red bot.
I can't imagine the effort required to build something this big and get it functioning. It is beautiful and your perseverance is commendable.
Thanks Martin, This was quite a thread back when I started it. As you can see I came here looking for a better means to run my bot and I found it in ARC. I am nowhere the programmer you are so the community played a big role in getting it running.
Hi Perry, on the hand, what kind of gears or roller do you use?
what did you fasten the fingers with, some type of screw?
Hi EzAng I had one standard hand and one with the flexible joints that Bob Houston posted. For the inmoov hand I printed 3mm pins because I didn't have any 3mm filament to use.