


I know I should finish Melvin before starting a new build but Josh's Jarvis has inspired me to give my JARVIS a physical form.
Some already are aware that I already have a JARVIS like system installed in my whole house which carries out a multitude of tasks from being an automatic PVR (like Tivo but better), controlling the heating and hot water system, controlling lights... too much to list really but one day I will attempt it.
Anyway, since it doesn't currently use ARC or an EZ-B I haven't posted much about it on here, but that's changing for 2 reasons...
- To inspire you guys to open a can of awesomeness and
- Because finally JARVIS will become a real robot rocking an EZ-B.
Basing the design around a RAD V1 robot
So far all I've done to the RAD is stripped it down - why they soldered every connection is beyond me!..
A lot of the choices I make on this project will be chosen by JARVIS. I will be adding some scripting so that I can ask him things like "What colour do you want to be?" and he will choose... this should make it interesting :D
Like I said, his brain is existing and has been for around 2 years, with new features being added all the time. You know what, let JARVIS tell you himself a little bit about him
For more, check out Jarvis Youtube Channel or www.JARV15.com (under construction)

Other robots from Synthiam community

Cardboardhacker's Rover Ad

Mickey666maus's Oled Animated Eyes For ARC Pro And ARC Free


Well soldering is the "best" connection even if not the most practical. I bought a bunch of xt60 turnigy connectors you might find those useful in your project for quick disconnects that can also handle a reasonable amount of current. Looks like we are going to need to start a " Jarvis" robot club for all things Jarvis love the video
What happened to Melvin being your JARVIS physical form?
Any which way......... Awesome!
Keep us posted! Where'd you get the RAD from?
If i had known how popular the name Jarvis was on here back when I started him 2 years ago I would have chosen a different name but everything is coded around the pre-word Jarvis now and there is no way in Hell I will be rewriting 2 years worth of code for a name change.
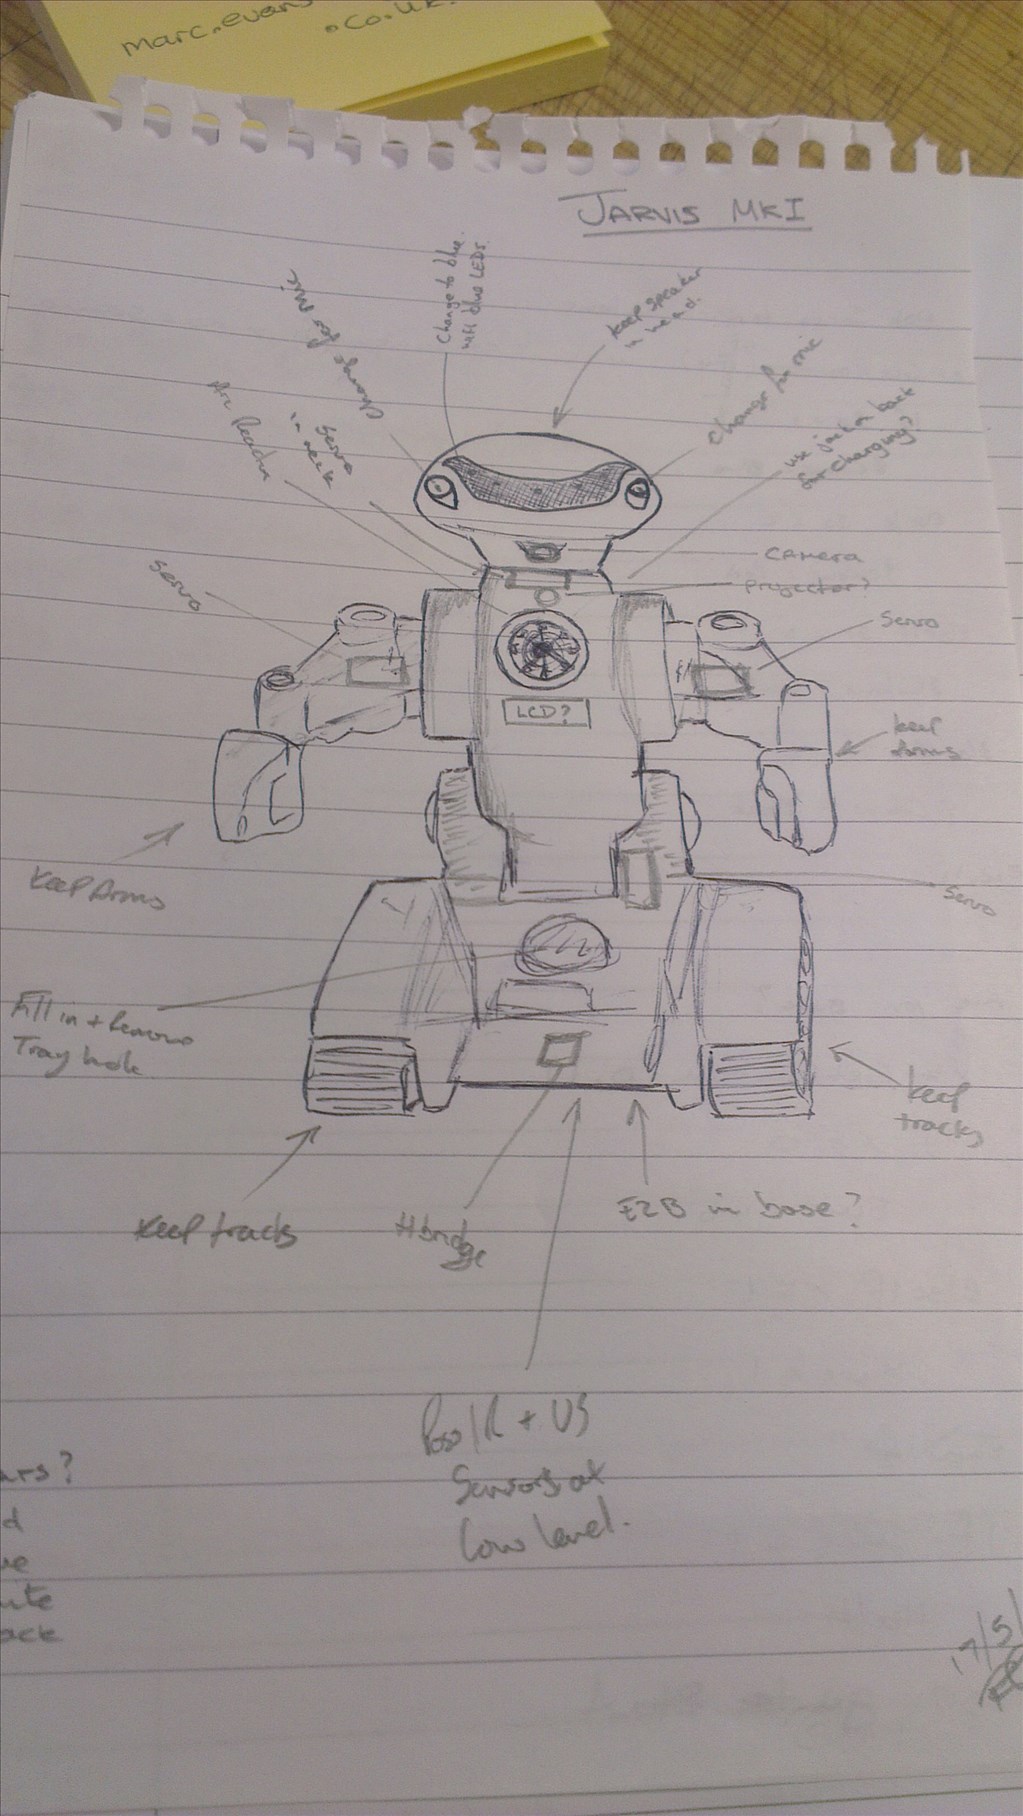
A lot of planning needs to be done too, since really he needs a screen. I have ideas, one includes a faux holographic display (untested but in theory should work), although that would be a huge power drain and I only plan to run it on one, maybe two 2S 5000mAh LiPo batteries (they couldn't fit better if they were designed for the base).
I have a bunch of connectors for the batteries since I needed them on Melvin and it was cheaper to buy 10 sets than 1 set. But typical of me, again I want nothing on show, not even the charging port or on/off switch.
Jarvis was never going to have a physical form, since Mr. Stark's doesn't have a physical form. But I picked up the RAD over Christmas (on ebay, £10, couldn't say no to that) and since then have been patiently waiting for Melvin to be finished so I can start on Jarvis, but 5 months of waiting is too much, especially as I have the EZ-B ready and waiting for him :)
I'm still not sure what he will do as far as functions go with ARC. Chances are he will be very basic running a hbridge on the original motors for driving around, pan head, camera and a bunch of lights... plus the ARC Reactor. But we will see what Jarvis says when I ask him A robot deciding it's own fate is kinda cool.
Stripping down the RAD
Apparently it's blocked in Germany, sorry for that.Excuse the poor camera, it's one of my IP cams and it decided it needed IR on which made me look grey, I'm not grey...
Awesome Rich! ..Great vid and Highway to Hell tune is cool ...with so many robot ideas it is hard not to be distracted and begin another robot. I really liked the Jarvis voice..very smooth...I suppose with all the Jarvis robots being developed a number might have to added or letter..Jarvis1( for Rich) or JarvisR...JarvisJ (for Josh).... If your on the "Highway to Hell" Rich your certainly with all your friends , EZ forum community included. :)
I shouldn't be left alone at work, I tend to doodle...
We will see how close I am once it's done, I suspect this will be another one which I'll constantly be improving too but we will see.
Rich, I did a RAD robot build 10 years ago, I just found this old photo.
I like the RAD robots, I still have a few left in the loft!
@toymaker - that guy has some serious ears!
@jstarne1 Yes they are actually the RAD hands cut off, each lobe had a PIR sensor in for right/left human detection, I do this with all my robots now. The face had a custom designed ultrasonic ranger and in the center is a thermal heat detector that measures the actual heat emitted from a target. This is useful as the robot can tell if (say) a ranger target is human or not by its heat signature.
Is that JarJar-RADS
Can't wait! I will follow this one closely, Great sketch BTW....
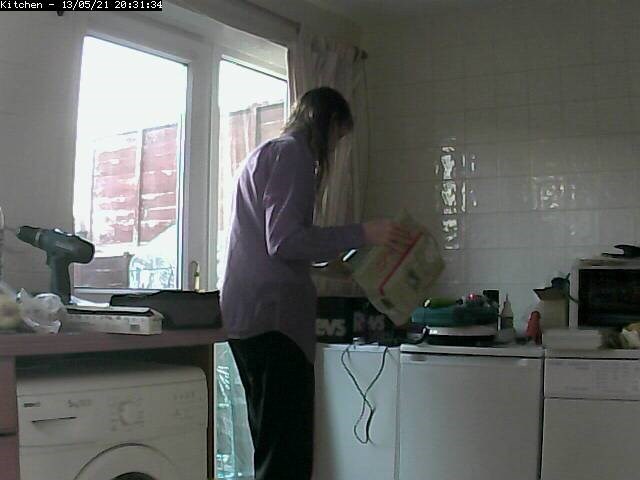
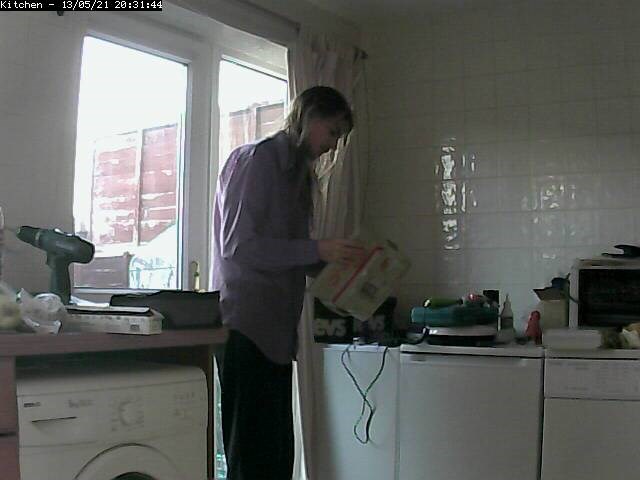
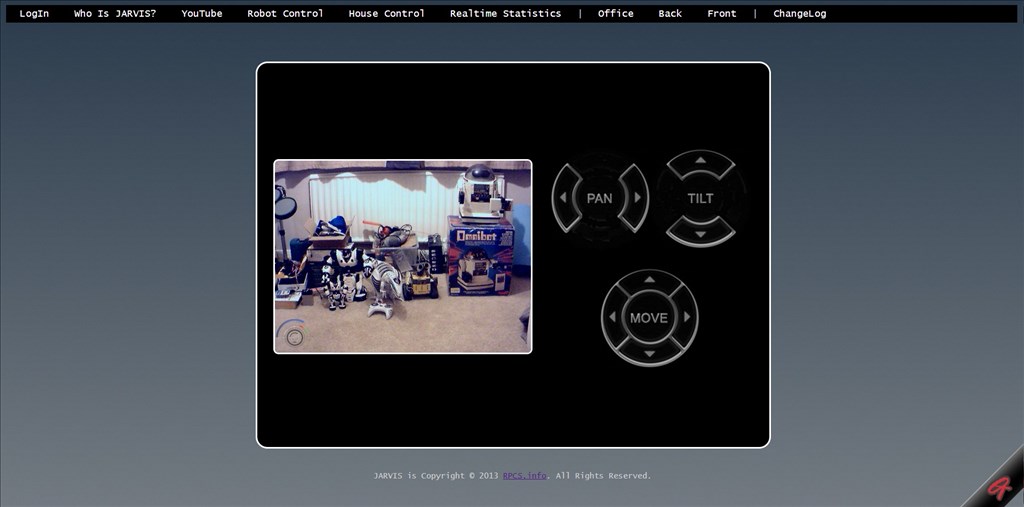
I jumped the gun a little and started playing with some ideas for the remote control over a web page and adding in some cool stuff on the image, kinda like Iron Man's hud (although Melvin helped out with the shot since Jarvis is still in pieces).
I've also written the script for Jarvis to pick what colour he wants to be A robot that designs itself is just awesome... video of that process to come soon but for those interested, here is the script.
What it does is it will pick a colour based on a random number, it will then pick another colour the same way, if they both match (i.e. two consecutive colours the same) then that's what he "actually really likes" otherwise it continues until either 2 colours the same are picked consecutively or the same colour is picked 3 times in any order. There is also some code to change the responses to stop it becoming repetitive.
What I may do is add in some preference over favourite colours based on real life surveys and lists on the internet such as this one, while still leaving it open for him to almost have free will. I'm not quite sure how I will do this yet without the script running for hours with him chopping and changing his mind but I'm sure I will figure something out.
A pointless script for the operation of the robot but a cool feature if I do say so myself. Hopefully he doesn't decide he likes brown!..
Cool :D
I think he will pick silver lol
Very cool Rich!(php)..and Thank you for the script! and I agree with Josh...silver!
Great work Rich, I like that screen graphic display.
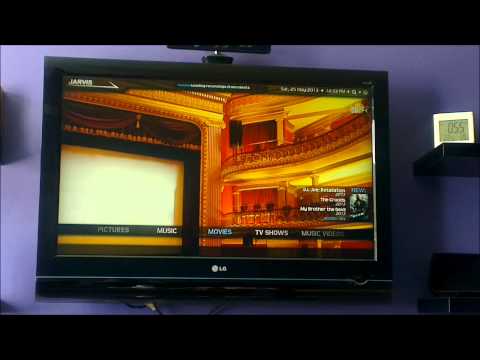
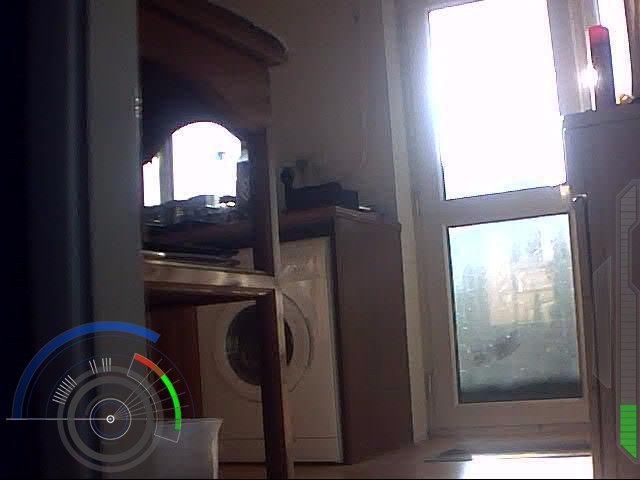
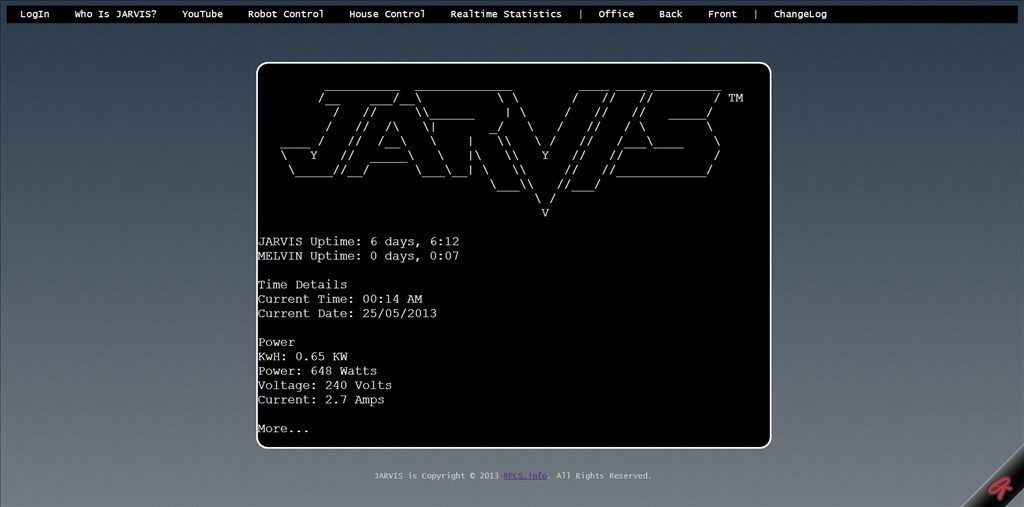
Tonight has mainly been about the Jarvis website. Basically the 3 IP cameras have been added to it which should all stream live (I hope, I just can't check this from within my network properly) and the widgets for Jarvis' battery level and front distance sensor are embedded on the images too (although taken from the database which is reporting the last known since the project isn't running).
The idea is to stream Jarvis' onboard camera to the web page, use the widgets to relay distances all around and battery level, and whatever else I can think of. And add some buttons to the page for controlling him. The problem will be the update speed of the camera feed, despite having "superfast" internet I am concerned that it wont be fast enough. But I'll tackle that problem when I get to it.
In the meantime, if anyone does decide to be nosey, let me know if the cameras are displaying correctly. Note: Camera 3 points to outside but it's night so between around 9pm and 7:30am it points at my curtains. Camera 1 is my "kids" in my spare room/office/robot room. Camera 2 is my kitchen (excuse the mess)
Better yet, do these show up?


I tried to use the house controls to move your place down the block a bit but they didn't work. I don't think it even moved one single inch :(
But seriously, it blows me away every time I see it. Amazing.
Yes they show up for me. They are static but I'm also on my tablet so things don't always work the way they are supposed to.
You mean you got past the security and the dreaded red ARC reactor?
In all seriousness, the "house controls" will be lights, thermostat, hot water overrun, blinds (another ezb project), curtains and possibly door locks plus reporting of door and windows open/closed statuses, smoke detector statuses and possibly some other bits I missed.
The images in the post above are static, the ones on the site should update but my tablet doesn't update them either, I borrowed the code from the ez office page for now, I guess I need to look at changing the code a bit... the update code works on chrome desktop but its still messy HTML which is tomorrows job :)
LOL I too borrowed some code from that page and made a little windows app in visual studio that I use to switch between the cams so I can watch just one at a time. I'll post what I did with the code when I get back to my PC in a few . What I did was pretty simple actually but maybe it'll help you out.
EDIT:
You probably could pull 2 and 3 out I was just lazy. I have 3 little pages like this on a free server that my app displays one for each cam. Buttons select the camera (call the pages).
A small update :)
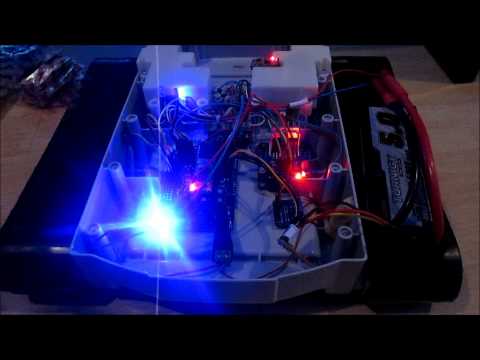
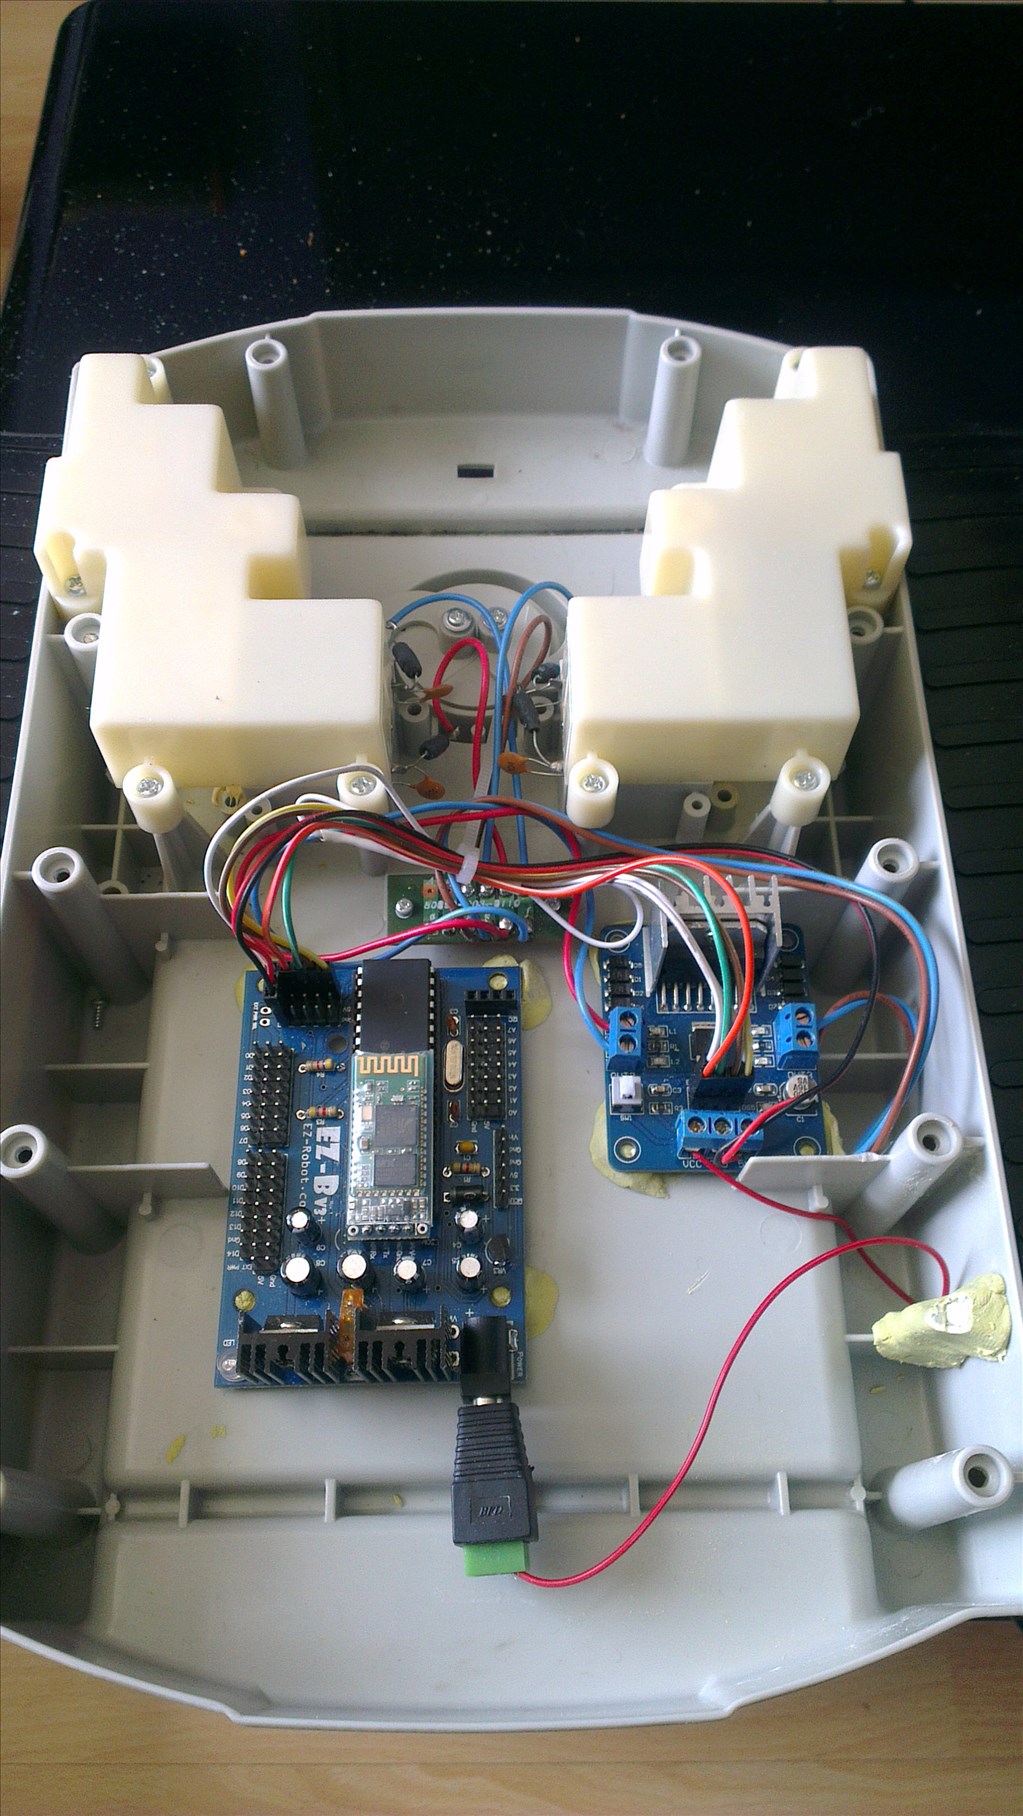
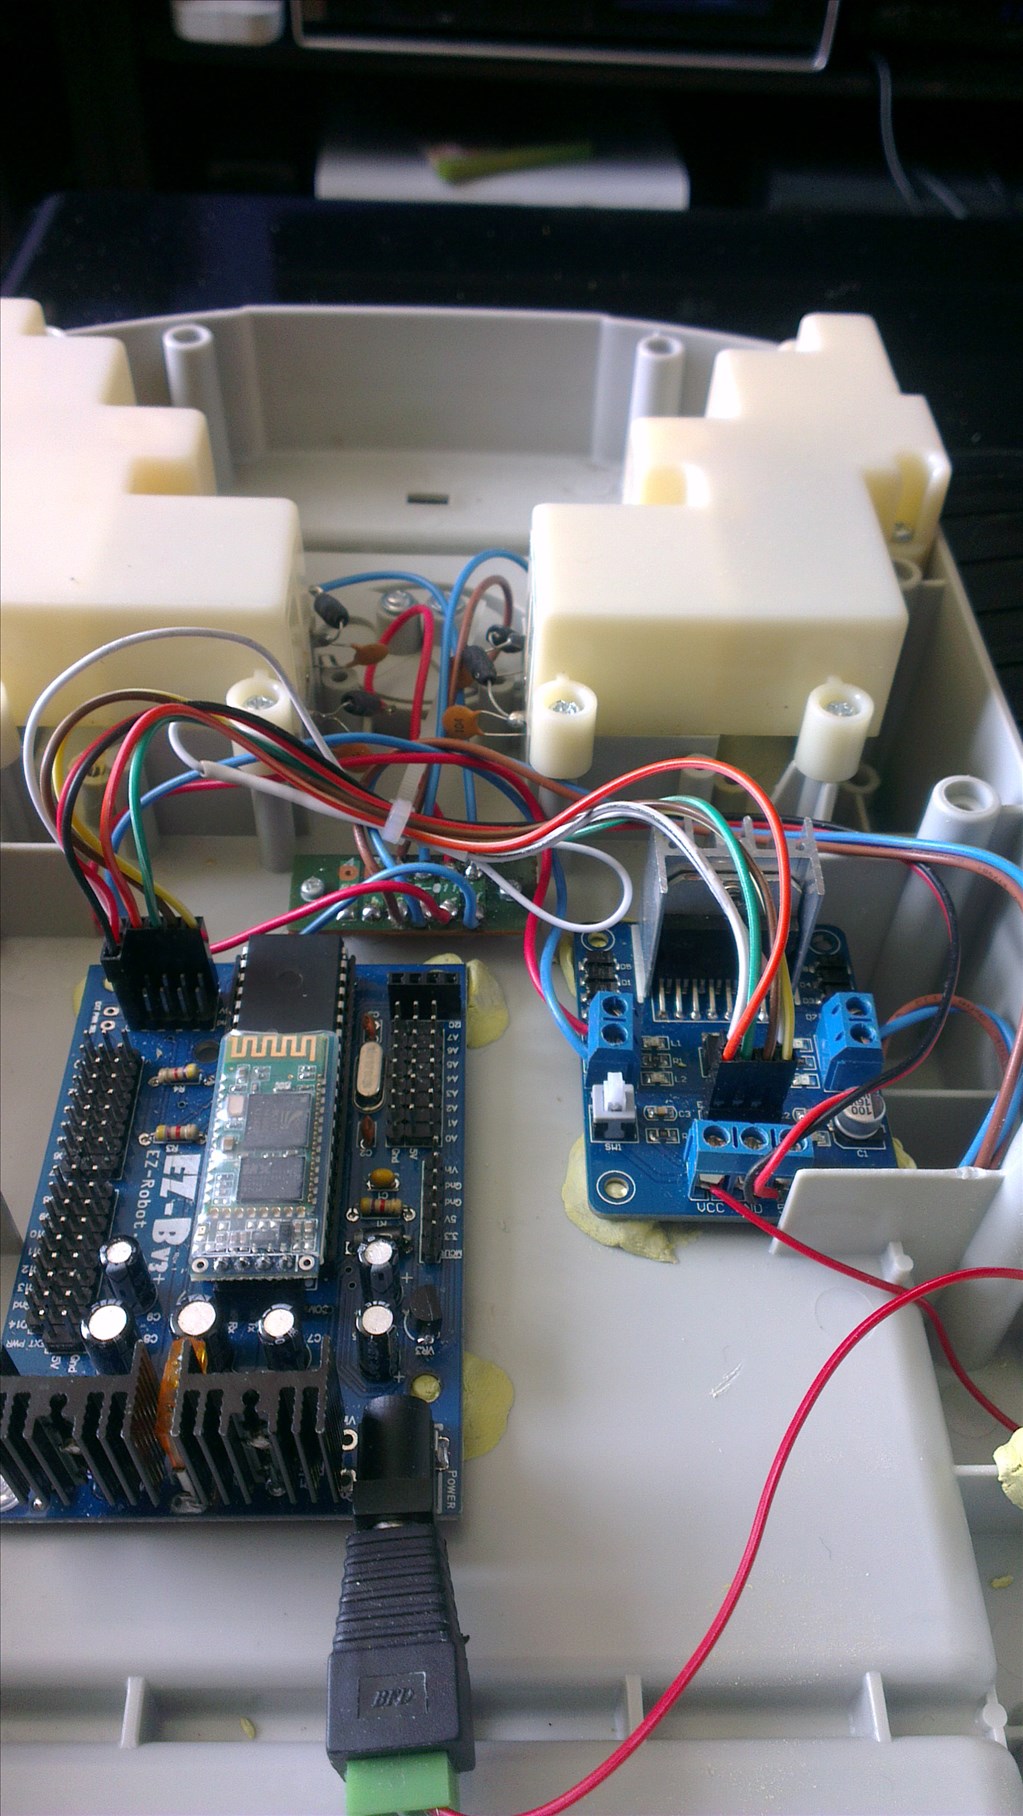
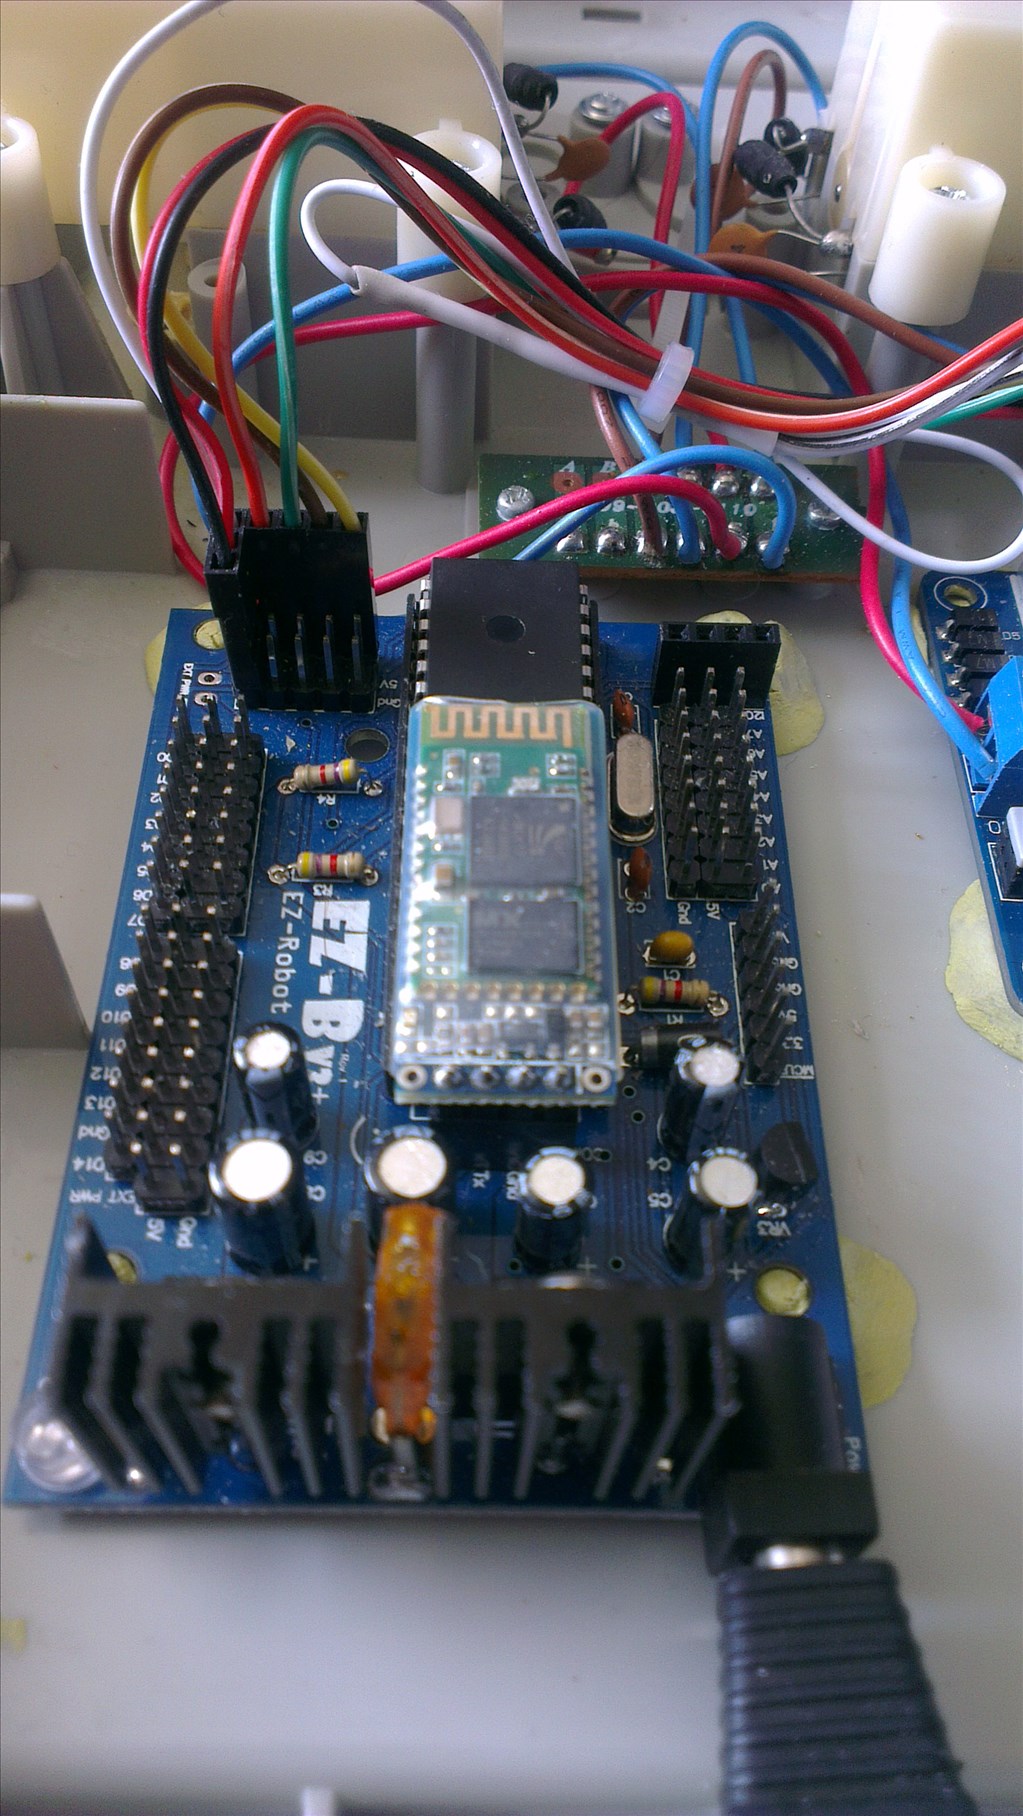
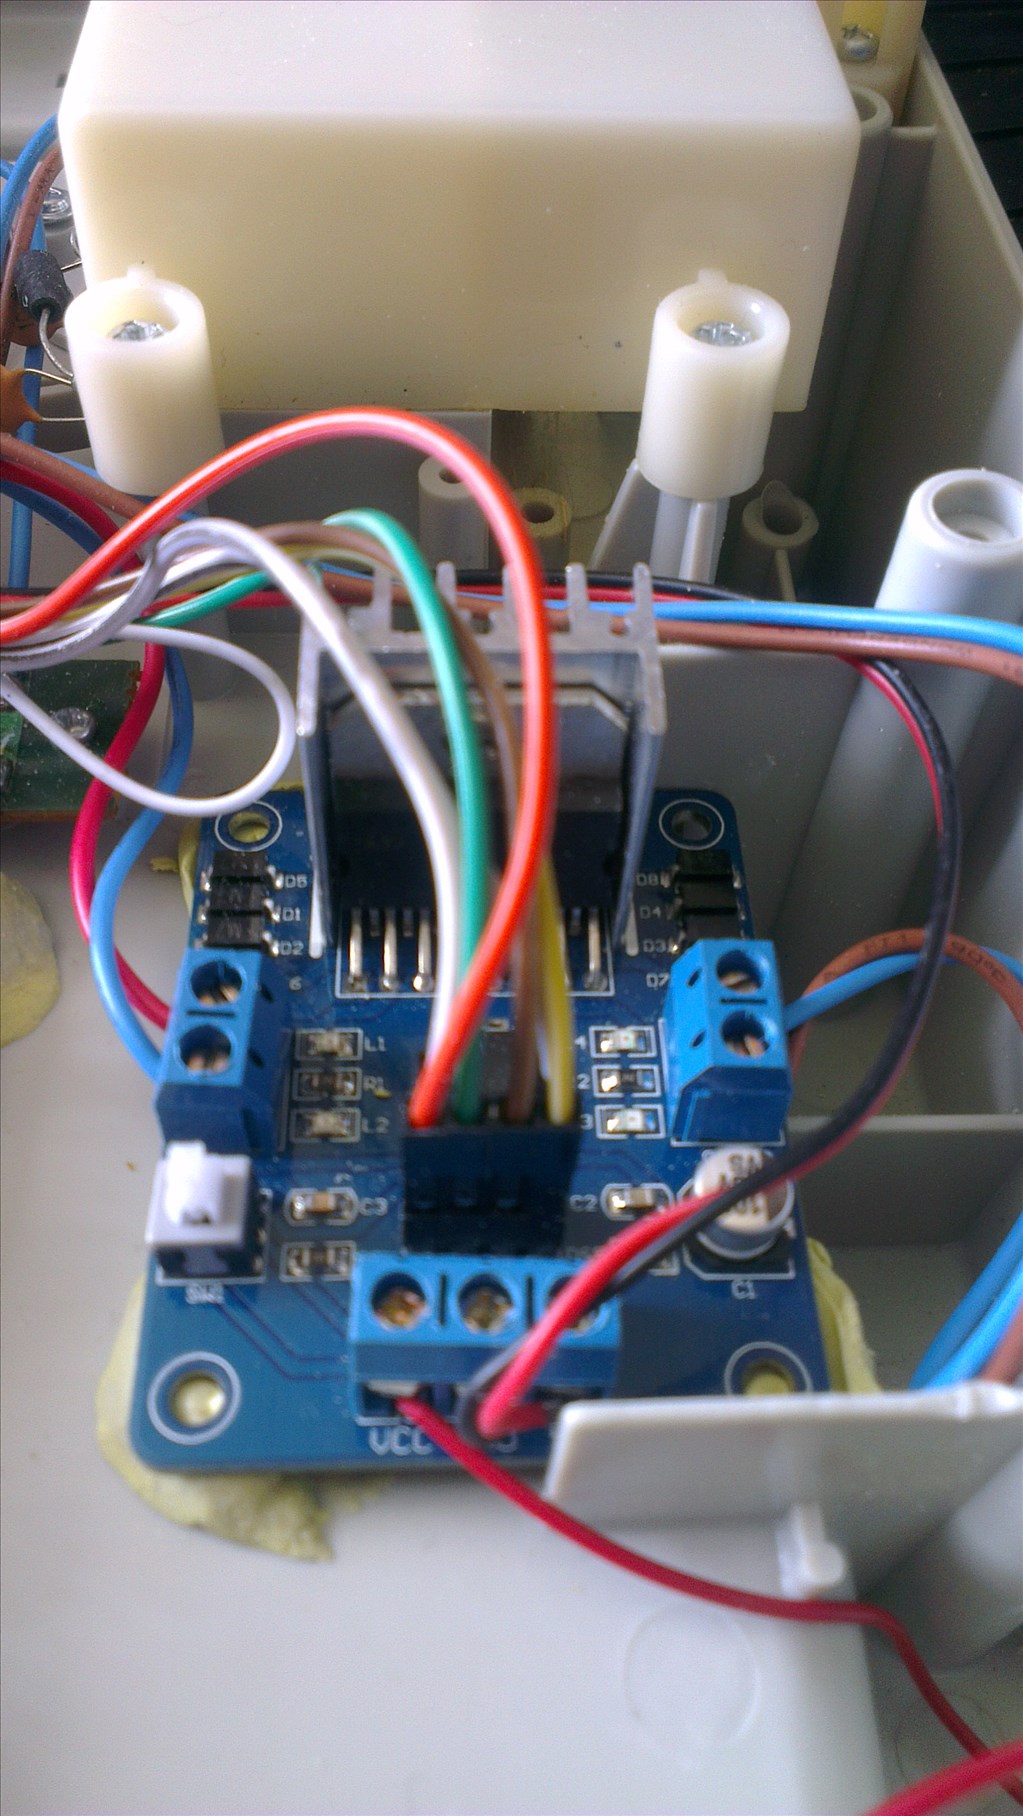
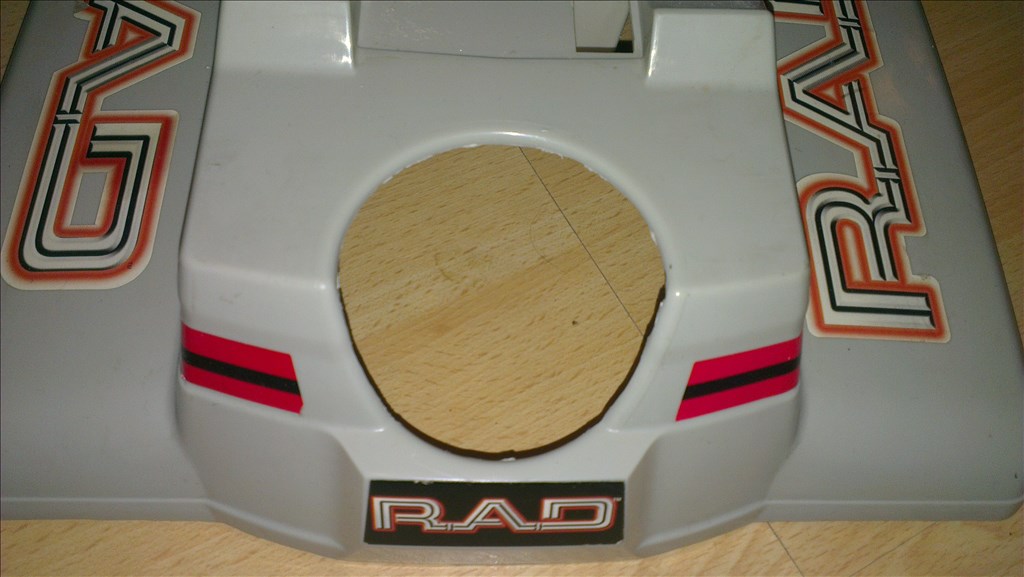
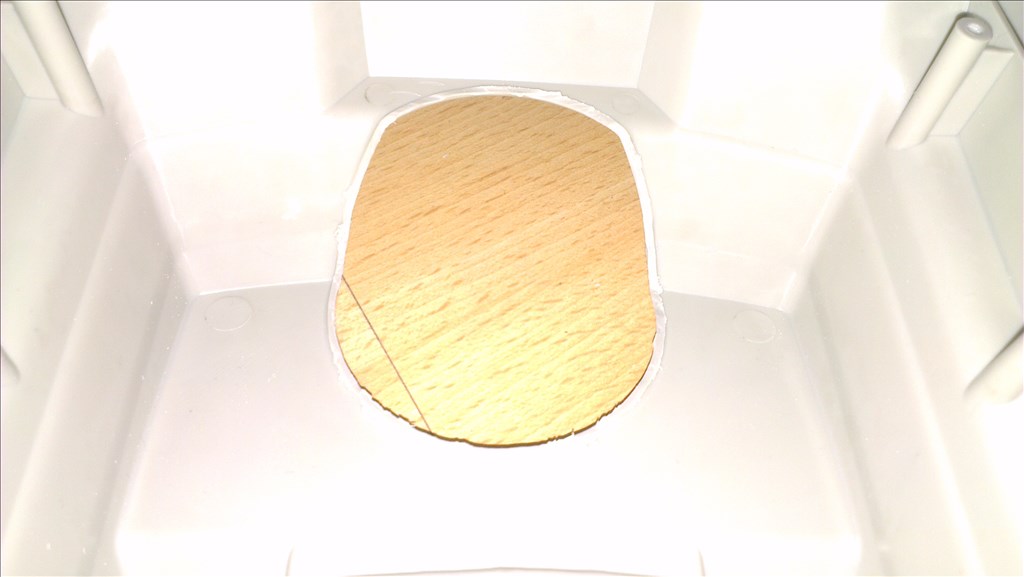
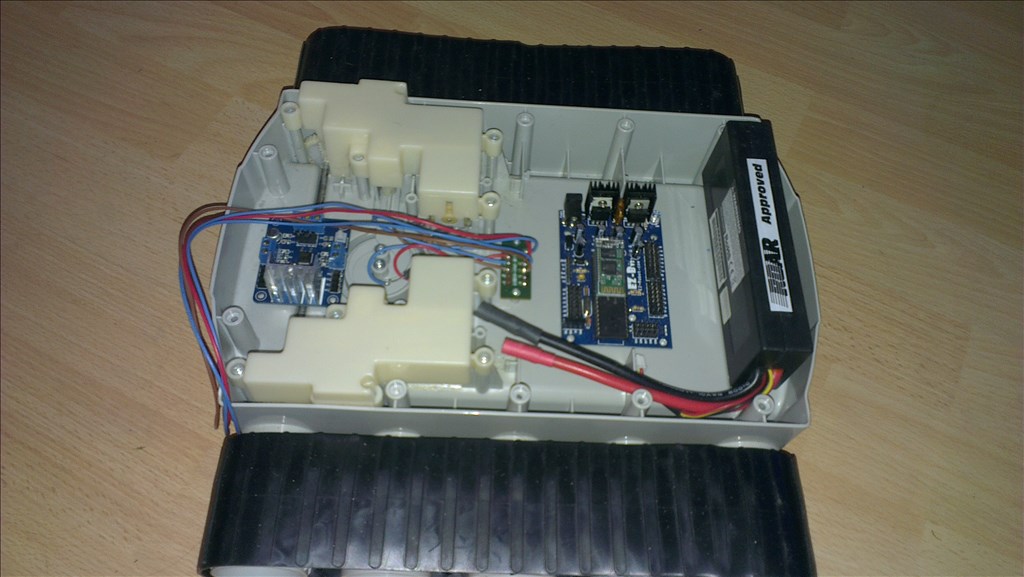
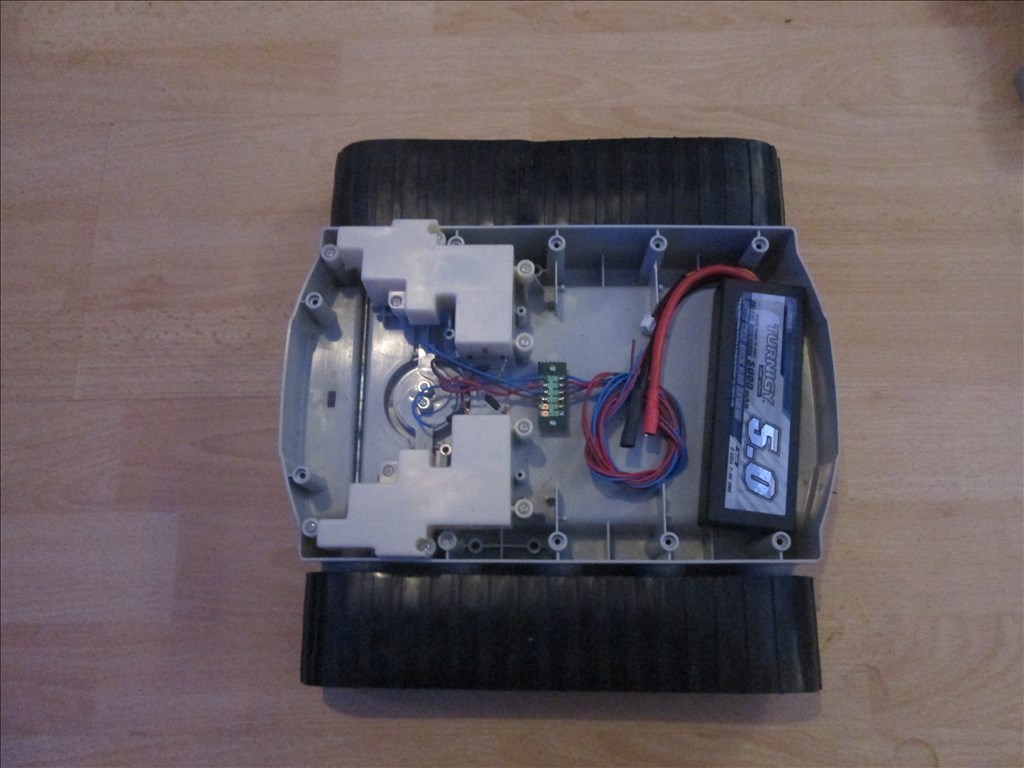
Cut the cup holder out of the rad base so now I can fit the batteries, EZ-B and H-Bridge in the base (EZ-B may be moved to the head to allow for more batteries though).
The good thing about having IP Cameras all over the house means I get video and stills of pretty much the whole build even when I forget to take photos

The H-Bridge turned up today so that's a job for the weekend.
Also made a fair amount of progress on the web based control/feedback too, some screenshots (more for historical purposes than anything). Melvin has been helping out a lot with this part, until Jarvis is moving and has a camera attached anyway.
And also fixed the problem with the web cam images not updating. A simple case of changing some single quotes to double quotes. Although that code will change soon since I don't like using other people's code so I am rewriting it all :)
One slight problem to overcome is the red visor on the rad head, it was like this when I got it but also I may need to change it's colour (depending on what colour Jarvis decides he wants to be). I have no idea how to cast this kind of stuff, but google will be my friend when I get to that. As long as it allows some light through it'll be fine.
It needs to let light through because of the LEDs which are wired up and planned to be used like a Larson scanner (I may use the Larson scanner I built for Melvin but I have plenty of spare ports so will probably just script it).
And also making progress with using telnet to link ARC with the other software I run, which will mean I can spread the load over all 3 computers currently running Jarvis (which will end up being 4 computers since I want a dedicated ARC machine).
What kind of hbridge are you using again?
I have 2 TB6612FNG (the same I used in Melvin) but I'm not satisfied with them as they sometimes make Melvin drive in circles when powered up so I picked up a L298N too which is what I'll be fitting once my jumper cables turn up (I don't want to solder directly to the pins on the board). They didn't turn up today so I guess I'll be waiting until Tuesday to fit that.
ok thanks.
How do you plan to do Jarvis's head? are you putting a camera in it and 2 servos for pan/tilt?
Just pan, tilt will be done through the body.
Camera position is unknown, I may fit it in the centre of the ARC reactor in the chest as I'd like to keep the speaker where it is which is also the only place the camera would fit in the head. But anything which has more than one choice will ultimately be decided by Jarvis The first (?) self designed robot.
Just thinking about what I just said, the camera will have to go on the head. While you can have ARC pan the head with the camera not on the head, the website based control has pan/tilt control, with the camera being the viewport for the robot panning the head would be useless if the camera isn't on there.
I'm sure Josh has ideas of where to fit the camera in a V1's head, I think I saw it in the small black area (where the speaker is) on a photo somewhere. The head itself has not been set in stone, working from the ground up so the base first, distance sensors in the base, then the body, (removable) ARC reactor, the arms, head, camera, leds, other sensors, speaker, possibly mic, then paint and put back together.
Then reconfigure the website to pick up the onboard camera and move the robot, arms, head and body. While I have the controls sorted thanks to a bit of HTTP server spying (I'm sure it's documented anyway but I couldn't be bothered to look). But, I will wait to do more on that until after the next update since it's a big one and there may be changes to how it handles everything.
The main reason for having web based control is so I can move it around from any of the tablets I have in my house (I use them for control and feedback of everything in the house).
Taking it further, however will use external programs and databases, it will act as though it controls the entire house electrics (all lights, most outlets, heating, hot water, blinds, curtains, TVs, media players etc). It will also be aware of things like what food is in my cupboards, what I'm running low on, what is going out of date, what I can have for dinner (including recipes). I'm also working on getting it to automatically shop for me but that is a little difficult without risking ordering a load of food I don't need.
And to top it off, it already knows about 4000 cocktail recipes and the contents of my drinks cabinet :)
Did I say it was a huge project? :D
Wait..... A drink mixing robot.... May ha ha
No his arms wont really be good enough to mix drinks properly... but while I wrote that I did think about another pair of arms on the bar powered by an EZ-B to mix the drinks I need to stop thinking before I end up with 100 projects on the go at the same time...
drunk robots taking over the earth...
LOL. anyways, cant wait to see what you come up with.
Could you tell me how the rad leans forward and backward? dc motor?
Could it be converted to a standard servo?
Yes, a DC motor. Not sure if it can be converted to use a servo, I plan to find that out when I attempt it.
ill keep posted
There is a very convoluted gearbox that let's the rad lean. Your better off just taking that box out and maybe put in a couple high torque servos. The upper body is very light once the stock electronics are gutted.
Yeah, I think some of that gearbox shot across the room when I stripped it down too so using a servo was the first choice anyway, unless I can find the gearbox, put it back together and find a servo with guts that will handle the motor and basically convert the motor itself into a servo with servo guts... unsure at the moment until I get on to that part of it which wont be until the base is done with the h-bridge, sensors, mounting the EZ-B and the battery/batteries.
@Josh, I assume the motors for the tracks can safely take 8.4v without a problem? Or should I PWM it down to ~6v
Yes the Rad motors will take the 8.4 volts easily. Bret has been running his Rad/ B9 at 12 volt when we found 6 volts just didn't cut it on carpet of any kind. 8.4 being in the middle you are totally safe. The only recommendation in regards to the motors is to remove the pinion , clean/ scuff the shaft and then use loctite on it when you press it back on. That's a anaerobic adhesive. I noticed on a couple of occasions the pinions flying off for no good reason. Even happened in one of my test videos.
I love the rad robot. The only obvious downside is the lack of space. It looks spacious at first but once everything is being put in its cramped.
About the head - the Neck portion is removable so you could use a pan / tilt bracket there and keep the EZ Cam in the location I put mine. Put the speaker in the torso or base. The less weight you put in the torso the easier your waist servo can handle it. On my robot I am eliminating the gearbox portion and I'm going to epoxy it together and hollow it out with a dremel so I have more room for servo wires and eliminate the problematic gearbox.
Your saying to use the pan/tilt servos and brackets available in the store?
Well those are too small. I was thinking more along the lines of lynx motion pan and tilt bracket B , its 9.99 and uses two standard servos. The one in the store is fine for just a camera but not a fully loaded head with the camera , LEDs, wiring , maybe a speaker etc.
I may have space in the base for the speaker, I'd certainly prefer the camera to be mounted in the head somewhere.
I'm probably going to have a play with that low temperature melt plastic like what's in the shop to sort out the waist servo, not sure about the arms closing though, I've only just taken the arms apart (I cheated on the stripdown and just took them out of the torso).
Thanks for the tips, all will come in handy :)
The pan/tilt bracket in the store wouldn't lift (or even hold) Melvin's head when it was the original head with no visor, micro servos don't have much grunt to them.
What about the micro servos in the store? they apparently have some fight to em'.
For me im taking the speaker out of the head most likely and putting a wireless pc speaker in the chest where the gun is if I cant control the gun.
Probably micro servos for the pan/tilt.
What do you have planned Rich?
@Rich the polymorph is the brand I have , its cool stuff. Its like nerdy play dough lol. The only think I will say is its difficult to get glues to stick well to the thermo plastic. I tried a couple types of super glue and it almost seemed like the CA / super glue didn't want to cure up against the stuff. I think it holds a lot of water from the shaping process and gradually evaporates out.
@Josh, thanks for the tip, in that case I may just use Milliput (epoxy putty), that's awesome stuff.
@Technopro, you'll have to ask Jarvis what he has planned Other than the basics and the distance sensors around the base I have no idea what else will be done. I have a list of possible things that can be done which I will be offering Jarvis as options and he will be telling me yes or no to them, just like his primary colour and detail colour(s). But mainly he will stay pretty much standard - I have Melvin for all the cool bells and whistles, Jarvis is just a body for what's already in place (and currently reminding me every 5 minutes that it's gone 3am and I'm not in bed yet).
Seems i am not the only one that likes the name JARVIS for a robot,looking to use eventghost and a few other automation software.
MORE like"going to be rad project" by KKEAST since i have so many X1O interfaces,from alarms to pool and spa control,A/C and every outlet and lights in my house,plus cams outside and tv/video control of all my plasma tvs and more.
Total automate home,will be posting my project up soon guys.
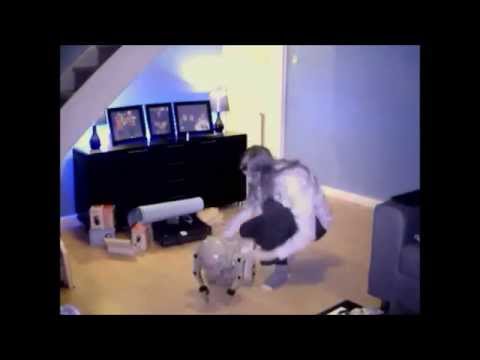
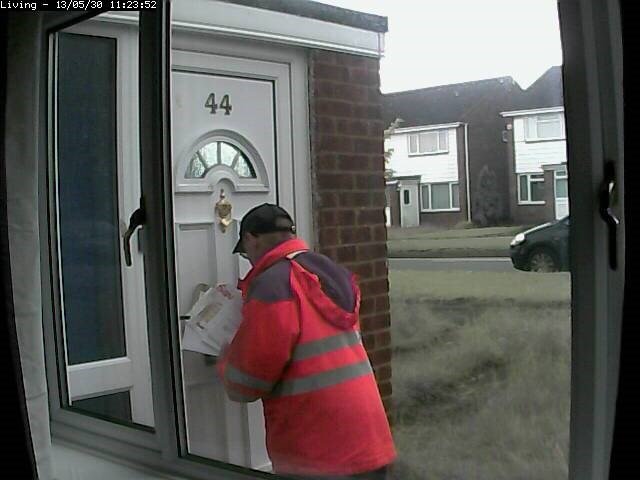
Looks like Mr. Postman delivered the jumper cables today which means I can finally get the H-Bridge set up :)
Also, looks like Jarvis recognises Mr. Postman since he let me know about it with video and stills via email...
Colour detection, which is great until summer or until someone else in bright orange comes to my door.
I see spell check is needed colour is spelled color Hope you share the code of your design.
That's awesome , who needs delivery confirmation when you can watch it be delivered!
Ok thats good to know but my spell checker i have said it was wrong.
H-Bridge is all wired up now. Just need to find that LiPo battery I have lying around somewhere (I tidied up at the weekend and forgot where I put it...) Should hopefully have movement later on tonight :)
NOT coming as a bad guy really,but will keep the comments off you post,on bad spelling will post since others said about my bad spelling an now i have spell checker.
@josh thanks ;), All I need now is to hook up an electronic lock and have the door open for the larger deliveries when I'm not there I bet that would freak out the delivery guy if a robot answered the door :D
I did that with a robot with a different board and software,i really freak my UPS guy when he answer the door and the robot open it. I had it part open so he just pull on the door and said hi,cant post photos since not a ezb project yet.
BUT hope you share all your codes for everyone.
@rich ha ha ha , I have daydreamed the same thing , i can see the delivery driver getting confused when a signature is required. Lol Jarvis can just tell him to sign for him.
MMM JOSH thats a good idea and may be it can be done, i bought some cool medic scanners and fingerprint scanners.
That is so Awesome Rich! I totally love that.
Thanks Bret.
A few more possible additions using EZ-Bs for integration with Jarvis...
Stair lighting... IR sensors built in to the top and bottom steps. TIP switching transistors on 14 digital outputs. LED Strip installed in the underside of the banister in 14 sections. LED Strip switched from TIP switches.
When someone or something triggers the IR sensor at the bottom the LED strips are illuminated one by one with slight delay from bottom to top. When the top IR sensor is triggered the strips stay on for 2 minutes (or so) then turn off, one by one from bottom to top like when they turned on. If the bottom IR sensor is triggered again without the top being triggered the lights turn off from top to bottom. The same but the other way around for the top sensor.
It's something I could use a different microcontroller for but let's face it, the EZ-B is easier to use and costs around the same.
And, the auto blinds... Venetian blind with twisty rod for opening & closing. Rod removed, servo attached to mechanism. LDR (light dependant resistor) fitted in window. Temperature sensor fitting in window. When light outside, blinds set to open by moving the servo to the correct position. When dusk blinds set to close by moving the servo to the correct position in increments defined by light level. When hot i.e. sunny blinds set to angle up deflecting sunlight by moving the servo to the correct position. When "movie mode" activated blinds set to close. On voice commands blinds set to specified position.
what is venusian blinds
Awsome Rich, Tony Stark would be proud.
My ultimate goal is for Tony Stark to be jealous :D
FYI, I forgot I made this video last weekend... My main problem is I have nothing to point the camera at so the TV was "it" for now. His response is a little quiet, sorry about that, but it's a pretty fun addition...
Still playing with the temperatures and overall conditions for the responses. Basically what happens is he will check Weather Underground via their API, fetch the current condition (httpget) and save this as a variable and fetch the current temperature and save it as a variable (although he could use the outside temperature he gets from the compensated heating thermostat control). Then he checks these and responds to suit, using Ifs.
i.e.
The same for the temperatures
There is also wind speed too but unless it's crazy high he doesn't even mention it.
Thanks for the code will use it in my design,plus can adapt to other saying. The scripts so far from what i see are fairly easy ,but goes a lot faster when someone else makes part of the code.
RICH your design is getting better,hope to see more good changes soon.
Holy crap Tony, uh sorry I mean @Rich. Its really amazing what you have got done.
Thanks @Rural. This one is going to be mainly focussing on the controls and scripts more than anything else, and I still have a lot left untouched and unmentioned :)
I did make a bit of a mistake though, I mounted the EZ-B and H-Bridge in the base, using Milliput blobs and making small pillars which the boards clip on to using the mounting holes, it makes for a screwless install that's easy to remove if needed. But in my haste I forgot to check the power connection on the EZ-B...
Luckily I like a challenge :)
The battery would fit nicely under the base, the height of the battery is lower than the height of the tracks and a hole could be drilled through the base for the wires, but I wasn't too convinced by that idea. Then I realised the top of the base is quite high, with the cup holder removed there was the perfect place for the battery, except gravity wouldn't let it float. So more Milliput and the battery is nicely held in position.
This isn't complete, I am expecting the battery to try and drop out of the Milliput once it's hardened and turned right way up. But once it is all set there will be more modification made to it with a small piece of plastic card fibreglassed or epoxied in position. I can't do this with the battery in position as it would bond to the battery and would result in it not being able to be removed. So currently waiting for it to set and then on with the fibreglass :)
A few more photos of the base. Neatness was what I was after and the ability to remove any part of it easily. I think I've achieved that.
Have any links to milliput you used.
Hey rich, I know you've been talking about controlling your blinds with Jarvis, and I think a found your answer
www.robotshop.com/add-a-motor-drapery-controller-800rc-1.html
I think a site called automation pro has a few listed ,will find the link RICH and post it for you.
Yeah, I am aware of the controllers out there but there's more fun making your own :)
Plus, those are $130...
EZ-B - $69 Servo - $10 max LDR - $0.50 Temp Sensor - $2.00 Misc cables etc. - $10 (being very generous there!) Power Supply - $10 Total $101.50
But thanks for the link :)
@TECHNOPRO that link for controlling the blinds is same that automation store store has,its control by X10. I have almost every X10 module they made except for that one,might get it. Thanks I am also building a JARVIS like RICH project,started a while back but doesn't have all RICH JARVIS has,but will use some ideas he is using.
Great about eventghost i like so much it has a interface for X10 modules.
WILL need gears and a lot more to get it working RICH,but you are right it is fun building your own and easy.
Blind electronics is easy but using servo's on a long distance drape control will be the problem. Might need a linear screw motor,like they have in the X10 drapery motor.
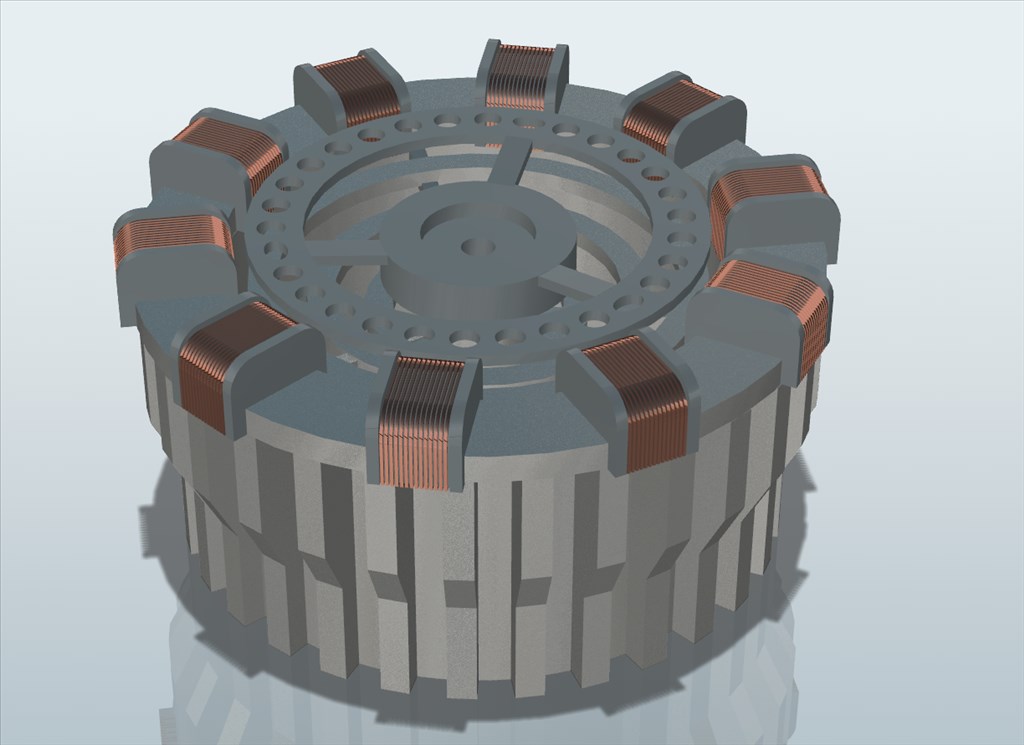
Since 3D printing is probably going to be a huge thing and I'm patiently waiting for the release I thought I would have a quick brush up on my 3d cad skills. I've been looking for an ARC Reactor for Jarvis for a while but nothing fits or what would fit isn't the right style so I thought screw it, let's make one :)
It's not perfect, it's not finished but the bones are there. Since I'm not as fluent in 3D cad as I'd like to be I don't think I've done half bad with this. Anyway, this shows how much I know about Inventor, all I can muster up is an exported image (got the sequences all working and playing in Inventor but God knows how to export those to video or whatever).
Anyway, here's the first draft
I want the ring around the outside to glow though which may be an issue, I'm not sure if PLA is at all translucent. And I will be manually wrapping copper wire around the blocks, I could have added 3d printed wires but I don't think that will look as good as actual copper wound around them.
Edit: Figured it out First draft dimensioned and multiview

Waiting for 3d printing place to start taking orders again then I'll get a prototype made, really cheap at £0.20p per cm cubed, it's like £6 rather than Shapeways wanting £26!..
Pla is not going to let light through. Its similar to a solid white milk jug , small amounts of bright light could come in. You can 3d print the part you want clear then use that to make a mold and cast your clear parts from epoxy resin. Is that a epoxy putty that gets hard or does it stay soft?
I found a 3d printer who use nylon and is dirt cheap so I'll knock up the prototypes in that stuff first, see how it looks and take it from there. There are other ways to get the ring to glow since it's only between the blocks so can always just whack a hole and an LED in those sections if it comes to it. Although I like the resin idea, that should be pretty easy to do (well I have no idea but it sounds it).
Yeah the Milliput goes rock hard in about 6 hours and is then sandable, drillable, tappable, cutable... If you look at the photos of the base I stuck a blob on the side of the base and have cut a small part of it (I had some spare and wanted to see how well it cut etc) it's pretty neat stuff. It's gone nice and solid now, a couple of pieces of card above and below the battery to make it slide in and out easier and it's all ready for fibreglass - when I go out and get some.
I thought I had some spare bullet connectors for the battery connection too, I know I have somewhere but I tidied up and seem to have lost them so can't connect the LiPo up just yet. Running on 4xAA at the moment, it's a damn fast base! Although a bit rattly with no weight in it.
Are you using a service for the 3d printing? Or buying one? Let me know who you are getting it through , I will need to do 3d parts too.
I'll be using a service. I found a place in the UK that does it, not sure if they ship internationally or not though.
3dprint-uk
Just waiting for them to catch up with their backlog. It's either them guys or shapeways but shapeways want close to £30 for the same, 3dprint want about £6, and are in the same country as me which helps.
I was looking at 3d printers but they are a bit too pricy at the moment and I can't really justify one yet. Maybe when I get on to my lifesize biped project it'll make financial sense but until then it doesn't.
I was considering a solidoodle 2 500 bucks. I mean its 500 dollars but if you are doing a handful of prints you can end up spending that much on a project.
If only they were that price over here, cheapest I found (although wasn't looking too hard) was £1200 which is around $1800... I'm sure there must be cheaper but everything kept sending me to US sites so I gave up trying to look.
At £6 a print (roughly 2.5"x2.5"x0.5") that's 200 prints without taking into account the material cost. That would take a while for it to start being worth it.
I am looking to get one fairly soon will post photos .
Look on ebay JOSH for the ARC reactor and instructables site to build one.
Quick update...
I got the price back for the 3D print and I totally missed they have a minimum order value so it's either 3 ARC Reactors or I need to squeeze more parts in to the same print... So I'll be making a few more parts from the looks of it... What parts I'm not sure yet though.
And, it's time... it's now got to a point where I need to know what colour Jarvis wants to be so I am about to run the script for picking the colour. I changed it slightly to use the BlinkM and get rid of the annoying "but I also like" bits I added in. It's going to be the first colour to be chosen twice... place your bets now :D
I will pass on betting its just not for me, just waiting on the script soon
I bet 2/3 on silver and 1/3 of my imaginary chips on brown. :)
Possibly you could just have someone ship you over one. The small amount of shipping would be worth it to save 600 dollars, or just wait till you have a buddy who is cool with doing the prints cheap for you.
The problem with that is import duty and taxes, usually they push the stuff over the price I can get it for here.
The 3dprint UK place seem good, and cheap too so I'll probably end up using them a lot. Plus they are UK based which is a huge benefit as far as time and shipping costs go.
Hi Rich I'm looking at these Makibox As I want to build something and its not tooooo expensive. Good forum on the site as well
I THINK pololu does 3D printing in UK.
Thanks Neil, they are really cheap... which is my concern since I've learned now that you get what you pay for.
Although at $200 for the printer and $16 for 1kg of PLA it could be worth a shot... Printer $200 2 x 1Kg PLA $32 $232 @ £0.642182 = £148.98 plus duty, taxes & shipping
That's not too bad, it's worth a look at least.
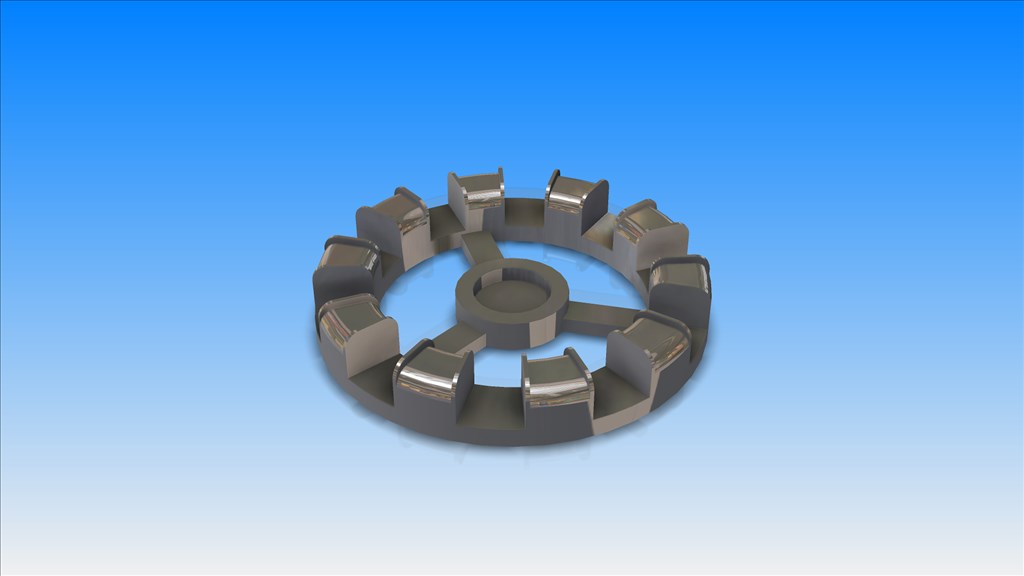
I wasn't happy with the first ARC Reactor I drew up so decided to start again from scratch
Much more detail on the inside (not shown, hard to get a good angle to show it) plus cutouts for LEDs to sit in it It's not quite finished yet, I need to add some connectors to it so the top half can be removed from the bottom half and some tabs to it to hold it all in the chest of the RAD.
@Rich looking awesome! Your inspiring more creative robots using 3d printing! @wnstn60 thanks for the 3d link. I am betting on SILVER!
Thanks irobot, that's the plan Hopefully if I can inspire people to play and build then we will end up with a massive library of robots. Plus this one is really to get me back into 3D cad and brush off my cobwebs. One small problem though is I screwed up with the diameter and it's twice the size it needs to me... nothing a little scaling wont fix though.
He picked white by the way, which is a little bland but never mind. If that's what he wants that's what he will get :)
@irobot check out instructables they many ideas on the ARC reactor and how to build them. www.instructables.com
@robotmaker You fail to understand the part where I said this is to dust off the cobwebs and get me back in to 3D CAD. Nobody has said they also want to make one, if they do I will be hosting the files on some of my webspace so that they can alter and resize as necessary.
The instructables ones are very poor and not anywhere near what I want. Plus the size of it needs to be pretty much spot on and so far nobody has made one that's the right size.
Time to check that box in settings again ;)
Are you going to wrap the sections with solid core magnet wire for "authenticity" ?
@winstn @rich - I heard makibox Was bringing a machine for display. If they do I will see if they don't mind doing a demo for us. I get to go to a pre-show party the night before and hang out with venders without outside spectators there. So if they come I will talk to them.
They will be wrapped with copper wire stripped out of 6491X pvc covered copper cable. Weather it'll be one continuous wrap per block or a bunch of strips just stuck on is undecided and will come down to what modifications I'll need to make in order to wrap them.
I was tempted to get the finned lower section made from aluminium too, but that's going to be inside the robot and barely seen so spraying a nylon printed part should look OK.
I can't find any palladium to use in it, no hardware stores stock it :D
Its not too hard to find.. http://www.providentmetals.com/bullion/palladium/pamp-suisse.html
Only $7745 for .999 fine palladium
YEA RICH thats cheap.
Decided to make the project public on the cloud :)
Haven't done anything on it for a few days since I've been away but it may help people out.
White! Dang robots "seem" to have a mind of their own Well, white IS a neutral color which other things/addons will def standout...like a bowl of icecream and strawberries on top!
THanks for some of the code ,will use it on my JARVIS design
What was just going to be a very basic robot has evolved, I don't think I can do simple :)
Although to be honest, Jarvis has turned in to something of a test robot with the TellyMate and MMA (if I can ever get it working) lately. But further to that, he now sports a neat little current monitor.
More precisely an Adafruit INA169 breakout board which took away any complicated circuits, sourcing parts etc. and very easy to fit (fits inline with the power supply, V+ to the battery, V- to whatever you want to monitor - I chose just the H-Bridge, then Vout to ADC signal, VCC to ADC VCC and Ground to ADC ground). 1V = 1A so using the ADC value should be very simple and adding in a script to stop movement on high load current should be a piece of cake.
I'm waiting on more protoboard so I can knock up another voltage monitor circuit then I just need to fix them to the base and the lower portion is completed and ready to be painted.
Also, I have my I2C chip which should, if I have the circuit right, provide independent switching of 16 LEDs through the I2C bus. This is going in the head for the LEDs in there.
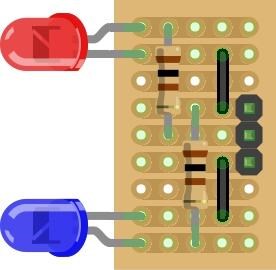
And lastly, another small protoboard to house 3 LEDs. One for a power indicator, one for a connection indicator and one for a fault indicator. I'll also be using the same proto board to provide a simple push switch circuit so a push to make switch will latch on with a single push and the same switch will also latch it off for a more professional feel.
It's getting there, while it may be slow it will get there in the end.
I am interested in seeing how this is going to turn out.
A quick update on Jarvis is due :)
I now have the error checking set up with feedback through two LEDs that automatically turn on or off depending on the fault state. Faults so far are; Low Battery Disconnected Battery Fault on Monitor Circuit Over Current Disconnection
This quick little video shows a demonstration of the connection status and the battery monitor since they were the easiest to emulate.
Basically, how it works is the LEDs are wired so that a Set(D8,On) command turns the blue LED on and red LED on, a Set(D8,Off) or disconnection turns the red LED on and blue LED off. This is achieved by connecting the Signal wire to the blue LED's anode and ground to the cathode and on the same port wiring the Signal wire to the red LEDs cathode and the VCC to the anode.
When the Signal goes high (or set to on) it becomes the VCC for the blue LED and current flows through the blue LED. When the Signal goes low (or set to off) it becomes the ground for the red LED and current flows through the red LED.
When the EZ-B is disconnected all signal pins go low. A simple script sets the signal to high on connection. Additionally the Set(D8, Off) command has been added into the battery monitor script in all error checks and Set(D8, On) added to the portion of code which reports the voltages to the LCD display. The current monitor works in a similar way.
Excellent job Rich. Thanks for sharing your progress. :)
Rich you are a power house of ideas. I will be using many of them in my build on Questor. Keep up the good work.
Thanks :)
As always, here's the protoboard layout for the LED circuit. 3 pin header connects to EZ-B with jumpers (you could solder wires direct if you wanted).
Throw a resistor between Vcc and an empty track (there are 2 there) and then another LED between that and ground and boom, you have a power indicator too.
How simple is that! Pure wizard idea! Richezmon itor! ...used by all..thanks for the generosity! .....A mere glance will indicate the power state....I am thinking a small buzzer for those who are not in the same room :)
I read all the way to the end? What happened to Jarvis? He has so much potential!
This one was shelved, at least for the time being. It may make a come back if I get more time but other things have taken priority.
At least the physical robot is shelved. Jarvis still runs my house.