Asked
— Edited
Hello,
i have a problem with my inmoov.
I add a "talking servo" i adjust the servo - everything is fine i have only one problem:
After a sentence the inmoov leave is mouth open. Nevermind how long or short the sentence is... the mouth is in the end still open.
I cant find any option to say after a sentence got to this servo postion.
Thanx for help.
Boris

@Boris.
Does the mouth move in sync correctly when the words are spoken (word spoken, mouth open, nothing said, mouth closed)? One suggestion is to click on the "Invert Direction" box under the "Min" "Max" servo positions and see if this helps. Give it a try and report back here to let us know how it helped.
Hi Steve!
i change the servo from a hitec to a toward pro servo and now my Inmoov is closing his moth after the sentence.
I don´t think it was the servo, but in the end it works!
Thanxx Steve for your fast help!
Boris
No problem. Glad you got it sorted out, but strange how a different servo made the difference. I wonder if one servo is digital and the other was analog, although I wouldn't have thought that would make a difference. At least it's working properly now. :)
Hello,
back again (me and an old problem)
I slowly finish my Inmoov Head and i have the same problem with the Talking.
Now i use a nice new Hitec Servo, but the same. After a sentence the mouth stays open.
Ok i check the invert function, but funny - there is no reaction of the mouth!
So is the invert Function of the talking servo not working?
Boris
you can set your Jaw servo to close after each time he speaks....
This is how I do mine
You need some form of punctuation: http://www.edufind.com/english-grammar/punctuation/
Hi DJ, Hi Richard,
But the funny thing is, with the same settings the other servo close the mouth.
But why the invert function don´t work?
Really no reaction with marked invert option. With unmarked full working mout but at the end still open.
Invert would open when it's supposed to be closed and vice versa. You need punctuation for proper grammar.
@DJ so am I understanding correctly that if I put a period "." at the end of saywait sentences, talk servo will either default to the min servo value or max servo value (depending on whether it is inverted or not) after speaking?
Correct. Otherwise it doesn't know the end of the sentence. If it doesn't work, I'll take a look tonight for you and see if it needs an update.
Ha, ha... so simple and it makes sense.... I really have to stop doing things the hard way. :D
Hi, ok i will try with a "." Point.
But if you can check it also for an update it will be great!
Boris
Here's how I have mine setup. I never put a period at the end of sentence and the mouth closes when done speaking.
HI, me again,
so i check everything, also bhoustons settings, and now the Invert is not working! And the Mouth is still open.
I can be that the servo must be build in in the diffrent direction, but for this is long time to late.
And to leave on each "Speech Script" the servo Close Command "d18, 50" is not the solution.
So please DJ if you have time (hahaha time?) check this out!
Thanxxx a lot!
BOOOO
@ Bhouston,
you marked "invert Direction" works?
Because if i marked it, no mouth moving is coming!
Strange?
Boris
@renta, Make sure that your servo is not defined/assign in any other control. For example if it is defined/assigned in an "Auto Position" control it won't work. Or if you have a script that assigns it to a position and you are trying to control it with the Talk servo control it won't work properly either.
@renta can you share your configuration screenshot? Just like bhouston had done?
I wonder if your MIN is greater than your MAX
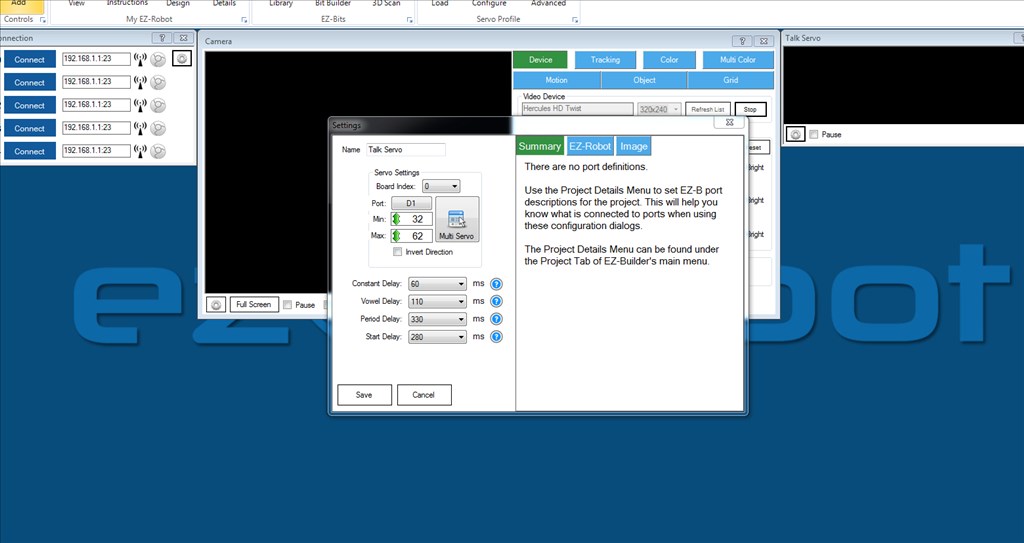
@DJ no prob here is the pic!
@bhouston no this servo has only one job, talking servo. no use in other script or else.
HI DJ,
do you found something what can be wrong?
Boris
Not sure Boris... Talk servo works perfectly for me, even without periods at the end of sentences....
Boris, give me an example of a phrase that causes the issue.
Hello DJ, Hello Richard, Hello Bhouston,
so i made a video where you can see on this simple phrase
"Hello DJ - Mein Name ist Sigi"
how the mouth works - and that the mouth is still open in the end.
I try also with a closed mouth from the start - to say samoething - No change in the end still open.
?
Boris
I just replicated your problem, Hopefully, I can explain how to fix it. I think the key is to determine the open and closed positions of the jaw first. With the sliders in the "Talk Servo" control, set the jaw to the open and closed positions. I my case 70 is open, 95 is closed. Then run it and see what you get. I had to then Invert the direction.
Hello Bob,
i set the open and close position in the settings of the Talk Servo.
So "180" is ful closed postion and "155" is good open position.
Else i don´t understand what i must change.
And like you see in my video the invert have no function!
One info --- i connect only the "S" cable from the servo to the EZB4. The Voltage comes directly from a power supply - not from the EZB4.
Boris
Yeah, looks like the servo is reversed :)
Mouth is opening when it should be closing...
and its sayezb("goodmorning") not say(" goodmorning")
Hmmm, that's strange that the Invert Direction doesn't do anything. Maybe, write down all your settings and delete the Talk servo control and then add it again and start new with it. It shouldn't matter where the power is coming from I have mine set up the same way as you.
PS:
i made a new project- only with the talking servo!
I plugged 1x Towardpro MG996 and this servo turn to the left , if a sentence is spoken. ( Invert not work!) I checked with 2 diffrent MG996 - all do the same
i plugged 1x Hitec HSB-9380 and this servo turn to the right, if a sentence is spoken (Invert also not works) I checked with 2 diffrent HSB-9380 - all do the same
So i found out, that diffrent servos are turning in diffrent positions.
One to the left - one to the right!
But on all no "Invert Function" will work!
So i need that my HSB9380 is turning to the left and not to the right! But how?
Boris
@nomad... he is using "talk servo" which is a new text to speech control ... it is irrelevant that he uses say, saywait, sayezb, sayezbwait... Doesn't matter which one he uses
richard r
ah thanks for telling
Ok, that is strange.... how is it possible that the servo is working backwards? With my inMoov 50=closed mouth and 115=open mouth... @Boris 180 is open mouth for you?
When you first installed your Jaw servo did you set it to 90 degrees? If you didn't that may be your problem - it might be maxing out so it can't "invert"?
@Boris... as Bob mentioned you need to set your servo to 90 so you have jaw movement on either side (open and closed)... The jaw doesn't have much range of movement... as I mentioned for me 50 is fully closed and 115 is wide open....
@richard
With 180 is full closed
with 155 is open!
Boris
@Boris... sorry I meant 180 is closed for you.... It should be the other way around... 90 is the middle travel for the jawpistonV1.stl Meaning when the servo is set to 90 you should see the jawpistonV1 at around mid point of travel... Closed should be less than 90 (mine is 50) and wide open should be more than 90 (mine is 115 for safety)
Hi Richard,
but think about this info:
The MG996 is turning to the left
The HSB-9380 is turning to the right!
So i am wondering, that servos can turn to diffrent positions on the D9 connection
Other test!
I plugged a Hitec HS-311 @talking servo and funny its also turing to the right. I plugged a Hitec HS805BB @talking servo and also turing to the right! I plugged a Hitec HS-5070 @talking servo and again turing to the right! I plugged a EZ-Servo @talking servo and HERE its turning left! I plugged a MG996 @talking servo and HERE its turning left! I plugged a Corna DS929HV @talking servo and again turing to the right!
I remember first i had this HS-311 installed. I had this problem and then i post this article and then i change to the MG996 and everything was fine. This i also post to Steve G this time.
Now i change to a expensive Hitec servo and again the same problem
So again funny.
All Hitec servo turn to right
And MG996/MG995 and EZ-Servo are to the left!
Now i think its more the problem of the turning!
@DJ why Hitec Servos (4 diffrent Modells) are turing in the diffrent direction? your EZ-Servo and the MG996/MG995 in the other direction!
PS:
This Test i did with a new project - and only with the talkservo window - nothing else!
Boris
@Renta I've been experimenting with this control. I found that with the "Invert Direction" box checked - if the "Min" value is higher than 90 - the servo doesn't move. The closer the "min" value is to 90 - the less it will move. The "Max" value can be set anything higher than the "Min" value. Try setting the "Min" value to less than 90 and see what happens.
Hello Bhouston,
i will try it later, now i must go sleep some hours!
But thanx for your help and time. We hear us later!
Boris
Hello Bob!
Your Tipp with the Min/Max Values was perfect! I adjust in a strange way the servo in the "Advanced servo Config"
and then i could make the settings in the talking-servo like you said and now it works.
The Only strange is: the Max-Value between 100 and 137 - make NO reaction to the servo, but if i not make the Value between MIN and MAX from 55 to 137 - the mouth open not so nicly. But don´t think about this mystery - IT WORKS!
Look to the video - somebody wants to say thank you! (Funny info - the voice is a german voice! I must say he can speak very well english! Not so horrible like many our politicans ;-))
I'm glad to see it is working for you now. I don't know why a Min value above 90 would stop it from working - but now we know it does. Always happy to help out.
@Bob
Really thank you!
I hope i will finish him this year with all arms, head and torso.
And than i will make a big video for saying thank to all supporters!
Boris
@Boris.
Really pleased you got it all working correctly now. I really likely the lighting you have there. Very slick. I look forward your progress, and to the "big video" when you get further in to the build. :)
@steve
Thanks also to you! You help me also a lot!
Yeah this roboter is a so big buildplace ;-) But i hope until X-mas he will be born complitly
Boris
@Bob
maybe you know a trick, how to loop a script for the neopixel ring?
I have a script for the arduino called "fade in/fade out" . Works fine solo on the Arduino ( in a loop!)
I make a Script in EZ what send a serial info to the Arduino and the script starts, but only one time and then stops!
How i make a loop?
This is the fade in / fade out code
How i can loop this code?
Here is the full code:
@Bob
Forget my question!
Who can read has more possibilities! ;-)
I rode now the hole treath and now i have "best of" working neopixel ring!
https://synthiam.com/Community/Questions/6767&page=6
Thanx Bob!
Boris
Good, glad you got it all figured out. Sorry I didn't get back to you - I had to take a day off of retirement and work today!
@Bob
no prob, sometimes its better to found out yourself - you learn a lot!
Tomorrow i will make a video of the hole lightshow!
See yaa!
Boo