


-635113052047031250.jpg)

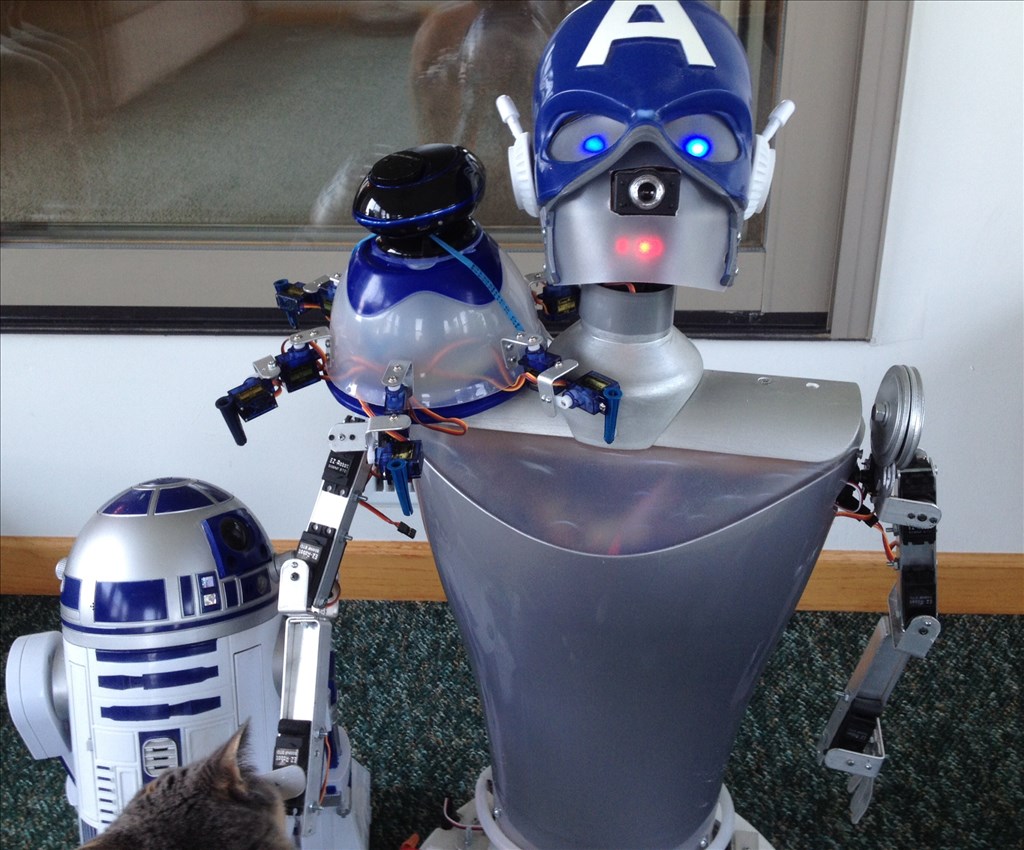
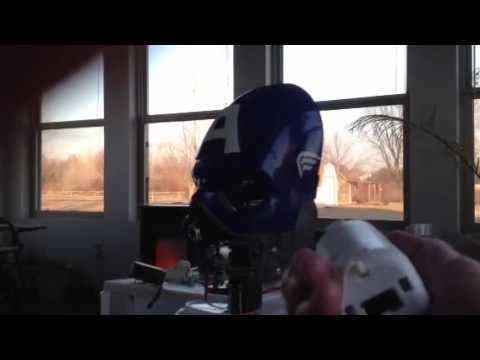
This is my first showcase of my robot. Her name is Captain Ann Droid. My last robot was built 25 yrs. ago. When I told my wife and daughter I was going to build a faster and smarter robot they told me it should be a female? She uses an Irobot Create platform, EZ robot kit and software, Radio Shack blue tooth speech unit and other parts. EZ robot has been far above my expectations. Thanks D.J. I hope my links work. Steve S
Thank you to the EZ robot community ;)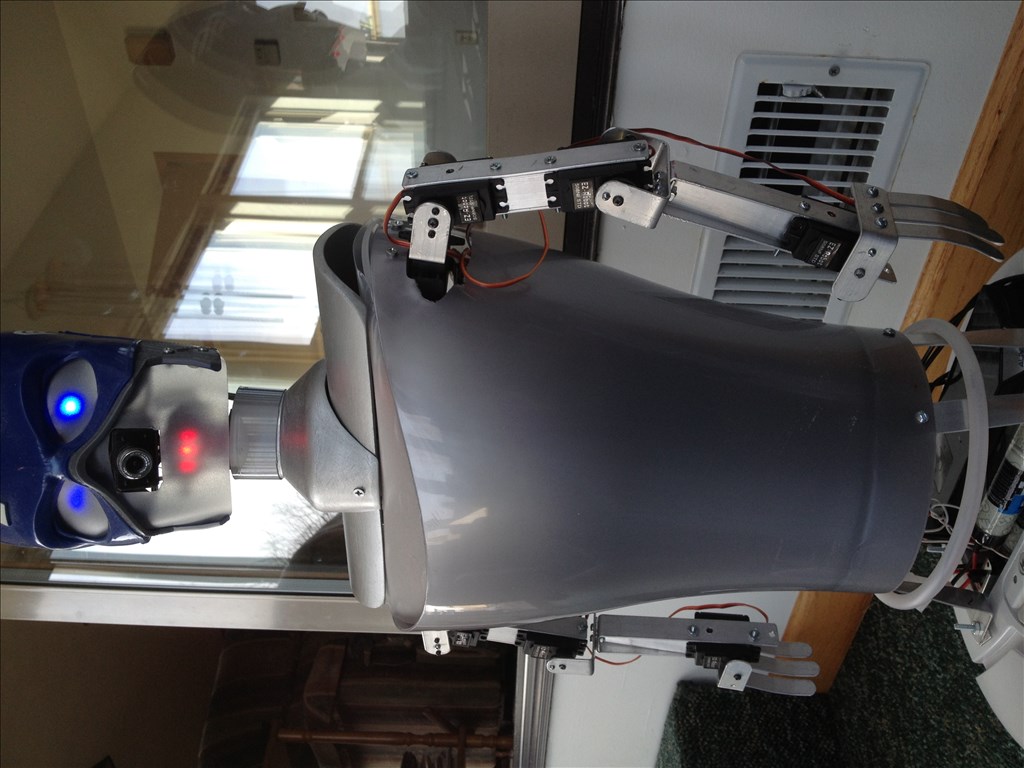
By Steve S
— Last update
Other robots from Synthiam community

Drephreak's New Robot
Hi Fellas. I havent been here for a while but have been keeping up from time to time anyways I wanted to introduce my...
Tmesserschmidt's Topsie The Easy To Build Robot Dog
Topsie is the dog robot (quadruped) that anyone can build. Building it takes no special skills. No 3D printing needed...
Animator28's AVA (Advanced Visual Android) Update
Hey guys I finally have my robot head all hooked up. I am using micro dc motors with hbridges and as there is no...

Bluetooth speech unit? Could you link that? Very cool , can you still vacuum? welcome to the community- Josh S
Nice!
Josh S I do not have a link, but the unit is Auvio bluetooth portable speaker @ Radio shack model 4000375. It has great speech quality and bass for the money. ($59 on sale, 79 reg.) Both of Roomba units had trouble, so I got a Irobot Create, no vacuum. I can't get camera tracking or video recording going. It worked in December, but not since then. I have even tried the camera example functions. It will not even take a picture. Maybe I need to turn on more microsoft fuctions? Thank You Steve S.
Steve, I LOVE your design. could you share many pictures, especially the body part. Where did you get that?
Your design looks Tight. Mine is sort of sloppy. I built Marti about 4 times trying to get her to be Tight. But, I like your design. Please share photos and info.
Thanks,
MovieMaker
Thats awesome and great VR! Great work Steve
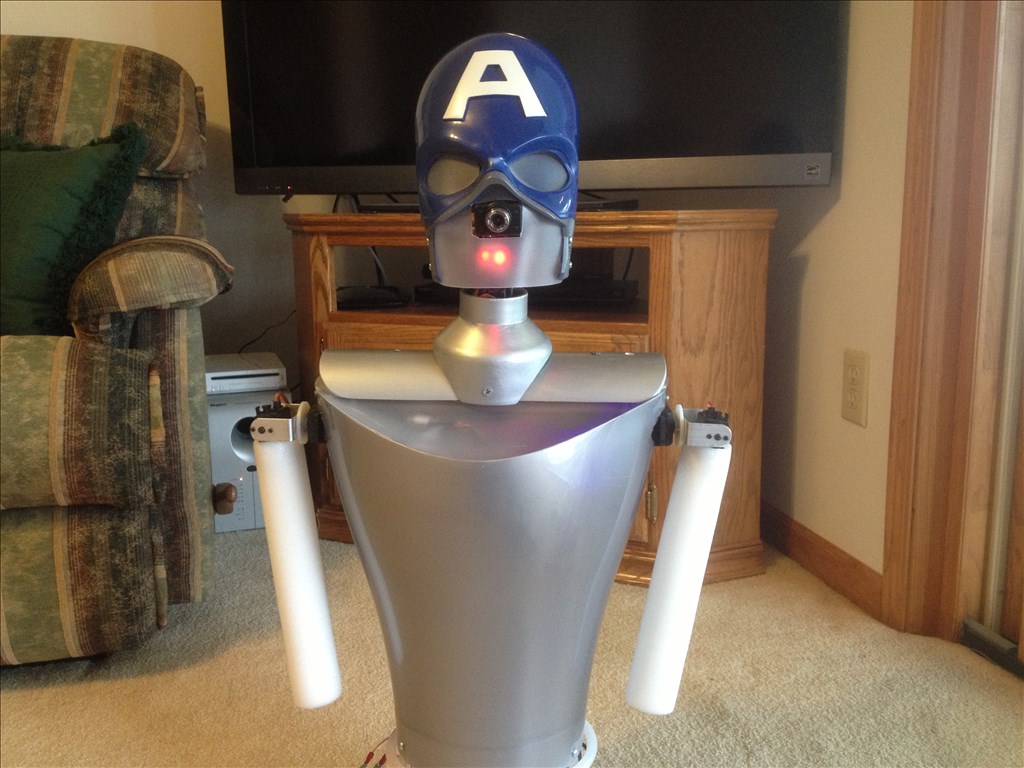
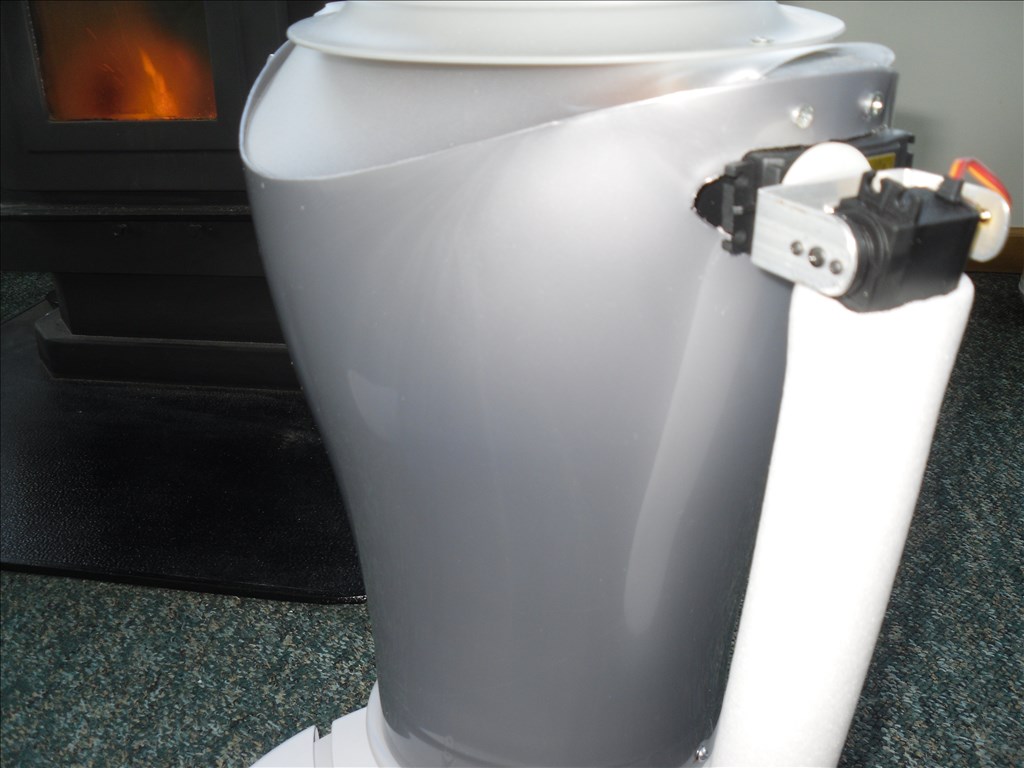
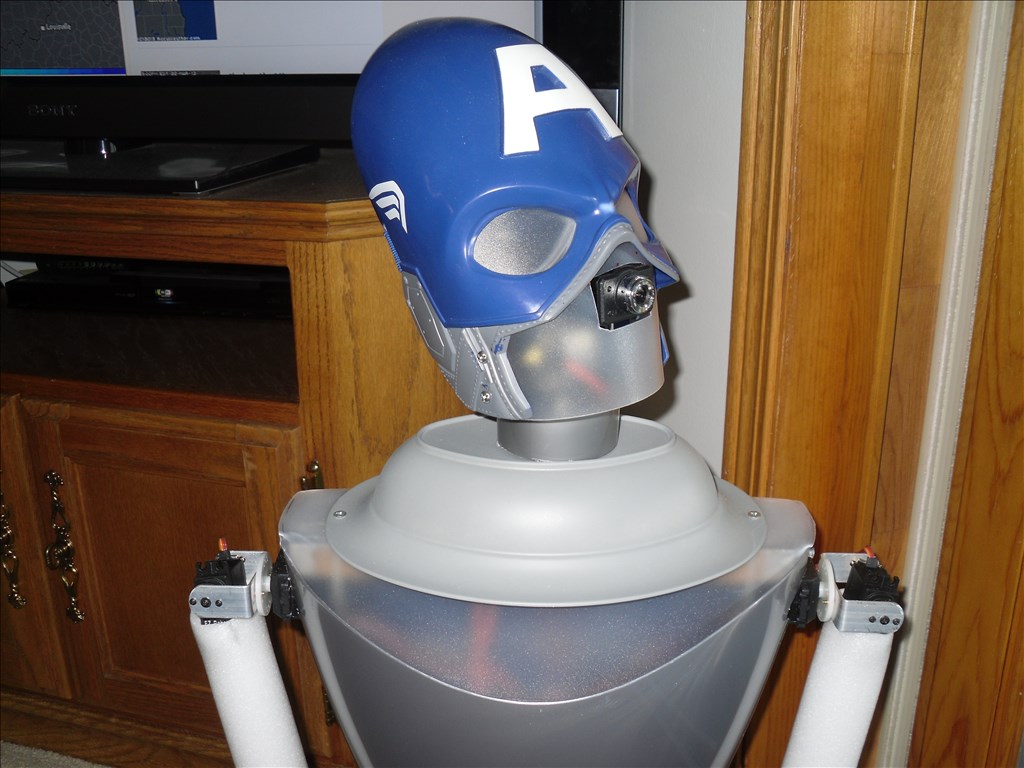
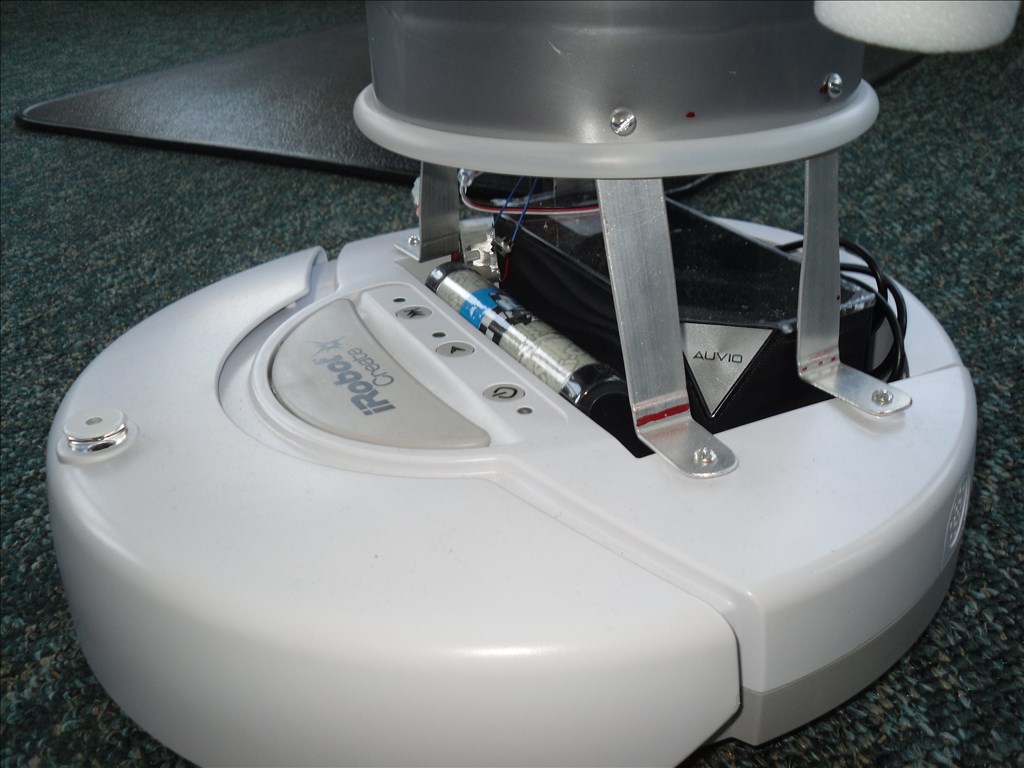
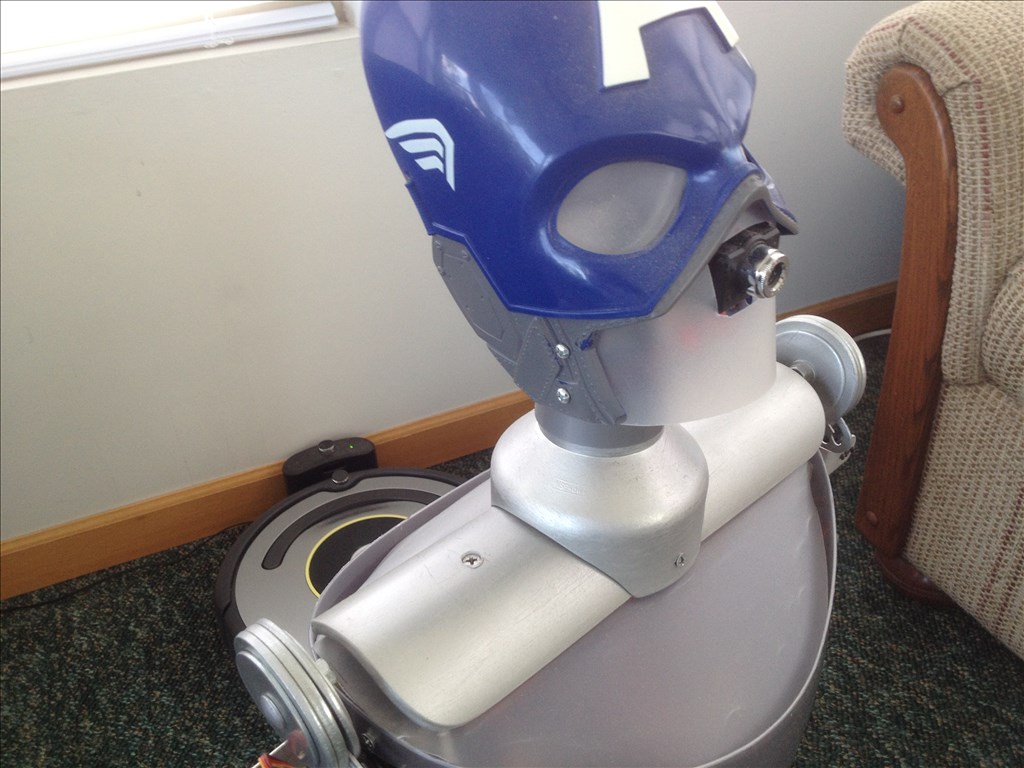
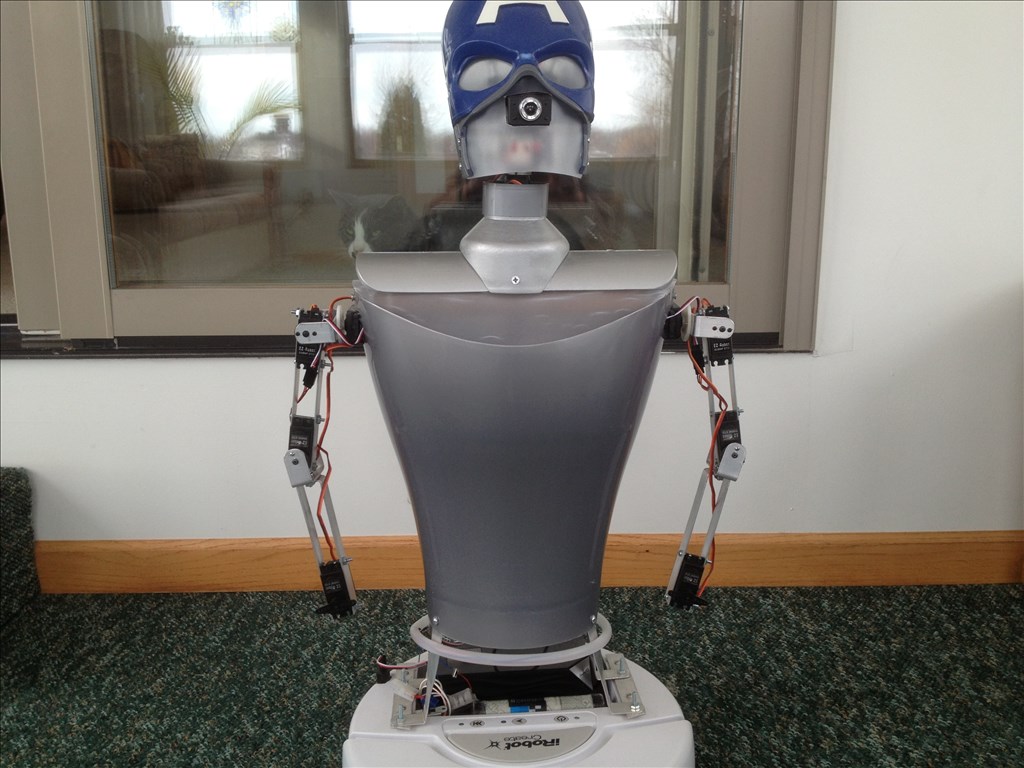
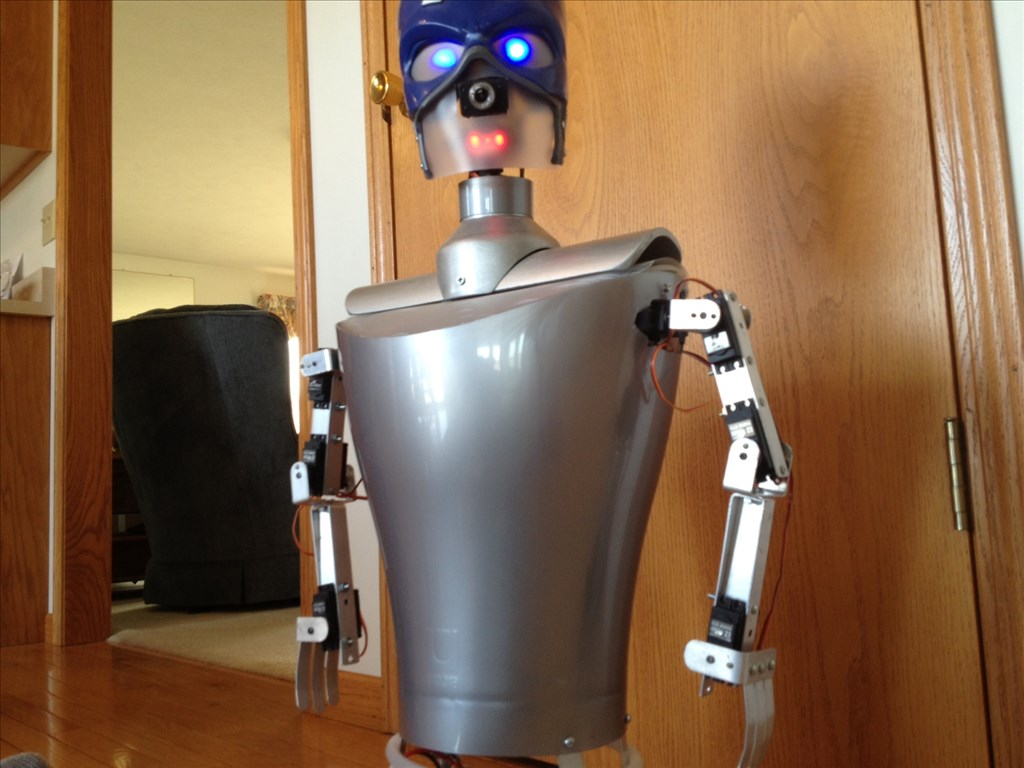
Here is more info on Captain Ann Droid with some pictures, She is a little more than 2 and 1/2 ft. tall, about 17" wide (servo to servo), and weighs in @ about 11 lbs. including I Robot battery and 6 cell Radio shack battery for servos and EZB controller.
Her main body is a designer waste container I purchased @ Target. I think the link below is similar. http://www.amazon.com/Umbra-Garbino-Polypropylene-Waste-Silver/dp/B004LLHEIA/ref=sr_1_7?s=home-garden&ie=UTF8&qid=1364084966&sr=1-7&keywords=umbra+waste+cans
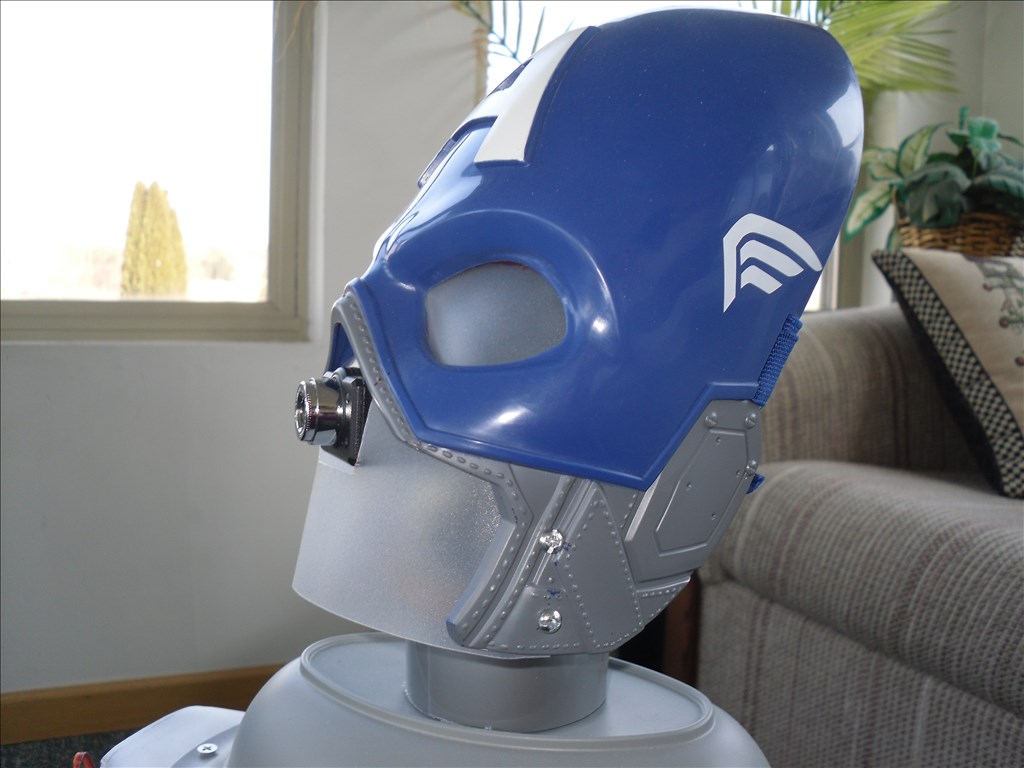
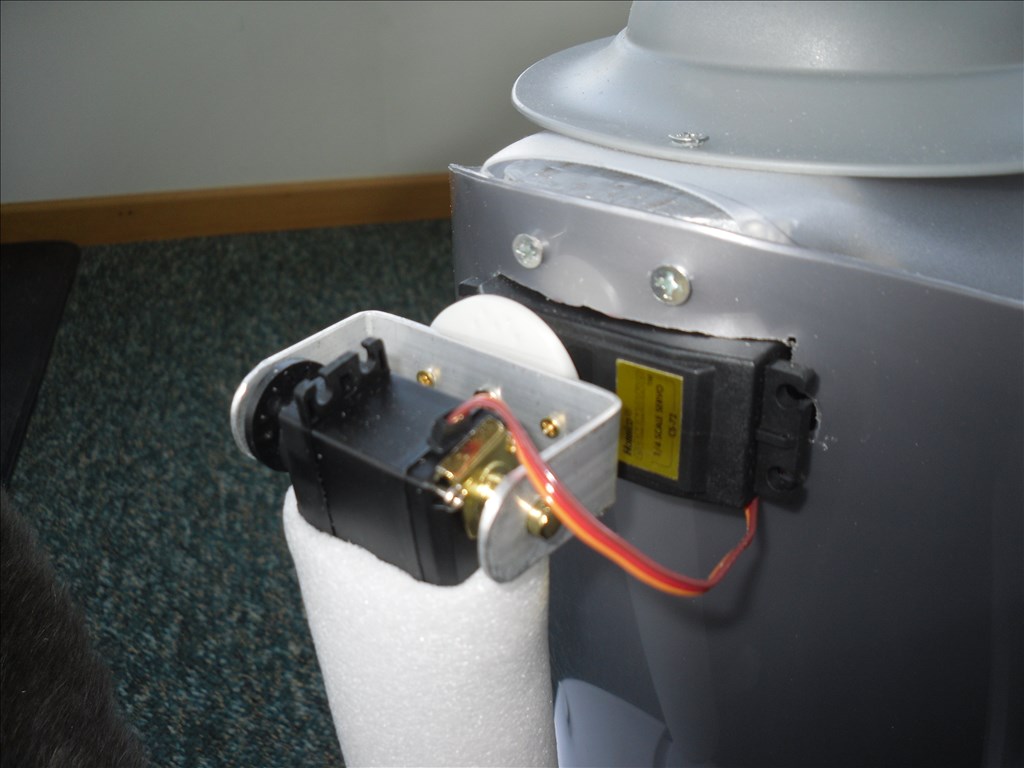
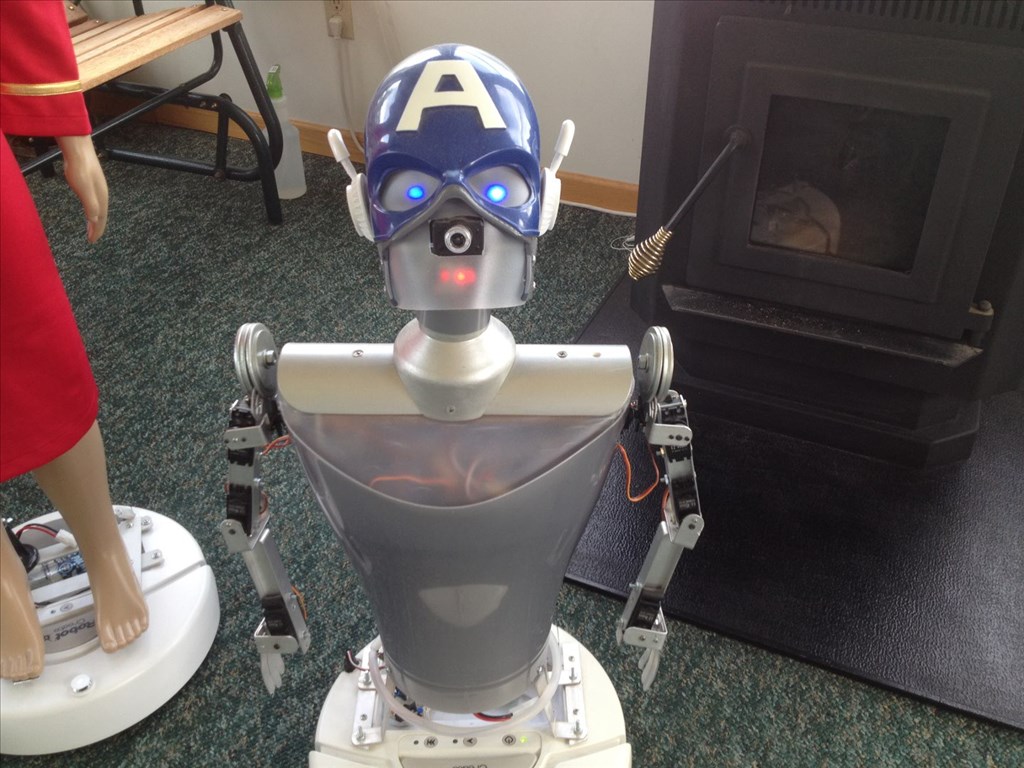
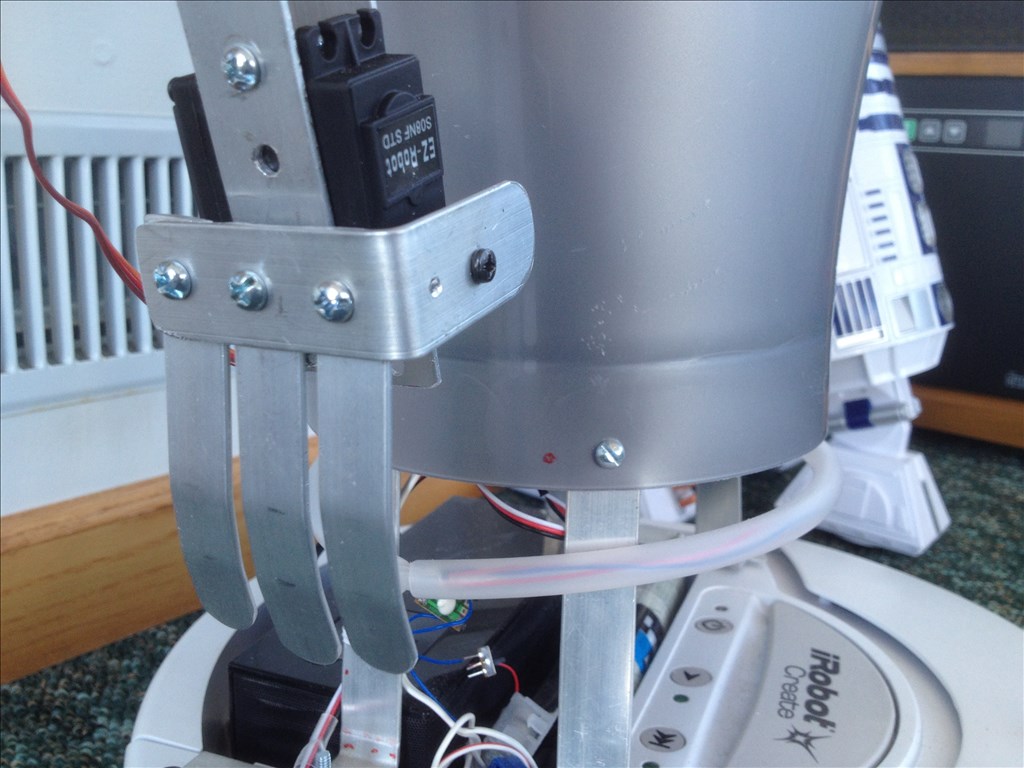
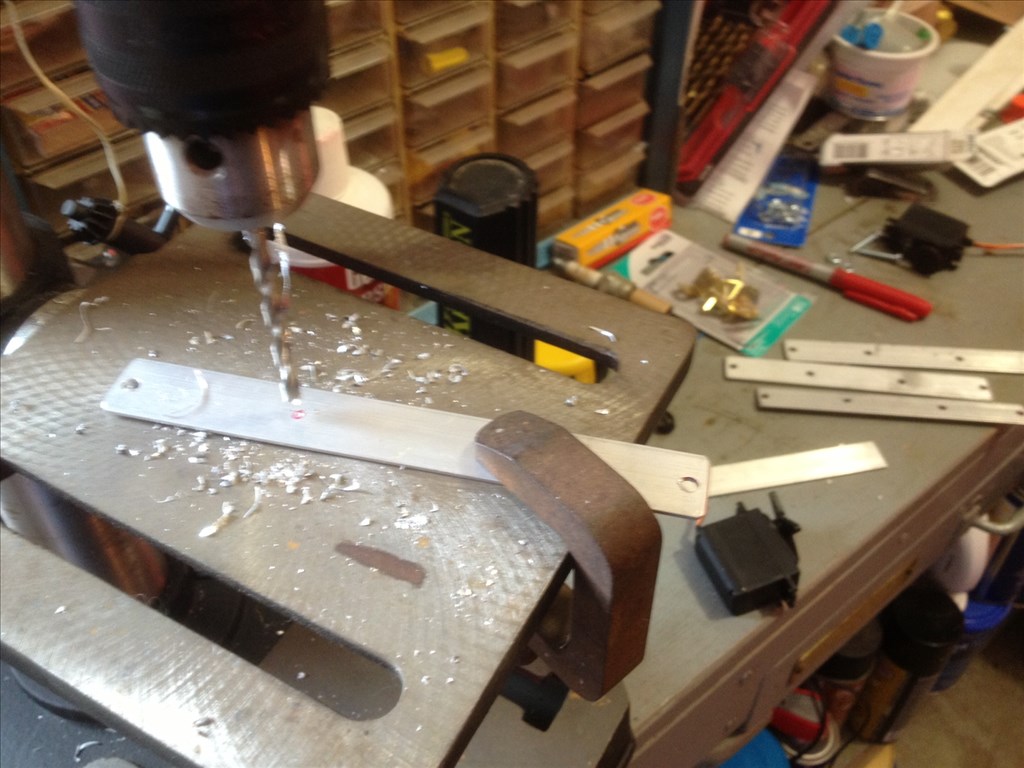
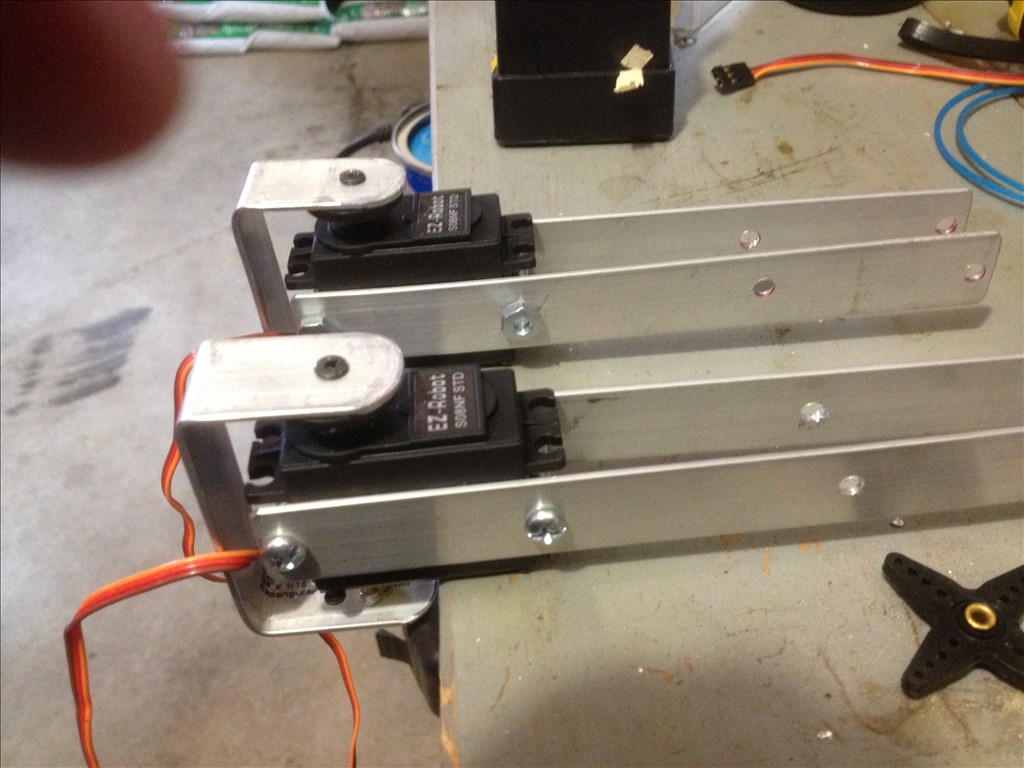
I rounded the ends of a 1 x 3 with a jigsaw to fit inside the body and give her an elongated width. The large 1/4 scale servos are connected to that. The arm servo brackets are homemade from aluminum that hold the standard servos. She now has only foam arms, but I plan to build an elbows and claws in the future. The head is a childs mask that I formed narrower. servo and camera brackets in the head are homemade steel and aluminum. Her blue LED eyes are from Walmart automotive. Her skin covering on eye sockets, face, and chest is flexible thin cutting boards from Ace hardware. I spent a long time heating and bending plexiglass for her chest, but it cracked. I can easily view my connection status LED's on the EZB and lift the current skin to access the EZB. I am pleased with Radio shack Auvio bluetooth speech speaker. I modified the 4th wheel on the Create to provide less rocking. I would like to add a simple sound activated light for a mouth? Thank you for your positive comments
That is AMAZING!
Only one question left. Where is your Notebook for windows? If you check Marti under the section of show our robots, you will see how I have her made.
I LOVE your design.
:D
I, for one will be watching your progress!
I really like their robot, the concept of reusing things from home for construction (love that concept :)) has also done a good job and a good saving yourself building aluminum joints in arms and head. and welcome!
Great job so far Steve! I do think the soud activated mouth woul be a big improvment.
What fun! Nice work!
For the sound activated mouth light, try connecting a light up to one of the digital ports (TIP circuit or LED direct to signal & ground) and use the Sound servo under Servos in add control. It gets brighter with volume and gives a nice effect with speech :)
Great looking robot Steve. Welcome to the forum. I will be following your progress.
Where did you get the voice that you are using for your robot? It sounds very clear.
Excellent work Steve ! I love the way you recycle/use ordinary household materials. We're on the same wavelenght ! Keep it coming !
Thanks for positive comments. I am sure glad I stumbled upon EZ Robot. My son said I should build a wireless robot after demonstrating my 25 yr. old robot to my grandkids. They love the new robot. The 3 yr. old is not sure, hides behind a chair. Rich, I will have to try a LED somtime for the sound effect as a mouth. Thanks. I tried stopping some startup programs with my Vista system, but no "processed video". It looks like other people have had success changing to "Windows 7 (starter). I sure like the new debug feature in EZB.
I will try to attach a link for the Radio Shack bluetooth speaker.
Bluetooth speaker
Steve, don't forget I asked you a question. It is "Where is your notebook installed."
Thanks,
Project looks very good Steve
MovieMaker,
I think you are asking about my pc notebook? I do not have my pc laptop on board my robot. I can see alot of advantages for onboard pc (speech, controls, screen, etc.)
I went back and took another look @ your robots, very cool. Do you have any more updates on either unit? I noticed you have navigation on your smaller robot, I would like to try that sometimes. Are there any special Irobot Create features or issues you have used or noticed? Do you use a docking station to charge your Create? I sure appreciate EZ Robot community. There are so many great robot people to learn from. Thanks, Steve S
SteVE any help you need about roomba or create that is one of the items i know mostly about
I design upgrades like higher torque motors,dual battery design for roomba ,plus i also sell my roomba's
I sold one to moviemaker (mel)
Good luck to your project it looks very cool that you done with a waste basket
I have to have a notebook and I have already ordered the trashcan. It should be here tomorrow.
I may put it as a knapsack on the robots back.
I will have to figure it out. No updates on Marti since she is working now.
I do use the docking station to charge Marti. I have not made her look for it yet, I just put her on it.
Thanks for all of the info.
Mel
P.S. Fred has all of the items needed to do ANYTHING with the Roomba. He is VERY resonalble on parts.
MEL you forget to say who FRED is (robotmaker)
You are right. I just assumed that everyone knows that Mel is Moviemaker and Fred is Robotmaker. sorry.
:)
Has anyone powered 2 LED,s on one sound servo channel? The LED,s I got @ Radio Shack today say 20mA, some are2.4v others are 2.0v. I currently have 2 separate channels operating ok with only one LED each. Radio Shack gave me a flyer paper today showing the Auvio bluetooth speaker on sale for $49.99 reg. 79.99, I purchased my mine on sale for 59.99 some time back. The sale date marked is 3.31-4.13.13 Thanks, Steve S
NOT good to power a led straight from a digital port,one reason is the port is rated at 20 ma and it will have problems latter on.
TO drive a led from digital port all you need is 2N2222 npn transistor and 4.7k resistor to drive it and you can drive a few leds with it.
Another way but only using one led is use a current resistor like 470ohm
HERE is a link to correctly drive a led from a digital output.
driving a led from a digital output
EDIT I forgot the link has the formula for working out the led set resistor
Before changing the head on my project I was running 2 high power bright LED lamps (not single LEDs, high current bright E10 MES lamps) in the eyes and one in the mouth using 2 of the Switching Circuit detailed here (one for eyes, one for mouth). Both PWM and Sound servo work great with the circuit.
The Signal on the EZ-B ports is only good for around 20 or 25mA. It's enough to power an LED, no need for a resistor on the EZB.
also STEVE here is a tutorial i put up on driving led from a microprocessor
driving a led from a digital output
SECOND you dont need a high power transistor to drive 2 to 5 leds ,simple 2N2222 using RICH's circuit and 4.7 k resistor will work perfect and its very tiny transistor plus the most common used for led drive circuit.connections are same in his circuit and so many examples on the web.
steve on driving one led from EZB digital port i see its not need a current resistor is needed ,since DJ said its built -in ,i didnt know that ,here is the link to LED TUTORIAL
LED TUTORIAL FOR EZB
BUT on driving 2 leds you do need a drive circuit plus the formula from the first link
Thank you folks for your responses. I will stick with my one LED per channel (port) setup for now. It is nice to know the EZB chip is already setup with a resistor.
My robot may be down for a little while till I can replace my bluetooth dongle that stopped. I rebooted the PC, but it said the USB device not responding or failed (not blinking either). I will have to drive to a larger town to replace it or order online. My unit is a Sabrent BT-USB There are so many helpfull people on EZ Robot. Thanks, Steve S
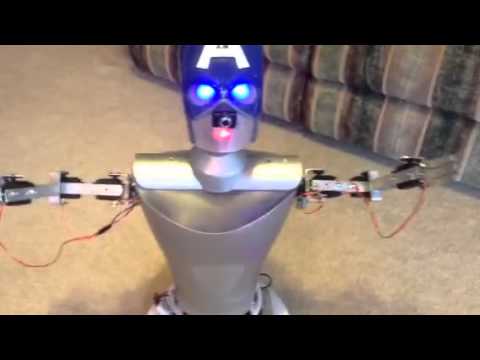
Captain Ann Droid now has a mouth feature. I used 3 sound servos to create a speech effect with red LED,s. They are 3 separate outputs (ports). The second and the third are added as multiple servos, with the second (middle) having inverted signal. It gives an impression that the mouth is moving or opening. I love the personality generators, they add so much to a robot. Thanks, Steve S
Robot personality
LUV it Steve! good things do come in small packages! .....there are very few "female" personality robots out there...good on you for acknowledging 50% of the planet!....and what a great name ,ANN DROID! :)
More personality
Happy Robot
Steve, Where did you get the voice that you use for your robot? It is really clear sounding.
rgordon, It is just the standard microsoft female voice. If I remember correctly, the only change was slowing it down, which made it easier to understand. I believe it is the Radio Shack Auvio bluetooth unit that gives it such a clear, distinctive, strong sound. Rex, I sure like your robot. It must be impressive to stand next to a 6 ft. robot. Steve S
Wednesday, 10 April 2013
AWESOME Job Steve !
May I please have an Email Address or Phone Number for you, as I don't type too fast ?
Thank You & Best Wishes From Phoenix,
DougPope@cox.net, 602-246-1246(H)
Have YOU Considered Doing Robotics Camps This Summer For Your Local School Districts ?
Thanks for the comments Irobot58 and Doug. We visited Phoenix last year, nice. It,s great having Irobot Create/Roomba as one of the supported platforms in EZ Robot. I wish there was an easy way to read the data packets on the wheel encoders for navigation. Steve S sdstud1975@yahoo.com
Thanks for the kind words. Yeah, I dreamed a little too big for my first robot...LOL. Now working on a smaller one so I can play....eehm...I mean... perform conclusive scientific tests utilizing a robotics platform....... :D
I think your robot is super cool.
Awesome robot Steve!
@rgordon so he is coming to maker faire right? I feel ya on the large project for a first robot but its so much more satisfying to go the extra step.
Steve,
Thanks,
Mel
Steve,
Looking good on your robot Captain Ann Droid. I wish there was a way I could use one of the Cepstral (male) voices for my robot but, I don't think you can add a voice to Windows 7.
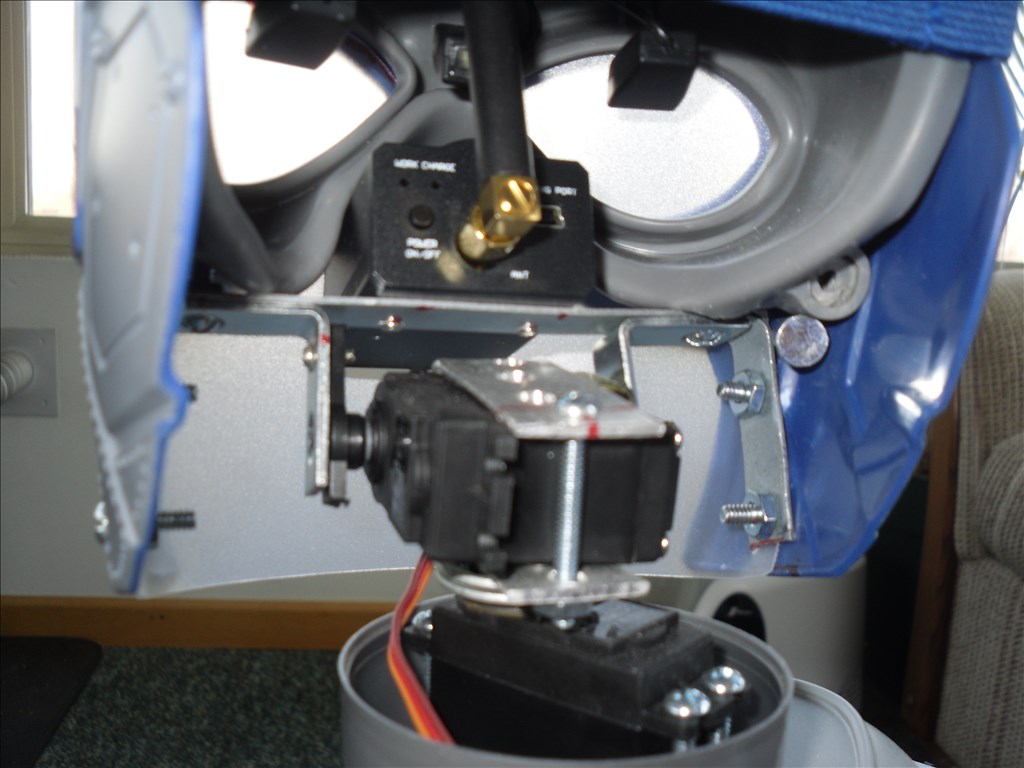
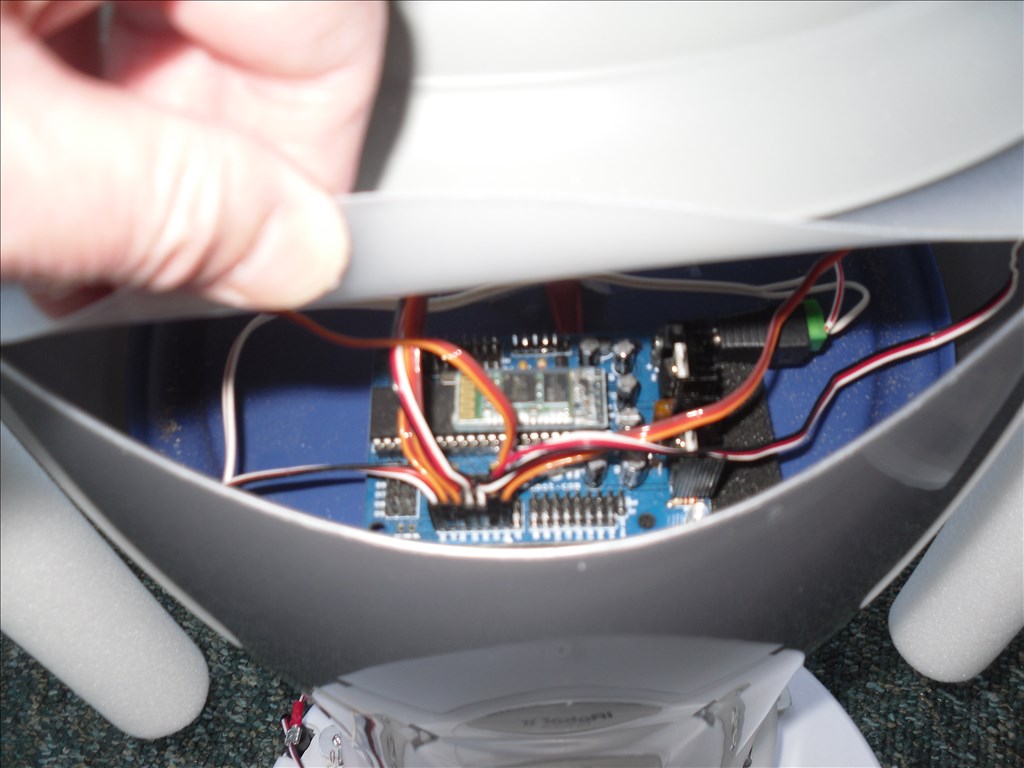
Mel, I have the Auvio bluetooth speaker unit sitting in the cargo bay of the I Robot Create platform that is utilized on my robot Captain Ann Droid. My EZB is located aprox. 12" above the bluetooth unit on a 1 x 3 that also support her neck, shoulders, and shoulder servos. It had issues when it was located closer.
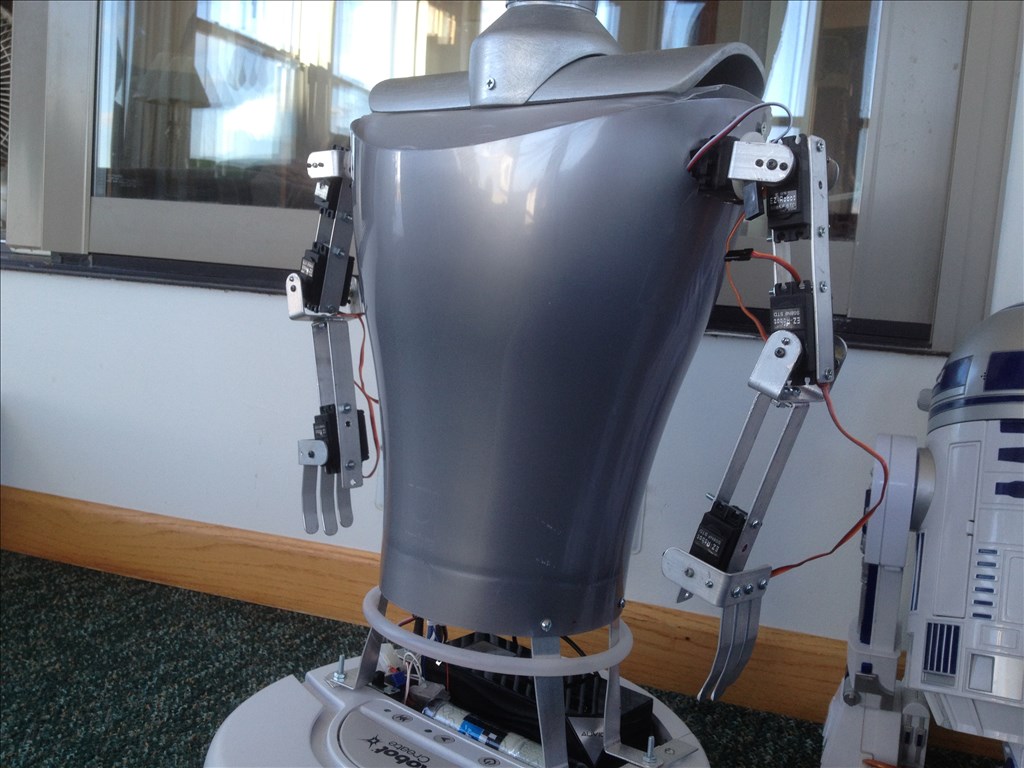
I have recently built her new shoulders and neck which replaced her (old platter dish) that use to support her head. This picture gives you an idea where the EZB is located. The bluetooth is right below her silver body. I can take another pic later if needed. I found the EZB and speech bluetooth both worked better when the EZB was higher and on top for my robot.
rgordan, I am glad you were able to use the voice sample you wanted on your project.
Steve S
Great job Steve! I am thinking Sunglasses would be a great acessory!
That makes sense.
@Steve S , hey I been busy but I'm checking in with you, how's the tracking coming / processed video? I cannot recommend to update your system if possible to win 7. if for some reason win 7 cannot be installed you may want to consider win xp sp3. VISTA was filled with all kinds of weird issues that I'm sure drive you nuts.
Mel, Keep moving things around and trying different locations, it might improve?
jstarne1, I have been following your project Jarvis, and it is amazing how much equipment you have integrated into your robot and how fast you do it ! No processed video yet, I have not upgraded to windows 7. My wife shares our pc with EMT files. I will eventually. I updated to netframe 4.5 last week (no processed video, but I can now save to cloud with new EZ update. I just did an update on netframe 4.5 today that is suppose to improve things for vista and win 7? I have not tried it yet? Thank you, Steve S
@Steve , thanks , my frequent updates give the illusion I'm really fast. :)
Most of those using vista reported all kinds of problems. A cheap alternative may be a little Acer netbook. I see those things sell for 60 to 90 dollars and you can control your robot like normal or you could mount the netbook like niek did on his Omnibot and just you splashtop HD and control it from a smartphone or another PC over WiFi. Just an idea
jstarne1, Does the little Acer netbook operate EZB without the internet? Sometimes I take my robot places where there is not any internet. I like the idea of having a separate, inexpensive pc., instead of changing everything on my wife,s pc. It would operate all the EZ Robot functions, including processed video? Thank You Steve S
Why do you need internet for your ARC operation? You will only need it if you want to access the Cloud files or download upgrades. at the end , it is BT connection to EZB and Direct Camera 2.4 GHZ to the USB dongle. The question that may arise is how much powerful is the Netbook , to handle the ARC functions and especially Video processing. I remember that there was a detailed subject in the forum discussing the min configuration needed. Josh , others and who ever tested it may give more proper suggestions for Netbook Models and prices.
ARC Community, My EZ Robot, Captain Ann Droid has been a great hit @ the campground. The first night demonstration @ the campground for a couple friends was rewarding. The 2nd night @ 7 PM was awesome demonstrating my robot for 30 people! (People told other people) I had to reboot my laptop (vista), but minutes later, patient children and adults loved the performance of the "EZ Robot" Captain Ann Droid performing for them. I programmed lots of children names. They all loved it. I told them about EZ Robot and to Google EZ Robot. People came over when we packing up the 3rd day, and wanted to see the "Robot". They are challenging me for a dance routine and more! Thank You Steve S
Awesome Steve! More inspiration for further personality routines for Ann Droid!
This a short video showing Captain Ann Droid using the Roomba("init") command with a SendSerial Beep in startup script. It also shows some SendSerial movement scripts being used with voice commands. Like I showed Josh. The last part is a Halloween tribute to Edgar Allan Poe " The Raven" with some autoposition, SendSerial scripts, and a soundboard "snooring.wav".
Thank You EZ Robot! Steve S
#I have improved and evolved my SendSerial IRobot SendSerial command for turning left Say("I will turn left") #original EZ robot command #sleep(1000) #left(255,740)
#1st IRobot SendSerial command #SendSerial(D0,57600,137,0,100,0,1) #sleep(3000) #SendSerial(D0,57600,137,0,0,0,0)
#IRobot command using angle SendSerial(D0,57600,137,0,100,0,1,157,0,90) SendSerial(D0,57600,137,0,0,0,0) #Above works great!
#Any ideas for turning right? I have tried my SendSerial command for turning right incorporating the right turn parameters with the above 90 degree turn, but my robot ran away stating I have given it an unrecognized code error? I have also had limited success with SendSerial distance. I have been unable to find a "complete" code of IRobot drive codes online-maybe someone else can help? Thanks Steve S
Irobot Create Users Here are SendSerialCommands That you can use on your Create to "Calculate angles and distance in realtime". Maybe some of you already utilize them, but I thought I would share them. I could find bits and pcs. of examples in my Create manual and online, but not complete information (especially on reverse distance calculation and turning right to a specific angle). I will also demonstrate a sequential toggle of Create,s 3 LED indicators. These commands are for the Create only, which uses a superset of commands, and some are different from the Irobot Roomba. Three of these commands are the "Wait for distance command 156", the "Wait for angle command 157", and the "Create LED play command 139". The wait commands do not allow any other input commands until they are complete.
say("I will move forward medium speed calculating 12 inches/305mm")
Forward Command with distance of 12 inches
SendSerial(D0,57600,137,0,180,128,0,156,1,42,137,0,0,0,0) sleep(2000) ControlCommand("IRobot Commands", ScriptStart, "toggle 3 LEDS")
D0 is the EZB port, 57600 is the baud rate, 137 is the drive command, 0 is forward, 180 is medium speed, 128,0 is straight, 156,1 is forward wait for distance 42(about 12"-change 42 to 144 equals 15.75" 42 to 254 equals about 20", 137,0,0,0,0 is stop
say("I will move reverse calculating 12 inches") #REVERSE SendSerial(D0,57600,137,255,75,128,0,156,254,213,137,0,0,0,0) sleep(2000) ControlCommand("IRobot Commands", ScriptStart, "toggle 3 LEDS")
137 is the drive command, 255 is reverse, 75 is reverse speed equal to 180 in forward (255-180=75), 128,0 is straight, 156,254 is wait for distance command reverse, 213 is reverse distance value (255-42=213), 137,0,0,0,0 is stop
say("I will turn left calculating 90 degrees") SendSerial(D0,57600,137,0,100,0,1,157,0,90,137,0,0,0,0)
157 is the wait for angle command, 0,90 is for left ( pretty straight forward)
say("I will turn right calculationg 90 degrees") SendSerial(D0,57600,137,0,100,255,255,157,255,165,137,0,0,0,0) 157 is the wait for angle command, 255, 165 is for right (255-90=165) The angle commands are accurate on hard floors
#toggle LEDS power,play,advance SendSerial(D0,57600,139,0,0,128) sleep(300) SendSerial(D0,57600,139,0,0,0) sleep(300) SendSerial(D0,57600,139,2,0,0) sleep(300) SendSerial(D0,57600,139,0,0,0) sleep(300) SendSerial(D0,57600,139,8,0,0) sleep(300) SendSerial(D0,57600,139,0,0,0)
139 is Create play LED indicator command, use above values, 139,0,0,0 turns off
These commands do not work on my Irobot Roombas, but the Custom Movement Panel below will work on Roomba. They also track straighter using script. EZ Robot is so cool, even after I replaced the Movement Panel with this custom panel, some of my old scripts using the forward, rev, left, and right still operate!
Maybe after we receive the EZB4 with 2 way communication (receive info packets) some one can help me utiiize the receive serial info.
Watch the 3 LED lights in the start of this video
http://www.youtube.com/watch?v=2lhSJ8dPPPM
http://www.irobot.com/filelibrary/pdfs/hrd/create/Create%20Open%20Interface_v2.pdf
You need a different init command for basic roombas manufactured after 2005.... create uses 128 or 131 or something like that... roombas that vaccum have something like 132 or 136 or something. I can't remember... Hopefully Romba Doc will chime in to help out...
Please delete repeat post
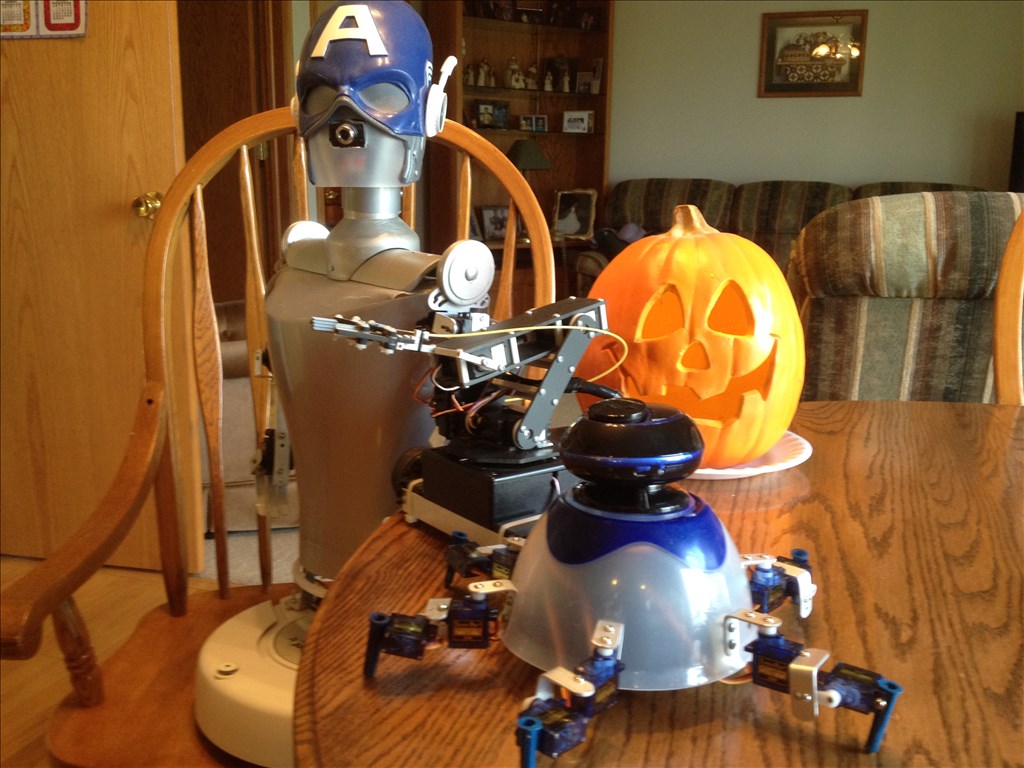
Update on Captain Ann Droid, I fabricated arms using aluminum plate, standard EZ Robot servos from my 3 kits, and 1/4 scale servos in the shoulders that purchased 10 years ago. My plans are to fabricate simple hands to complete them. The arms have 4 degrees of freedom. I also want to make partial covers for the arms, similar to the neck/shoulder cover, but something much lighter. The arms are only temporary affixed to inside supports using plastic tie straps. The arms will be more stable after they are better secured. The 4 arm sections are 6" / 152 mm each. I am thinking of shortening each section about 3/4'. The new 4 DOF arms add much more to the robot, compared to the previous foam arms with 2 DOF. Steve S
Very good Steve! Will you be using a light plastic to "wrap" the arms? something like, from a soap/detergent jug/pop bottle! I like how Ann Droid also converted the typical inch measurement (old school, like myself) to mm's :)
iRobot open interface info: To start up the interface on the R2 Roombas 4XX, 4XXX, and dirt dog the command is 128. When using the Create robot, the same command 128 is also used to start the interface. And finally, the start up command for the R3 Roomba, 5XX, 6XX, 7XX, and 8XX is also 128.
I had to use opcode 130 (from the Roomba ROI) after the 128 opcode to get regular Roombas to be under user control...
Control Command opcode: 130 Number of data bytes: 0 Enables user control of Roomba. This command must be sent AFTER the start command (128) and BEFORE any control commands are sent to the ROI. The ROI must be in passive mode to accept this command. This command puts the ROI in safe mode. Serial sequence: [130]
An excerpt from the iRobot ROI document. ROI=Roomba Open Interface
update, I have modified the new arms for my robot. The new arms are slightly shorter. I had numerous (ideas and builds) possibilities, but ended up with these modifications. The bicep is slightly shorter, and arm is slightly modified. I have built the hands, but still working on the thumbs! I am happy with the overall look, close to what I was wanting to achieve, but not totally finished. Here are updated photos.
These new additions are forcing me to add external power for my new 4 DOF arms. I have been getting by with servos plugged in to EZB only powered by a 7.2 NICD. It has worked fine with 6 servos (2 are 1/4 scale shoulder). After the addition of my new arms, things started to act up! I plan to connect 2 NICD 7.2 in series (that I already have) to a voltage regulator (8-40 volt) to 5 volt. I think the EZB3 can handle the two 7.2 in series, and run the servos off the regulator, similar to what Rich posted for an external power option, connecting both grounds. I know the EZB3 has only a 3 amp capability, the new regulator has a 10 amp capability.
Thank You, Steve S www.ebay.com/itm/50W-12V-24Vdc-to-5Vdc-10A-Step-Down-Regulator-Module-Converter/200984281187?_trksid=p2047675.m2109&_trkparms=aid%3D555012%26algo%3DPW.MBE%26ao%3D1%26asc%3D389%26meid%3D4421748166902273512%26pid%3D100010%26prg%3D1076%26rk%3D1%26rkt%3D15%26sd%3D221350642721%26
Maybe I am not understanding what you are attempting, so my apologies if I get it wrong... The ezb can handle the 2 x 7.2 in series, but that won't help your servo power problem... Unless you use and external power source for the servos they will only get 5 volts no matter what you power the ezb board with. That is if they are plugged directly into the ezb3 board... You need more voltage (more amps won't help you) than 5V to the servos, so hence the external servo power mod... so give your servos direct 7.2 volts (check first if they can handle that)... don't forget to use common ground to the ezb
rryerson, Thank you for responding. My plan is run two 7.2 NICD batteries to a voltage regulator (8-40 volts down to 5 volts) for the external power supply. I plan to connect all of the servo plus and negative to the battery voltage, the servo white control wires to the EZB3, and connect negative ground wires together. I am not sure my standard EZB servos can handle 7.2. I am happy with their results @ 5volts, I know the new EZB4 servos can. Steve S
Ok I get it now, you're just trying to reduce the load off of the ezb 5v regulator... Hey Steve, noticed you have the interactive R2D2 in the background... I have the same... Just finished thoroughly gutting him as I am in the middle of installing an EZb3 board... I have a couple of iRobot Creates waiting on the back burner for my V4s to show up... ;)
@rryerson your reasoning is right on. @steve I am loving your new build by the way! Giving the servos more voltage(with in their specs of course) would be helpful!
Steve, great work your robot is looking good! I will be sending the Bosh motor drives out to you in then next couple of days, these should be run at 12V, though your series NICD (or NIMH) batteries at 14.4V should work fine.
Tony
rryerson, Maybe you are one that successfully won the last auction on Ebay for the IRobot Create. I am happy if you are. IRobot Create,s are great and very versatile. I have 3 R2,s, only one works. They are cool. I will follow your build with EZB3. Do you understand my plan for the external power supply and running EZB3 off of (7.2 x 2) ? Thank you, Steve S
Yep, I think I understand your plan for powering the servos... Ha, ha... Not me I bought mine directly from iRobot a few months ago... I now have 3...
 I do love the create bases... My only gripe is their proprietary battery system (yes, I know I could customize)... But 14.4volts? And you have to use their battery? Would be nice if you could use something like a generic 7.2 or even 12V battery option...
Toymaker, Thank you very much. I will have a new power source in my new larger build robot. Keep up your awesome work. Steve S
@Toymaker... Not to thread jack (and my apologies to Steve), but are you still selling those Bosch Motor drives? If so, how much? We can discuss via email if you prefer..
rryerson, Robot Doc had an option (custom build) for a HD IRobot battery.
irobot58, thank you for positive comments. I wish I could be faster in my progress!
Thank you for all the response, did everyone see questions on the previous page? Steve S
My current project runs off one 7.2 battery to EZB3. My first test to update my robot to external power was to try running my robot EZB3 off 2 x 7.2voltage NiCad batteries in series. I believe EZB3 can handle up to 17 volts?
I realized strange results ( head and arms cranked into a curl), after connecting. I tried it twice with similar results. I have not connected the 8-40 volt to 5 voltage converter to the servos yet. I wanted to see how the EZB3 would handle the higher voltage. I am charging both 7.2 batteries and will re-test later. Maybe I realized these results because the batteries were not equally charged? If I have the same results after recharge, Would it be bad to power EZB3 off of one of 7.2 volt batteries still in series, and the servos off the 14.4 voltage of having the 2 7.2 batteries in series? Thank you, Steve S
Update, I realized the same results when attempting to power EZB3 from my two 7.2 volt NiCd batteries in series after recharging. After connection, all servos jittered and jumped, head and arms cranked into a curl? My voltmeter showed 15.27 into EZB. My IRobot Create operated ok receiving serial commands from EZB. Then my next test went surprisingly favorable, powering EZB with 5 volts (meter showed 5.08) from my two 7.2 batteries into my new 10 amp voltage converter (8-40 volt to 5 volt ). Not only did the EZB operate well on the 5 volts, it successfully powered all ten of my robots servos with two of them being 1/4 scale servos in the shoulders. It is the first time I could operate both arms at the same time (4 D.O.F. each), including new hands. The robot operated great for over 2 hours. I still plan to use servo extensions to power the arm servos directly from the 5 volt converter, instead of plugging everything into EZB. I will only have the white signal wires plugged into EZB. The servo extensions will have all the + and - supplied directly from the 5 volt converter. The ground will already be tied to the EZB. I am very happy with results so far. Steve S
Awesome Steve! Very curious as to why the EZB reacted weird with 15.27 volts and perfectly with 5 volts ...anyways sounds like its progressing!
That's great news Steve. And thanks for sharing. Will there be a video coming soon? I'd really like to see that action ;)
Irobot58, Thanks Glen. If I experience any issue powering EZB at 5 volts (minimum listed in the manual), maybe I can crank it up to 7.2 with a buck regulator to the EZB only? I was happy that I can now operate my robots hands for the first time.
Antron007, Yes I will do a new video, after I complete the external power to the arm servos. Maybe I will realize more improvement? I am trying decide whether to build aluminum thumbs or make plastic pads that the hands will close to? Thanks for the responses, Steve S
Update, My latest test was adding external power to 4 of the arm servos (two 1/4 scale shoulder and two bicep) using servo extension wires connecting all + and - to 5 volt convertor and white signal wires to EZB. The results were not favorable, arms operated but were very jumpy, jittered, and looked very robotic. I am not sure if the servo extension wires were heavy enough? The arms did not curl up like they did when I tried running EZB from two 7.2 packs in series. I removed the extensions and replaced the shoulder and bicep servo plugs back into the EZB directly, and they operated fine. Here is an updated video of the arms and new hands operating directly off of the EZB. For now I plan just to run things like this.
I have a short video of the unfavorable results with the servo extensions, but not posting it for now. Thank You, Steve S
myerson I conected two 7.2 volt Lipo packs in series to run an iRobot Create as well as an R2 Roomba. I also have 4400 mAH LI-ion packs for the R3 Roomba and the Scooba 450.
Robot-Doc, Thank you responding. Do you mean you are powering your IRobots, or EZB,s, or both, like that? I remember you built a custom HD battery pack for your Create. Any IRobot or Create tips are welcome, with your valuable experience. I was trying to power the EZB. Maybe your post was for rryerson? Steve S
Steve S I use the 14.4 Lipo on the Create and a couple of Roombas but use a 7.4 LI-ion pack to power the EZ-B(3)s.
Update, I replaced the 1/4 scale Hobbico shoulder servos with EZ Robot standard servos. The old servos never did run smoothly, even with separate power. They were 16 yrs old, but not previously used. The standard servos perform much smoother. Other updates include aluminum arm inserts, and shoulder end covers / arm counterweights. I added the counterweight to the shoulder servo C brackets which also gives me the look I was trying to achieve with the shoulders. The standard servos actually lifted the arms ok, but the counterweights smooth things out and will make it possible for the arms to lift objects after I fabricate some thumbs or pads for the hands to close into. I will also tie up the servo wiring now that I am done taking the arms apart and testing. Here is a short video update.
Steve S
That's pretty cool Steve. Where did you get the counter weights? How much do they weight?
Justin, I removed one of the counterweights and it 300 grams/ 10.5 ounces on my wife's kitchen scale. After searching different hardware stores, I used 3 large steel washers (2 3/4") with fender washers on the ends held together with screws. They clamp on thin brackets attached to the shoulder servo C brackets that are adjustable. Thanks, Steve S
Thank you Steve for the VID! The arms seem more smooth for sure..... a couple of questions...have you thought about using wheel lead weights to do the same thing but a smaller size ......and giving Ann Droid a slightly more feminine look? :)
Glen, You are so funny! I always like reading your comments, don't quit. Yes I did think about adding lead weights to plastic shoulder end covers, but was concerned about the grandkids touching them. I also thought about enclosing them in something. You are right about her look, my wife said she looks scary and her new arm home positions does not help her feminine appearance. Best wishes on your new grandchild. Thank you, Steve S
Indeed I am looking forward to spending time with my grandson, thank you! As far a my comments I like to try for a balance of serious robot development and light "Gary Larson , Far side" humour. With all the seriousness(rightfully) around the V4 its also important to convey humour.
@Glen- You always give me a good chuckle. I try to put some fun into my posts as well. The world is a better place when you try to make people smile.
@Steve. Nice work. Those arms are moving real fluidly. I often find adjusting my speeds helps with fluidity of motion. What speed(s) are you running your servos at? It almost looks like they are full blast 10. (or is it 0 that's faster? I can't remember off hand)
Antron007 , Thank you for the comments. Great work on the 3D printer. Here are the speeds. I run the head pan and tilt at speed 1 The arm 4 DOF are shoulder speed 2, bicep speed 2, elbow speed 2, and hands are speed 1. I have better movement running the arm movements with FrameJump instead of AutoPosition? This is how they ran in the last video. say("I will raise arms then lower them") sleep(1000) ControlCommand("Auto Position", AutoPositionFrameJump, "hands close") sleep(2700) ControlCommand("Auto Position", AutoPositionFrameJump, "hands open") sleep(2000) ControlCommand("Auto Position", AutoPositionFrameJump, "arms up") sleeP(2500) ControlCommand("Auto Position", AutoPositionFrameJump, "arms middle") sleep(1000) ControlCommand("Auto Position", AutoPositionFrameJump, "arms up") sleeP(1000) ControlCommand("Auto Position", AutoPositionFrameJump, "arms middle") sleep(1500) ControlCommand("Auto Position", AutoPositionFrameJump, "bicep up elbow90") sleep(1800) ControlCommand("Auto Position", AutoPositionFrameJump, "shouldersup") sleep(2000) ControlCommand("Auto Position", AutoPositionFrameJump, "arms up") sleeP(1000) ControlCommand("Auto Position", AutoPositionFrameJump, "shouldersup") sleep(1000) ControlCommand("Auto Position", AutoPositionFrameJump, "arms down") sleep(1500)
ReleaseAll(0)
ControlCommand("Script Manager", ScriptStart, "Reset Servos") and #ControlCommand("Auto Position", AutoPositionAction, "wave") ControlCommand("Auto Position", AutoPositionFrameJump, "R arm wave2") sleep(2500) Say("Hello, how are you on this" + $dayname) Say("in" + $monthname) sleep(1500) ControlCommand("Auto Position", AutoPositionFrameJump, "Rarm wave1") sleep(600) ControlCommand("Auto Position", AutoPositionFrameJump, "R arm wave2") sleep(600) ControlCommand("Auto Position", AutoPositionFrameJump, "Rarm wave1") sleep(600) ControlCommand("Auto Position", AutoPositionFrameJump, "R arm wave2") sleep(600)
ControlCommand("Auto Position", AutoPositionFrameJump, "arms down") sleep(1000) ControlCommand("Script Manager", ScriptStart, "Reset Servos")
When I try AutoPosition with the same frames, it skips steps? I have tried different delays and speeds in Auto Position, but have not stumbled across anything that runs as well as individual FrameJumps? I did have much improvement replacing the 1/4/ scale shoulder servos with standard EZ Robot servos. Steve S
Awesome tip on the frame jumps. I'm going to be playing with Auto Position a lot here real soon so that is some info I will definitely keep in mind. Thank you for the info and compliments.
After looking at Daves request for a variable movement for send serial and Richs,s response, I used Rich,s script and modified to create several script speeds to Irobot Create, variable speed forward and reverse scripts. Thank you "Rich" for inspiring me to explore and create new scripts! This script identifies two speeds, $speed and $speed2, one is for ramping up speed and the other ramping down. I think this will only work with Irobot Create "Superset Command"s. Roomba users can easily add a sleep timer instead of wait for distance 156 command. I used a simple serial command wait for distance that moved Create about an inch then added varible ramping speed up and down. The 137,0,0,0,0 is needed to stop. Captain Ann Droid has a total arm span of about 36" / 0.91 meters.
#third attempt Say("I will move forward variable speed up then down")
Set the speeds
$Speed = 25 $Speed2 = 225
Make a point to loop back to
:loop
Send the serial command for ramp up
SendSerial(D0,57600,137,0,$Speed,128,0,156,0,25,137,0,0,0,0) print($Speed ) sleep(100)
Check the speed and act accordingly
IF($Speed < 225) $Speed = $Speed + 25 Else
If the speed is already at 25 end the script.
#Halt() Goto(loop2)
EndIf
Go back to the loop
Goto(loop) :loop2 #Set start of ramp downspeed print($speed2)
Send the serial command for ramp down
SendSerial(D0,57600,137,0,$Speed2,128,0,156,0,25,137,0,0,0,0) print($Speed2 ) sleep(100) IF($Speed2 > 25) $Speed2 = $Speed2 - 25 Else #If speed2 is at 225 end the script Halt() EndIf Goto(loop2)
Second Script #third attempt Say("I will move reverse variable speed up then down")
Set the speeds
$Speed = 225 $Speed2 = 25
Make a point to loop back to
:loop
Send the serial command for ramp up
SendSerial(D0,57600,137,255,$Speed,128,0,156,255,230,137,0,0,0,0) print($Speed ) sleep(100)
Check the speed and act accordingly
IF($Speed > 25) $Speed = $Speed - 25 Else
If the speed is already at 25 end the script.
#Halt() Goto(loop2)
EndIf
Go back to the loop
Goto(loop) :loop2 #Set start of ramp downspeed print($speed2)
Send the serial command for ramp down
SendSerial(D0,57600,137,255,$Speed2,128,0,156,255,230,137,0,0,0,0) print($Speed2 ) sleep(100) IF($Speed2 < 225) $Speed2 = $Speed2 + 25 Else #If speed2 is at 225 end the script Halt() EndIf Goto(loop2)
I hope this works for you! Please let me know. Steve S
Looking good Steve, and glad my input on the forums has spurred you on and inspired you to have a go at adapting scripts to suit your needs :)
Awesome @Steve ! You are definitely one the Forum people who inspires me to create my own Scripting and post videos Great job Steve..thank you !
Thank you Rich and Glen, Both of you are always helpful and encouraging. There are so many great people on this forum. Steve S
You did a GREAT job on her. I disassembled my roomba robot. The batteries kept going bad and I did not like the design. I took the basic stuff and moved it to the omnibot base, then I took most of the stuff and put it on my new robot "SUNSHINE" named after my wife. It is on a wheelchair base made similar to Lexi-3000. I just put the pictures up. Look in the showcase.
Nice work Steve!
Not that you asked for it or anything, Steve.... but below is code I hacked up to utilize the Create's bumper sensors while driving around... Crude and I haven't optimized the code, but for now it works... When you get your V4, if you need it the codes below...
Cheers Richard
Thanks for the comments. Mel, Sunshine is probably happy that you are giving her attention again, looking good. Bret, it sounds great that you are working on a new project, glad to see both of you back. Now that I am done helping my grandson Hunter for now ( I had an awesome time watching them get so excited about robotics), I want to add new features to my robot. I want to build her real ears, instead of the painted ears. First thought was to purchase some 3D printed ears then I thought about fabricating some aluminum ears. The size would be somewhere between the current painted ears and smaller then the Mercury Man ears? Thanks, Steve S
Richard R, If I was closer, I would buy you a barley pop of your choice! This is something I wanted to do since I started running EZ Robot on my IRobot Create. Now I will have to enlarge my Create bumper, so it does not clip furniture, because her arms hang beyond her base. Thank you so much, you made my day! So much to look forward to with the new EZBV4 and a great community! :)
Thanks Steve, but it will have to be Canadian beer my friend.... We didn't put a man on the moon or create the legionary Supermarine Spitfire, but we do have great beer... oh and DJ Sures of course... ;)
Btw, I am still working on the 2 byte return.... making some progress, but not quite there yet...
Cheers Richard
Captain Ann Droid gets real movable Ears, I have been wanting and thinking how to build ears for my robot, instead of the painted ears. The new ears are slightly below the painted ones, which highlight each other.. After many attempts, this is what I did. The ears are powered by micro servos left over from my fabricated 6. Actual ears are made from McDonalds Happy Meal milk lids, Menards Utility Hooks, and fender washers. In the new pic and vids I forgot to tuck in Ann,s front skin, Left ear servo wire, and install the fender washer. Hope you like her new ears, they move when she is thinking. The beep is from an IRobot send serial command. She is in automatic mode for the vids.
Steve S
love it ,the ears.and the mini hexapod fit cap ann same color.
Thank you Nomad.
Very cool. Are you going to use the ears to give Anna a sense of emotional state? Up for alert, down for sad, back for mad?
Justin, Thank you. Yes, I was planning to incorporate them into some of her other actions. It will give her more expression that she needed. Planning eventually to have her ear movements into her Auto Position frames. Steve S
@steve, I've got a question 4-U.
I noticed that on the shoulders you have some round circles. They look sharp. What exactly are they? Is this just for looks, or are they weights to make the shoulders move easier. either way, Captain Anne Droid is Rockin'!
P.s. Where did you get the EARS from?
Sorry. I went back and read and answered my own questions.
But, another question . . . . do you have your complete EZB file for download?
You and your robots are a GREAT inspiration to us all!
@Steve have you ever posted pictures of the robot "James"?
MovieMaker, Thank you for the kind words. I have to give credit to members in this great community who have been helpful to me. Yes the counterweights (fender washers) make the arms perform better and provide an end cap look that I wanted. I removed some personal info and posted captainanndroidpublic file. The code still needs improvements. Open to ay suggestions. The I Robot commands are made for an I Robot Create with Superset commands.
Justin, Here is a link from a thread that Toymaker started about first robots.
James is on this thread
Steve S
WOW, James was controlled by a c64. That was one of my first successful computer to robot interfaces. I really wanted to make my c64 mobile, but the 9vac power supply was too much of a pain back it the day. I had a quick shoot arm like on James too - those were really well built arms.
This is a flash back to Feb, 9, 2013 It was the beginning of Captain Ann Droid and learning about EZ Robot. Luv it! I did not post or share this on EZ Robot before.
This was a IRobot demo command sent to Create with a serial command sent from EZB3, with a virtual wall on my foot, when Ann had foam arms! Later she developed aluminum fabricated arms. Create users
Say("starting follow home demo, I will, hunt you down!") SendSerial(D0,57600,136,6) This command will end or you can send the following command
Say("stopping current demo") SendSerial(D0,57600,136,255) ControlCommand("IRobot Commands", ScriptStart, "initialize")
@Steve.... Always loved seeing the Captain in action....
:)
This is such a cool project! I am still using 1/4 scale servos in my shoulders. They are working very well. One of my first computer controlled robots used a C=64 computer and a home made robot controller for drive and arm control. So many years ago.
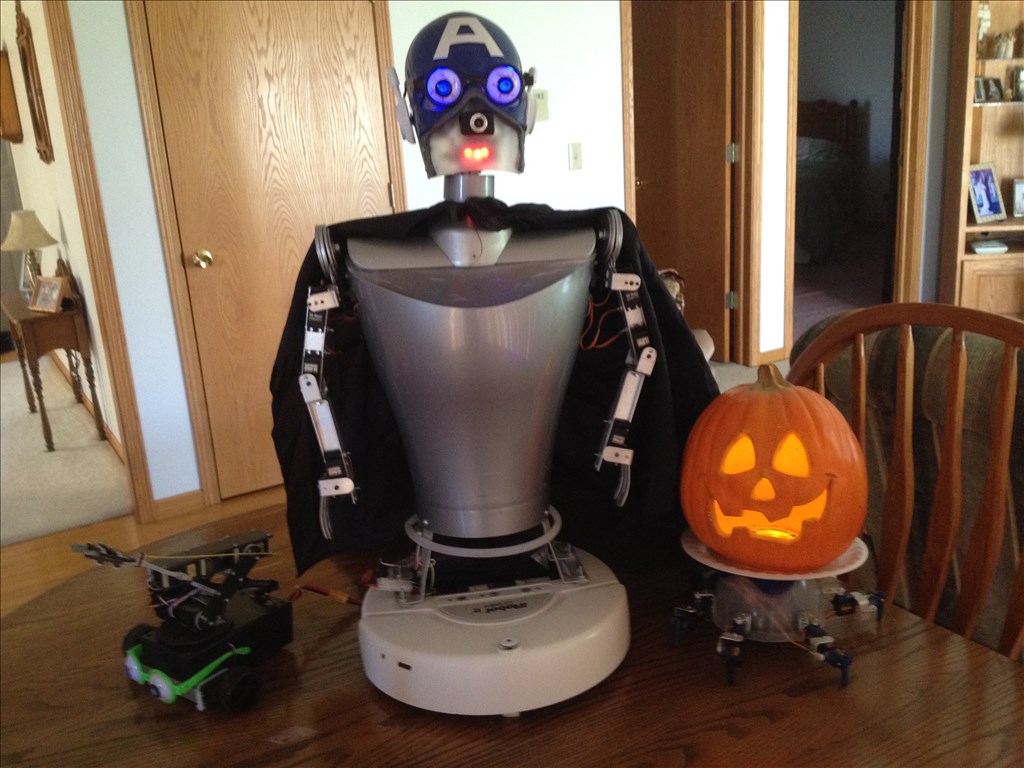
This is my Halloween 2014, My wife and I had a lot of fun working on this! She is the best computer script activator and more! She also lowered Mini 6 with a fishing pole when he was wall walking. My cat also loved hiding under the "Countess" cape.

Steve SThat is awesome Steve! Great job on the video, very creative! I love Captain Ann!
Great work! Lots of work to put that all together.
Cool work!
"Captain Ann Droid" having fun with her new sister "Lal". "Ann" is powered by a EZB3 and "Lal" is powered by a EZB4. They work synchronized together very well! They now have their own batteries and can be operated together! How cool is EZ Robot? Steve S
steve s
very nice .
Patrick, They are just simple robots, but I enjoyed designing and fabricating them from scratch myself. That is what EZ Robot allows, individual ideas and builds. I look forward to the new options that will soon be available for purchase and will also try them. Thank You, Steve S
withs options do you mean?
Patrick, I think there will be many great options for ARCs starting with the new options in the store, like the balance sensor, adventure bot, and a location device that has been talked about. Don't forget D.J.'s advancements that are always great. Private options include the ALTAIR EZ Robot that will offer many great features, and I have been following the development . The new KS "Alan" by Will Huff is very interesting, and gives builders an option that do not have a 3D printer. Anthony has designed some interesting options. Dave's A.I. is also interesting. Josh working on inline voltage regulators. Justin working on a new EZ Face recognition. The future of Robotics is only going to get better here! ;)
;)
wow and ARC is allreddy so big. thanks for charing.
Very cool work Steve.Every robot should have a sister or at least a friend. I have a Star Trek uniform for my android I started over a year ago. She is packed in a box until I move somewhere with room to work. I have a fully working Elvis with remote for sale if you need eye and face movement in you new android or just like to hear Elvis sing live! lol
@Steve S.
Hey, captain Ann's back :). I always enjoy seeing her doing her thing, and nice video demo with Lal as well. It was nice to see them moving in sync, and doing it so gracefully. Nicely done.
It will be great to see what other options you will be adding and how you will be using them.
Great stuff, and thanks for sharing. :)
mcsdaver, Thank you for your comments. I would like to incorporate eye and mouth movement, but not enough room in "Lal". Hope you get back to your android soon.
Steve G, Thank you. That was the first time I tried operating them together after purchasing "Lal" her own battery. "Ann" was running on my Acer W3 and "Lal" on my laptop. I decided to pull out my phone and record after I saw how synchronized they operated together. You had some great lighting on your projects. I would like to add lighting to "Lal's mouth. Do you think that lighting tape would be bright enough behind her semi-transparent mouth, controlled by a sound servo?
@Steve.
I'm glad you did pull your phone out. It was a nice little video demo. In regards to light, LED light tape may be bright enough (depending on ambient light of course), but personally I think it would be a mistake. I love lighting, and the illuminated mouth on Captain Ann looks great, because it looks like a robot. Where as Lal has the human look and I'm not a flashing mouth would suit.
I could be wrong of course and that's just my opinion. Hey, it might look pretty cool too, so it will be interesting to see which way you go. I guess you could try it with a couple of temporary LEDs to get an idea of what it would look like. :)
This video was posted on Youtube in May, just playing with Ann after her new ears. I decided to post on EZ Robot now, who offers great products and deserves the credit! I have a new EZB4 for her when I get chance to install it, at a later season. The last video is a collage of events w/Ann. Steve S ;)
;)
if fun to see those video's again.
Thanks Patrick, just playing around. You were awesome spotting the wiring locations on that 6. Steve S
you mean six?melted one?
hi how did u make the body for captain an droid
andrew34. Captain Ann's main body is a designer waste container I purchased @ Target. I think the link below is similar I rounded the ends of a 1" x 3" with a jigsaw to fit inside the body and give her an elongated wide shape. Her shoulders are PVC pipe cut down the length to about 1/3 of its original diameter. The neck is PVC cut to fit the curve of the shoulders. I trimmed flexible milky white cutting board to fit inside the diameter of the silver body.
www.amazon.com/Umbra-Garbino-Polypropylene-Waste-Silver/dp/B004LLHEIA/ref=sr_1_7?s=home-garden&ie=UTF8&qid=1364084966&sr=1-7&keywords=umbra+waste+cans
I read your EZ profile and look forward to any future projects. Steve S
thanx i went for a similar design as you however i carved it out of insulation board which i highly recommend as it is strong light, and very easy to work with